8 Attaching Policies to Web Services
This chapter includes the following sections:
Viewing the Policies That are Attached to a Web Service
To view the policies that are attached to a Web service
-
Navigate to the home page for the Web service, as described in Navigating to the Web Services Summary Page for an Application.
-
In the Web Service Details section of the page, click on the plus (+) for the Web service to display the Web service ports if they are not already displayed.
-
Click the name of a port to navigate to the Web Service Endpoints page for a particular Web service.
-
Click the Policies tab.
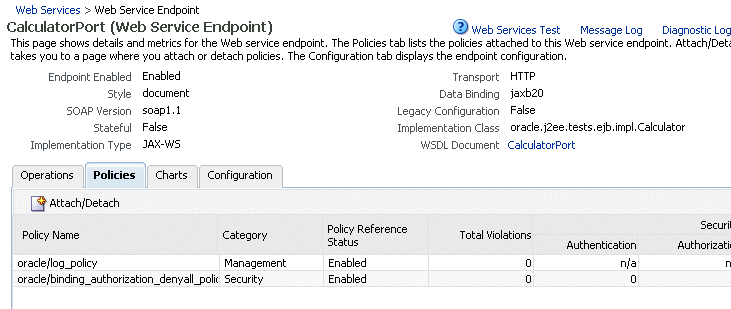
A list of the policies that are attached to the port is displayed, as shown in Figure 8-1.
Figure 8-1 Policies Attached to a Web Service

Description of "Figure 8-1 Policies Attached to a Web Service"
Attaching a Policy to a Single Subject
A subject is an entity to which a policy can be associated. You can attach one or more policies to a subject.
The order in which policies are attached to a subject or appear in the list of attached polices does not determine the order in which policies are executed. As a message is passed between the client and the Web service, the order of the interceptors in the policy interceptor chain determines the order in which the policies are executed.
See "How Policies are Executed" for more information.
Attaching a Policy to a Web Service
Follow this procedure to attach a policy to a single Web service. See "Attaching a Policy to Multiple Subjects (Bulk Attachment)" to attach a policy to multiple Web services at the same time.
To attach a policy to a Web service
-
Navigate to the home page for the Web service, as described in Navigating to the Web Services Summary Page for an Application.
-
In the Web Service Details section of the page, click on the plus (+) for the Web service to display the Web service ports if they are not already displayed.
-
Click the name of a port to navigate to the Web Service Endpoints page for a particular Web service.
-
Click the Policies tab.
A list of the policies that are already attached to the port is displayed. For example, consider the policies shown in Figure 8-1.
-
Click Attach/Detach.
-
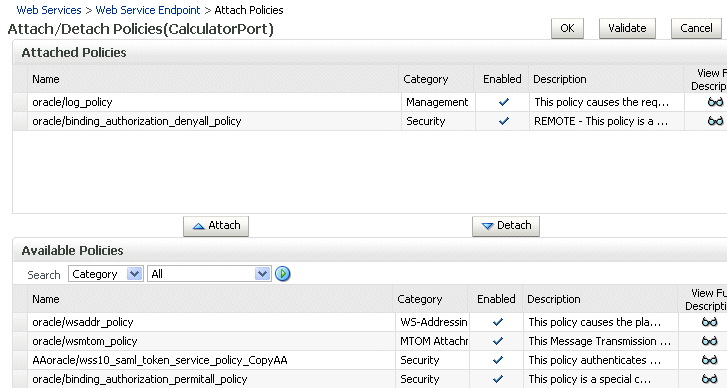
Select a policy from the Available Policies list, and click Attach. SeeFigure 8-2.
Figure 8-2 Attaching Policies to a Web Service

Description of "Figure 8-2 Attaching Policies to a Web Service "
-
Continue selecting and attaching policies. When you are finished, click Validate to verify that the combination of policies selected are valid.
-
Click OK.
-
The Web Service Port page now displays the attached policy on the Policies tab.
-
Restart the Web service application.
Attaching a Policy to Multiple Subjects (Bulk Attachment)
From the Application pages, you can attach one or more policies to one or more Web services.
Note:
The bulk attachment mechanism does not perform validation on the policies that you attach.The bulk attachment mechanism does not prevent you from creating an unsupported configuration such as having multiple authentication policies, or from attaching the same policy multiple times, and so forth.
To attach a policy to multiple Web services within an application
-
In the navigator pane, expand WebLogic Domain to show the domain in which you want to attach the policy.
-
Select the domain, and then the instance of the server in which you want to attach the policy. The server can be an admin server or a managed server.
-
Using Fusion Middleware Control, click Weblogic Server and then Web Services.
-
From the the Web Services Summary page, click Attach Policies.
-
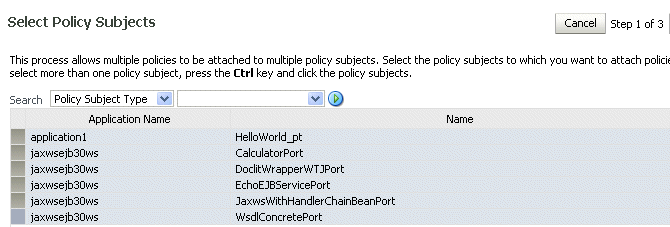
From the Select Policy Subjects page, select one or more applications to which to attach a policy, as shown in Figure 8-3.
Use the Search control to search for a particular policy subject type, a particular application name, or the type of Web service to which you want to attach a policy. For example, if you choose to search for a policy subject type of Web Service Client, only available Web service clients, if any, are displayed.
To select more than one application, press the Ctrl key and click the applications.
-
Click Next.
-
From the Select Policies page, select one or more policies that you want to attach to the selected applications, as shown in Figure 8-4. The Select Policies page shows only those policies that you can apply to all of the subjects selected in the previous step.
To select more than one policy, press the Ctrl key and click the policies you want to attach.
-
Click Next.
The Summary page displays the applications you selected and the policies that will be attached to those applications, as shown in Figure 8-5.
-
Click Back to make any changes, or click Attach to complete the bulk attachment.
-
Restart the application that uses the Web services.
Validating Policy Subjects
The type and number of assertions within a policy may be valid and, therefore, a policy may be internally consistent and valid. However, when more than one policy is attached to a policy subject, the combination of policies must also be valid. Specifically, the following must be true:
-
Only one MTOM policy can be attached to a policy subject.
-
Only one Reliable Messaging policy can be attached to a policy subject.
-
Only one WS-Addressing policy can be attached to a policy subject.
-
Only one Management policy can be attached to a policy subject.
-
Only one Security policy with subtype authentication can be attached to a subject.
-
Only one Security policy with subtype message protection can be attached to a subject.
-
Only one security policy with subtype authorization can be attached to a subject.
Note:
There may be either one or two security policies attached to a policy subject. A security policy can contain an assertion that belongs to the authentication or message protection subtype categories, or an assertion that belongs to both subtype categories. The second security policy contains an assertion that belongs to the authorization subtype. -
If an authentication policy and an authorization policy are both attached to a policy subject, the authentication policy must precede the authorization policy.
-
If the policy requires a particular transport protocol (for example, HTTP or HTTPS), it checks to see that the Web service uses the expected transport protocol.
You cannot use policy subject validation to check the validity of multiple policy subjects when you use the bulk attachment feature. After you attach the policies to your subjects with this feature, you must validate each subject individually.
Note:
The policy subject validation does not validate the XML schema of the policy. Therefore, if you manually edit the policy file, you must use another tool to check that the XML is valid.To check for policy subject validation
-
From the navigator pane, click the plus sign (+) for the Application Deployments folder to expose the applications in the farm, and select the application.
The Application Deployment home page is displayed.
-
Using Fusion Middleware Control, click Application Deployment, then click Web Services.
This takes you to the Web Services summary page for your application.
-
In the Web Service Details section of the page, click on the plus (+) for the Web service to display the Web service ports if they are not already displayed.
-
Click the name of the port to navigate to the Web Service Endpoints page.
-
Click the Policies tab.
-
Click Attach/Detach.
-
Click Validate.
If there is a validation error, a dialog box appears describing the error. Fix the error and do a policy subject validation again.
Attaching Policies to Web Service Clients
This section describes how to attach a policy to a Web service client.
The steps you follow to attach a policy to a Web service client are the same for all Web service client types. However, how you use Fusion Middleware Control to navigate to the Web service client itself depends on the application type.
For ADF DC Web service clients:
-
From the navigator pane, click the plus sign (+) for the Application Deployments folder to expose the applications in the farm, and select the application.
The Application Deployment home page is displayed.
-
Using Fusion Middleware Control, click Application Deployment, then click ADF.
-
Select the Administration tab.
-
Click ADF Connections.
-
In the Web Service Connections portion of the page, click Configure Web Service.
-
Select the Web service client endpoint to configure.
-
Click Attach/Detach.
-
From the Available Policies portion of the page, select one or more policies that you want to attach. Click Validate to validate the policy, or Check Services Compatibility to make sure that the client policies are compatible with the service policies.
-
Click Attach when you are sure that you want to attach the policy or policies.
-
Click OK.
For SOA Reference Web service clients:
-
From the navigator pane, click the plus sign (+) for SOA Deployments, and select the target.
-
From the Dashboard, click the SOA Reference page.
-
Click the Policy tab.
-
Click Attach/Detach.
-
From the Available Policies portion of the page, select one or more policies that you want to attach. Click Validate to validate the policy, or Check Services Compatibility to make sure that the client policies are compatible with the service policies.
-
Click Attach when you are sure that you want to attach the policy or policies.
-
Click OK.
Attaching Client Policies Permitting Overrides
The policy configuration override feature allows you to specify certain Web service client configuration information on a per-client basis, in addition to or in lieu of setting it globally for any attachment of the policy. This targeting of configuration information limits the number of distinct policies you need to maintain.
You can define a single policy, and specify a default value for a configuration value. Rather than creating multiple policies with slightly varied configurations, you could use the same generic policy and override specific values to meet your requirements.
For example, the oracle/wss_http_token_client_policy policy is one example of a policy that includes the csf-key property, which has a default value of basic.credentials. The value signifies a key that maps to a username/password. It might happen that you will always use the same key value any time you attach this policy to any number of Web service clients. In this case, you can specify the key value on the oracle/wss_http_token_client_policy policy Configurations page and have it apply to every instance.
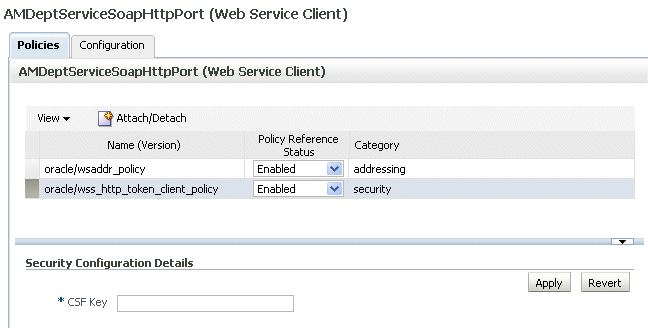
However, you also have the option to override this key value on a per-client basis. After you attach a client policy that includes a property you can override, you can then supply a value in the Security Configuration Setting section of the Policies page, as shown in Figure 8-6.
Figure 8-6 Overriding a Configuration Property

Description of "Figure 8-6 Overriding a Configuration Property"
You can override only the following properties in Web service client policies:
-
user.roles.include (Optional, does not have to be set.)
-
csf-key. (Must be set on policy Configuration page or overridden.)
-
saml.issuer.name (Optional, does not have to be set.)
-
saml.assertion.filename (Optional, does not have to be set.)
-
service.principal.name (Must be set on policy Configuration page or overridden.)
-
keystore.recipient.alias (Must be set on policy Configuration page or overridden.)
Clearing a Configuration Property
If you need to clear an overridden configuration property, set it to an empty string.
Before you clear it, remember that other policies could be using the same property. The properties are client-specific and there could be multiple policies that are attached to the same client that use the same property.


