6 Extending WebLogic Domains
You can add product component functionality, or additional applications and services to an existing domain by extending it using the Configuration Wizard. For example, if you created a base WebLogic Server domain and you want to add the Avitek Medical Records Examples functionality, you must extend the domain by using the medrec.jar template.
The Configuration Wizard simplifies the task of extending an existing domain by using extension templates. For more information about domain templates, see WebLogic Server Domain Template Reference.
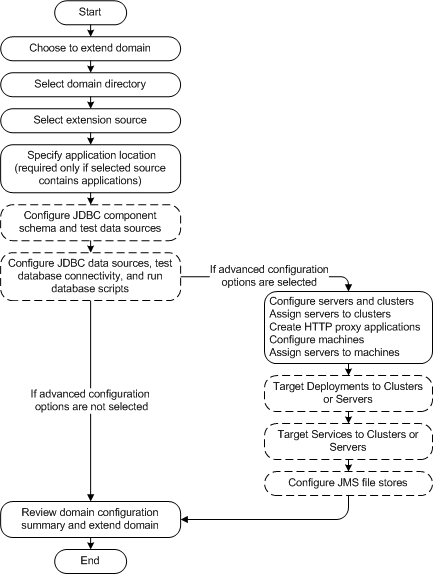
Figure 6-1 shows the steps in the process of extending a domain.
Note:
When you extend a domain in which the managed servers are distributed (by using thepack and unpack commands) to remote machines, the startup scripts on the remote machines are not updated automatically.
To ensure that startup scripts on the remote machines are updated, perform the following steps after extending the domain.
-
Delete the managed server directories on the remote machines.
-
Create a managed server template from the extended domain, by using the
packcommand with the-managed=trueoption. -
Create managed servers on the remote machines, by
unpacking the managed server template.
For more information about the pack and unpack commands, see Oracle Fusion Middleware Creating Templates and Domains Using the Pack and Unpack Commands.
To extend a domain, perform the following steps:
-
Ensure that the servers in the domain that you want to extend are not running.
-
Start the Configuration Wizard as described in Section 2.1, "Starting the Configuration Wizard in Graphical Mode."
The Welcome screen of the Configuration Wizard prompts you to choose whether you want to create a domain or extend an existing domain by adding product component functionality, applications and services.
-
Select Extend an existing WebLogic domain and click Next.
The Select a WebLogic Domain Directory screen prompts you to select the existing domain to update with additional applications or services.
-
Use the navigation tree to select a valid domain directory (a directory that contains a
config.xmlfile in theconfigdirectory of the domain, and click Next.The Select Extension Source screen prompts you to select the source from which to extend your domain. You can select products to add to your domain, or extend your domain by using an existing extension template.
-
Choose one of the following options:
-
Extend my domain automatically to support the following added products:
Select the check boxes for the products to add to your domain. The products already included in your domain are indicated by grayed-out check boxes.
-
Extend my domain using an existing extension template
Specify the path to the extension template in the Template location field.
Click Next.
If you opted to extend the domain by using an extension template, and if the template that you specified contains applications, the Specify Domain Name and Location screen is displayed.
-
-
Specify the path to the application in the Applications location field, and click Next.
The remaining steps in the process to extend domains are identical to the steps for creating a domain, except that the wizard does not display the screens to configure the administration server and RDBMS security store database.
-
Perform the advanced configuration tasks (such as configuring servers, clusters, and machines; and targeting deployments and services to clusters or servers), as described in Chapter 4, "Customizing the Domain Environment."
-
Configure the JDBC component schema and JDBC data sources as described in Chapter 5, "Customizing JDBC Data Sources and Component Schema."
-
Finally, in the Configuration Summary, screen review the configuration changes and then click Extend.
The Creating Domain screen displays status messages during the domain extension process. The Configuration Wizard updates the
config.xmlfile and other application-specific components in the domain directory, as defined by the domain template. -
Click Done.
