19 Integrating the Mail Service
This chapter explains how to integrate the Mail service in a custom WebCenter application at design time.
For more information about managing and including mail, see:
-
"Managing the Mail Service" in the Oracle Fusion Middleware Administrator's Guide for Oracle WebCenter
-
"Working with the Mail Service" in the Oracle Fusion Middleware User's Guide for Oracle WebCenter
This chapter includes the following sections:
Note:
The Mail service supports only the Inbox. No other folders (or moving of messages) are supported.19.1 Introduction to the Mail Service
This section provides an overview of Mail service features and requirements. It contains the following subsections:
19.1.1 Understanding the Mail Service
The Mail service enables users to access the inbox of a mail server that supports Internet Message Access Protocol4 (IMAP4) and Simple Mail Transfer Protocol (SMTP). Additionally, it enables users to compose a new mail message from within the application (with attachments) and delete, reply to, and forward messages.
The Mail service does not replace users' mail clients; it simply enables users to access and compose mail in a single, collaborative environment.
With the Mail service, you can do the following:
-
Read a message by clicking the linked mail subject.
-
View sender details (including date) by expanding the From field.
-
Scroll down to see the other messages not in the view. You can navigate among the fetched messages as cached messages.
-
Attach a file to a message by expanding the attachment section within the mail dialog and clicking Attach. Specify an attachment in the new dialog pop-up. Remove an attachment from the mail by clicking the Remove Attachment icon.
-
Reply to a message by clicking the Reply or Reply All icon.
-
Forward a message by clicking the Forward icon.
-
Cancel an operation (for example, sending a mail) by clicking Cancel.
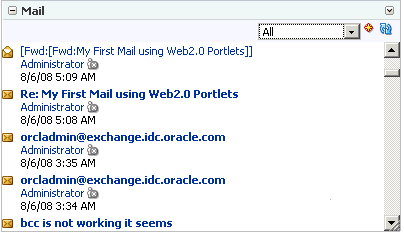
Figure 19-1 shows the Mail task flow at runtime. At the top of the view are three elements: a dropdown list that shows the number of mails to display (here, All), the Compose icon, and the Refresh icon. The Refresh icon provides a means of manually checking for new messages in the inbox.
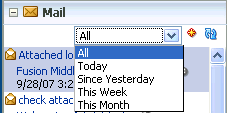
The dropdown list provides filters to focus the view on messages received today, messages received since yesterday, messages received this week, and messages received this month (Figure 19-2).
Note:
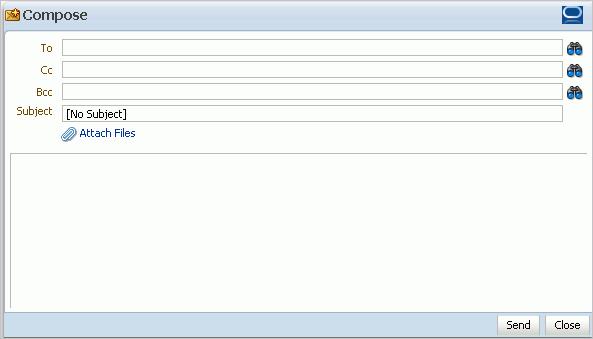
By default,All displays the 50 most recent messages. For information on how to increase this amount, see Section 19.3.2, "Configuring the Number of Mails Displayed."Click the Compose icon next to the dropdown list to compose a new message right from your application. Clicking this icon displays the Compose page, as shown in Figure 19-3.
Use the Search icons to find mail addresses and contacts of users in the LDAP store that the WebCenter application uses. For any user not in the LDAP store, you must enter an explicit mail address.
For more information about the Mail service at runtime, see Oracle Fusion Middleware User's Guide for Oracle WebCenter.
19.1.2 Requirements for the Mail Service
The Mail service requires a mail server that supports IMAP4 and SMTP protocols.
In the WebCenter Spaces application, the Microsoft Exchange mail server is required for automatic creation of distribution lists when group spaces are created. In a custom WebCenter application, this feature may not be desirable. To disable it, do not provide the LDAP (Active Directory) server details in the mail connection.
19.2 Basic Configuration for the Mail Service
This section describes the steps required for adding the Mail service to your application. It contains the following subsections:
19.2.1 Setting up Connections for the Mail Service
Before you can use the Mail service, you must first set up the connection to your mail server. The Mail service supports any mail server based on IMAP4 and SMTP protocol.
Note:
While you can set up the connections to back-end servers at design time in Oracle JDeveloper, you can later add, delete, or modify connections in your deployed environment using Enterprise Manager Fusion Middleware Control. For more information, Oracle Fusion Middleware Administrator's Guide for Oracle WebCenter.To create a connection to your mail server from the application:
-
In Oracle JDeveloper, open the application in which to consume the Mail service.
-
In your application, under Application Resources, right-click Connections, then select Mail from the list.
-
Select to create the Mail service connection in Application Resources.
A connection in Application Resources is available only for that application; while a connection in IDE Connections is available for all applications you create. If you plan to use the connection in other applications, then select IDE Connections to avoid having to re-create it.
-
In the Connection Name field, enter a unique name for the connection.
-
When configuring a single mail account, select the Set as default connection checkbox to use this as the active connection (Figure 19-4).
Figure 19-4 Configure a New Mail Connection, Step 1
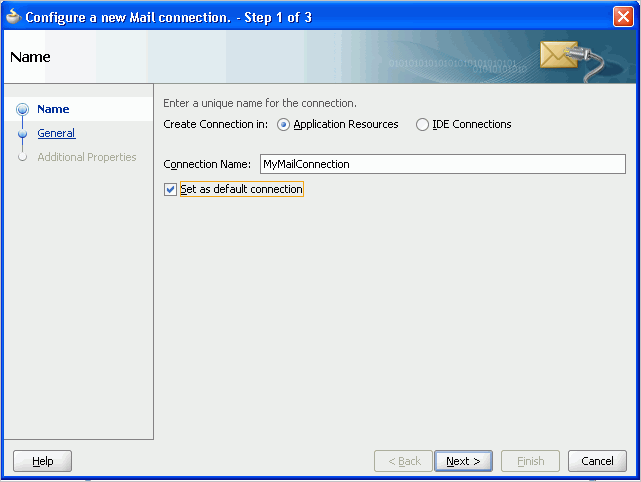
Description of "Figure 19-4 Configure a New Mail Connection, Step 1"
When configuring multiple mail accounts, you are not necessarily required to select this as the default connection. Keep in mind, however, that the service requires that one connection be marked as the default connection.
Note:
After you create a connection as the default connection, you cannot edit it so that it is not the default. To use a different default connection, you must create a new connection and mark that as the default connection. -
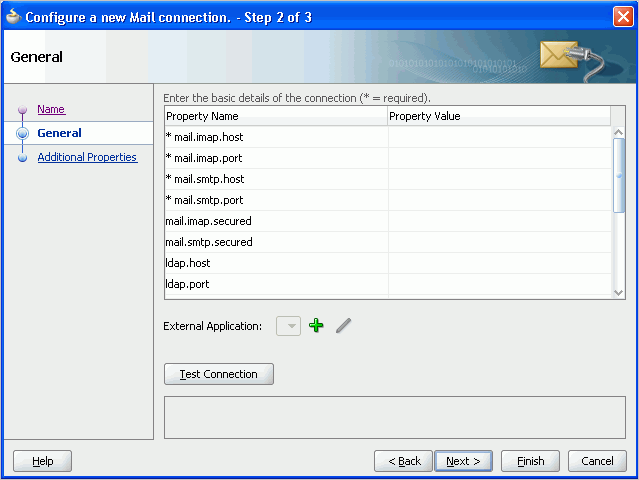
On the General page, enter values for the following required parameters (Figure 19-5).
Figure 19-5 Configure a New Mail Connection, Step 2
Description of "Figure 19-5 Configure a New Mail Connection, Step 2"
-
mail.imap.host: The location of your IMAP server -
mail.imap.port: The IMAP server port number (default is -1) -
mail.smtp.host: The location of your SMTP server -
mail.smtp.port: The SMTP server port number (default is -1)
Optionally, enter values for the other parameters:
-
mail.imap.secured: Indicates (true/false) a secure SSL connection (default is false) -
mail.smtp.secured: Indicates (true/false) a secure SSL connection (default is false) -
ldap.hostandldap.port: These, and all other LDAP values, are required only if Microsoft Exchange is the mail server. For the Mail service to create distribution lists reliably, the WebCenter Spaces application should use the same Active Directory server as Microsoft Exchange.
-
-
Click Test Connection to check that the host and port are available.
-
You must select an existing external application or create a new external application to proceed:
-
For External Application, click the + icon to open the Register External Application wizard
The application maps the mail server user to the application user so that end users are not required to enter their user names and passwords each time.
For more information on external applications, see Section 37.2, "Working with External Applications."
Note:
External application credential provisioning is built into the mail connection. You do not need to drop the External Application - Change Password task flow on a page. -
On the Name page:
For Application Name, enter a unique name to identify the application. This name must be unique not only within the WebCenter application, but also among other connections. Note that you cannot edit this field afterward.
For Display Name, enter a name for the application that end users see in the credential provisioning screens.
-
Click Next.
-
On the General page, you can optionally enter values if you want the external application for the Mail service to participate in Click Through Login.
For Login URL, enter the URL to which the HTML login page is submitted. View the HTML source of the application's login form to retrieve this URL.
For User Name/ID Field Name, enter the label that the application uses for the user name field, for example, User Name.
For Password Field Name field, enter the label that the application uses for the password field, for example Password.
From the Authentication Method list, select POST. This submits login credentials within the body of a form. The external application for the Mail service requires this authentication method.
-
Click Next.
-
On the Additional Fields page:
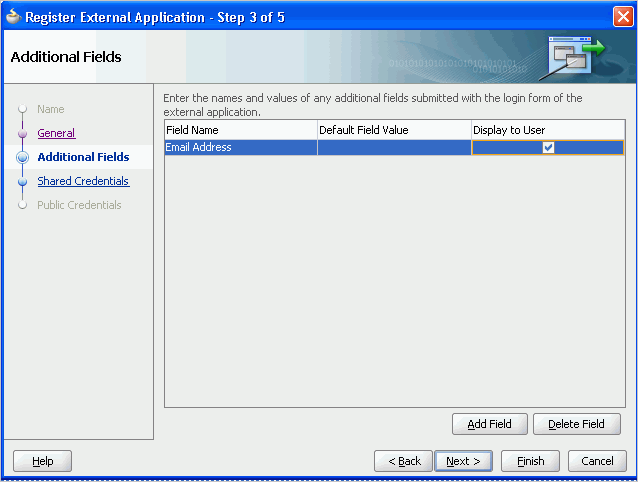
Click Add Field, and add an extra field with the name
Email Address. Make sure to select the Display to User checkbox, as shown in Figure 19-6.Figure 19-6 Email Address Additional Field
Description of "Figure 19-6 Email Address Additional Field"
Note:
The external application for the Mail service requires this additional field. It must be shown to users. This field captures the user's mail address, so that when the user sends mail, the sender address is this mail address. -
The External Application service allows different types of credentials to be associated with a connection.
When shared credentials are specified, every authenticated user uses the same credentials to access the external application; that is, the user name and password you define here.
With public credentials, without authenticating your WebCenter application, you can view mail from a certain mail ID for all unauthenticated (public) users. Public credentials are used whenever an application is not secured or the user has not yet logged in.
Note:
Public credentials are required to send mail from a self-registration page.With private credentials, each user must authenticate to an individual mail ID. That is, each application user must specify his own credentials.
-
Click Finish to have the external application use private credentials, or click Next to set up shared or public credentials.
-
For Shared Credentials Only: On the Shared Credentials page, ensure that Specify Shared Credentials is selected and then enter the shared user credentials and mail ID.
-
For Public Credentials Only: On the Public Credentials page, ensure that Specify Public Credentials is selected and then enter the user credentials and mail ID for public use.
-
Click Finish to register the external application.
-
-
Back on the Mail connection wizard, ensure that this newly-created external application connection for mail is selected.
-
You can optionally add LDAP parameters and values for the Active Directory server managing (WebCenter Spaces) group space distribution lists.
For detailed parameter information, see Table 19-1.
Note:
For WebCenter Spaces and the Mail service to share an identity management system for setting up group space mailing lists, you must use Active Directory. For information about installing and configuring mail servers as the WebCenter administrator, see Oracle Fusion Middleware Administrator's Guide for Oracle WebCenter.Table 19-1 LDAP Directory Server Configuration Parameters
Field Description LDAP Host
Enter the host name of the computer where the LDAP directory server is running.
LDAP Port
Enter the port on which the LDAP directory server listens.
LDAP Base DN
Enter the base distinguished name for the LDAP schema. For example, CN=Users,DC=oracle,DC=com.
LDAP Domain
Enter the domain to be appended to distribution list names.
In WebCenter Spaces, for example, if the domain value is set to
oracle.com, then the Finance Project group space maintains a distribution list namedFinanceProject@oracle.com.LDAP Administrator User Name
Enter the user name of the LDAP directory server administrator.
A valid user with privileges to make entries into the LDAP schema.
LDAP Administrator Password
Enter the password for the LDAP directory server administrator.
The password is stored in a secured store.
LDAP Default User
Enter a comma-delimited list of user names to whom you want to grant moderator capabilities. These users become members of every group space distribution list that is created. The users specified must exist in the base LDAP schema (specified in the
LDAP Base DNfield).ldap.securedIndicate whether a secured connection (SSL) is required between the WebCenter application and the LDAP directory server.
If LDAP is configured to run in secure mode, then add this property (set to true/false) to use LDAP while creating distribution lists.
-
Click Finish.
You can see the new mail connection under Application Resources - Connections.
19.2.2 Adding the Mail Service at Design Time
This section explains a basic incorporation of the Mail service. It contains the following subsections:
19.2.2.1 Mail Service Task Flows
The Mail service includes one task flow: Mail. This task flow displays a mail inbox.
19.2.2.2 How to Add the Mail Service to your Application
To add the Mail service to your application:
-
Follow the steps described in Chapter 3, "Preparing Your Development Environment" to create a customizable page in your application and implement security.
-
Ensure that you have configured your application to connect to the mail server.
-
If you configured your external application for private or shared credentials, then the WebCenter application must be made secure using the ADF Security wizard, and the pages must be made secure on the page definition.
-
Open the page on which to add the service.
-
In the Resource Palette, expand My Catalogs, WebCenter Services Catalog, and Task Flows.
-
Drag and drop the Mail task flow on to the page.
-
In the Create list, select Region to add the task flow to your page.
-
The resulting Edit Task Flow Binding dialog displays the optional
tabularViewparameterIf this parameter is set to
true, then mail messages appear in a table, like an Inbox on any mail client. If this parameter is set tofalse, then mail messages render in a list view.Figure 19-7 depicts the Mail task flow where the region parameter
tabularViewis set to true.Figure 19-7 A Mail Task Flow where the Region Parameter Tabular Is Set to True

Description of "Figure 19-7 A Mail Task Flow where the Region Parameter Tabular Is Set to True"
Note:
If you created a connection in IDE and not in the application, then the connection must be added to the application. For example, in the Resource Palette under IDE Connections, right-click the connection and select Add to Application. -
Save your page and run it to the browser.
-
When you run the page with the Mail task flow for the first time, you are prompted to enter external application mail credentials from within the Mail task flow.
Enter the credentials, then click Submit.
Notes:
-
All instances of the Mail task flow in an application run against the same mail server, and it serves no purpose to add multiple Mail task flow instances. This is true for all service task flows that require connections to back-end servers, such as task flows from the Discussions or Announcements services.
-
After an application has been accessed with saved credentials, those credentials are persisted even after redeployment. To ignore saved credentials from previous deployments, edit
appUIDinadf-config.xmlbefore redeploying the application. Edit the following value in bold to specify a modified value; for example, add 1 to the last value to update it asWCApp1-1235).<adf:adf-properties-child xmlns="http://xmlns.oracle.com/adf/config/properties"> <adf-property name="adfAppUID" value="WCApp1-1234"/> </adf:adf-properties-child>
19.2.3 Setting Security for the Mail Service
The Mail service works in a non-secured WebCenter application if, and only if, the external application connection is configured with public credentials. If you do not apply security, and if mail requires a login to access the content, then users are not able to authenticate and do not see any content at runtime.
With an ADF-secured application, the Mail service fetches mail for each logged-in user. The external application credentials for the user name used to log in to the application is fetched and used to log in to the mail server. The recommended approach is to have the mail server and the WebCenter application point to the same identity store.
Note:
Even if the WebCenter application and the mail server share the same identity store, the Mail service does not support identity propagation. Single sign-on functionality is enabled through the external application mechanism.For information about configuring ADF security, see Section 3.5, "Implementing Security in Your Application."
For information about using external applications, see Section 37.2, "Working with External Applications."
19.3 Advanced Information for the Mail Service
This section describes optional features available with the Mail service. It contains the following subsections:
19.3.1 Invoking the Mail Compose Page
The Mail Compose page enables users to determine how they want to compose individual messages within the application. Invoke the Mail Compose page directly with a navigation rule that directs the user to the full page:
Example 19-1 Invoking the Mail Compose Page
/oracle/workplace/collab/mail/view/jsf/pages/ComposeView.jspx
You can pass optional parameters to seed the compose message. For example, you can pass parameters to pre-populate fields like To, Cc, Bcc, From, Subject, and Content.
Set parameters only for items you want to pre-populate. If you require an empty ComposeView.jspx, then no setActionListener is necessary. You must set all parameters on pageFlowScope.
Example 19-2 shows parameters for the Mail Compose page (ComposeView.jspx):
Example 19-2 Parameters of the Mail Compose Page
<af:commandLink text="Compose Mail" action="sendMail">
    <af:setActionListener from="#{'john.doe@oracle.com'}" to="#{pageFlowScope['collab.mail.compose.toList']}"/>
    <af:setActionListener from="#{'Testing Mail......'}" to="#{pageFlowScope['collab.mail.compose.subject']}"/>
    <af:setActionListener from="#{'Testing Mail Service'}" to="#{pageFlowScope['collab.mail.compose.content']}"/>
    <af:setActionListener from="#{'ruby@oracle.com'}" to="#{pageFlowScope['collab.mail.compose.ccList']}" />
    <af:setActionListener from="#{'ruby@oracle.com'}" to="#{pageFlowScope['collab.mail.compose.bccList']}" />
    <af:setActionListener from="#{'monty@oracle.com'}" to="#{pageFlowScope['collab.mail.compose.from']}" />
    <af:setActionListener from="#{'text/html'}" to="#{pageFlowScope['collab.mail.compose.contentType']}" />
</af:commandLink>
To hide the recipients fields (like To, Cc and Bcc), set the following action listener in ComposeView.jspx:
19.3.2 Configuring the Number of Mails Displayed
By default, the Mail service displays the 50 most recent mail messages from your Inbox folder. Providing that your mail server supports the increase in memory cache that fetching additional mail requires, the administrator can change this to a higher number in the adf-config.xml file.
Add the mail.messages.fetch.size property as shown in Example 19-4:
Example 19-4 Increasing the Number of Mails Displayed
<adf-collaboration-config xmlns="http://xmlns.oracle.com/webcenter/collab/config">

<service-config
serviceId="oracle.webcenter.collab.mail">
<property name="mail.messages.fetch.size" value="500"/>
</service-config>

</adf-collaboration-config>
Alternatively, your Fusion Middleware administrator can increase this value with the WLST command setMailServiceProperty. For more information, see the Oracle Fusion Middleware WebLogic Scripting Tool Command Reference.
This change applies to all users; that is, following Example 19-4, all users see 500 recent mails in their Inbox in the WebCenter application. Increasing the number of messages shown correspondingly increases the cache size on the WebCenter application. Take care to set this to a reasonable size.
19.3.3 Troubleshooting the Mail Service
This section describes common problems and solutions for the Mail service.
Users are not able to retrieve their mail messages or send mail messages from within the custom WebCenter application.
Ensure the following:
-
Ensure that a Mail service connection exists in your application.
-
Ensure the required Mail service connection is marked as the default connection.
-
Ensure the mail server configured in the connection is up and running. You can try connecting from any other mail client to ensure that the connection details are correct.
The Mail service within your custom WebCenter application requires users to log in, but users are not able to authenticate and do not see any content at runtime. When users access the Mail service, it throws the ExtApp Authorization Exception.
The Mail service works in a non-secured custom WebCenter application if, and only if, the Mail connection is configured to use an external application connection with public credentials. If your application is running in non-secured mode, then ensure that you have configured public credentials for your external application.
If you want your custom WebCenter application to run in secure mode, then you must configure ADF security for your application.
When users receive mail in WebCenter applications, message content is shown as an attachment (named content.html) rather than within the message body. This can occur if the mail server is running Microsoft Exchange Server 2007 and the "Update Rollup 3 for Microsoft Exchange Server 2007" is not yet installed.
Mail server administrators must download and install "Update Rollup 3 for Microsoft Exchange Server 2007" which fixes this issue. For more information, see http://support.microsoft.com/kb/930468.
