5 Building Portlets and Wiring Them in Your Application
In this lesson, you will learn how to build two types of portlets: a standards-based Java (JSR 168) portlet, which you will build using a wizard in Oracle JDeveloper, and an OmniPortlet, using a step-by-step wizard at runtime.
After you create the portlets, you will add them to the page, then connect the two portlets. By the end of this lesson, you should have a good handle on what's involved with building and testing a standards-based Java (JSR 168) portlet and a PDK-Java portlet (OmniPortlet). You'll also be able to “wire” the two portlets so that when you click a link in one portlet, the content in the second portlet is dynamically updated.
Figure 5-1 shows how your page will look at the end of this lesson.
Figure 5-1 MyPage.jspx at the End of this Lesson
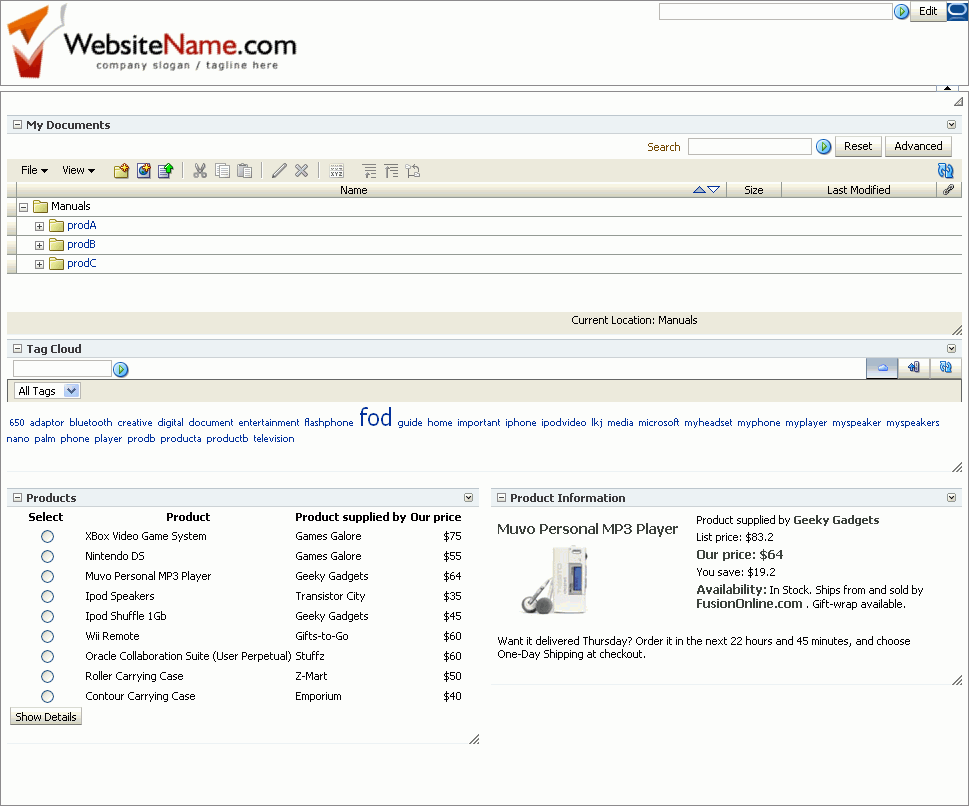
Description of "Figure 5-1 MyPage.jspx at the End of this Lesson"
Introduction
This lesson contains the following steps:
-
Step 2: Create the JavaBeans to Store the Standards-Based Portlet Information
-
Step 3: Create the Business Logic for the Standards-Based Portlet
-
Step 5: Register the Standards-Based Portlet with Your Application
-
Step 6: Test the Standards-Based Portlet in Your Application
-
Step 10: Wire the Standards-Based Portlet and OmniPortlet Together
Both of these portlets use the tutorial schema that we installed in Chapter 2, "Preparing for the Tutorial," and require that you have a database connection. We created the database connection when we added the Tags service in Chapter 4, "Adding WebCenter Web 2.0 Services to Your Application," so if you did not complete the steps in that chapter, you must follow the steps in Step 5: Create a Database Connection to the WebCenter Schema for the Tags Service in that chapter before you build the portlets.
Step 1: Create a Standards-Based Java (JSR 168) Portlet
Oracle WebCenter Framework enables you to quickly and easily build a standards-based portlet that you can use with a portal or application, such as the one you're currently creating.
Note:
The steps to build this portlet rely on the naming convention we've used, so follow the steps carefully. If you do not use the names we've provided, you may not achieve the same results.In this step, we will create an application based on the Portlet Producer template, then build a standards-based portlet. Afterwards, we'll consume the portlet into our tutorial application. Figure 5-2 shows the portlet at runtime in MyTutorialApplication.
Figure 5-2 Standards-Based Portlet at Runtime in MyTutorialApplication
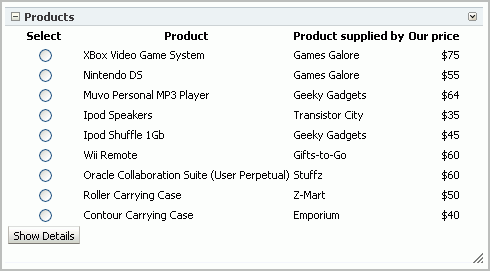
Description of "Figure 5-2 Standards-Based Portlet at Runtime in MyTutorialApplication"
-
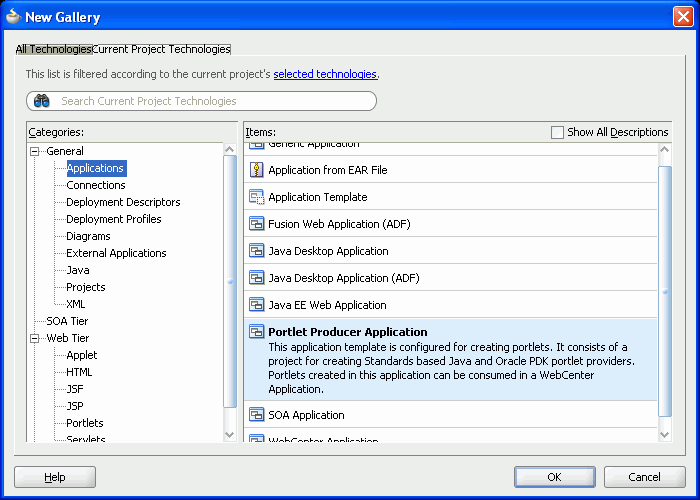
In Oracle JDeveloper, create a new application based on the Portlet Producer Application template (Figure 5-3), then click OK. To do so, choose File >New, then choose Applications > Portlet Producer Application in the New Gallery.
Figure 5-3 Creating a New Portlet Producer Application
Description of "Figure 5-3 Creating a New Portlet Producer Application"
-
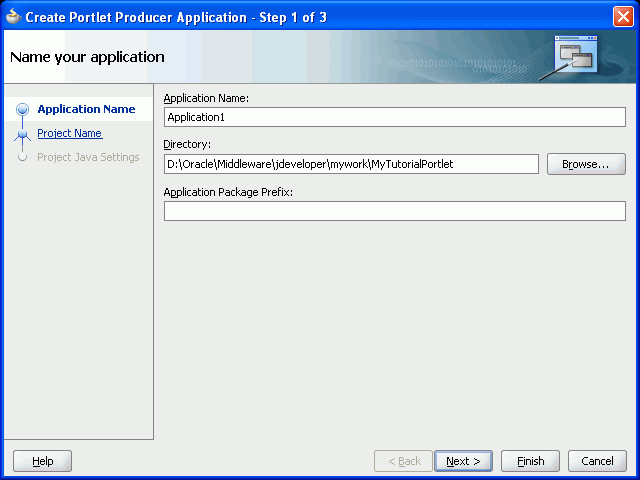
In the Create Portlet Producer Application wizard, in the Application Name field, enter
MyTutorialPortlet. -
By default, the Directory field should contain the directory where the application will reside (Figure 5-4). You can change the directory location, if you like, but let's leave it as it is for the purposes of the tutorial.
Figure 5-4 Creating a Portlet Producer Application - Step 1
Description of "Figure 5-4 Creating a Portlet Producer Application - Step 1"
-
Click Next.
-
On the Project Name page of the wizard (Figure 5-5), let's leave the default name:
Portlets, and click Next.Figure 5-5 Creating a Portlet Producer Application - Step 2
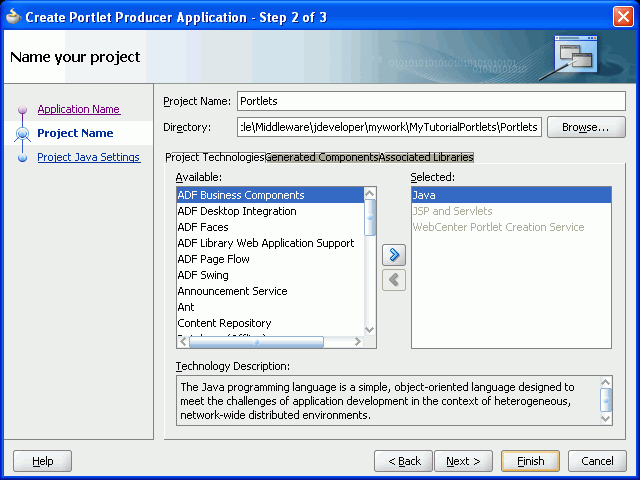
Description of "Figure 5-5 Creating a Portlet Producer Application - Step 2"
-
On the last page of the wizard, you can configure the Java settings. You can see that the default package contained in the portlet producer application is
portlet(Figure 5-6). For the purposes of this tutorial, let's leave the default options and click Finish.Figure 5-6 Creating a Portlet Producer Application - Step 3
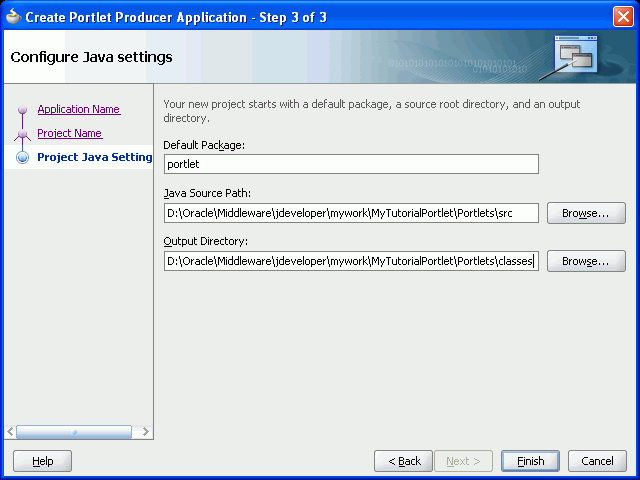
Description of "Figure 5-6 Creating a Portlet Producer Application - Step 3"
-
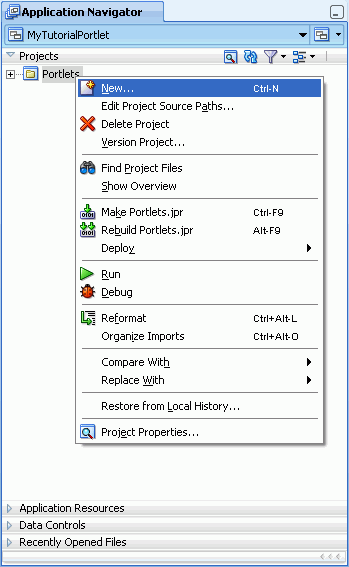
In the Application Navigator, under your new
MyTutorialPortletapplication, right-click Portlets, and select New (Figure 5-7). -
Click the Current Project Technologies tab.
-
In the Categories list as shown in Figure 5-8, expand the Web Tier category, and select Portlets.
Figure 5-8 Creating a New Portlet Producer Application
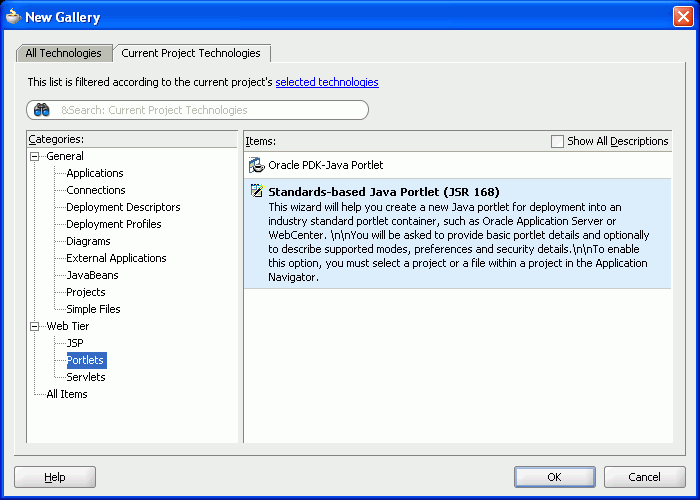
Description of "Figure 5-8 Creating a New Portlet Producer Application"
Notice there are two kinds of portlets you can create:
-
An Oracle PDK-Java portlet. PDK-Java portlets can be consumed by WebCenter applications, Oracle Portal, or some other type of Oracle-specific solution. You build an Oracle PDK-Java portlet using the APIs provided by the PDK. Note that the OmniPortlet producer you will register in Step 7: Register the Preconfigured Portlet Producer is a type of Oracle PDK-Java Portlet
-
A standards-based Java (JSR 168) Java portlet. Java portlets can be consumed by portals from any vendor that supports the portlet standards. In this tutorial, we're going to build a standards-based (JSR 168) Java portlet.
-
-
Select Standards-based Java Portlet (JSR 168), and click OK.
The JSR 168 Java Portlet wizard displays, which generates a skeleton for the portlet. We'll later add our own logic to the portlet. Let's see how this is done.
-
On the General Portlet Information page, in the Name and Class fields, enter
Products.Note:
The steps to build this portlet rely on the naming convention we've used, so follow the steps carefully. If you do not use the names we've provided, you may not achieve the same results. -
Select Enable inter-portlet communication using Oracle WSRP V2 extensions. Selecting this option enables your portlet to support Oracle WSRP 2.0 extensions, and generates the
oracle-portlet.xmlfile that is used for WSRP 2.0 features, such as navigation parameters. We'll need these parameters later on, when we enable the OmniPortlet and this portlet to communicate with each other. Figure 5-9 shows how the General Portlet Information page should now look.Figure 5-9 Creating a JSR 168 Java Portlet - General Portlet Information
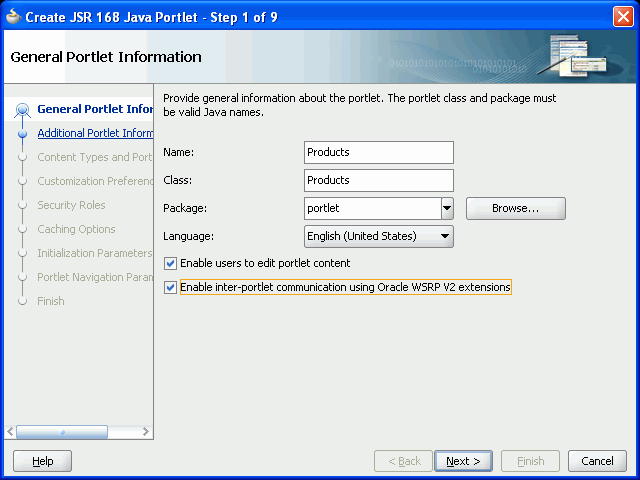
Description of "Figure 5-9 Creating a JSR 168 Java Portlet - General Portlet Information"
-
Click Next.
-
On the Additional Portlet Information page, we can either leave the defaults or, because we know we are going to show a few details about the products in our database, we can change the display name so anyone using the portlet will know what the portlet contains. Update the fields on this page according to Table 5-1. Figure 5-10 shows the resulting Additional Portlet Information page.
Table 5-1 Name and Attribution Values
Property Value Display Name
Name that will appear in the JDeveloper Component Palette. Because you entered Products as the class name, this field is automatically populated with that name.
Portlet Title
Title that will appear on the portlet header. Because you entered Products as the class name, this field is automatically populated with that name.
Short Title
Title that will appear on the portlet header on mobile devices.
Let's leave the default name, Products.
Description
Description of the portlet. This field is relevant only when the portlet is used in an Oracle Portal 10g environment.
Enter a description, for example,
This is a JSR 168 portlet that displays the products.Keywords
Keywords provide additional information about a page, item, or portlet so that users can locate it during a search. Although keywords are not supported by Oracle WebCenter Suite or Oracle Portal 10g, they are supported by other vendors from whom you may have obtained a deployment environment.
Enter
sample, Tutorial, products.Figure 5-10 Creating a JSR 168 Java Portlet - Additional Portlet Information
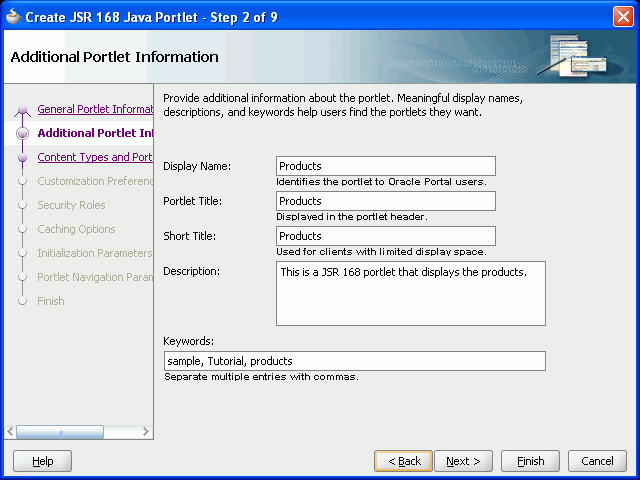
Description of "Figure 5-10 Creating a JSR 168 Java Portlet - Additional Portlet Information"
-
Click Next.
-
On the Content Types and Portlet Modes page, notice that text/html is the default content type. That means that the portlet will support text encoded with HTML. View and edit are listed as the default portlet modes for
text/html. View is always available as a portlet mode; edit mode provides a page that allows users to personalize the portlet instance.Notice the Implementation Method area as shown in Figure 5-11. These controls enable you to specify whether you want to generate JSP for the portlet, or use your own custom JSP code.
Figure 5-11 Creating a JSR 168 Portlet - Content Types and Portlet Modes
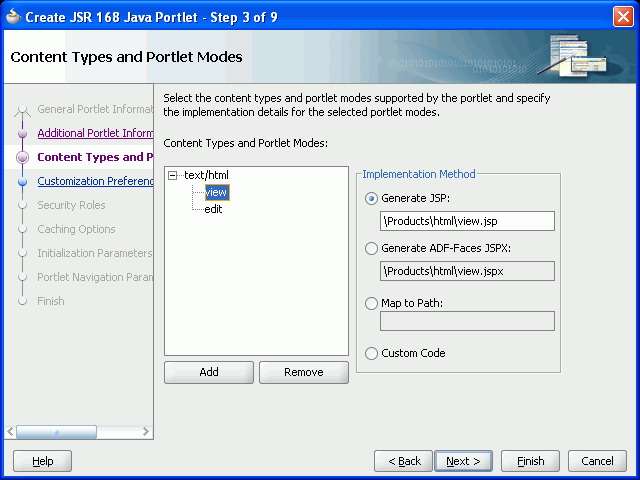
Description of "Figure 5-11 Creating a JSR 168 Portlet - Content Types and Portlet Modes"
In this lesson, we'll ask JDeveloper to generate JSPs for us by leaving the default selection.
-
Click Next.
Although you could click Finish here and produce a basic portlet, let's continue and choose some other options and settings for our portlet.
-
On the Customization Preferences page, let's leave the default values and click Next (Figure 5-12).
Although we're not going to do anything with this page now, in the future you can use it to add other customization options for the portlet. For example, if your portlet accepted a
Zip Codeparameter, you might want to allow users to personalize the Zip Code label. If this were the case, you would use the Add button to make the Zip Code label personalizable.Figure 5-12 Creating a JSR 168 Java Portlet - Customization Preferences
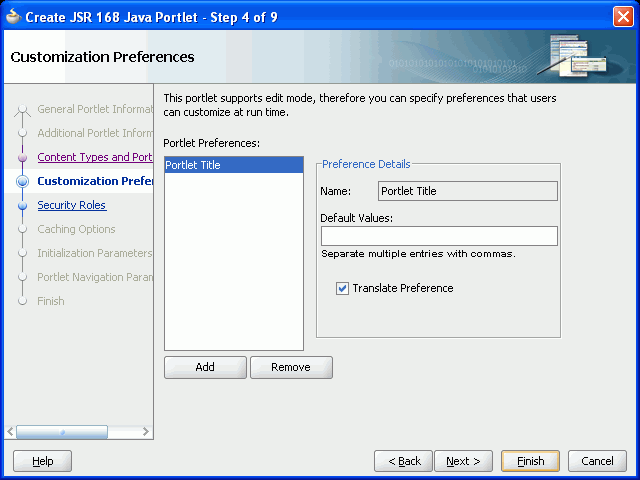
Description of "Figure 5-12 Creating a JSR 168 Java Portlet - Customization Preferences"
-
On the Security Roles page, click Next (Figure 5-13). The Security Roles page is used to specify which of the application's security roles you want to establish for this portlet.
Figure 5-13 Creating a JSR 168 Java Portlet - Security Roles
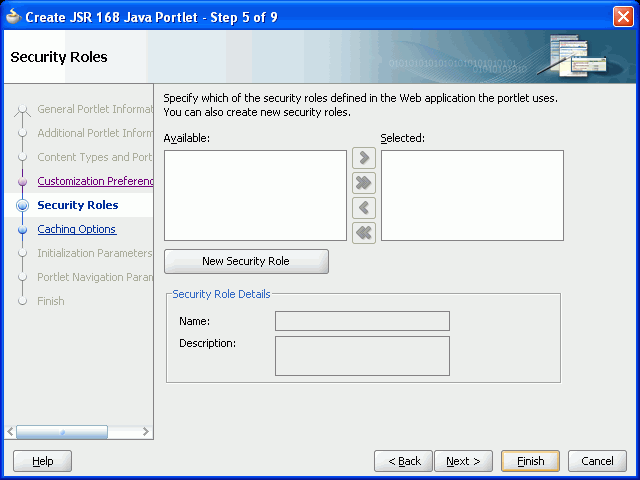
Description of "Figure 5-13 Creating a JSR 168 Java Portlet - Security Roles"
-
On the Caching Options page, click Next (Figure 5-14).
The settings on this page enable you to define expiry-based caching for your portlet. You do not need any caching conditions now.
Figure 5-14 Creating a JSR 168 Java Portlet - Caching Options
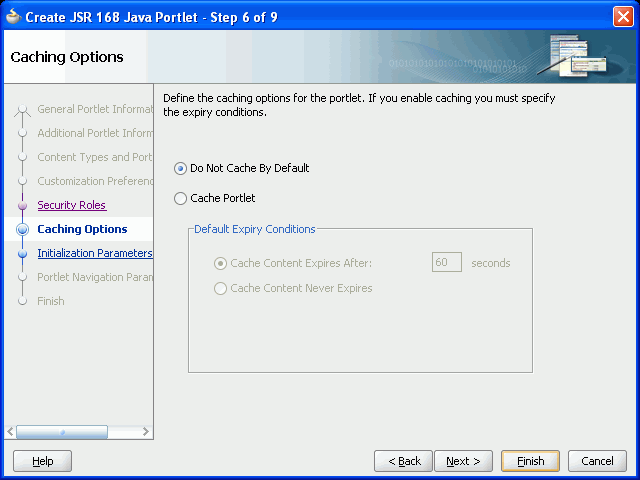
Description of "Figure 5-14 Creating a JSR 168 Java Portlet - Caching Options"
-
On the Initialization Parameters page, click Next (Figure 5-15). Our portlet does not require any initialization parameters.
Figure 5-15 Creating a JSR 168 Java Portlet - Initialization Parameters
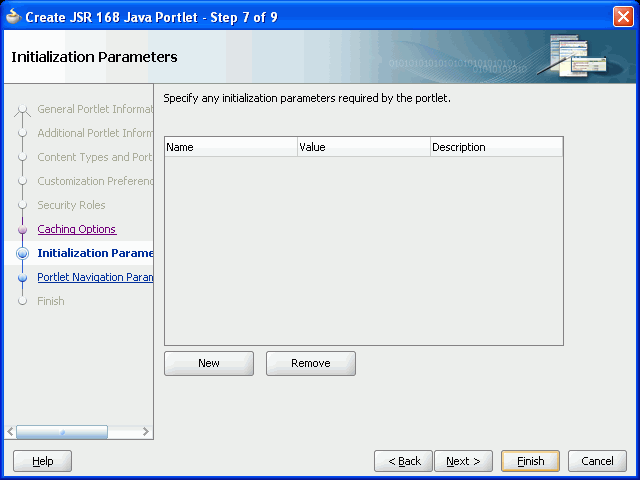
Description of "Figure 5-15 Creating a JSR 168 Java Portlet - Initialization Parameters"
-
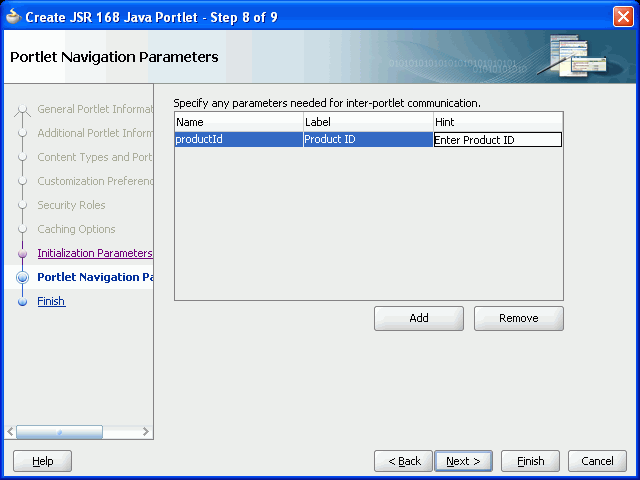
On the Portlet Navigation Parameters page, let's create a navigation parameter based on the
product ID.Navigation parameters are a WSRP 2.0 feature. This page enables you to specify external parameters to be consumed by the standards-based portlet, and only displays if you select the Enable inter-portlet communication using Oracle WSRP V2 extensions option on the first page of the wizard.
Click Add.
-
Double-click the values and update each value to the following:
-
Name:
productId -
Label:
Product ID -
Hint:
Enter Product ID
We will use these navigation parameters later on in Step 10: Wire the Standards-Based Portlet and OmniPortlet Together. Figure 5-16 shows the updated Portlet Navigation Parameters page.
Figure 5-16 Creating a JSR 168 Java Portlet - Portlet Navigation Parameters
Description of "Figure 5-16 Creating a JSR 168 Java Portlet - Portlet Navigation Parameters"
-
-
Click Next.
-
On the last page of the wizard (Step 9 of 9), click Finish.
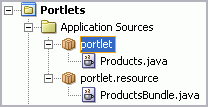
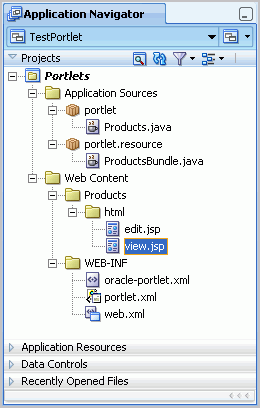
After you click Finish, you should be able to locate several newly generated files in the Application Navigator under the Portlets project. The expanded Navigator looks like Figure 5-17.
Figure 5-17 Files Generated for the New Portlet
Description of "Figure 5-17 Files Generated for the New Portlet"
-
Under Application Sources, under portlet and portlet.resource, notice two Java classes:
-
Products.java is invoked by the portlet container. It contains all the methods required by the portlet standards.
-
ProductsBundle.java contains all the translation strings for the portlet.
-
-
Under Web Content, Products, html:
-
edit.jsp, which contains the information needed to populate the Personalize dialog box.
-
view.jsp, which is invoked when the portlet is sharing the page with other components.
-
-
Under Web Content, WEB-INF, three deployment descriptors:
-
oracle-portlet.xml, which contains information to support Oracle extensions for import/export and inter-portlet communication. It appears because you chose Enable WSRP V2 inter-portlet communication using Oracle extensions on Step 1 of the wizard.
-
portlet.xml, which specifies all the portlet resources (the information you entered through the JSR 168 Java Portlet Wizard).
-
web.xml, which specifies the web application resources.
-
-
-
Save all your files. In the next step, we'll create a JavaBean to store all the portlet information you just generated.
Step 2: Create the JavaBeans to Store the Standards-Based Portlet Information
In this step, you will create the JavaBean to store the information for your standards-based portlet.
-
In the Application Navigator, right-click the portlet package, and choose New. Figure 5-18 shows the
portletpackage in the Application Navigator. -
In the New Gallery, click the All Technologies tab.
-
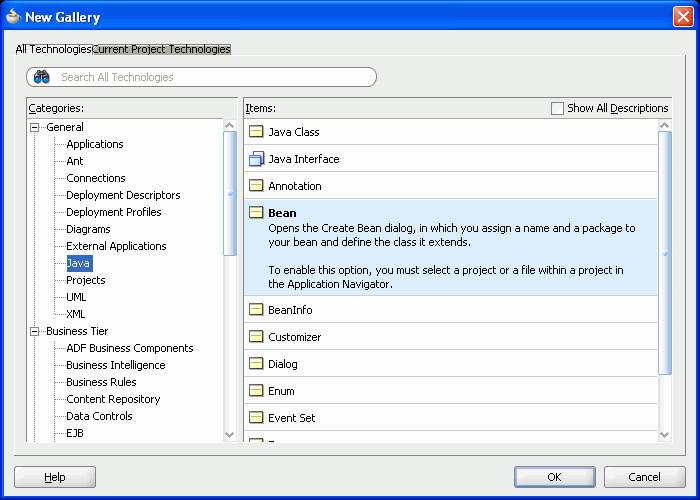
In the Categories list, under General, choose Java, select Bean from the Items list, then click OK (Figure 5-19).
Figure 5-19 Choosing the JavaBean in the New Gallery
Description of "Figure 5-19 Choosing the JavaBean in the New Gallery"
-
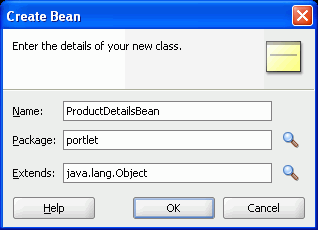
In the Create Bean dialog box that displays, enter the following information to set up the new JavaBean (Figure 5-20):
-
Name:
ProductDetailsBean -
Package:
portlet -
Extends:
java.lang.Object
This creates a new bean called
ProductDetailsBeanin the portlet package. -
-
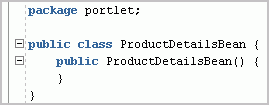
Click OK. The new JavaBean displays in the Design window (Figure 5-21).
Figure 5-21 ProductDetails JavaBean in the Design View
Description of "Figure 5-21 ProductDetails JavaBean in the Design View"
Figure 5-22 shows the JavaBean in the Structure window. As we mentioned in Chapter 3, "Creating a WebCenter Application with a Customizable Page," you can use the pushpin in the Structure window to freeze and unfreeze the current view. Ensure that you have selected the
ProductDetails Beanin the Design view, then toggle the pushpin so that you see theProductDetails Beanin the Structure window.Figure 5-22 ProductDetailsBean in the Structure Window
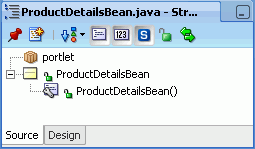
Description of "Figure 5-22 ProductDetailsBean in the Structure Window"
-
Now that we've set up our JavaBean, let's add the information we need for the portlet. In the Structure window, right-click the ProductDetailsBean, then choose New Field from the context menu.
Figure 5-23 Creating a New Field for the ProductDetails Bean
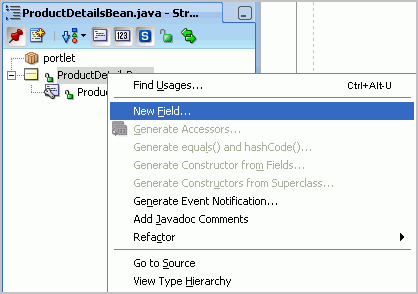
Description of "Figure 5-23 Creating a New Field for the ProductDetails Bean"
-
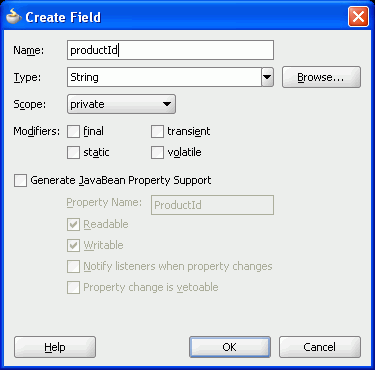
In the Create Field dialog box, in the Name field, enter
productId. This name represents the name of the product in our database schema. -
Ensure the Type is set to
String. -
Ensure the Scope is set to private (Figure 5-24).
-
Click OK. The new field displays in the Design view of the JavaBean (Figure 5-25).
Figure 5-25 New Field in the ProductDetailsBean
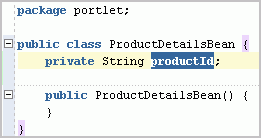
Description of "Figure 5-25 New Field in the ProductDetailsBean"
-
Now, let's create the other four fields we want to show in our portlet. Follow steps 6 through 10 to create these four fields with the following names:
-
productName -
productPrice -
imageURL -
categoryDescription -
supplierName
The Design view of your JavaBean should now contain the six fields (Figure 5-26).
Figure 5-26 ProductsBean with the Six Fields
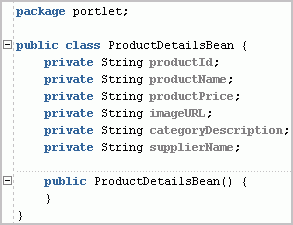
Description of "Figure 5-26 ProductsBean with the Six Fields"
-
-
Now that we've set up the fields for the JavaBean, let's generate the accessors.
In the Structure window, right-click ProductDetailsBean and choose Generate Accessors from the context menu.
The Generate Accessors dialog box displays (Figure 5-27).
Figure 5-27 Generate Accessors Dialog Box
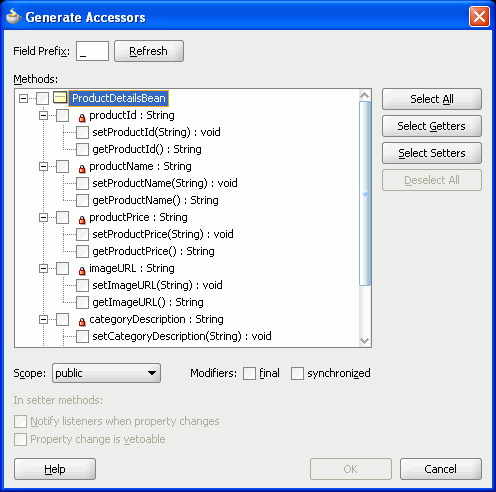
Description of "Figure 5-27 Generate Accessors Dialog Box"
-
Click the Select All button to select all the fields you created for this bean (Figure 5-28).
Figure 5-28 Generate Accessors DIalog Box with all Fields Selected
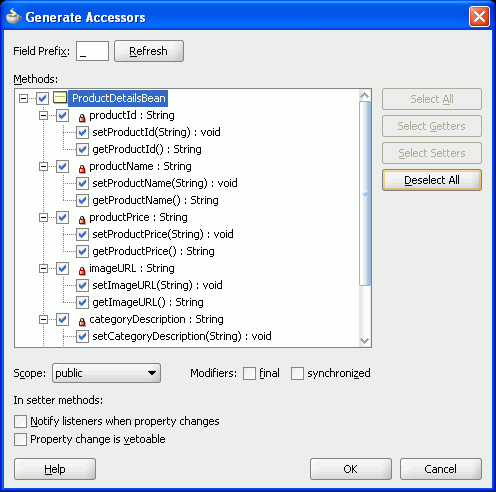
Description of "Figure 5-28 Generate Accessors DIalog Box with all Fields Selected"
-
Click OK to generate the accessors for these fields. Oracle JDeveloper generates the code as shown in Example 5-1:
Example 5-1 ProductDetails JavaBean
package portlet; public class ProductDetailsBean { private String productId; private String productName; private String productPrice; private String imageURL; private String categoryDescription; private String supplierName; public ProductDetailsBean() { } public void setProductId(String productId) { this.productId = productId; } public void setProductName(String productName) { this.productName = productName; } public String getProductName() { return productName; } public void setProductPrice(String productPrice) { this.productPrice = productPrice; } public String getProductPrice() { return productPrice; } public void setImageURL(String imageURL) { this.imageURL = imageURL; } public String getImageURL() { return imageURL; } public void setCategoryDescription(String categoryDescription) { this.categoryDescription = categoryDescription; } public String getCategoryDescription() { return categoryDescription; } public void setSupplierName(String supplierName) { this.supplierName = supplierName; } public String getSupplierName() { return supplierName; } } -
Create another JavaBean for the portlet called
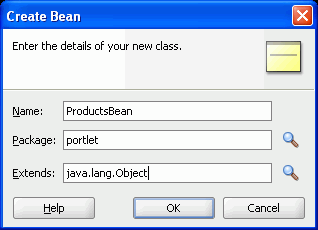
ProductsBean.java. This bean represents the list of products, which the portlet will display at runtime.To create the JavaBean right-click the portlet package in the Application Navigator and choose New from the context menu to display the Create Bean dialog box (Figure 5-29).
-
Replace the code of
ProductsBean.javain the Source view with the code in Example 5-2.Note:
If the formatting of the code in this text does not work, you can open theC:\TutorialContent\Portlets\ProductsBeanJava.txtfile and copy and paste the code from there.Example 5-2 ProductsBean.java Code
package portlet;

import java.util.ArrayList;

public class ProductsBean {
    public static final String DEFAULT_PRODUCT_ID = "12";

    private ArrayList<ProductDetailsBean> products =
        new ArrayList<ProductDetailsBean>();

    public ProductsBean() {
        super();
    }

    public void addProduct(ProductDetailsBean product) {
        products.add(product);
    }

    public ArrayList<ProductDetailsBean> getProducts() {
        return products;
    }
}
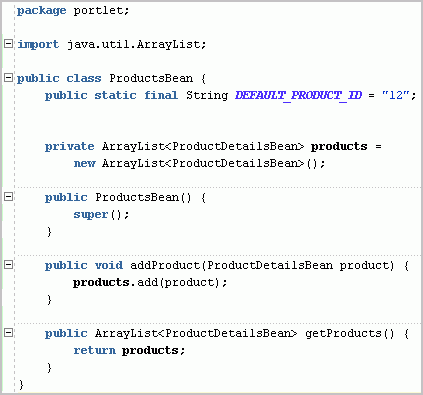
The Source view of the bean should now look like Figure 5-30.
-
Save all your files.
In the next steps, we'll set up the connection between our JavaBeans and the database schema that contains the data we want to show in our portlet.
Step 3: Create the Business Logic for the Standards-Based Portlet
After you create the JavaBean to access the data in the database, you create the business logic for the portlet in a Java Class. This class will contain a connection to the database, establish the connection, then query for information using the SQL statement in the class file. When you create a standards-based portlet, you must manually create this class.
-
In the Application Navigator, right-click the portlet package, then choose New from the context menu.
-
In the New Gallery, click Java, then choose Java Class from the Items list (Figure 5-31).
Figure 5-31 Choosing the Java Class Option in the New Gallery
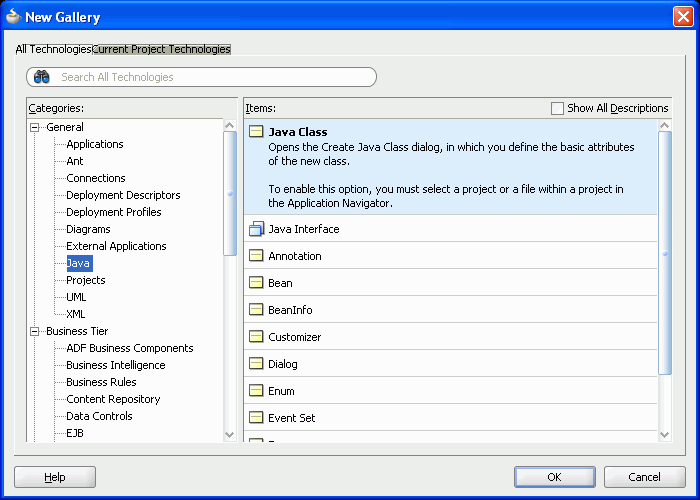
Description of "Figure 5-31 Choosing the Java Class Option in the New Gallery"
-
Click OK.
-
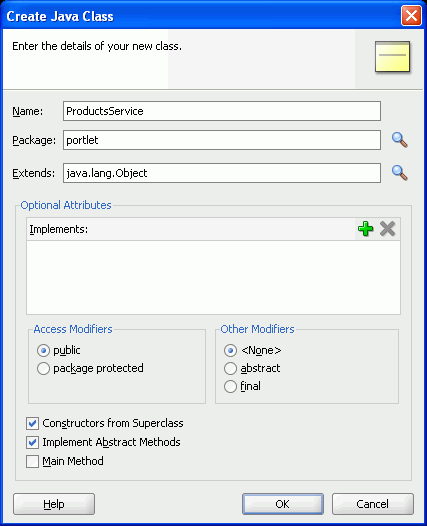
In the Create Java Class dialog box, in the Name field, enter the name:
ProductsService, as shown in Figure 5-32. -
Leave the rest of the default values in this dialog box, as we will overwrite them in the next step, then click OK.
-
In the
ProductsService.javafile that displays, replace all the automatically-generated code with the code shown in Example 5-3. The code assumes that the database where you installed the sample schema is local. In the code, modify the highlighted JDBC connection (jdbc:oracle:thin:@localhost:1521:xe)to point to your database and tutorial (fod) schemaNote:
If the formatting of the code in this text does not work, you can open theC:\TutorialContent\Portlets\ProductsServiceJava.txtfile and copy and paste the code from there.Example 5-3 ProductsService.java Code
package portlet;

import java.sql.Connection;
import java.sql.DriverManager;
import java.sql.ResultSet;
import java.sql.SQLException;
import java.sql.Statement;

public class ProductsService {
    public ProductsService() {
    }

    public ProductsBean getProducts() throws ClassNotFoundException {
        Connection conn = getConnection();
        ProductsBean products = new ProductsBean();
        if (conn != null) {
            try {
                Statement stmt = conn.createStatement();
                String query =
                    "SELECT DISTINCT product_id, product_name name, cost_price price, 'http://localhost:7101/MyTutorialApplication/' || external_url image_url, category_description, supplier_name " +
                    "FROM category_translations, products_base, suppliers" +
                    "    WHERE products_base.category_id = category_translations.category_id" +
                    "    AND products_base.supplier_id = suppliers.supplier_id " +
                    "    AND cost_price between 25 and 75 " +
                    "    order by product_id";
                ResultSet rs = stmt.executeQuery(query);
                while (rs.next()) {
                    ProductDetailsBean productDetails = new ProductDetailsBean();
                    productDetails.setProductId(rs.getString(1));
                    productDetails.setProductName(rs.getString(2));
                    productDetails.setProductPrice(rs.getString(3));
                    productDetails.setImageURL(rs.getString(4));
                    productDetails.setCategoryDescription(rs.getString(5));
                    productDetails.setSupplierName(rs.getString(6));

                    products.addProduct(productDetails);
                }
                conn.close();
            } catch (SQLException sqle) {
                System.out.println("======== Oracle Fusion Middleware Tutorial for WebCenter Developers ======== ");
                System.out.println("Database Connection established successfully but encountered an error while working with the DB:" +
                                   sqle);
                System.out.println("============================================================================ ");
            } catch (Throwable t) {
                System.out.println("======== Oracle Fusion Middleware Tutorial for WebCenter Developers ======== ");
                System.out.println("Error while trying to get Product Details: " +
                                   t);
                System.out.println("============================================================================ ");
            }

        }
        return products;
    }

    public static Connection getConnection() throws ClassNotFoundException {
        Connection conn = null;
        try {
            Class.forName("oracle.jdbc.driver.OracleDriver");
            conn =
DriverManager.getConnection("jdbc:oracle:thin:@localhost:1521:xe", "fod",
                            "fusion");
        } catch (SQLException sqle) {
            conn = null;
            System.out.println("======== Oracle Fusion Middleware Tutorial for WebCenter Developers ======== ");
            System.out.println("SQL error while trying to  get connection to DB: " +
                               sqle);
            System.out.println("============================================================================ ");
        } catch (Throwable t) {
            conn = null;
            System.out.println("======== Oracle Fusion Middleware Tutorial for WebCenter Developers ======== ");
            System.out.println("Error while trying to get the connection to DB: " +
                               t);
            System.out.println("============================================================================ ");
        }
        return conn;
    }
}
Note:
In this code, the package names and import statements of theview.jsp,ProductsService, andProductsBeandepend on the name, class name, and package you specified or the portlet. Also, in this code, you must update the connection information to point to the database containing the tutorial (fod) schema. If you encounter problems with this portlet, you can check the Messages log below the Visual Editor (the Design view) to verify that the connection information you entered in this code is correct. -
Save the file.
-
Before we can update our portlet's
view.jspfile to use this Java class, let's return to our portlet code so that it uses the parameter value. This parameter value is theproductIdnavigation parameter defined for the Products portlet in Figure 5-16.Click the Products.java tab to bring it into focus. Or, if the file is not open, double-click the name in the Application Navigator.
-
In the
Products.javafile, we must update theProcessAction()method in the generated portlet class file to pass the parameter value from the portlet to the Java Bean, so that the appropriate products display depending on the parameter entered.In the
Products.javafile, locate theprocessAction()method. Example 5-4 shows the section of the code in theProducts.javafile where the method is located.Example 5-4 End of the Products.java File Containing the processAction() Method
    public void processAction(ActionRequest request,
                              ActionResponse response) throws PortletException,
                                                              IOException {
        // Determine which action.
        String okAction = request.getParameter(OK_ACTION);
        String applyAction = request.getParameter(APPLY_ACTION);

        if (okAction != null || applyAction != null) {
            // Save the preferences.
            PortletPreferences prefs = request.getPreferences();
            String param = request.getParameter(PORTLETTITLE_KEY);
            prefs.setValues(PORTLETTITLE_KEY, buildValueArray(param));
            prefs.store();
            if (okAction != null) {
                response.setPortletMode(PortletMode.VIEW);
                response.setWindowState(WindowState.NORMAL);
            }
        }
    }
Example 5-4 shows the section we must update. For simplicity, you can replace all the code in the
Products.javafile with the code inthe C:\TutorialContent\Portlets\ProductsJava.txtfile. Alternatively, Example 5-4 shows the updated section.Example 5-5 Updating the Final Section of the Products.java file
// Form field names public static final String PARAMETER1 = "productId"; public static final String FORM_PARAMETER1 = "form_Parameter1"; public static final String FORM_SUBMIT = "dosub"; // Portlet Modes public static final String MODE_NAME_PARAM = "mode"; public static final String MODE_VIEW = "view"; public void processAction(ActionRequest request, ActionResponse response) throws PortletException, IOException { // Determine what kind of action we have by examining the mode parameter boolean viewMode = MODE_VIEW.equals(request.getParameter(MODE_NAME_PARAM)); // Extract the form field parameter and pass it through as a portlet parameter String param1 = request.getParameter(FORM_PARAMETER1); if (param1 == null) { param1 = ProductsBean.DEFAULT_PRODUCT_ID; } if (viewMode) { // Set the new parameter values. These will be intepreted by the // container as navigational parameters as the names match the names of // the declared parameters. response.setRenderParameter(PARAMETER1, param1); } else { // Determine which action. String okAction = request.getParameter(OK_ACTION); String applyAction = request.getParameter(APPLY_ACTION); if (okAction != null || applyAction != null) { // Save the preferences. PortletPreferences prefs = request.getPreferences(); String param = request.getParameter(PORTLETTITLE_KEY); prefs.setValues(PORTLETTITLE_KEY, buildValueArray(param)); prefs.store(); if (okAction != null) { response.setPortletMode(PortletMode.VIEW); response.setWindowState(WindowState.NORMAL); } } } } } -
Now that we've updated our portlet and created the Java Class to enable the portlet to communicate with the database, let's update our portlet's
view.jspfile for the portlet to use the Java class.In the Application Navigator, under Portlets >Web Content > Products > html, open the
view.jspfile (Figure 5-33).Figure 5-33 View.jsp File in the Application Navigator
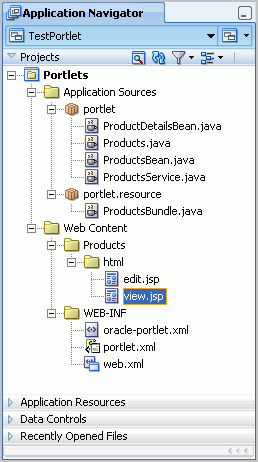
Description of "Figure 5-33 View.jsp File in the Application Navigator"
-
Click the Source tab to view the code of this page.
-
Select all the code in the Source view and delete it.
-
Enter the code in Example 5-6 in the Source view of the
view.jsp:Note:
If the formatting of the code in this text does not work, you can open theC:\TutorialContent\Portlets\ViewJSP.txtfile and copy and paste the code from there.<%@ page contentType="text/html" pageEncoding="windows-1252" import="javax.portlet.*, java.util.*, portlet.ProductsBean, portlet.ProductDetailsBean, portlet.ProductsService, portlet.Products "%> <%@ taglib uri="http://java.sun.com/portlet" prefix="portlet"%> <!-- Include the Portlet render Response & Request objects --> <portlet:defineObjects/> <% // Get the list of products ProductsBean products = new ProductsService().getProducts(); ArrayList<ProductDetailsBean> productDetails = products.getProducts(); // "Portlet encode" the Action URL if running Portlet mode String actionURL = "view.jsp"; if (renderResponse != null) { actionURL = renderResponse.createActionURL().toString(); } // Extract the current portlet parameter value if running in Portlet mode String param1 = ""; if (renderRequest != null) { param1 = renderRequest.getParameter(Products.PARAMETER1); if (param1 == null) { param1 = ""; } } %> <form method="POST" action="<%= actionURL %>"> <table> <tr> <th>Select</th> <th>Product</th> <th>Product supplied by</th> <th>Our price</th> </tr> <% for (int i = 0; i < productDetails.size(); i++) { ProductDetailsBean productDetail = productDetails.get(i); %> <tr> <td align="center"> <!-- Set the Form parameter name to passed as a render parameter during processAction --> <input type="radio" name="<%= Products.FORM_PARAMETER1 %>" value="<%=productDetail.getProductId()%>" <%= param1.equals(productDetail.getProductId()) ? " checked='checked'" : "" %>/> </td> <td> <%=productDetail.getProductName()%> </td> <td> <%=productDetail.getSupplierName()%> </td> <td align="right"> $<%=productDetail.getProductPrice()%> </td> </tr> <% } %> <tr class="PortletText1"> <td> <input name="<%= Products.FORM_SUBMIT %>" type="submit" class="portlet-form-button" value="Show Details"></input> </td> <td colspan="3"> </td> </tr> </table> <!-- create a hidden parameter to note we're running in "view" mode --> <input type="hidden" name="<%= Products.MODE_NAME_PARAM %>" value="<%= Products.MODE_VIEW %>"/> </form> -
Save the
view.jsp.
Now that you have established the connection to the database and set up the portlet to use the new JavaBean and Java Class to get the appropriate product information for the portlet, you are ready to include the portlet in a WAR file. WAR stands for web archive, and it packages all the resources, portlets, and deployment descriptors required to deploy your portlet.
Step 4: Test and Deploy the Standards-Based Portlet
In this lesson, you'll learn how to deploy the standards-based portlet to your local Default Server (the Integrated WebLogic Server). When you deploy a portlet, you package it so that it can run on a Java EE server. If you're familiar with Oracle Portal, we're in effect creating a portlet provider, which in the WSRP world is known as a portlet producer.
-
If it is not running yet, start the Default Server by choosing Run > Start Server Instance.
-
Before we deploy the portlet, let's quickly compile and test it. In the Application Navigator, under Web Content > Products, right-click view.jsp and choose Run. The portlet should compile and you should see it display in your browser, as shown in Figure 5-34.
Figure 5-34 Testing the Standards-Based Portlet
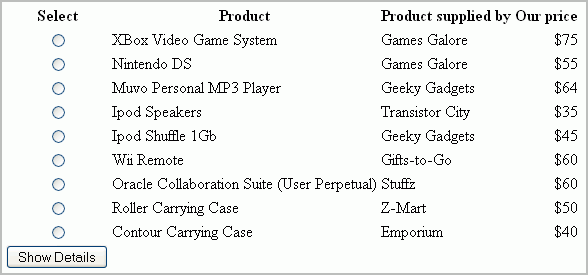
Description of "Figure 5-34 Testing the Standards-Based Portlet"
-
In the Application Navigator, under Portlets, Web Content, WEB-INF, right-click the
web.xmlfile, then choose Create WAR Deployment Profile from the context menu (Figure 5-36).Figure 5-35 Create WAR Deployment Profile Menu Option
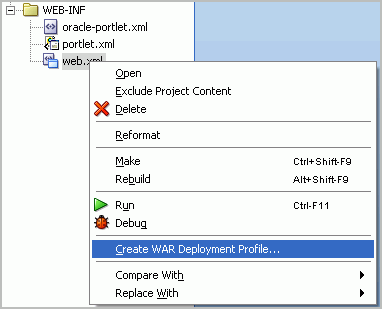
Description of "Figure 5-35 Create WAR Deployment Profile Menu Option"
-
In the Create Deployment Profile dialog box, name the Deployment Profile
Products, then click OK (Figure 5-36).Figure 5-36 Create Deployment Profile - WAR File Dialog Box
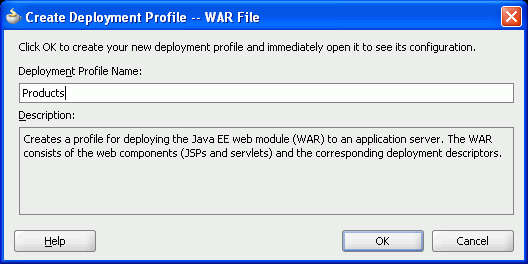
Description of "Figure 5-36 Create Deployment Profile - WAR File Dialog Box"
-
On the General tab of the WAR Deployment Profile Properties dialog box, look for the Web Application's Context Root setting. Let's change this to a more logical name, so that we can easily reference it later.
Select the Specify J2EE Context Root option, then enter
Productsin the field, as shown in Figure 5-37.Figure 5-37 WAR Deployment Profile Properties -- Setting the Context Root
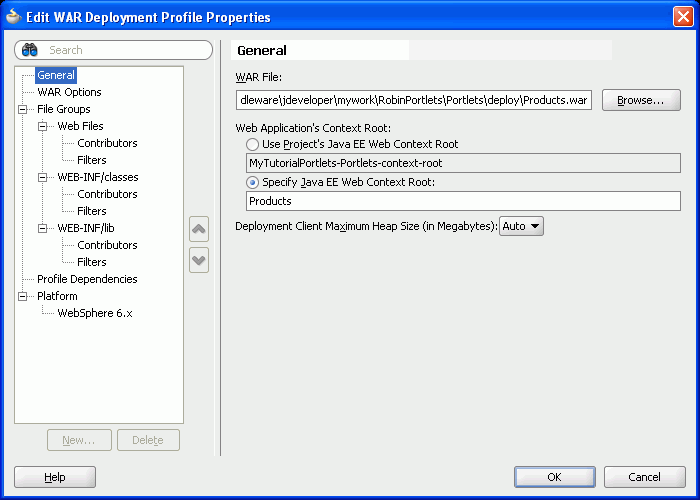
Description of "Figure 5-37 WAR Deployment Profile Properties -- Setting the Context Root"
-
Click OK to finish updating the properties, then click OK in the Project Properties dialog box to finish creating the WAR deployment profile.
-
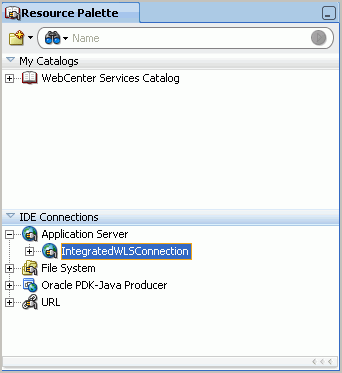
Oracle WebCenter includes its own default connection to the Integrated WLS Server. You can see the connection, called IntegratedWLSConnection, in the Resource Palette, under IDE Connections (Figure 5-38).
Figure 5-38 IntegratedWLSConnection in the Resource Palette
Description of "Figure 5-38 IntegratedWLSConnection in the Resource Palette"
-
Now, we're ready to deploy our standards-based portlet. In the Application Navigator, right-click the Portlets project, then choose Deploy > Products > to > IntegratedWLSConnection from the context menu.
-
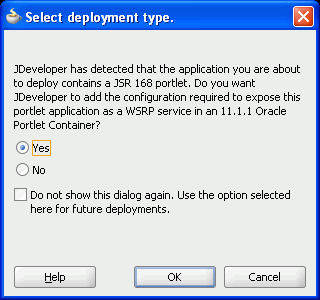
If the Select deployment type dialog box displays, leave the default options and click OK (Figure 5-39).
You can check the Deployment - Log below the Visual Editor (the Design view) for the message “Deployment finished.”
-
Let's to go a browser and verify whether the portlet deployment worked. In your browser, enter the URL:
http://localhost:7101/Products/info
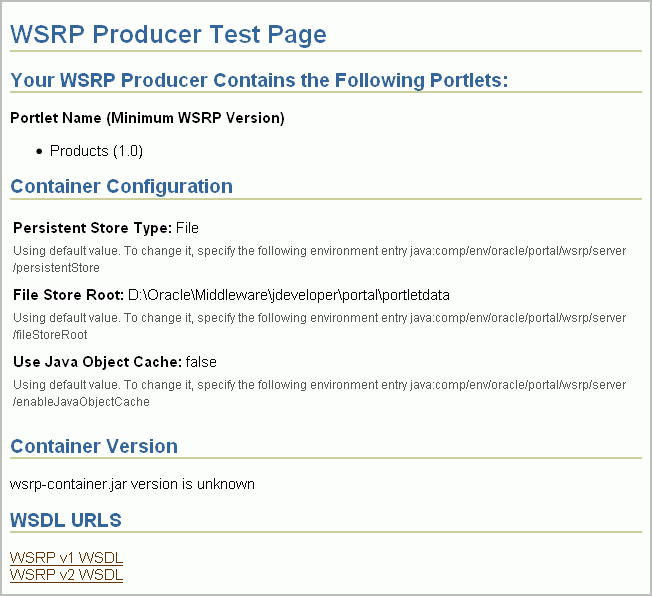
The WSRP Producer Test Page displays as shown in Figure 5-40.
-
You can choose to use either the WSRP version 1 or version 2 WSDL In general, it's good practice to use more recent versions wherever possible. If the portlet will be consumed by WSRP 1.0 compliant consumers (such as Oracle Portal), you may want to choose WSRP 1.0.
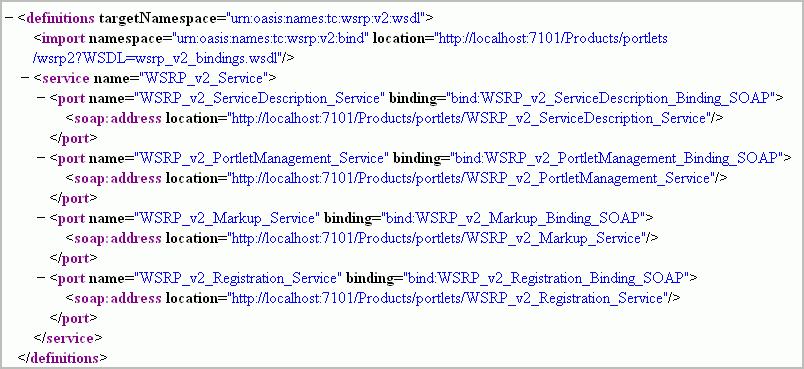
Click WSRP v2 WSDL to view the XML for this WSDL (Figure 5-41).
-
Figure 5-41 WSDL Describing Your Portlet as a Web Service
Description of "Figure 5-41 WSDL Describing Your Portlet as a Web Service"
The portlet you just deployed has now been exposed as a web service. What appears in the browser is the Web Services Description Language (WSDL) that describes this web service. Now that the portlet is deployed and running, you can add this portlet to any application that can consume portlets. Our next step is to register the producer with our tutorial application, then add this portlet to MyPage.
Step 5: Register the Standards-Based Portlet with Your Application
Once we have deployed our portlet, we can register the producer with our tutorial application and add it to our page.
To register the producer with MyTutorialApplication:
-
In the Application Navigator, choose MyTutorialApplication from the list to return to our custom WebCenter application (Figure 5-42).
Figure 5-42 MyTutorialApplication in the Application Navigator List

Description of "Figure 5-42 MyTutorialApplication in the Application Navigator List"
-
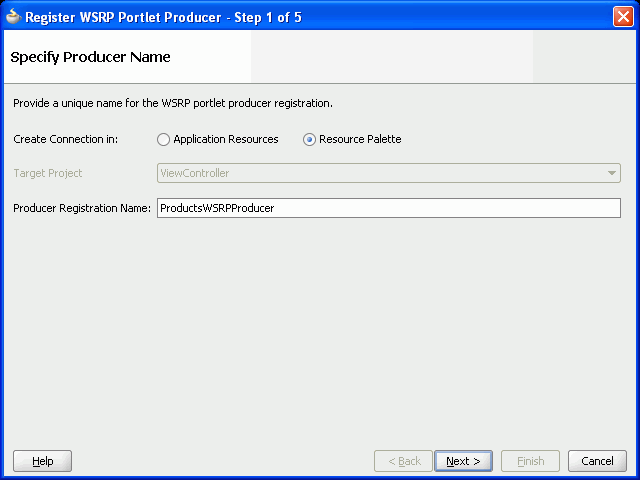
In the Resource Palette, click the folder icon, then choose New Connection > WSRP Producer from the context menu.
-
On the Name page, ensure Resource Palette is selected, and enter a name for the producer, for example
ProductsWSRPProducer, then click Next (Figure 5-43).Figure 5-43 Register WSRP Portlet Producer -- Name
Description of "Figure 5-43 Register WSRP Portlet Producer -- Name"
-
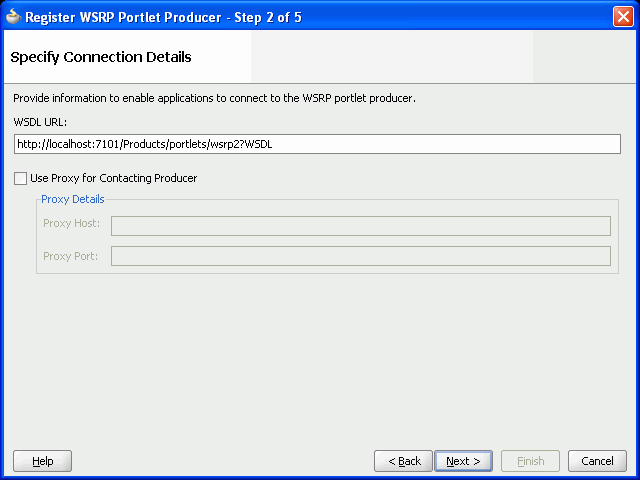
On the Connection page, in the WSDL URL field, enter the URL for the WSDL (typically, we use v.2):
http://localhost:7101/Products/portlets/wsrp2?WSDL
Figure 5-44 Register WSRP Portlet Producer -- Connection
Description of "Figure 5-44 Register WSRP Portlet Producer -- Connection"
-
Since our Default Server is installed locally, we do not need a proxy. Click Next to create the connection to the WSRP Producer.
-
Let's leave the rest of the defaults and finish the wizard. On the Registration Details page, click Finish. You'll see a registration dialog box letting you know the registration is being completed.
-
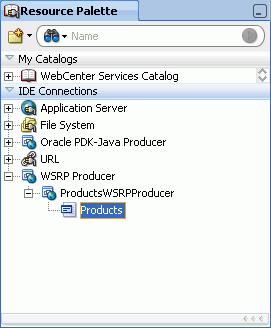
In the Resource Palette, under IDE Connections, open the WSRP Producer node, then expand the ProductsWSRPProducer node. Figure 5-45 shows the Products portlet here.
Figure 5-45 Products Portlet in the Resource Palette
Description of "Figure 5-45 Products Portlet in the Resource Palette"
Now that we've registered the producer with our application, let's add the portlet to the page and test it.
Step 6: Test the Standards-Based Portlet in Your Application
To test the portlet, we'll add it to MyPage.jspx, run the page, and see if the portlet displays as expected.
-
In MyTutorialApplication, if
MyPage.jspxis not open, locate the page name in the Application Navigator (under ViewController, Web Content) and double-click it. -
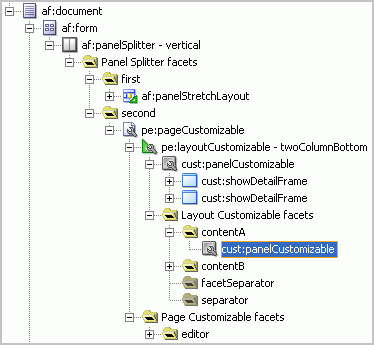
In the Structure window, navigate to the second facet, then expand Page Customizable > Layout Customizable > contentA, and locate the Panel Customizable, as shown in Figure 5-46.
Note:
As previously mentioned, you can use the pushpin in the Structure window to freeze the current view. For this step, you should click MyPage in the Design view, then ensure the pushpin is in the “freeze” position (pressed).Figure 5-46 Panel Customizable Where You Will Add the Products Portlet
Description of "Figure 5-46 Panel Customizable Where You Will Add the Products Portlet"
-
Drag and drop the Products portlet from the Resource Palette onto this Panel Customizable.
-
Run the page to see how the portlet looks at runtime. This may take a few moments.
You'll notice that selecting the different options and the Show Details button do not yet work, because we have not wired this portlet with another portlet. Let's create a second portlet, then wire it to this portlet. Figure 5-47 shows the Products portlet at runtime.
Figure 5-47 Products Portlet in a Browser Window

Description of "Figure 5-47 Products Portlet in a Browser Window"
Step 7: Register the Preconfigured Portlet Producer
For this tutorial, we will use a preconfigured portlet producer, called OmniPortlet, which is predeployed to the Integrated WLS (WebLogic) Server, also referred to as the Default Server. Be sure you have followed the steps in Chapter 2, "Preparing for the Tutorial" before you proceed.
To register our portlet producer:
-
Ensure the Default Server is running.
-
To find out the URL for the OmniPortlet producer running on the Default Server, choose Help > WebCenter Preconfigured Server Readme. This Read Me file shows all the information needed to use the portlets that are predeployed to the Default Server, and the login credentials for the server.
-
In the Read Me file, under Preconfigured Portlet Producers, then PortalTools Portlet Producers, click OmniPortlet Producer.
-
In your browser, you should see the OmniPortlet Producer Test Page. Copy the URL from the location bar. The URL should look like this:
http://localhost:7101/portalTools/omniPortlet/providers/omniPortlet
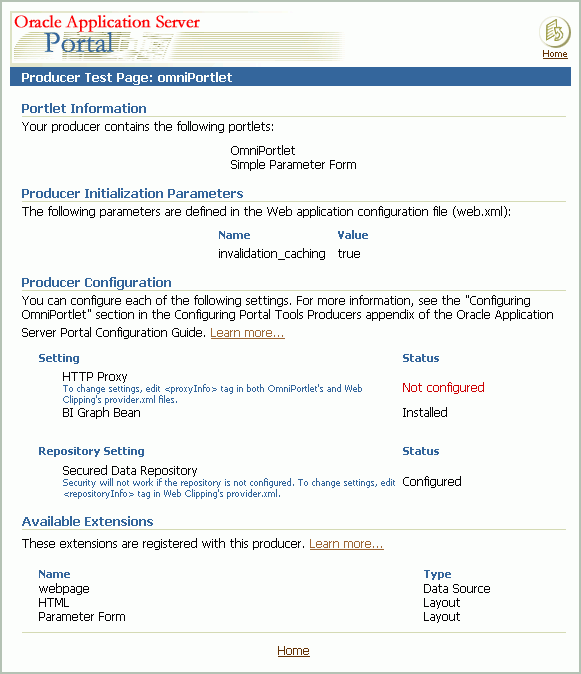
Entering this URL in your browser displays the OmniPortlet producer test page (Figure 5-48).
Figure 5-48 OmniPortlet Producer Test Page
Description of "Figure 5-48 OmniPortlet Producer Test Page"
-
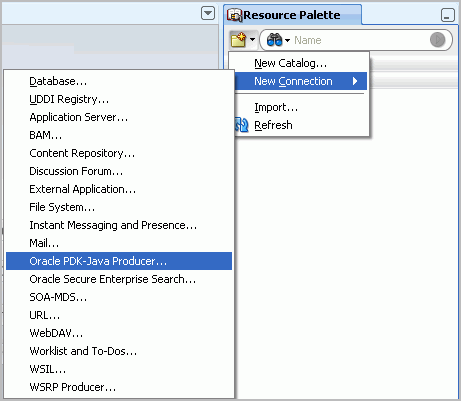
In the Resource Palette, click the New icon next to the search toolbar, then choose New Connection, and then Oracle PDK-Java Producer (Figure 5-49).
Figure 5-49 Registering an Oracle PDK-Java Producer
Description of "Figure 5-49 Registering an Oracle PDK-Java Producer"
-
On Step 1 of the Register Oracle PDK-Java Portlet Producer wizard, let's enable this portlet producer to be used across all our applications. Select Resource Palette.
-
In the Name field, enter
OmniProducer(Figure 5-50).Figure 5-50 Naming the OmniPortlet Producer
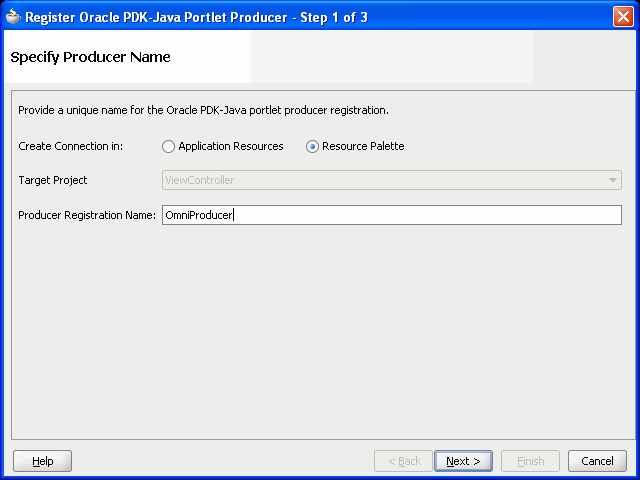
Description of "Figure 5-50 Naming the OmniPortlet Producer"
-
Click Next.
-
Enter this URL for the OmniPortlet Producer Test Page, which you copied earlier in the URL Endpoint field (Figure 5-51).
Figure 5-51 Specifying the Connection Details for the OmniPortlet Producer
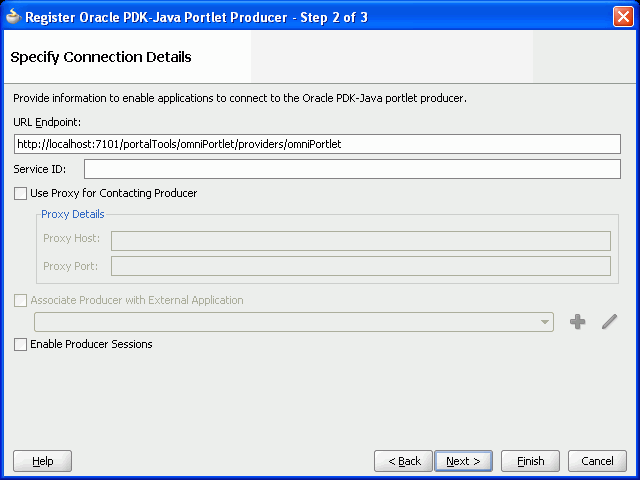
Description of "Figure 5-51 Specifying the Connection Details for the OmniPortlet Producer"
-
Click Next.
-
On the Registration Details page, click Finish. You should see a message indicating that Oracle JDeveloper is registering your producer.
Because you chose to register the portlet producer in the Resource Palette, your new portlet producer displays in the IDE Connections list of the Resource Palette, as shown in Figure 5-52.
Figure 5-52 OmniProducer in the IDE Connections List
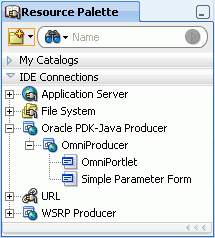
Description of "Figure 5-52 OmniProducer in the IDE Connections List"
Step 8: Add an OmniPortlet to Your Page
One type of portlet you can use with Oracle WebCenter Framework is OmniPortlet. This portlet is provided out of the box, and is preconfigured on the Default Server. It lets you quickly create portlets using a variety of default layouts and data sources.
Figure 5-53 shows a sample portlet you can build with OmniPortlet. The portlet displays items stored in a database as images, which are stored locally. After you wire this portlet with the portlet you created in "Step 1: Create a Standards-Based Java (JSR 168) Portlet", a user can click these images in your application to learn more about that item.
Before you can use this OmniPortlet, ensure that you have added the sample schema to your database and that you have started the Default Server as described in Chapter 2, "Preparing for the Tutorial." Also, ensure that you have registered the OmniPortlet producer, as described in Step 7: Register the Preconfigured Portlet Producer.
-
In Oracle JDeveloper, ensure MyTutorialApplication is open.
-
In the Application Navigator, ensure the
MyPage.jspxis in the Design view. If you've closed your application, you can double-click the page name in the Application Navigator. -
In the Structure window, locate the Panel Customizable in second facet, where you added the Documents and Tags services.
Note:
As previously mentioned, you can use the pushpin in the Structure window to freeze the current view. For this step, you should click MyPage in the Design view, then ensure the pushpin is in the “freeze” position (pressed). -
Open the Layout Customizable facets, then open
contentBto expose the Panel Customizable (you added the standards-based Java (JSR 168) portlet tocontentA), as shown in Figure 5-54.Figure 5-54 Panel Customizable in contentB
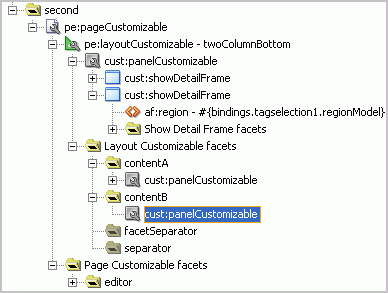
Description of "Figure 5-54 Panel Customizable in contentB"
-
In the Resource Palette, under IDE Connections, navigate to Oracle PDK-Java Producer > OmniProducer > OmniPortlet (Figure 5-55).
Figure 5-55 OmniPortlet in the Resource Palette
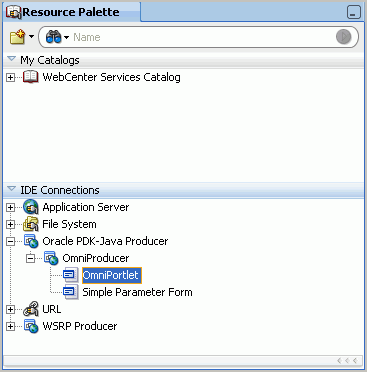
Description of "Figure 5-55 OmniPortlet in the Resource Palette"
-
Drag and drop OmniPortlet onto your page onto the Panel Customizable under contentB in the Structure window. OmniPortlet displays in the Design view of your page, as shown in Figure 5-56. If you see an error message, ensure you have started the Default Server, then try again.
For more troubleshooting tips on using OmniPortlet, refer to Oracle Fusion Middleware Developer's Guide for Oracle WebCenter.
Figure 5-56 OmniPortlet Instance on MyPage at Design Time
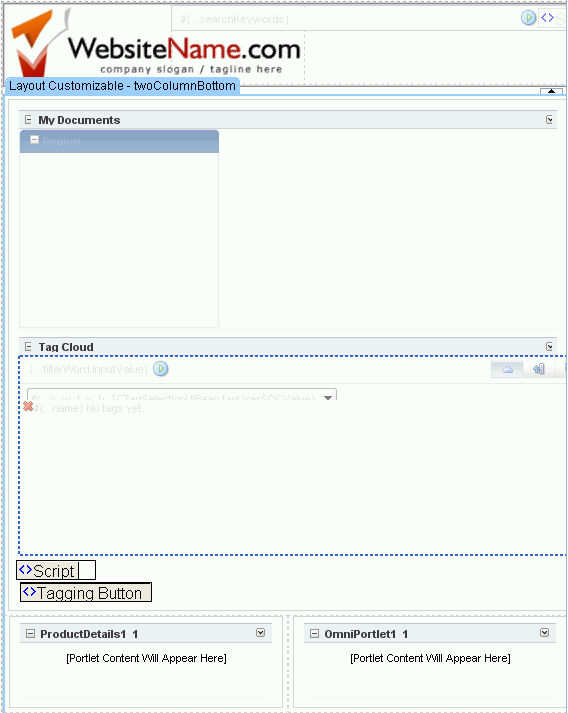
Description of "Figure 5-56 OmniPortlet Instance on MyPage at Design Time"
-
Now that we've added OmniPortlet to our page, let's customize its contents.
Run your page to the browser.
Figure 5-57 shows the OmniPortlet on MyPage in your browser.
Figure 5-57 Undefined OmniPortlet at Runtime

Description of "Figure 5-57 Undefined OmniPortlet at Runtime"
Step 9: Define OmniPortlet at Runtime
In this section, we'll customize our OmniPortlet to bring in some information from the database schema and the images we added to our application in Chapter 2, "Preparing for the Tutorial."
Since OmniPortlet is a preconfigured portlet, our only steps are to add it to our application, then customize it at runtime. Now that we've placed it on our page and run our page to the browser, let's customize the layout and content of this portlet.
-
In the upper right corner of the portlet, click the arrow, and choose Customize to launch the OmniPortlet wizard (Figure 5-59).
Figure 5-58 Customize Link for OmniPortlet

Description of "Figure 5-58 Customize Link for OmniPortlet"
-
On the Data Type page, choose SQL so that we can obtain data from the schema in a database, then click Next. At this point, be sure you've added the schema to your database (as described in Chapter 2, "Preparing for the Tutorial") and the images to your application resources (as described in Chapter 3, "Creating a WebCenter Application with a Customizable Page") otherwise the portlet will not retrieve the sample tutorial data.
If you're familiar with SQL and your database, you can always use your own sample data, but the ensuing images and steps may not necessarily be accurate for you.
-
On the Data Source page, we can define our SQL statement and set up the connection to the database where we installed the schema.
In the Statement box, enter the code in Example 5-7. The parameter in the statement will be used when we wire this portlet with the Products portlet we added in Step 5: Register the Standards-Based Portlet with Your Application.
Note:
If the formatting of the code in this text does not work, you can open theC:\TutorialContent\Portlets\OmniPortlet_SQL_Statement.txtfile and copy and paste the code from there.Example 5-7 OmniPortlet SQL Statement
SELECT product_name name
, cost_price our_price
, cost_price * 1.3 retail_price
, cost_price * 0.3 savings
, external_url image_url
, category_description
, supplier_name
FROM category_translations, products_base, suppliers
    WHERE products_base.category_id = category_translations.category_id
    AND products_base.supplier_id = suppliers.supplier_id
    AND products_base.product_id = nvl('##Param1##',0)
Note:
In the statement, you'll notice a reference to the localhost. This refers to the OmniPortlet producer you registered in Chapter 2, "Preparing for the Tutorial." Notice that you can also click the Test button to see what the statement will return. -
Under Connection, click Edit Connection.
-
Enter a name for your connection and the connection information for your database. The schema username is
fodand the password isfusion. For example, if you are using an Oracle XE database locally, the page would look like Figure 5-59.Figure 5-59 Connection Information for OmniPortlet
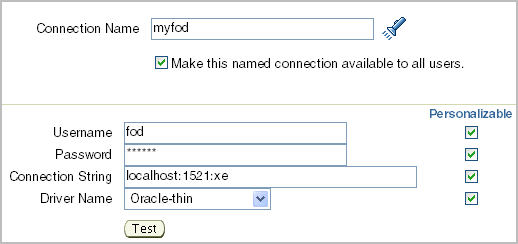
Description of "Figure 5-59 Connection Information for OmniPortlet"
-
Let's make sure the connection information is correct by clicking Test. Figure 5-60 shows a successful test message.
Figure 5-60 Successful Connection Message
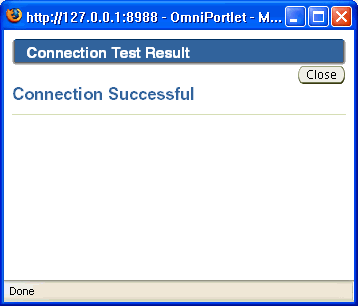
Description of "Figure 5-60 Successful Connection Message"
-
Click Close, then click OK to finish creating the connection.
-
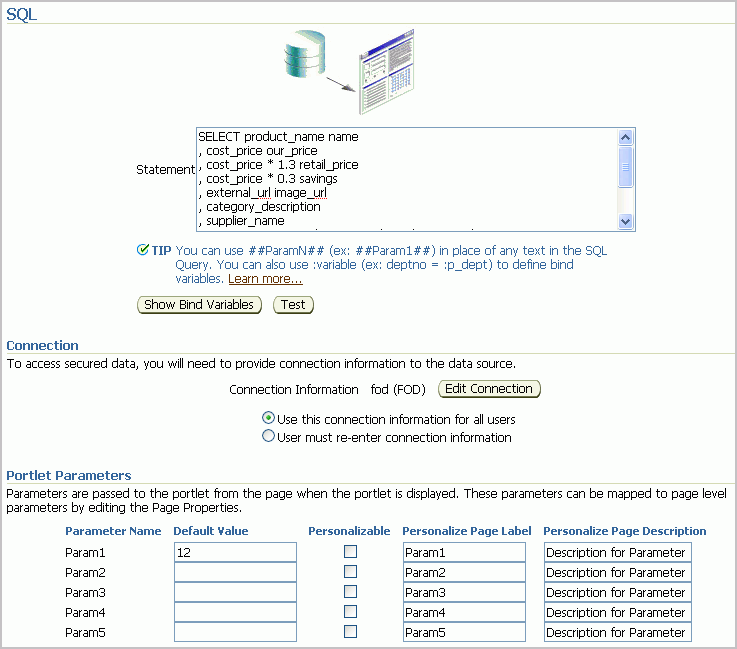
Under Portlet Parameters, set the Default Value for Param1 to
12. Doing so provides a default value for the parameter in our SQL statement.Figure 5-61 shows the SQL Source page.
Note:
If you do not have theimagesfolder in your ViewController project as described in Chapter 3, "Creating a WebCenter Application with a Customizable Page," the images referenced in the SQL statement will not display. You can go back and add these now by following Step 2: Add the Images Files to the Application, but you must run the application to your browser again in order for OmniPortlet to recognize the new folder. -
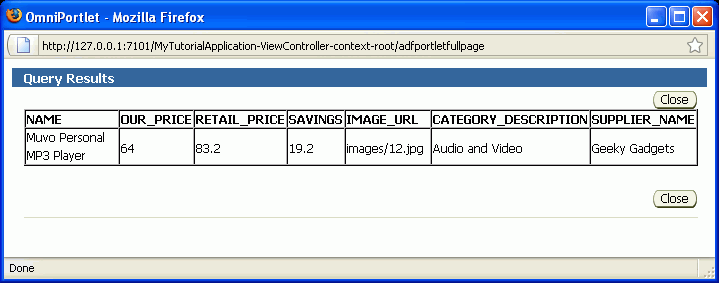
Click Test next to the Show Bind Variables button to validate the SQL statement and connection.
A pop-up window displays returning a row based on the statement. If you do not see a row returned, validate your SQL statement, connection, and portlet parameter.
-
Click Next.
-
On the Filter page, click Next.
-
On the View page, let's name the portlet, for example
Product Information, by entering the name in the Title field. -
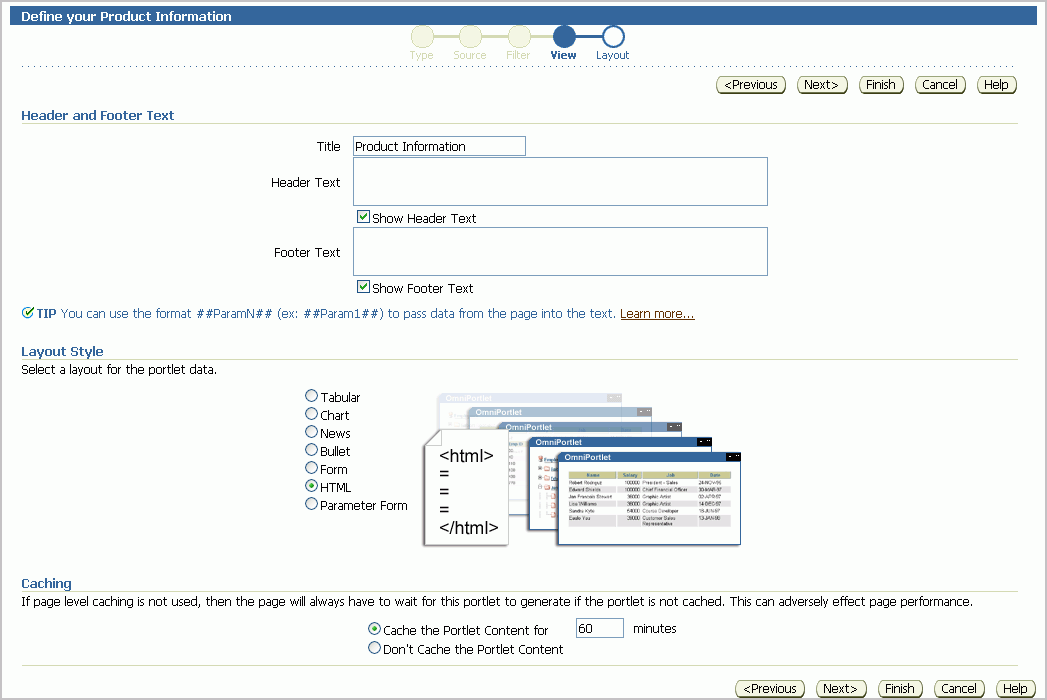
We can choose any of the default layouts for this portlet. However, let's check out the HTML layout, which you can use to fine tune the look and feel of your portlet.
Under Layout Style, select HTML, as shown in Figure 5-64, then click Next.
-
On the Layout page, you'll notice a form for filling in HTML for the template. Here, you can modify the layout of your portlet by updating the Header, Body, and Footer fields. You can use the default layout that OmniPortlet provides, but let's step through creating our own HTML layout.
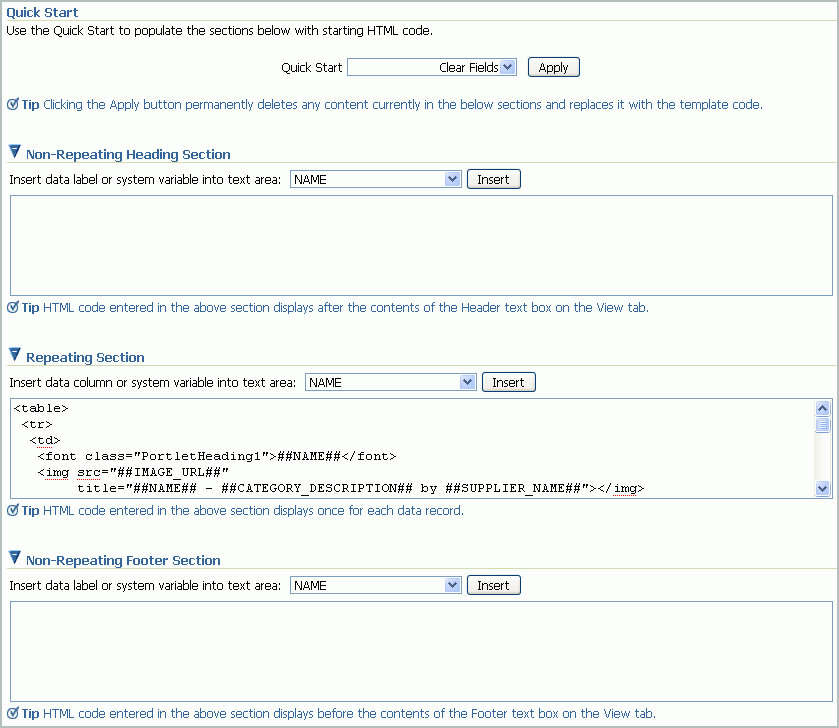
From the Quick Start list, select Clear Fields, then click Apply. Doing so removes the existing HTML code from the layout template.
-
In the Repeating Section, enter the HTML in Example 5-8 to create a table that formats the data.
Note:
If the formatting of the code in this text does not work, you can open theC:\TutorialContent\Portlets\OmniPortlet_HTML_Layout.txtfile and copy and paste the code from there.Example 5-8 OmniPortlet HTML Layout Code
<table> <tr> <td> <font class="PortletHeading1">##NAME##</font> <img src="##IMAGE_URL##" title="##NAME## - ##CATEGORY_DESCRIPTION## by ##SUPPLIER_NAME##"></img> </td> <td> <table> <tr class="PortletText2"> <td> Product supplied by <font class="PortletHeading3"> ##SUPPLIER_NAME## </font> </td> </tr> <tr class="PortletText2"> <td> List price: $##RETAIL_PRICE## </td> </tr> <tr class="PortletHeading2"> <td> Our price: $##OUR_PRICE## </td> </tr> <tr class="PortletText2"> <td> You save: $##SAVINGS## </td> </tr> <tr class="PortletText2"> <td> <font class="PortletHeading2">Availability:</font> In Stock. Ships from and sold by <font class="PortletHeading2">FusionOnline.com</font> . Gift-wrap available. </td> </tr> <tr> <td> </td> </tr> </table> </td> </tr> <tr class="PortletText1"> <td colspan="2">Want it delivered Thursday? Order it in the next 22 hours and 45 minutes, and choose One-Day Shipping at checkout.</td> </tr> </table>The Layout page should now look like Figure 5-65.
-
Click Finish. Figure 5-66 shows the OmniPortlet in your browser.
Figure 5-66 Completed OmniPortlet at Runtime
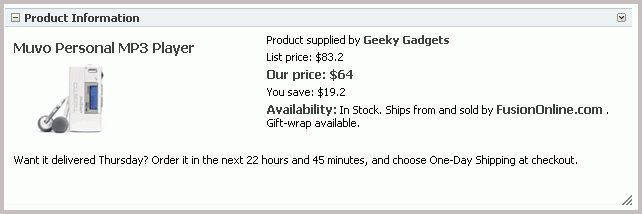
Description of "Figure 5-66 Completed OmniPortlet at Runtime"
Now that we have created our two portlets, let's wire them.
Step 10: Wire the Standards-Based Portlet and OmniPortlet Together
When you added the code for the standards-based portlet called Products, you also included a parameter called productId. When you select different options in the Products portlet, the application will send this parameter to OmniPortlet so that it can display the details of a particular product with that product identification number.
We now must map the two parameters to each other, so that when you choose an option in the Products portlet, the information in OmniPortlet updates accordingly.
To wire the portlets:
-
In Oracle JDeveloper, ensure MyTutorialApplication is open.
-
In the Application Navigator, open the page definition file for the
MyPage.jspxpage. You can do this by opening the page definition file itself in the Application Navigator, or by right-clicking the page and choosing Go to Page Definition. -
In the Structure window, use the pushpin to freeze the current view. Ensure the MyPage Page Definition is selected in the Design view, then, in the Structure window, click the pushpin so that it is in the “freeze” position (pressed).
-
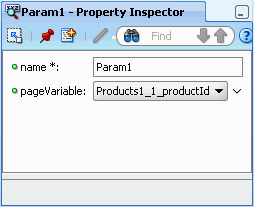
In the Structure window for the MyPagePageDef.xml (page definition) file, expand executables, expand OmniPortlet1_1 > parameters, then select the portlet variable Param1, as shown in Figure 5-67.
Figure 5-67 OmniPortlet Variable in the Structure Window
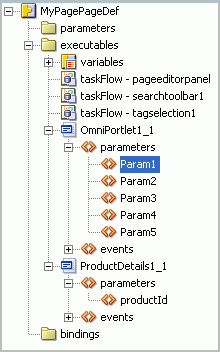
Description of "Figure 5-67 OmniPortlet Variable in the Structure Window"
-
While the variable is selected, you should be able to view the properties for it in the Property Inspector.
Set the pageVariable property to Products1_1_productId, as shown in Figure 5-68.
-
Now we want the detail portlet (OmniPortlet) to refresh whenever the value from the master portlet changes. To do so, we add a Partial Trigger to the detail portlet. Click the MyPage.jspx tab at the top of the Visual Editor to bring it into focus.
-
Select the OmniPortlet on the page in the Design view.
Figure 5-69 OmniPortlet on MyPage in the Design View
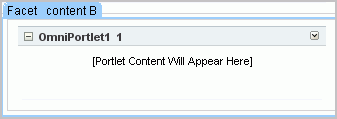
Description of "Figure 5-69 OmniPortlet on MyPage in the Design View"
-
In the Property Inspector for OmniPortlet, under Common, click the arrow next to PartialTriggers, then choose Edit (Figure 5-70).
Figure 5-70 Editing the PartialTriggers Property for OmniPortlet
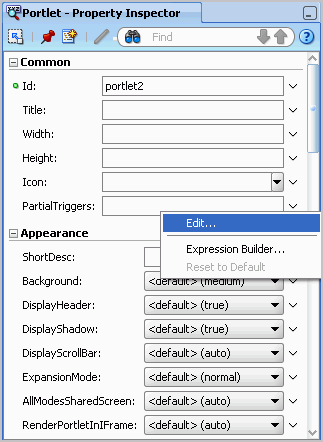
Description of "Figure 5-70 Editing the PartialTriggers Property for OmniPortlet"
-
In the Edit Property: PartialTriggers dialog box, the Portlet ID for OmniPortlet is automatically selected. Locate the Portlet ID for the Products portlet, which is in facet (
contentA), under the Panel Customizable (Figure 5-71).Figure 5-71 Locating the Portlet ID for the Products Portlet
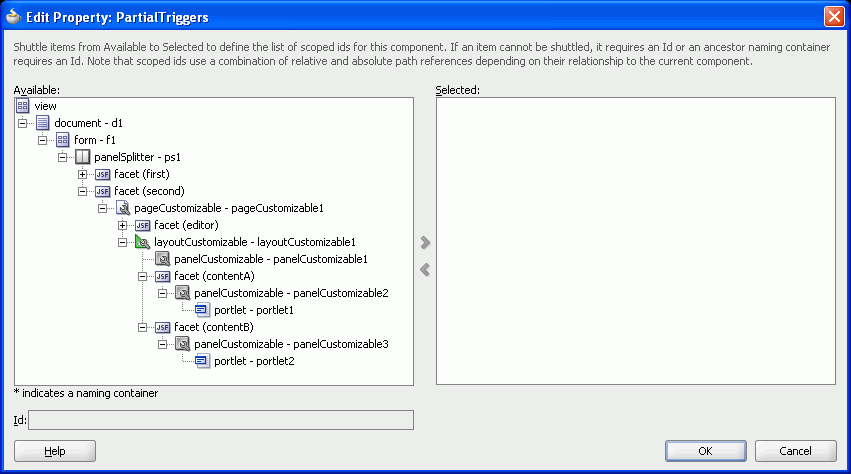
Description of "Figure 5-71 Locating the Portlet ID for the Products Portlet"
-
Select the Portlet ID, in this case portlet - portlet1, and click the right arrow to move it to the Selected list, then click OK (Figure 5-72).
Figure 5-72 Selecting the Portlet ID for the Products Portlet
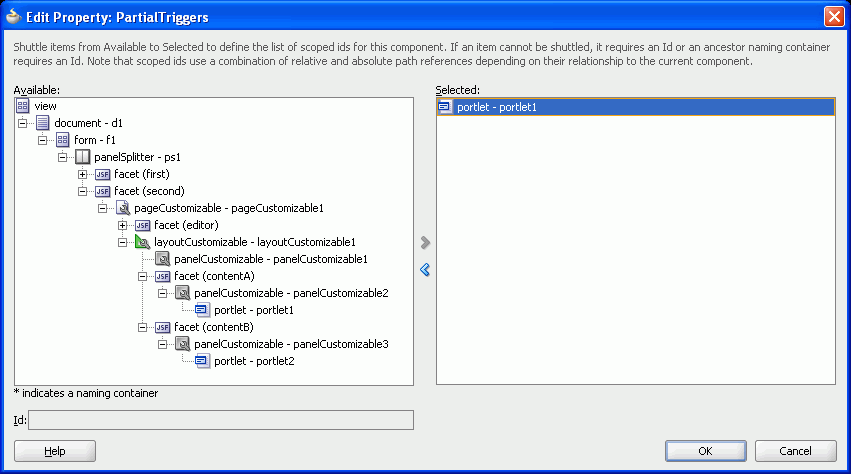
Description of "Figure 5-72 Selecting the Portlet ID for the Products Portlet"
-
Now that we've wired the portlet parameters, let's examine how they behave at runtime.
Run MyPage.jspx to your browser. In the next step, we'll test how the JSR 168 (Products) portlet and the OmniPortlet interact at runtime.
Step 11: Test the Interaction Between the Portlets
Let's test the portlets at runtime.
-
In the Products portlet, select an option, for example iPod Speakers, then click Show Details.
-
In the OmniPortlet, notice that the portlet updates to display information about the iPod speakers (Figure 5-73).
Figure 5-73 Testing the Interaction Between the Portlets
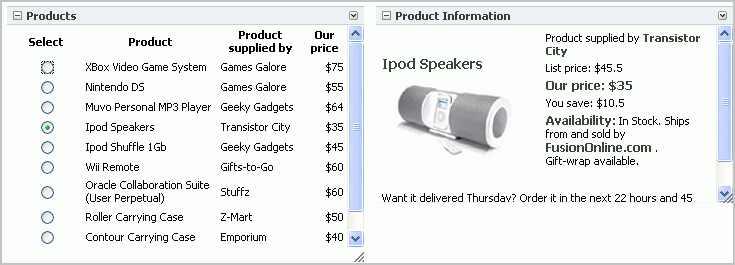
Description of "Figure 5-73 Testing the Interaction Between the Portlets"
Figure 5-74 shows MyPage in your browser.
Congratulations! You've completed this lesson and created two portlets and made them communicate with each other. Continue on to Chapter 6, "Conclusion" to review what you learned in this tutorial, and where you can find more information about the features you used.
