


|
|
This chapter describes when to use different types of Personalization and explains the relationships between the Interaction Management features.
This chapter includes the following sections:
Use Table 2-1 to determine which type of Interaction Management to develop.
This section contains the following topic:
|
|||
Display a graphic specific to the user type – when a certain type of user visits the portal, display a graphic specific to the user type.
|
Target specific users differently by creating a Placeholder with a default query for all users or a Placeholder used by a Campaign to target specific users differently. Use one of the following ways to show the same content node without content rotation:
|
||
Display personalized inline JSP content by creating User Segments and using the
<pz:div> JSP tag to wrap personalized content.
You can also use the following JSP tags to display inline JSP content based on the device that is viewing the content (for example, a handheld device or a PC):
<cscm:default>, <cscm:not-default>, <cscm:recognized>, <cscm:not-recognized>, <cscm:when>, and <cscm:when-not>. The cscm tags are Portal Multichannel JSP tags. The are contained in the client_taglib.jar file.
|
|||
Create and store e-mail message files and create a Campaign that uses an e-mail action. See
Building a Campaign.
|
|||
|
|||
Use the Rules Executor control in your Page Flows and Web Services. See Creating Advanced Personalization with Rules.
|
Interaction Management uses a variety of conditions that identify users and what they are doing.
When you build Interaction Management functionality, you use conditions to perform the following actions:
Figure 2-1 illustrates how personalized content is dynamically displayed to users with a Content Selector. Conditions are captured, specific users are identified, and actions occur for those users.
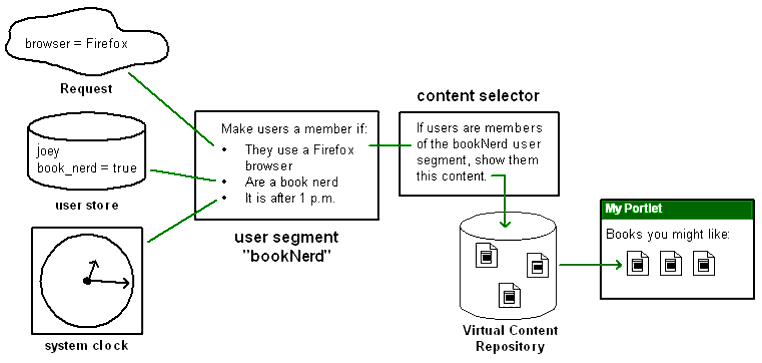
A rules engine runs behind the scenes on a server in a portal domain, reads all available conditions in memory, evaluates those conditions against the rules you created, and executes the actions you defined if the conditions match your rules.
For example, the following list contains some of the conditions that a Campaign can use to determine which users to target with personalized content:
Adding Personalization to your portal can involve setting up several related pieces. The checklist in Table 2-2 includes items that you should consider when planning a personalized portal.
Determine the content you want to display, when it should display, and set specific properties on your content items. For example, you can use Workshop for WebLogic to add properties to your content that can make an image clickable, end a Campaign after a specific number of clicks, start a movie, provide a clickable URL, and so on. See
Setting up Content
for instructions. You should also consult the Content Management Guide for information on creating and maintaining a virtual content repository.
|
||||
Property sets use properties to create conditions that uniquely identify users. The properties you create in Workshop for WebLogic are used in the conditions you define for your Personalization logic. For example, you could create a NewHire property set to target these users with benefit enrollment information.
Workshop for WebLogic provides editors to help you define the following properties to create conditions that identify users:
Based on the logic conditions, each user is dynamically served personalized, accurate web content, automatic e-mails, and discounts. See Creating a Property Set for instructions.
|
||||
Access existing users in external databases or add new users to your portal. For instructions on setting up and managing users, see the
User Management Guide.
|
||||
You can create User Segments to dynamically categorize users based on conditions or criteria that define the target visitor. Those conditions can include characteristics, such as occupation, browser type, User Profile values, or other user properties.
For example, you could classify all users who ordered more than five on-demand movies in the last 30 days If visitors match the defined characteristics, they automatically become members of that User Segment and are shown specific web content with Content Selectors or are targeted with Campaign Actions.
User Segments can be used over and over in Content Selectors, Placeholders, and Campaigns. See Creating a User Segment for instructions.
|
||||
A Content Selector lets you target specific groups of people with content items from the WLP Virtual Content Repository. For example, after you create a User Segment to trigger Personalization, you can create a Content Selector that defines the content that is shown to users in a specific User Segment. You could display a list of recommended movies to users identified as movie fans. For instructions, see Creating a Content Selector.
|
||||
A Placeholder displays a single personalized content item on a JSP. The content item is dynamically retrieved from the WLP Virtual Content Repository.
A Placeholder uses queries to retrieve and display one piece of content at a time. For example, if a user is identified as a bird lover, a Placeholder in a Campaign can display an image of a bird with a store discount. The image can change with a browser refresh to show other birds as well. You can also use Placeholders by themselves to display specific types of non-personalized content that is not provided by a Campaign. See Creating a Placeholder.
|
||||
A Campaign lets you target specific users with a single piece of personalized content at a time, automatically send them a predefined e-mail, or provide a discount in a commerce application. You must add commerce services to your portal application.
Campaigns run for a limited time and drive online behavior and Personalization to achieve a specific business goal. Your Marketing Department generally drives the content of a Campaign. For instructions, see Building a Campaign.
|
||||
You can use events to trigger Campaigns, persist event data in the database, and other actions. Events are generated when users interact with a web interface, such as logging in, clicking or viewing a graphic, clicking a button, navigating to another page in a portal, and so on. These events that occur in a user’s path through your portal are logged to the database, so you can analyze the user behavior in your portal. For example, you could determine how many users have registered in a portal and then create a Campaign that automatically sends each user a welcome e-mail when the registration event occurs.
You can also be notified of custom events at runtime and respond accordingly. You might decide to forward events to another system or make runtime decisions on the basis of those events.
See Setting Up Events and Behavior Tracking for more information.
|
One of the most important benefits of using Interaction Management is that the logic is decoupled from your source code. The files you create (Campaigns, Placeholders, Content Selectors, and so on) contain the Personalization logic and content queries, and your code references those files. For example, Campaigns show web content using a JSP tag called a Placeholder.
The next step is to define your Campaign to use the existing Placeholders, each of which can display content unique to the Campaign and to the individual users. Campaigns can change and new ones can be added, but you never have to change your JSP code. The Placeholders you need in the JSPs stay the same.
Campaigns provide a broad set of features for delivering personalized functionality, such as displaying personalized web content, triggering email messages, and calculating dynamic commerce discounts. For detailed information about campaigns, see Building a Campaign.
The following sample use cases illustrate some ways to use Campaigns to deliver personalized content and functionality:
| Note: | Campaigns and Behavior Tracking are not currently supported for anonymous, non-trackable users. See the User Management Guide. |
If you plan to use a Campaign in your portal, use the checklist in Table 2-3.
See the
WebLogic Portal Tutorials.
|
||
When you show personalized content with a Campaign (using a content rule), the content is retrieved from the WLP Virtual Content Repository and displayed in a Placeholder. There are many properties you can add to your content that enable necessary and helpful features for Campaigns For example, to increase the chances of a specific content item being shown in a Placeholder, create an adWeight property (as an Integer) for your content items. The greater the adWeight number you enter for a content item, the greater the chances that it will be displayed in a Placeholder if it is retrieved by a query.
For more information on setting up content for use in Interaction Management, see Setting up Content.
|
||
Goal Setting ends a Campaign based on the number of content items displayed or clicked. For more information on Goal Setting, see Planning Your Campaign Logic and Setting Goal Definitions.
|
||
Campaigns use Placeholders to display personalized web content. If you display personalized content through Campaigns, create the Placeholders that will hold your Campaign queries and display the web content.
For more information on Placeholders, see Creating a Placeholder.
|
||
If you want to trigger a Campaign based on users who are grouped dynamically based on specific characteristics, create User Segments. For more information on User Segments, see
Creating a User Segment.
|
||
If you plan to trigger a Campaign based on properties from users, events, HTTP sessions, or HTTP requests, perform the following relevant procedures:
For more information on how these properties are used in Interaction Management, see Setting up a Property Set.
|
||
You can send automatic e-mails in a Campaign. Follow the steps in Setting Up Automatic E-Mail Messages.
|
||
Set up a Regular or Behavior Tracking event that start your Campaign. A commonly used event is
SessionLoginEvent. For instructions, see Triggering a Campaign.
|
WebLogic Portal’s event framework provides many options for generating and handling events, to track the behavior of visitors to your portal. This section provides guidelines to help you determine the pieces of the event framework you want to use to implement the functionality you need.
This section contains the following topics:
WebLogic Portal provides many predefined Behavior Tracking events you can use in your applications, described in Using Predefined Events. Each event collects specific attributes and structures those attributes as XML, and the Behavior Tracking listener puts the XML in a buffer to insert into the BT_EVENT database table.
Most of the predefined events also have predefined event property sets in Workshop for WebLogic, stored in the portal application’s /data/src/events directory. These property sets let you use events in your Campaign definitions to trigger Campaign actions when the events occur or when events have specific attribute values.
The following list explains when to use WebLogic Portal’s predefined events:
If none of WebLogic Portal’s predefined events capture the specific combinations of attributes you need, create a custom event. There are two types of custom events you can create: Behavior Tracking events and regular events.
See Setting Up Events and Behavior Tracking for instructions on setting up events.
Create a custom Behavior Tracking event when none of Portal’s predefined events captures the event attributes you want and you want to use Portal’s Behavior Tracking framework to persist event data as XML in the BT_EVENT table. You can use these events in Campaigns and create a custom listener that performs special handling on the event, but unless you want to use the Behavior Tracking framework to store event data as XML, you do not need to create a custom Behavior Tracking event.
If you do not want to use the Behavior Tracking service, create a custom regular event.
Create a custom regular event when none of WebLogic Portal’s predefined events captures the event attributes you want and you do not want to use the Behavior Tracking service for persisting event data as XML in the BT_EVENT table.
The following list describes when to create a custom regular event:
WebLogic Portal provides two listeners: a Campaign listener and a Behavior Tracking listener.
The Campaign listener tells the Campaign service when an event has occurred (with the exception of the ignored events in the wps.jar file’s listener.properties file). The Campaign service reads the current request and executes Campaign actions if the request data matches the conditions of any of your Campaigns. If your Campaign definitions include any event conditions, which you were able to supply with event property sets, the Campaign service evaluates those as well to determine if it must execute Campaign actions.
The Behavior Tracking listener listens for only the Behavior Tracking events that are registered with the Behavior Tracking service. When it receives an event it is interested in, it moves the XML document for that event into a buffer for later persistence into the BT_EVENT table at an interval you determine.
Create a custom event listener if you want to execute functionality not provided by the Campaign listener or the Behavior Tracking listener. For example, if you want to perform your own event data persistence, modify a User Profile, redirect the user to another part of a Page Flow, or provide any other type of real-time response to the event, create a custom event listener that provides the functionality you want.
See Setting Up Events and Behavior Tracking for more information.
After you create Property Sets, User Segments, Content Selectors, Placeholders, and Campaigns in Workshop for WebLogic, you can modify the settings and queries for those components in the WebLogic Portal Administration Console For instructions, see Modifying Property Set Values, Modifying a User Segment, Modifying a Content Selector, Modifying a Placeholder, and Managing a Campaign.
If you need to create new Interaction Management features or modify properties, use Workshop for WebLogic and then iteratively push your updates to the running server. For more information, see the Production Operations Guide.
When you run the Oracle WebLogic Upgrade Wizard, the wizard upgrades your WebLogic Portal 8.1 or 9.2 interaction features, such as Content Selectors, Placeholders, Campaigns, and so on.
When you run the Oracle WebLogic Upgrade Wizard and it detects your Portal 8.1 or 9.2 installation, you can select the Upgrade RDBMSAuthenticator option. Selecting this option replaces the existing authentication provider with the new SQLAuthenticator authentication provider and upgrades all content, including personalization features. You can also choose to manually upgrade your personalization features from Portal 8.1 SP4, SP5, or SP6 to the Portal 10.0 RDBMS user store later. For step-by-step instructions on running the Oracle WebLogic Upgrade Wizard, see the Upgrade Guide.


|
