|
|
The process of optimizing your portal for the best possible performance spans all phases of development. You should continually monitor performance and make appropriate adjustments.
This chapter describes performance optimizations that you can incorporate as you develop your portal.
For information about fine-tuning your portal application after it has been deployed, please refer to the Performance Tuning Guide. For information about capacity planning, see the Capacity Planning Guide.
| Note: | The Performance Tuning Guide and the Capacity Planning Guide are typically available online three months after the release of a particular version of WebLogic Portal. |
This chapter contains the following sections:
Asynchronous rendering improves overall portal performance by allowing the contents of portlets to render independently of one another.
WebLogic Portal supports two methods of asynchronous rendering: portlet-specific and desktop. With portlet-specific asynchronous rendering, you can choose which portlets will render asynchronously. With asynchronous desktop rendering, all portlets within a portal desktop render asynchronously.
This section discusses asynchronous desktop rendering primarily. For detailed information on portlet-specific asynchronous rendering, see the chapter “Optimizing Portlet Performance” in the Portlet Development Guide.
| Note: | The Collaboration portlets, such as the Calendar portlet, will not operate correctly when the desktop or portlet asynchronous mode is enabled. Async mode is not supported for Collaboration portlets. For information on Collaboration Portlets, see the WebLogic Portal Portlet Development Guide. |
This section includes these topics:
Both portlet-specific and desktop asynchronous rendering improve overall portal performance. Because only the portlets that have changed are updated (refreshed), users experience quicker overall response times. In addition to improving portal response times, asynchronous rendering decreases server load.
Consider choosing asynchronous desktop rendering if:
Consider choosing portlet-specific asynchronous rendering if:
You can configure asynchronous desktop rendering in Workshop for WebLogic and in the WebLogic Portal Administration Console. In both cases, you can choose one of three options:
Asynchronous desktop rendering in Workshop for WebLogic is set with the portal property called Asynchronous Mode. See Editing Portal Properties for details.
In the Administration Console, you can set asynchronous desktop rendering for specific desktops in the Advanced Properties section of the Desktop Details window. See Modifying Desktop Properties for details.
One of the most important variables that affects portal performance is portal framework controls. The more portal framework controls (pages, portlets, buttons, and so on) you have, the larger your control tree.
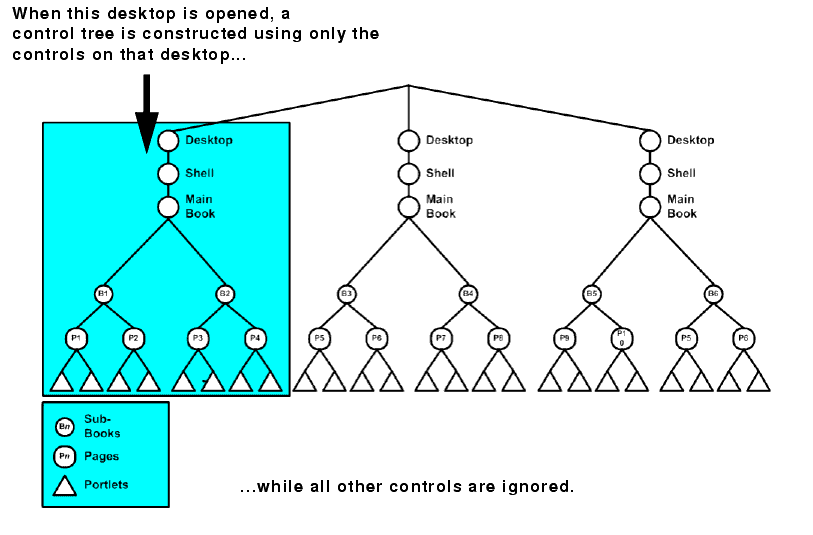
When a portal is instantiated, it generates a taxonomy, or hierarchy of portal resources, such as desktops, books, pages, and portlets. Each resource is represented as a node on the control tree, as shown in Figure 10-1.
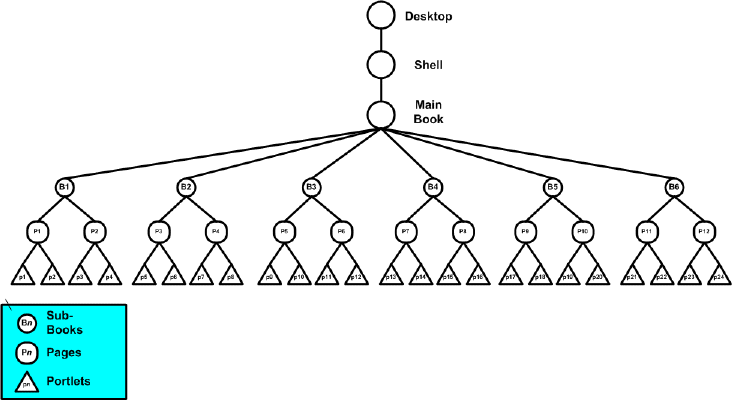
This example depicts a single portal with a main book containing six sub-books, which in turn contain two pages each, and each page contains two portlets each, for a minimum of 42 controls in the portal; the inclusion of buttons, windows, menus, and layouts increases the number of controls on the portal significantly.
| Note: | This example is significantly oversimplified; enterprise portals might include thousands of controls. |
Once the control tree is built and all the instance variables are set on the controls, the tree must run through the life cycle for each control before the portal can be fully-rendered. The life cycle methods are called in depth-first order. That is, all the init() methods for each control are called, followed by the loadState() method for each control, and so on in an order determined by the position of each control in the portal’s taxonomy. For example, the control tree illustrated in Figure 10-2 depicts the taxonomy a simple portal comprised of a book (B1) containing two pages (P1 and P2), which each contain two portlets (p1-p4; note that p2 also contains its own subordinate book, page, and portlet hierarchy).
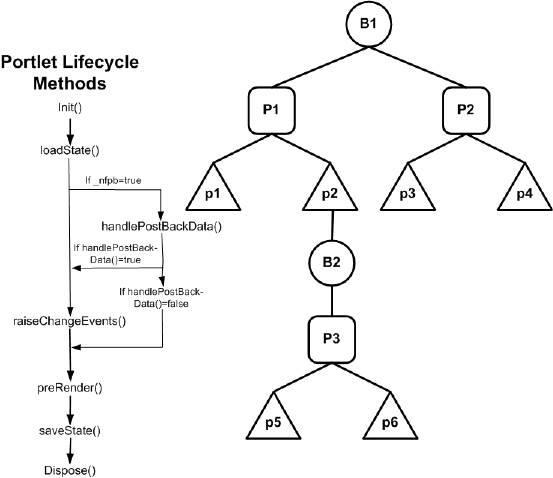
When this portal is rendered, the init() method (and handlePostBackData() if _nfpb=true) is called first, for each control, in this order: B1, P1, p1, p2, B2, P3, p5, p6, P2, p3, and finally p4. Next, the loadState() method would be called in the same order, and so on for all life cycle methods through saveState().
| Note: | Control life cycle methods preRender(), render(), and dispose() are called only on visible controls. |
Running each control through its life cycle requires some overhead processing time, which, when you consider that a portal might have thousands of controls, can affect performance. Thus, you can see that larger the portal's control tree the greater the performance hit.
The simplest way to limit the size of the control tree without limiting the flexibility of the portal is to split the portal into multiple desktops. In portal taxonomy, a desktop is nothing more than a portal embedded into another portal. It maintains the ability to leverage all of the features inherent in any portal and, within itself, can contain additional desktops.
When you split a complex portal into multiple desktops, you spread the controls among those desktops. Since the control tree is scoped to the individual portal and since a desktop behaves much like a portal, each desktop has its own tree and the controls on that tree are built only when that desktop is opened. Thus, by splitting a complex portal with a large control tree into multiple desktops, you reduce the number of controls on the tree to just that number necessary for the active desktop. As you might guess, this reduces the amount of time required to render the portal as a single desktop and increase portal performance.
When a portal is rendered, about 15% of the processing time is dedicated to constructing the control tree, 70% to running the life cycle methods, and 15% in garbage collection (clearing dead objects from the heap, thus releasing that space for new objects). While construction and garbage collection are always performed, running the life cycle methods is necessary only for visible controls (that is, those on the exposed desktop). This results in considerable overhead savings and improved system performance.
For example, the sample control tree depicted in Figure 10-1 shows a single portal with 42 controls. Were we to split this portal up into multiple desktops, as in Figure 10-3, while we would increase the number of control trees in the entire portal, each tree would be nearly two thirds smaller, and thus be processed in roughly two-thirds the time, significantly reducing the time required to render the portal.
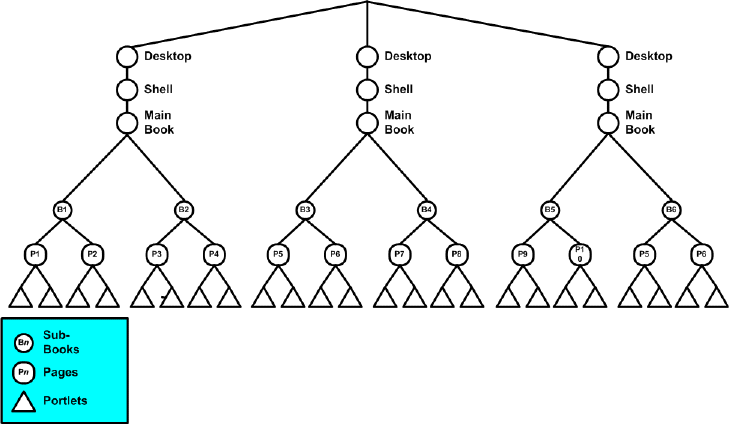
Figure 10-4 shows how the example in Figure 10-3 might be rendered once opened.
As these examples demonstrate, splitting a complex portal into multiple desktops can be very rewarding in terms of improved performance; however, not all portals benefit from the extra effort required to split them into multiple desktops. Before implementing a portal using multiple desktops, you need to consider some important design decisions. For example:
For more information on creating desktops, please refer to Desktops.
Tree optimization, as the name implies, means that control tree rendering is done in a way that creates the least amount of system overhead while providing the user with as complete a set of portal controls as that user needs to successfully use the portal instance.
| Note: | Asynchronous rendering can be used with control tree optimization. For more information about asynchronous portlet rendering, refer to the Portlet Development Guide. |
You enable control tree optimization by setting the treeOptimizationEnabled flag in the .portal file to true, as shown in Listing 10-1.
<desktop> element:
<netuix:desktop definitionLabel="defaultDesktopLabel"
markupName="desktop"treeOptimizationEnabled="true"markupType="Desktop" title="SimplePortal"><netuix:lookAndFeel
definitionLabel="defaultLookAndFeel">
<netuix:desktop/>
| Notes: | If treeOptimizationEnabled= is not included in the .portal file, the portal defaults to treeOptimizationEnabled=false. |
When this flag set to true, the portal framework generates a partial control tree instead of the full control tree, basing this tree on just the controls that are visible and active. Thus, with fewer controls needing to be rendered, processing time and expense can be significantly reduced.
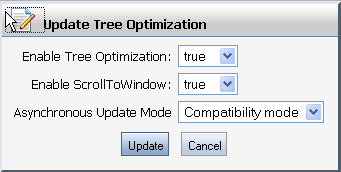
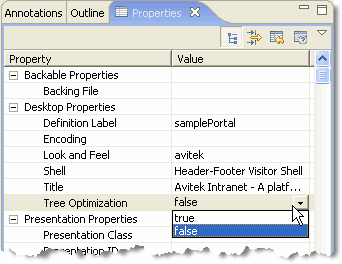
For portals, you can enable this flag by setting Tree Optimization to true in the Workshop for WebLogic Properties view, as shown in Figure 10-5.
| Note: | For new desktops, treeOptimizationEnabled="true" is the default value. |
Before the flag can actually work, the file beehive-url-template-config.xml (in Portal_Web_Project/webAppName/WEB-INF) must have {url:currentPage} set in the <url-template> element, as shown in Listing 10-2.
| Note: | When you create a new project in Workshop for WebLogic, currentPage is added automatically; however, if you are migrating from an earlier version of WebLogic Portal, you must manually update beehive-url-template-config.xml. |
<!-- URL templates -->
    <url-template>
        <name>default</name>
<value>{url:scheme}://{url:domain}:{url:port}/{url:path}?{url:queryString}{url:currentPage}</value>
    </url-template>
    <url-template>
        <name>default-complete</name>
<value>{url:scheme}://{url:domain}:{url:port}/{url:prefix}/{url:path}?{url:queryString}{url:currentPage}</value>
    </url-template>
    <url-template>
        <name>jpf-default</name>
<value>http://{url:domain}:{url:port}/{url:path}?{url:queryString}{url:currentPage}</value>
    </url-template>
    <url-template>
        <name>jpf-action</name>
<value>http://{url:domain}:{url:port}/{url:path}?{url:queryString}{url:currentPage}</value>
    </url-template>
    <url-template>
        <name>jpf-secure-action</name>
<value>https://{url:domain}:{url:securePort}/{url:path}?{url:queryString}{url:currentPage}</value>
    </url-template>
    <url-template>
        <name>jpf-resource</name>
<value>http://{url:domain}:{url:port}/{url:path}?{url:queryString}{url:currentPage}</value>
    </url-template>
    <url-template>
        <name>jpf-secure-resource</name>
<value>https://{url:domain}:{url:securePort}/{url:path}?{url:queryString}{url:currentPage}</value>
    </url-template>

 <url-template-ref-group>
		<name>default-url-templates</name>
		<url-template-ref>
			<key>action</key>
			<template-name>jpf-action</template-name>
		</url-template-ref>
		<url-template-ref>
			<key>secure-action</key>
			<template-name>jpf-secure-action</template-name>
		</url-template-ref>
		<url-template-ref>
			<key>resource</key>
			<template-name>jpf-resource</template-name>
		</url-template-ref>
		<url-template-ref>
			<key>secure-resource</key>
			<template-name>jpf-secure-resource</template-name>
		</url-template-ref>
	</url-template-ref-group>
When the portal servlet receives a request (that is, a mouse-click) it reads the cache to determine if a control tree factory exists. If one doesn’t, it calls controlTreeFactoryBuilder, passing it the XML from the .portal file. This class returns a control tree factory to the servlet, which passes the request to the CreateUIControlTree class.
Assuming _pageLabel and treeOptimizationEnabled="true", CreateUIControlTreeFactory calls the PartialUIControlTreeCreator() method, which returns a control tree comprised of just the control identified by the page label and the set of active page and book labels; this is a partial control tree.
For example, if tree optimizations were enabled for the portal depicted in Figure 10-4, when you submit a request (that is, a mouse click), only the active controls would be rendered, as illustrated in Figure 10-7.
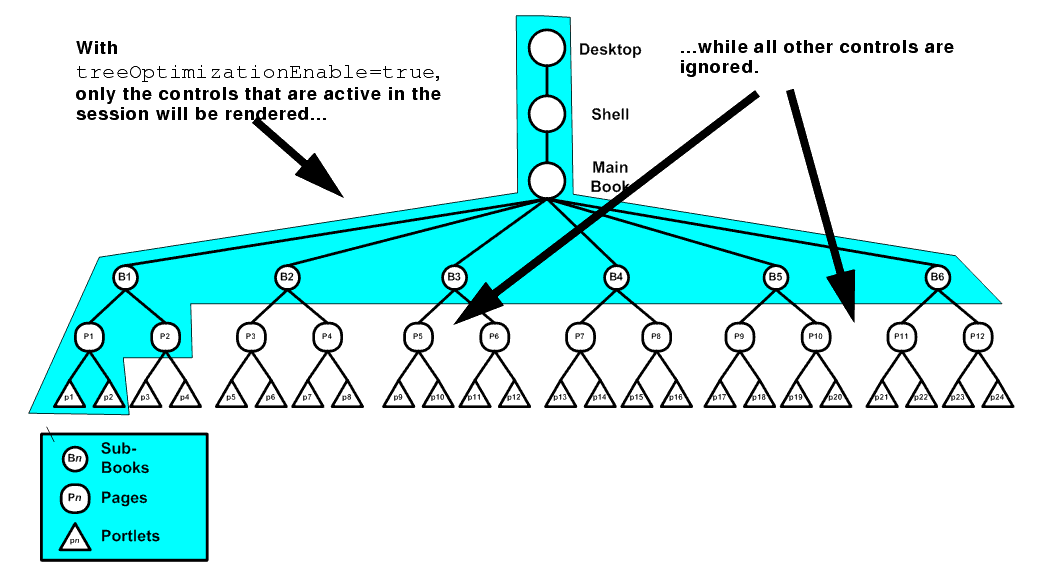
The set of active page and book labels for that session stored during the saveState() life cycle method execution tell PartialUIControlTreeCreator() which controls to build. Only these controls will be built; all others in the portal are ignored. As you can see, a significant amount of processing overhead is eliminated when the control tree is optimized—since far fewer controls need to be built—resulting in greatly improved performance.
Single Level Menus provide significantly better performance in very large portals than Multi Level Menus. Although every environment is different, an example of a very large portal might include one that contains 40 books, with each book having 10 pages, and each page having 10 portlets, for a total of 4000 portlets; a typical user load might be 2000 concurrent users.
With Single Level Menus enabled in an example environment, the response time of the system is at least twice as fast when compared with portals having Multi Level Menus. The reason for this is that the Multi Level Menu must traverse the control tree to be able to build the menu, regardless of whether control tree optimization is turned on. There is still an advantage to using control tree optimization with a multi level menu, but system performance is not a primary reason to do so.
If you are creating complex portals that require a large number of controls, tree optimization is the easiest way to ensure optimal portal performance. Controls that aren’t active in the current portal instance aren’t built, saving considerable time and overhead. Nonetheless, you need to be aware that tree optimization slightly changes a portal’s behavior and some portal implementations will not have substantial benefit; for example:
init() and handlePostBackData() are called for both visible and non-visible controls; when tree optimization is enabled these lifecycle methods are called only for visible controls.On DesktopBackingContext, BookBackingContext, and PageBackingContext, the following methods return null if they are trying to access a page, book, or portlet that is not in the partial tree
public BookBackingContext getBookBackingContextRecursive(String definitionLabel)public PageBackingContext getPageBackingContextRecursive(String definitionLabel)public PortletBackingContext getPortletBackingContextRecursive(String instanceLabel)public PortletBackingContext[] getPortletsBackingContextRecursive(String definitionLabel)
You might experience the same behavior—or lack thereof—on DesktopPresentationContext, BookPresentationContext, and PagePresentationContext with the presentation versions of these methods:
public BookPresentationContext getBookPresentationContextRecursive(String definitionLabel)public PagePresentationContext getPagePresentationContextRecursive(String definitionLabel)public PortletPresentationContext getPortletPresentationContextRecursive(String instanceLabel)public PortletPresentationContext[] getPortletsPresentationContextRecursive(String definitionLabel)If the menu is on an active book, every control accessible from that menu must be created before the portal is completely rendered, thus more overhead and a greater performance hit. On the other hand, because a multi-level menu results in the creation of a skeletal control tree, it can reduce the number of request cycles required to navigate to your desired destination, reducing the total overhead required to accomplish a navigation.
Overall, single-level menus provide significantly better performance in very large portals than multi-level menus. Although every environment is different, an example of a very large portal might include one that contains 40 books, with each book having 10 pages, and each page having 10 portlets, for a total of 4000 portlets; with a typical user load of 2000 concurrent users. With single-level menus enabled in an example environment, the response time of the system is at least twice as fast when compared with the same portal using multi-level menus.
You can work around this problem by doing one of the following (this is the preferred order):
._nfto=”false” in the invoking link. This causes the full control tree to be created for that single request.
When the “tree optimization” flag in a .portal file is turned on, not all non-visible portlets for a given request are processed. (A non-visible portlet is one that lives on a page that is not displayed for the given request.) This can be a problem if you are trying to catch an onDeactivation event for a portlet—once the portlet has been deactivated, it is no longer visible, and so the system doesn't process it to fire its deactivation event. The recommended workaround is to set tree optimization to false for the portal in question. However, there is a trick you can play if you need the tree optimization. For each portlet that you want to catch deactivation events for, define a dummy event handler (for example, create a custom event handler with event = "[some nonsense string]" and set the property “Only If Displayed” to false. This forces the system to process the portlet whether visible or not.
Mindful of these conditions, never set treeOptimizationEnabled to true without first doing a complete regression test on the portal. If any of the above-listed problems occur, you might want to rethink your portal design or disable tree optimization completely.
As discussed above, although control tree optimization can benefit almost any portal, behavioral limitations might require that you disable it. When you disable optimization, the portal creates a full control tree upon every request. Be aware that this could significantly impede the performance of very large portal. You need to decide whether the anticipated performance hit is offset by the improvement in functionality.
To disable tree optimization, do one of the following:
Include nfto=”false” in the request parameter of just that instance for which you want to disable tree optimization. The parameter needs to be added to URL programmatically as the URLs are generated using framework classes GenericURL and PostbackURL; for more information on these classes, see the WebLogic Portal Javadoc.
The following code shows one way to adding this parameter:
PostbackURL url = PostbackURL.createPostbackURL(request, response);
   url.addParameter(GenericURL.TRE_OPTIMIZATION_PARAM, "false");
In addition to managing the taxonomy of your portal through effective use of the control tree, WebLogic Portal offers other ways to improve performance. These solutions can all be used in concert with multiple desktops and control tree optimization, ensuring superior portal performance. This section describes the most effective performance-enhancing solutions available with WebLogic Portal.
Entitlements determine who can access the resources in a portal application and what they can do with those resources. This access is based on the role assigned to an application visitor, allowing for flexible management of the resources. For example, if you have an Employee Review portlet, you can assign the “Managers” visitor entitlement role you created to that portlet, letting only logged in users who belong in that role view the portlet.
Users visiting an application are assigned roles based on an expression that can include their name, the group that they are in, the time of day, or characteristics from their profile. For example, the “gold member” role could be assigned to a user because they are part of the frequent flyer program and have flown more than 50,000 miles in the previous year. This role is dynamically assigned to the user when they log into the site.
To ensure optimal portal performance, use entitlements judiciously. Too many entitlements can significantly impact performance. This happens because the entitlement engine is called during the render phase of an operation and is required to check system overhead and rules. Because this checking represents additional system overhead, if it is required too often on a portal, performance degrades. In addition, the entitlements engine is also responsible for managing administrative tasks, which increases that overhead, again causing degrading performance.
By default, entitlements are stored in the database as opposed to LDAP. Nonetheless, always be aware that too many entitlements can impede performance.
Here are some simple recommendation for using entitlements judiciously:
<control-resource-cache-size=nn> attribute to equal the number of desktops + number of books + number of pages + number of portlets + number of buttons (max, min, help, edit) used in a portal. Use the default value if you are concerned about available memory.Oracle recommends that you allow portal visitors to modify only one page or a small set of pages, and require that administrators control the remainder of pages.
When users customize a page, they obtain their own instance of that page. All other pages that have not been customized point back to the original library instance. When an administrator makes a change to a page, that change must iterate for each user who customized the page. If many users customized that page, propagating the change might take a long time because of the required database processing.
If your portal uses page flows portlets in a replicated clustering environment, you might experience a performance issue because the request attributes you add to these portlets might be persisted to the session as a component of a page flow portlet’s state. As more request attributes are added, the session grows, often to sizes that can severely restrict performance.
Page flow portlets are hosted within the Portal framework by the Scoped Servlet environment. This environment effectively acts as a servlet container, but its behavior causes the request attributes to be scoped to the session within a container class used to persist page flow state. This can be particularly unwelcome in clustered environments, when large amounts of data—including these page flow portlet request attributes—might be replicated across the cluster.
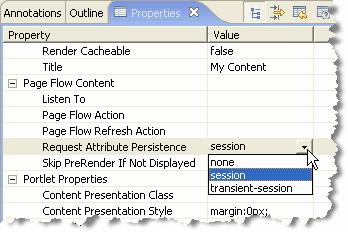
WebLogic Portal provides the Request Attribute Persistence (requestAttrPersistence) property for page flow portlets. This property is included in the .portlet file and can be set using the Properties view in Workshop for WebLogic.
The Request Attribute Persistence property has these values:
session: this is the existing behavior (this is the default). All existing page flow portlets should not require changes by default.transient-session: places a non-serializable wrapper class around a persisted page flow state object into the session. These portlets work just as the existing portlets, except in failover cases, where the persisted request attributes disappear on the failed-over-to server. In these cases you must write the forward JSPs to gracefully handle this contingency by, at minimum, not expecting any particular request attribute to be populated and, ideally, by having a mechanism to either repopulate the request attributes automatically or present the user with a link to re-run the last action to repopulate the request attributes. For non-failover cases, request attributes are persisted, providing a performance advantage for non-postback portlets identical to default session persistence portlets. While session memory is still consumed in this case, there will be no additional cluster replication costs for the persisted request attributes.none: performs no persistence operation. Since these portlets never have request attributes available on refresh requests, you must write the forward JSPs to assume the request attributes will not be available. This option is helpful when you want to remove completely the framework-induced session memory loading for persisted request attributes.To set the request attribute persistence attribute for a page flow portlet, open the Request Attribute Persistence drop-down under the Page Flow Content group in the Properties view and select the desired value, as shown in Figure 10-8.
Portals come in two flavors: file-based and streaming. As the name implies, a file-based portal—also called a “light portal”—obtains all of its resources from the user’s file system. Streaming portals, on the other hand, derive their resources from one or more databases.
A key difference between the two implementations is in the method you use to create and manage multiple portlet instances. Using a streamed portal, managed using the WebLogic Portal Administration Console, you can manage a single instance of a portlet while reusing it in many places; you can also easily create a large number of portlet instances and configure each one differently. Using a file-based portal you need to create individual source portlets within .portal files.
Streaming portals also provide you with the management capabilities of the Administration Console. For example, if you want to disable a portlet, you can do this task easily from the Administration Console; otherwise, you must directly access the production servers to change .portal files. The Administration Console also provides management functionality for book and page contents, and the ability to user visitor entitlements and delegated administration on different instances of resources.
For simple, static portals, deriving resources from the file system can result in improved performance and bring these benefits:
While file-based portals might show some performance improvement over streaming portals, their functionality is limited; for example, because no database is involved, you cannot take advantage of things such as user customization or entitlements. Other features that are missing from a file-based portal include:
Moreover, in the majority of cases, the performance improvement gained by using a file-based portal is not so significant as to outweigh these limitations.
While this tip doesn’t directly improve performance at runtime, it nonetheless allows you to see how your application will perform before you propagate it to production. By creating a production domain in development, you can simulate and then evaluate how the portal will perform in production. You can then make the necessary adjustments before actually deploying the portal. If problems occur or performance is not optimal, you can rectify these situations before the end user ever sees them.
To create a production domain, you must update the startup script settings by setting the WLS_PRODUCTION_MODE= flag to true and setting to false these flags:
Additionally, you must set default values for the threadcount and the JDBCConnectionPool sizes. If you are threading portlets (that is, using forkable=true) ensure that you configure a portalRenderQueue and portalPreRenderQueue in your config.xml file so that the forked portlets use their own thread pools and not the WebLogic thread pool. The following code sample describes how to set the thread count appropriately:
<ExecuteQueue Name="default" ThreadCount="15"/>
<ExecuteQueue Name="portalRenderQueue" ThreadCount="5"/>
You can optimize the performance of the portlets in your portal in several ways, including the following:
You can find more detail on each of these alternatives in the Portlet Development Guide.


|