|
|
This chapter covers a range of topics related to WebLogic Portal propagation. We recommend that you read this chapter before you attempt to propagate a portal.
| Note: | The propagation tools only work with inventories that were created using the same version of WebLogic Portal. For example, you cannot use an inventory generated with WebLogic Portal 10.0 with the propagation tools from a later version of WebLogic Portal. |
This chapter includes the following topics:
Figure 6-1 shows the basic flow of a typical propagation session. The basic steps illustrated include:
| Note: | These steps represent a typical propagation session. Other possible uses of the propagation tools exist. For instance, you could export an inventory and immediately (without merging) upload it to the destination and commit it. |
The following sections describe some preparation tasks to perform before propagating a portal application. For additional information about the propagation planning process, see Developing a Propagation Strategy.
| Note: | It is not recommended to propagate between source and destination systems that are running JVMs with different default locales. If the locales differ between the source and destination system, performance will be slower and the localization node of all Portal Framework assets will always be logged as a difference. |
The Administration Server must be running when you perform a propagation to allow certain LDAP data to be updated. A propagation can cause the following kinds of LDAP data to be added, deleted, or updated: visitor roles, delegated administration roles, entitlement policies, and delegated administration policies.
Back up your WebLogic LDAP repository using the steps in the “Avoiding and Recovering from Server Failure” section of the WebLogic Server documentation.
Back up your database using the vendor tools appropriate for your environment. Save a copy of the deployed application that you are propagating; you will be deploying an EAR to the existing application, which will overwrite the current configuration.
Before you import a final inventory to a destination system, take steps to prevent users from changing portal data. When the final inventory is being committed to the destination server, any changes made through the WebLogic Portal Administration Console or certain WLP API calls (such as content management APIs) can lead to unwanted side effects, such as lost data.
The OnlineMaintenanceModeTask Ant task can be used to prevent changes to the destination server. You can also use the WebLogic Portal Administration Console to place a server in maintenance mode. To do this, select the Configuration Settings > Service Administration > Maintenance Mode. For detailed information on OnlineMaintenanceModeTask, see OnlineMaintenanceModeTask. Workshop for WebLogic does not provide a maintenance mode feature.
The Workshop for WebLogic propagation feature is installed automatically when you install WebLogic Portal (unless you explicitly exclude it). The propagation Ant tasks require some additional configuration before you can use them. For information on installing and using the Ant tasks, see Using the Propagation Ant Tasks.
For information on configuring verbose log files in Workshop for WebLogic, see Enabling Verbose Logging.
If you created new resources for your web application using Workshop for WebLogic, including portlets, portals, books, pages, custom layouts, look and feels, menus, shells, themes, JSPs, or Java classes, you must deploy the J2EE application from the source system to the destination system at some point prior to committing the changes with the propagation tools.
| Tip: | It is a good practice to deploy the EAR file before you export the destination inventory. By doing this, you can reduce the number of manual changes you need to make after you commit the final inventory to the destination. |
When you deploy the J2EE application, changes reflected in the EAR file may or may not be propagated automatically, depending on whether your server is in production mode or development mode. For more information, see General Propagation Scenarios and Scenario 2: Redeploying an EAR file. For detailed information on deploying EAR files, see Deploying Portal Applications.
If you commit propagation changes without deploying the J2EE application, the inventory listing includes the new resources, but the resources are not displayed in the portal library on the destination system and the following destination database tables are not updated with new data:
For more information on these database tables and how they are used, see the Oracle WebLogic Portal Database Administrator Guide.
While the propagation tools propagate most portal data, there are some exceptions. Any portal assets that are not propagated must be added to the destination server using the WebLogic Portal Administration Console.
In general, the propagation tools do not propagate the following kinds of data:
Users and groups are, by design, not propagated.
You must create matching content repositories on the destination system before you can propagate content in those repositories.
| Note: | The workflow state of content nodes is not preserved during propagation for content items in a managed repository. During propagation, the workflow state of content nodes that were published on the source show up as DRAFT on the destination. To work around this issue, manually go to the destination nodes and publish each of them individually, or use the bulk loading feature in the Administration Console to perform this task. |
If you use the scoping mechanism to exclude assets that other assets depend upon, you must manually add the dependencies to the destination server. See Understanding Scope for more information.
| Tip: | For a comprehensive list of propagated and non-propagated portal resources, see Propagation Reference Table. |
Manual changes are reported to you in the following places:
| Note: | All manual adds cause the commit operations to fail. You can override this behavior using an Ant task modifier. Manual updates and deletes are reported as warnings, but do not cause the commit operation to fail. The propagation servlet writes information about all manual elections to the concise log file that is sent back to the client by the propagation servlet. You can view these messages by: |
Table 6-1 provides a comprehensive list of the categories and types of data that comprise a portal and whether or not the propagation tools move them. Any type of data that is not propagated by the propagation tools is noted in the Notes column. Data that is not propagated might require a manual change to be made on the destination server. For more information on manual changes, see Make Required Manual Changes.
|
|||||||
Not propagated. User customizations are preserved on the destination system, but may be modified when imported changes are applied to the destination. For more information, see User Customizations and Propagation.
|
|||||||
|
|||||||
|
|||||||
|
|||||||
|
|||||||
For more information on WSRP propagation, see Federated Portal (WSRP) Propagation.
|
|||||||
Propagation will not move the checkout status (if a user has an item checked out in staging, the user will not have it checked out in production after propagation). In a managed repository, a node that is published on the source will be in the “Draft” state when propagation adds it to the destination.
|
Security information consists generally of authentication data and authorization data. As Table 6-2 shows, authorization data consists of roles and policies, while authentication consists of users and groups.
Users and groups are never propagated by the propagation tools. In addition to user and group information, the propagation tools do not propagate the following:
Because roles contain user and group information, you need to consider how user and group information is stored for your staging and production system; these two systems may or may not share the same authentication repositories.
If your systems do not share the same authentication repositories for managing users and groups, then after propagating a portal, you must manually edit each role to add the appropriate users and groups on the destination system. If the systems do share the same authentication repositories, then no manual changes to roles need to be made after a propagation.
For more information on manual propagation changes, see Make Required Manual Changes.
| Note: | It is a best practice to reference groups, but not specific users, in roles. This practice makes it easier to maintain roles when users need to be added or removed from the system. |
You can think of a WebLogic Portal inventory as a large tree structure, with multiple levels of parent and child nodes. Each node in the tree represents the inventory for a part of the portal application. If a node is declared to be in scope, then that node and all of its descendents are in scope. That is, they will be included in the exported inventory file.
This section includes these topics:
If you do not want to propagate an entire portal application, you can use scoping to limit the propagated assets. The most common use cases for scoping include:
The Workshop for WebLogic based propagation tools and the propagation Ant tasks both support scoping. The Workshop for WebLogic propagation tools let you manually make scoping decisions by selecting and unselecting nodes in the merged inventory tree. The Ant tasks let you control scoping with a scope.properties file that specifies which portal items are considered to be in scope.
| Tip: | It’s important to remember that scope defines which portal artifacts will be included in a propagation. By default, scope is set to the entire Enterprise application, including content repository data. When you specify scope either manually or in a properties file, you are specifying what to include. If you specify a single desktop, for instance, only that desktop and its contents (books, pages, and so on) are propagated. Any other desktops in the portal, content, and other items are not propagated. If you limit the scope to a single content folder, then that folder, its contents, and its parent folders are propagated; however, the contents of parent folders are not propagated. |
Performance is the primary use case for scoping. Because a scoped inventory reduces the overall size of an exported WebLogic Portal inventory, propagation tasks typically run faster. If you have a large content repository, you might not want to export it when you propagate a portal. In this case, you can move the content repository, and all of its content, out of scope.
Another reason to scope is security-related. You may want to exclude certain sensitive content from an inventory if you plan to transport that inventory through insecure channels.
The primary risk associated with scoping is that a scoped inventory file can include assets with dependencies that cannot be resolved. When an inventory is scoped, entire nodes (and descendants of the nodes) are excluded from the inventory. As a result, if included artifacts depend on excluded artifacts, those dependencies cannot be resolved. Typically out of scope dependencies are reported as manual elections. By default the propagation servlet will fail on manual add elections.
| Tip: | If you want to exclude specific nodes from an inventory, we recommend that you use policies instead of scoping. Policies are explained in Using Policies. |
The following are best practices if you intend to consider scoping an inventory:
You can set the scope of a propagation in the Workshop for WebLogic based propagation tools and in the Ant tasks.
This section includes these topics:
This section explains how to set scope using the New Propagation Session Wizard.
| Tip: | For detailed information on using the propagation tools, see Using Workshop for WebLogic Propagation Tools. |
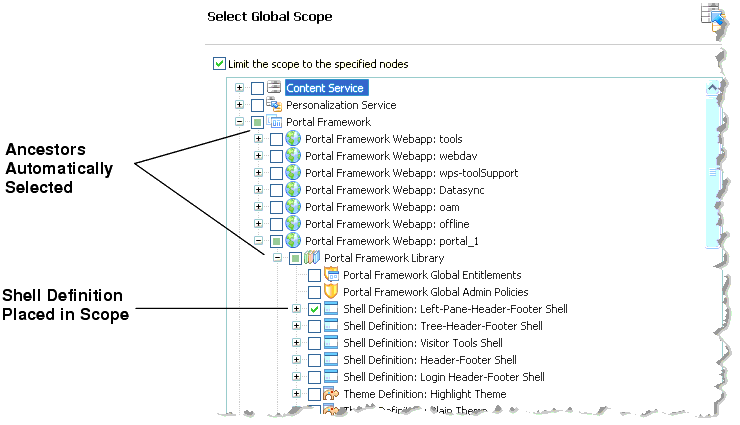
When you create a new Propagation Session, you select a source and a destination inventory to merge. Before the merge, however, you are given the chance to make scoping decisions in the Select Global Scope dialog, shown in Figure 6-2. As shown in the figure, when you select a node to be in scope, the node’s ancestors are automatically selected.
| Note: | It is important to remember that when you select items in the Select Global Scope dialog, you are selecting items to be in scope. All other items in the enterprise application will be out of the scope of the propagation. Therefore, in Figure 6-2, only the selected shell definition and its ancestors will be propagated. For example, a content item’s parent folder is included, but content types on which the content item depend are not automatically included. |
To make selections in the Select Global Scope dialog, you must first select the Limit the scope to the specified nodes checkbox.
You can use the OnlineDownloadTask to scope an inventory file. This task takes a scope.properties file attribute. You can edit this file to include the items you want to include in the inventory file. If you do not specify a scope.properties file, then the entire enterprise application is considered to be in scope. For detailed information on the OnlineDownloadTask and other propagation Ant tasks, see Propagation Ant Task Reference.
WebLogic Portal gives you a great deal of freedom to scope your portal inventories. When you select an inventory node to be in or out of scope, that choice usually affects other nodes that are either dependent on or a dependent of the selected node. WebLogic Portal automatically determines these dependencies. In Workshop for WebLogic, you can see the dependencies visually: when you select a node, other related nodes are automatically selected.
This section helps you to understand the effects of four kinds of scoping decisions:
| Note: | When you deploy the EAR file to a server in development mode, datasync data and some portal framework data is automatically extracted and placed in the database. If you intended to exclude some or all of the datasync data with scoping, then you will find that it is added automatically by the EAR deployment, effectively negating the scoping intention. |
By default, all propagations are scoped to the Enterprise application level. This means that all of the artifacts that make up the portal that can be propagated are propagated. By default, the entire Enterprise application is in scope, as Figure 6-3 illustrates.

There are no preset scoping levels. Both the propagation tools and Ant tasks let you specify scoping however you want. The Ant tasks let you specify a scope.properties file, in which you specify which artifacts to propagate. (See also Understanding a Scope Property File.)
There are four major categories of portal artifacts that you can scope to:
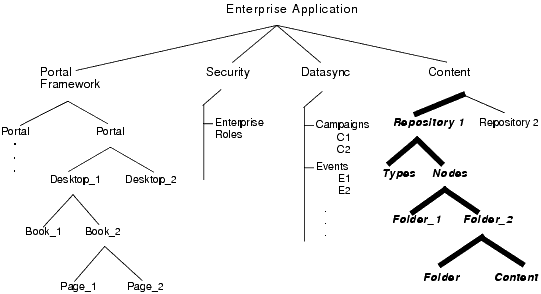
Each of these top-level nodes are represented in the New Propagation Session wizard’s Select Global Scope dialog, as shown in Figure 6-4. Using this dialog, you can drill into one of the top-level categories to refine the level of scoping. However, as previously noted, the best practice is to scope only to one of the top-level categories, such as the Content Service.

One of the most common scoping use cases is scoping to the desktop level. This means that you identify one or more specific desktops to be in scope. The rest of the enterprise application is then considered to be out of scope and is not propagated. As Figure 6-5 illustrates, when you scope to Desktop_1, the desktop and its children (books, pages, and so on) are placed in scope. Any other desktops and the rest of the Enterprise application are then out of scope. See What are the Risks of Scoping? for information on the risks of scoping at this level.
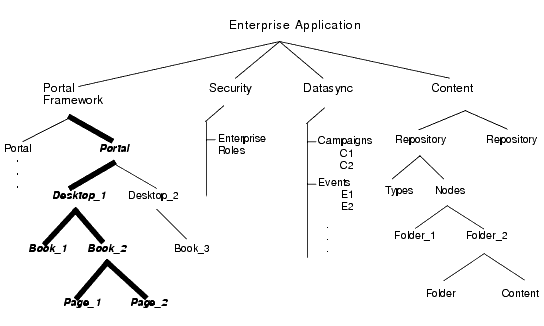
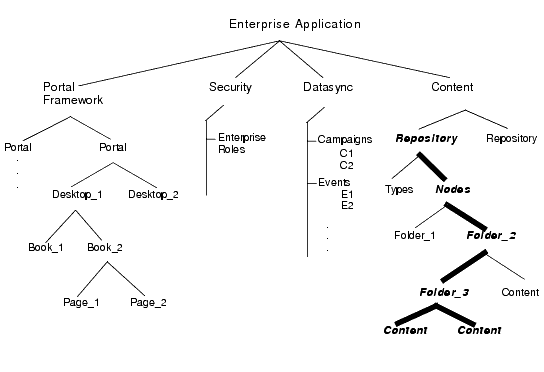
Another common use case it scoping to a repository. When you scope to a repository, the entire repository is propagated, including all types, folders, and content, as illustrated in Figure 6-6. Any other repositories are not propagated, and no other part of the Enterprise application is propagated.
When you scope to a folder in a content repository, that folder, its contents, and all of the folder’s parent folders are propagated. Note that the contents of parent folders are not propagated, only the parent folders themselves, as illustrated in Figure 6-7. See What are the Risks of Scoping? for information on the risks of scoping at this level.
When you propagate portal assets, such as desktops containing pages and books, new pages and books are added to the Portal Library if they do not already exist there.
The WebLogic Portal Administration Console organizes portal resources in a tree that consists of Library resources and desktop resources. Understanding the relationship between Library and desktop resources helps you to understand the effects and consequences of propagation.
The following text describes the relationships between the following instances of portal assets:
.portal or .portlet file
When you create a new desktop using the WebLogic Portal Administration Console, you can use an existing portal template. Using a template means that you will be taking the portal resources for your desktop directly from a .portal file that was created in Workshop for WebLogic. (The .portal file is also called the primary instance.) When you create a desktop, the portal assets are removed from the .portal file, placed in a database, and surfaced in both the Library and desktop trees of the WebLogic Portal Administration Console. Taking the assets from a new desktop instance and placing them in the Library is called disassembling.
At this point, the assets (books, pages, and so on) in the Library (Library instances) are hierarchically related to their corresponding desktop instances. A change to a Library resource, such as a name change, is automatically inherited by the corresponding desktop instance. On the other hand, a change to the desktop instance is not reflected back up the hierarchy.
| Note: | Changes made to assets are never “reverse inherited” up the hierarchy. A change to a desktop asset is never inherited by its corresponding Library instance. Likewise, a change to a Visitor instance is never inherited by a desktop or Library instance. |
New books and pages that you create in a desktop are not disassembled—they are considered to be private to that desktop.
If an administrator or a visitor (using Visitor Tools) changes the Book Properties of a book or the Page Properties of a page in a desktop, those property settings become decoupled from the settings in the parent book or page in the Library. Page properties include layout and theme, while Book Properties include menus and layout. These properties can be modified in the WebLogic Portal Administration Console. When a portal is propagated, any assets that are decoupled in the source application will remain decoupled in the destination.
For more details on the specific data propagated, see Propagation Reference Table.
Policies let you control how source and destination inventories are merged into a final inventory file. This section describes policies and presents examples to help you understand how to apply them.
This section includes the following topics:
Policies let you specify how to handle the following three merge cases:
Through the propagation tools, you can set two kinds of policies:
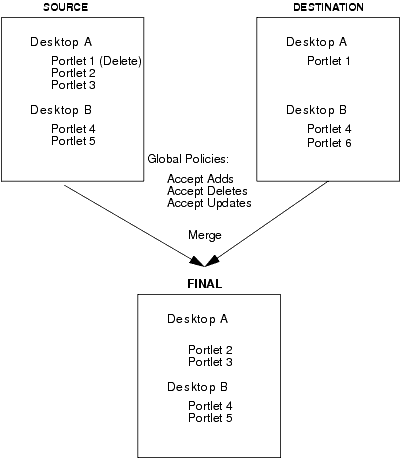
Figure 6-8 illustrates a simple, but common, example. In this case, the default global policies define how two inventories are merged. Portlets 2 and 3 on Desktop A are added to the destination’s Desktop A. Portlet 5 from Desktop B is also added. However, Portlet 6 on the destination is deleted, because it did not exist in Desktop B on source system.
| Tip: | By default global policies are set to accept adds, deletes, and updates. |
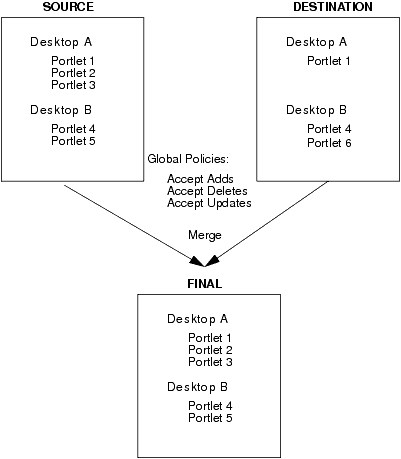
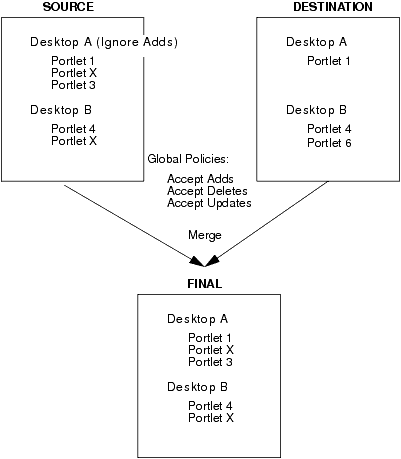
Figure 6-9 shows the same source and destination system; however, in this case the global policy specifies that adds are ignored. In this case, Portlet 6 is removed from the destination desktop because it did not exist in the source desktop. None of the additional portlets from the source are added, because the global policy specifies that adds are to be ignored.
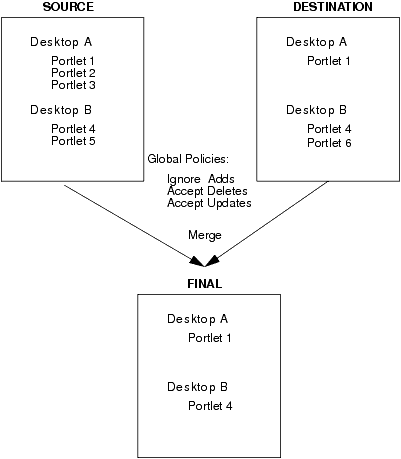
Figure 6-10 shows how a local policy overrides a global policy. In this example, the global policy is to accept adds; however, a local policy is placed on Portlet 1 in Desktop A. The local policy states that the portlet should be deleted from the destination. In this case, Portlet 1 on Desktop A is not propagated. The local policy overrides the global policy.
In WebLogic Portal, multiple desktops can contain instances of the same library object, such as a portlet.
| Tip: | It is important to understand the difference between a library instance and a desktop instance of an artifact, such as a portlet. For a detailed summary of this difference, see Scope and Library Inheritance and Export and Import Scope. |
Because global policies can be overridden at the desktop level, it is possible that the policies for instances of the same library object (such as a portlet) might conflict. The propagation software resolves these conflicts as follows:
For example, consider this scenario: A user adds Page 1 to Book 2 on the source system, but another user adds the same Page 1 to Book 3 on the destination. The rules are defined such that additions to the source are added to the destination, and “deletions” on the source are ignored (that is, if an asset exists on the destination and not on the source, it remains on the destination). Because WebLogic Portal requires that a given page cannot exist in more than one book, the propagation tools resolve the conflict by adding Page 1 to Book 2, and removing it in Book 3 on the destination system.
For another example, consider the following scenario:
In this scenario, illustrated in Figure 6-11, there is a conflict between the local policy for Desktop A and the global policy inherited by Desktop B with respect to additions. Because Desktop B includes Portlet X, Portlet X is required in the propagation of Desktop B (Desktop B cannot be propagated properly without this portlet). Therefore, according to the rules stated previously, the library object for Portlet X will be included in the propagation, despite the policy override applied to Desktop A indicating that adds should be ignored.
When a propagation conflict is resolved by a propagation Ant task, the resolutions are listed in the log file that is created during processing. The Workshop for WebLogic based interface lists any changes that occurred in order to resolve conflicts in the Console view.
For information on log files, see Reviewing Log Files.
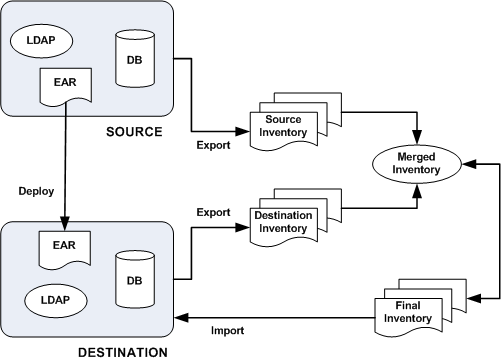
The basic propagation process starts with a source inventory and a destination inventory. You then merge these two files into a merged inventory file using either Workshop for WebLogic or the propagation Ant tasks.
Before you generate and commit a final inventory file, you have an opportunity to examine the pending changes that will be made to the destination server. You can view these changes in the following ways:
User customizations refer to changes a user makes to his or her own desktop settings. The typical propagation occurs from a staging environment to a production system. In this scenario, users typically do not have access to the staging environment, and no user customization changes that require propagation would exist. For this reason, user customizations are not propagated.
User customizations are preserved on the destination system, but when you propagate to a destination system, those customizations might be removed or modified on the destination server under certain conditions. For instance, an administrator might make changes through the WebLogic Portal Administration Console that potentially conflict with a given user’s customizations. For example, an administrator might delete a particular portlet from the portal that has been added by a user to one of their pages using the Visitor Tools. In this situation, the user’s customization is “lost” in the sense that the portlet no longer exists, and as such, will not appear in the user’s portal upon the next login.
| Tip: | It is a good practice to always review the verbose log after every propagation to ensure that all of your propagation elections were processed and to review the server log to check for propagation errors. |
Propagation operations and tasks generate log messages in the following locations:
The propagation tools are not transactional, and therefore do not support roll-back capability. If you must revert to a pre-propagated environment, use the backups that you created before beginning the propagation process. For more information, see Perform a Data Backup.
This section discusses propagation of federated portals.
| Tip: | If you are upgrading to WebLogic Portal 10.2 and later versions, it is recommended that you read the section on upgrading federated portals in the WebLogic Portal Upgrade Guide before reading this section. |
This section includes these topics:
WebLogic Portal 10.2 and later versions support features of WSRP 2.0 that permit a more flexible and practical approach to propagation of federated portals. With WebLogic Portal 10.2 and later versions, the consumer applications in staging and production environments can point to separate producers. The primary advantage of this new capability is that you can create and modify remote (proxy) portlets in a staging environment in isolation from the production environment.
Before version 10.0, if you wanted to propagate WSRP consumer applications, the consumers on the source and destination systems had to point to the same producer. This configuration, which is described in detail in “WSRP Propagation” in the WebLogic Portal 9.2 Production Operations Guide, included several limitations. For detailed information on using WSRP with WebLogic Portal, see the Federated Portals Guide.
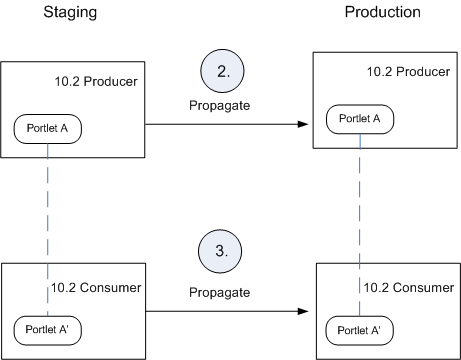
If both the producer and consumer applications are at WebLogic Portal 10.2 or later versions (either new installations or upgrades), then propagation of consumers is fully supported. There is no requirement for the staging and production consumers to point to the same producer. This recommended configuration is illustrated in Figure 6-12. For detailed information on upgrading federated portals to WebLogic Portal 10.2 or later versions, see the WebLogic Portal Upgrade Guide.
The procedure for propagating a federated portal where both the producer and consumer applications have been upgraded to WebLogic Portal 10.2 or a later version is:
| Note: | The following steps apply whether or not the producer required the consumer to register itself. |
For example, if you added or registered the producer with the consumer in staging with the producer handle myProducer, you must also use myProducer as the producer handle in the production area.
| Note: | You only need to perform Step 1 the first time you propagate the portal. |
| Note: | You also need to perform Step 2 if you made any changes to the portlet definitions on the producers. |
When the propagation is completed, the consumer portal in the production environment is functionally equivalent to the consumer portal in the staging environment.
| Note: | If you do not upgrade all producers and consumers to WebLogic Portal 10.3, then the configuration where consumers point to separate producers (Figure 6-12) is not supported. For detailed information on upgrading federated portals to WebLogic Portal 10.2 or later versions, see the WebLogic Portal Upgrade Guide. |
The following steps are mandatory if you have upgraded a producer to WebLogic Portal 10.2 or later versions, but consumers(s) are not upgraded:
If you upgrade only the consumer(s) to 10.2 or a later version, you are required to use the propagation model described in WSRP Propagation in the WebLogic Portal 9.2 Production Operations Guide. In this model, consumer applications in both staging and production environments must point to the same producer.
| Note: | You only need to run the utility described in this section on the systems where your consumer applications are deployed. |
This section explains how to run the List Producer JSP utility (listProducers.jsp) on both the staging and production systems on which your consumer applications are deployed. This utility obtains the registration handles for producers that have been previously added to your consumers.
| Note: | You must have administration privileges to run the JSPs. |
| Note: | If your consumer application is deployed in a WebLogic Portal 9.2 or 8.1.5 (or later) environment, you must perform steps 1 and 2 below. If your consumer environment was already upgraded to WebLogic Portal 10.2 or a later version, steps 1 and 2 are not required. |
listProducers.jsp file from the following J2EE Shared Library. You can use an archive tool, such as WinZip, to extract the listProducers.jsp file from the archive:<WLPORTAL_HOME>/propagation/lib/j2ee-modules/wlp-propagation-web-lib.war
listProducers.jsp file you extracted into the web applications in which your consumers are deployed. Do this on both the staging and production systems.
http://host:port/EarProjectNamePropagation/wsrp/listProducers.jsp
Where EarProjectName is the name of the enterprise application deployed to the server. For example:
http://localhost:7001/myEarPropagation/wsrp/listProducers.jsp
For a 9.2 or 8.1.5 (or later) installation, the URL depends on where you placed the JSP. For example:
http://host:port/EarProjectNamePropagation/mydir/listProducers.jsp
| Note: | You only need to run the utility described in this section on the systems where your producer application is deployed. |
This section explains how to run the Update Registrations JSP utility (updateRegistrations.jsp) on both the staging and production systems. This utility updates the registration handles for each consumer application the currently references a given producer.
| Note: | If your producer application is deployed in a WebLogic Portal 9.2 or 8.1.5 (or later) environment, you must perform steps 1 and 2 below. If your producer environment was already upgraded to WebLogic Portal 10.2 or a later version, steps 1 and 2 are not required. |
updateRegistrations.jsp file from the following J2EE Shared Library. You can use an archive tool, such as WinZip, to extract the updateRegistrations.jsp file from the archive:<WLPORTAL_HOME>/propagation/lib/j2ee-modules/wlp-propagation-web-lib.war
updateRegistrations.jsp file you extracted into the web application in which your producer is deployed. Do this on both the staging and production systems.
http://host:port/EarProjectNamePropagation/wsrp/updateRegistrations.jsp
Where EarProjectName is the name of the enterprise application deployed to the server. For example:
http://localhost:7001/myEarPropagation/wsrp/updateRegistrations.jsp
| Note: | The Update Registrations JSP copies registrations so that both consumers have access to the remote portlet. |
The propagation management servlet has a configuration setting to help mitigate “denial of service” attacks. The servlet is configured with a maximum size allowed for uploaded files (files uploaded over HTTP). By default, this is set to 10 megabytes. If any given file inside the inventory ZIP file is larger than this value, it will be rejected. This section explains how to either work around this limitation or change the propagation servlet’s configuration to allow larger files.
The simplest workaround to this file size limit is to physically copy your file, through FTP or another means, from the source to the destination server. After you copy the file to the destination, you can use the OnlineUploadTask’s readFromServerFileSystem attribute to perform the upload. For information on this task, see OnlineUploadTask.
You can override the 10 megabyte default file upload limit using a deployment plan. A deployment plan is an optional XML file that configures an application for deployment to WebLogic Server. A deployment plan works by setting property values that would normally be defined in the WebLogic Server deployment descriptors, or by overriding context parameter values already defined in a WebLogic Server deployment descriptor.
| Tip: | The creation and use of deployment plans is thoroughly discussed in the WebLogic Server documentation. For more information, see “Configuring Applications for Production Deployment” and “Updating Applications in a Production Environment.” |
To modify the file size limit using a deployment plan, follow these steps:
| Tip: | The location of the deployment plan must be specified in your domain’s config.xml file. A sample stanza is shown in Listing 6-2. Refer to the WebLogic Server documentation for more information. |
<variable-definition> and <variable-assignment> elements to change the context deployment descriptor parameter maximum_inventoryfile_upload_size. These elements are highlighted in bold type in Listing 6-1. In the example, the upload file size limit is changed to 13 MB. Note that the overridden descriptor is associated with the application’s web.xml file. <deployment-plan xmlns="http://www.bea.com/ns/weblogic/90" xmlns:xsi="http://www.w3.org/2001/XMLSchema-instance">
<application-name>drtApp</application-name>
<variable-definition>
<variable>
<name>CHANGEUPLOAD</name>
<value>13000000</value>
</variable>
</variable-definition>
<module-override>
<module-name>propagation.war</module-name>
<module-type>war</module-type>
<module-descriptor external="false">
<root-element>weblogic-web-app</root-element>
<uri>WEB-INF/weblogic.xml</uri>
</module-descriptor>
<module-descriptor external="false"></module-override>
<root-element>web-app</root-element>
<uri>WEB-INF/web.xml</uri>
<variable-assignment>
<name>CHANGEUPLOAD</name>
<xpath>/web-app/context-param/
[param-name="maximum_inventoryfile_upload_size"]/param-value</xpath>
</variable-assignment>
</module-descriptor>
</deployment-plan>
<app-deployment>
<name>drtApp</name>
<target>portalServer</target>
<module-type>ear</module-type>
<source-path>/myProject/myApplication</source-path>
<deployment-order>101</deployment-order>
<plan-dir>/myProject/applications/plan</plan-dir><security-dd-model>Advanced</security-dd-model>
<plan-path>plan.xml</plan-path>
</app-deployment>
| Note: | This method is not recommended. |
You can configure the file upload size directly in the propagation application’s web.xml file. To modify this file, do the following:
<WLPORTAL_HOME>/propagation/lib/j2ee-modules/wlp-propagation-web-lib.war
web.xml file for editing. web.xml file shown in Listing 6-3. In this example, the default file size is changed to 13 MB. <context-param>
<description>Maximum upload size (in bytes), if not specified
defaults to 10 MB.
</description>
<param-name>maximum_inventoryfile_upload_size</param-name>
<param-value>13000000</param-value>
</context-param>
A number of configuration parameters that affect the propagation servlet are specified in the propagation web application’s web.xml file. The preferred method for modifying these parameters is by using a deployment plan.
A deployment plan is an optional XML file that configures an application for deployment to WebLogic Server. A deployment plan works by setting property values that would normally be defined in the WebLogic Server deployment descriptors, or by overriding context parameter values already defined in a WebLogic Server deployment descriptor.
| Tip: | The creation and use of deployment plans is thoroughly discussed in the WebLogic Server documentation. For more information, see “Configuring Applications for Production Deployment” and “Updating Applications in a Production Environment.” |
| Tip: | See also the section, Increasing the Default Upload File Size, for information on configuring the propagation servlet using a deployment plan. |
The following sections show context parameters for the propagation application’s web.xml file. To override these parameters, use a deployment plan. The parameters are used to set the following configurations:
The inventoryWorkingFolder parameter shown in Listing 6-4 specifies a folder on the server where the propagation tools place certain runtime data, such as inventory exports. For detailed information on configuring the temporary space used on the server during propagation, see Configuring Temporary Space.
context-param>
    <description>Base folder path for runtime data, such as inventory exports.
    </description>
    <param-name>inventoryWorkingFolder</param-name>
    <param-value>D:\dev\src\wlp\propagation\test\inventories</param-value>
</context-param>
The example stanza shown in Listing 6-5 is used to specify a short description to be placed in the export.properties file. This file contains summary information about the inventory; including who exported it, when it was exported, how many nodes are in the export, and other information.
<context-param>
    <description>The name of the operating environment.</description>
    <param-name>environment_name</param-name>
    <param-value>Staging</param-value>
  </context-param>
The example stanza shown in Listing 6-6 is used to enable or disable verbose logging.
<context-param>
    <description>Enable verbose logging for the servlet.</description>
    <param-name>enable_verbose_logging</param-name>
    <param-value>true</param-value>
  </context-param>
The example stanza shown in Listing 6-5 is used to specify the location of the verbose log file.
| Note: | By default, this file is stored in a temporary directory in the domain. For detailed information on configuring the default temporary space used during propagation, see Configuring Temporary Space. |
<context-param>
    <description>Specify the folder to put verbose logs.</description>
    <param-name>verbose_log_folder</param-name>
    <param-value>D:/dev/src/wlp/propagation/test/inventories</param-value>
  </context-param>
Certain propagation operations, such as creating an inventory file or combining two inventories, write temporary files to the file system. The temporary location where these files are written depends on the type of operation performed. This section explains how this temporary space is created and how to configure it.
| Note: | The propagation tools do not typically remove these temporary files; therefore, they are available to help debug propagation problems. You may be required to clean up the temporary space at your discretion. |
Online propagation operations take place on the server and include tasks such as uploading and committing inventories. (see Overview of Online Tasks). Temporary space is created for online operations according to an algorithm where the first available of the following locations is used:
inventoryWorkingFolder context parameter, which is set in the propagation web application’s web.xml file. See Configuring the Inventory Temporary Directory. javax.servlet.context.tempdir. This temporary directory is required by the servlet specification. All servlet containers are responsible for creating this temporary space. java.io.tempdir. | Note: | Warning messages may appear in the propagation log files if the path to the temporary directory is longer than the operating system’s path length threshold. This threshold varies among operating systems. The best way to avoid this problem is to make the path as short as possible. |
Offline propagation operations take place outside the context of a server and include tasks such as combining and differencing inventories. (see Overview of Offline Tasks). For offline operations, temporary space is specified by the Temporary space is created for offline operations system property java.io.tempdir.
Applications in development mode write datasync files to the filesystem. If you propagate to an application in development mode and datasync resources are marked to be deleted then be aware that the corresponding datasync files will be deleted from the filesystem. See Datasync Definition Usage During Development for more information.


|