|
|
Developers can use Workshop for WebLogic to create JSP tags and controls that add and edit user profiles. A user profile consists of a username and any additional properties you collect and store about a user. These properties can be used to personalize the user’s experience in your portal.
Properties can consist of personal data, work-related data, geographic data, or something else that logically categorizes your users. For example, you could create a property set in Workshop for WebLogic called human resources that contains properties such as gender, hire date, and e-mail address.
You must use Workshop for WebLogic to programmatically create user profiles, edit the profile’s default property values, and enable property value encryption.
| Note: | To determine if you should encrypt your user data and learn about the different ways to perform encryption, see Planning Data Encryption. For instructions on encrypting the data, see Creating a User Profile Property Set. For instructions on encrypting a user password see Using Properties from an External User Store. |
Administrators can edit the profile’s property values in the Administration Console. See Editing User Profile Property Values for instructions.
When users log into a portal, the portal can access the property values and target them with personalized content, e-mails, pre-populated forms, and discounts based on the personalization rules you set up. See the Interaction Management Guide for more information.
Developers can use the following tools to programmatically create and edit user profile default property values:
createProfile JSP tag to create a portal JSP tag that adds a user profile. Other JSP tags let you retrieve the user profile and add or edit its properties.createProfile action in the Profile control to add a user profile. Other actions in the User Provider control let you retrieve the user profile and add or edit its properties. You can use the Profile control to retrieve a user's profile, use the Property control to put properties in working memory, then use the Rules Executor control to evaluate and filter the user profile’s properties in order to trigger actions based on that evaluation.com.bea.p13n.usermgmt.profile.ProfileFactory Java class to create a user profile. You can change user properties by calling the ProfileWrapper object directly. For more information on the Java class, see the
Javadoc.This chapter includes the following sections:
A user profile is a collection of user property values for a user from all available user property sets. Each piece of metadata in a user profile is called a user property. A user profile property set organizes the properties that it contains and provides a convenient way to name a group of properties for a specific purpose. The properties you create can be used to define rules for personalization, delegated administration, or visitor entitlement.
User properties can range from statically-defined properties (such as a user’s phone number and e-mail address) to dynamically-created and persisted properties (web site tracking information for the user, for example). A property set called personal could contain properties, such as age, gender, marital status, and address. Another property set called preferences could contain properties, such as hobby, favorite color, and news preference.
You must create user profiles and edit the profile’s default values in Workshop for WebLogic. You can edit the profile’s values in Workshop for WebLogic or in the Administration Console.
WebLogic Portal provides a default user profile property set called CustomerProperties.usr that contains common properties.
| Note: | You can also create an application-defined property set to store profile data for entities that are not users or groups. These entities include communities and Web Services for Remote Portlets (WSRP), or a custom entity created by an application programmer. See the Interaction Management Guide for instructions on creating this type of property set. |
This section contains the following topics:
You can create a user profile and a property set in Workshop for WebLogic. You can edit the profile’s default values in Workshop for WebLogic or in the Administration Console.
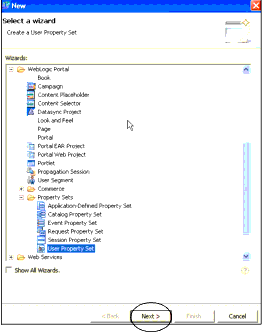
To create a property set for a user profile:
| Tip: | You can customize the menu so that Property Sets appears as a choice on the New menu. See the Portal Development Guide for instructions. |
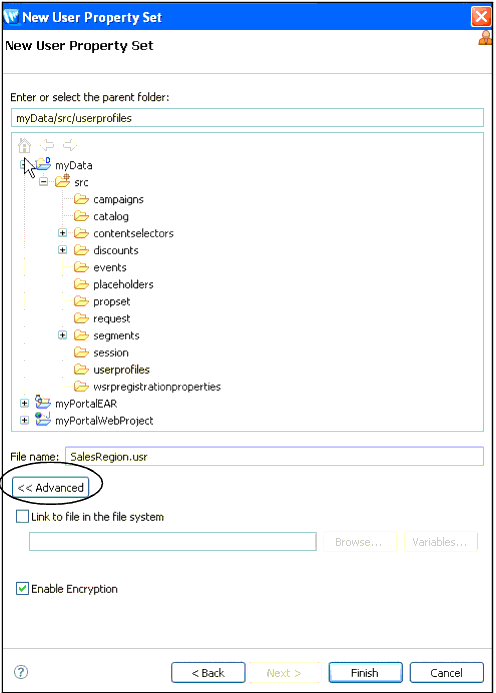
.usr file extension. For example, SalesRegion.usr.| Tip: | If you use a custom UUP that does data encryption on its own, do not select the Enable Encryption check box because that option will encrypt and decrypt the data twice and can impact performance. Use your UUP documentation to set up encryption at the UUP. Only the property set you specify is encrypted. To determine if you should use this method to encrypt data for your application, see Planning Data Encryption. If you want to share your encrypted data across portal applications or domains, you can transfer an encryption key from one custom UUP to another. For instructions, see Transferring an Encryption Key Between Custom UUPs. |
.usr file: enable-encryption="true”. For example: <propertyset is-complete="true" enable-encryption="true".| Note: | Even though the Enable Encryption check box is enabled, any default property values entered in Workshop for WebLogic (and eventually persisted in the .usr file) are not encrypted. |
After you create a property set by following the instructions in Creating a User Profile Property Set, you can capture user information by adding properties to the profile.
To add properties to a user profile property set:
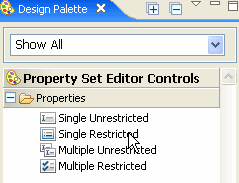
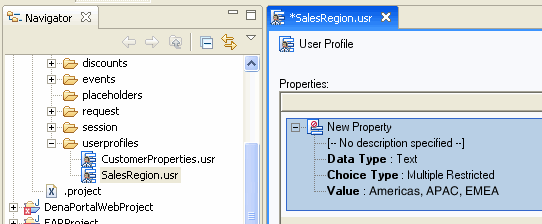
Figure 5-3 shows the property types for a property set.
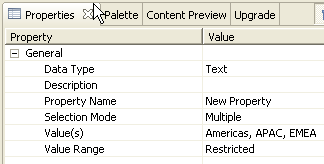
java.sql.Timestamp type. Your selection determines the dialog box you see when you edit the Value field. For example, properties with a Boolean data type are automatically set to single restricted. If you edit the Data Type, the change removes anything previously entered in the Value field, because the types of values change.Figure 5-4 shows how to configure a multiple restricted type to reflect three sales regions called Americas, APAC, and EMEA. You could use this Sales Region property to target sales employees with personalized content.
| Note: | Any change to Data Type, Selection Mode, or Value Range fields replaces anything previously entered in the Value field because the number of allowed values changes. |
Use the Value field to enter values for restricted types or to set the default value for unrestricted types. Click the ellipsis icon (...) to enter values. (If you picked Restricted in the Value Range field, enter the value in the Enter Property Value dialog box that appears and click Add after each entry. Click OK after you enter all values. If you picked Unrestricted in the Value Range field, enter the value in the Enter Property Value dialog box and click OK.) Any values you enter in this field will be removed if you change the Data Type, Selection Mode, or Value Range.)
The properties you enter in the property editor appear in the user profile editor, as shown in Figure 5-5.
| WARNING: | You can also use the Property control to programmatically create and manage properties. However, properties created with this control do not appear in the Administration Console. You must modify and update them programmatically. |
If you use more than one UUP for your user data and you want to share encrypted data across portal applications or domains, you must transfer the encryption key from one UUP to another UUP. The 3DES symmetric algorithm uses the same key to encrypt and decrypt data.
If you use the Profile Manager to encrypt profile data, you have to transfer the managed encryption keys to another portal application or domain. This transfer is required because the Profile Manager manages encryption keys for each encrypted property set through the Portal application’s deployment descriptor and plan. Transferring the encryption key ensures you use the same encryption key for all domains and applications.
To determine if this is the best way to encrypt data for your application, see Planning Data Encryption.
To generate an an encryption key:
p13n-profile-config.xml file. This is the easiest method to transfer encrypted data, but it does not provide the strongest encryption of your user data. Set up a password in the Administration Console; see
step 10 in Configuring an LDAP UUP and Transparent Failover.p13n-profile-config.xml file. If the password is located, an encryption key is derived from the password. If the password is not located, the Profile Manager randomly generates an encryption key and stores it in WebLogic Server’s DefaultCredentialMapper. To transfer the encryption key to re-use the user profile data from another application:
.ldif file.dn: cn=type@E@Fwlp@G@M@OEntApp@EqaApp@M@OWebapp@E@M@OResource@EUUP.
@K@M@OCapability@E.EncryptionKey-Alias,ou=CredentialMaps,ou=
@realm@,dc=@domain@
objectClass: passwordCredentialMap
moduleName: null
cn: type@E@Fwlp@G@M@OEntApp@EqaApp@M@OWebapp@E@M@OResource@EUUP.
@K@M@OCapability@E.EncryptionKey-Alias
applicationName: null
principalName: myEncryptionkeyAlias
wlsCreatorInfo: null
wlsCollectionName: null
resourceName: type=<wlp>, EntApp=qaApp, Webapp=,S
Resource=UUP.myUUPadapterName, Capability=
principalPassword: ezNERVN9NmkyVjVQcjA1SllKbldZNmtxU0BUcjQwblFPdGxnY
UtnW Dh5U1 BQNXRFcGZ2T1pCQFRQR3dRbk10dFZ2QWU4cU1TekxuRGVjT21jWjI2c1l
GaGhZQ FRAVVliZ29wODhwVUdKV2pOd09BMkBVR3BXTThBZmZuQjVUNzg5bGFVRmxmS
1NvaVJEMDMweHlMeVVZQEU=
dn. For example, change M (OEntApp)EqaApp to M (OEntApp)E<yourAppName> .cn. For example, change M (OEntApp)EqaApp to M (OEntApp)E<yourAppName>. resourceName. For example, change type=<wlp>, EntApp=qaApp, Webapp=, Resource=UUP.myUUPadapterName, Capability= to type=<wlp>, EntApp=<yourAppName>, Webapp=, Resource=UUP.<yourUUPadapterName>, Capability=. *.usr) and UUP adapter configuration (in the p13n-profile-config.xml file) from your portal application or domain to your target portal application or domain.
You can use Workshop for WebLogic to create user profiles and the profile’s default values. You can edit the profile’s values in Workshop for WebLogic or in the Administration Console. See Editing User Profile Property Values for instructions on editing the values for property sets in the Administration Console.
This section contains the following topics:
Developers use the user profile editor in Workshop for WebLogic to create a user profile and add the profile’s properties. Then you can edit properties and their default values that are part of each user’s profile.
To modify properties and their values in Workshop for WebLogic:
| Tip: | You can edit property values in the Administration Console. |
A set of JSP tags allow for easy access to property set data:
For more information on these tags, see JSP Tag Javadoc.
The <profile:getProperty> JSP tag retrieves property values for a specified property set. The <profile:setProperty> JSP tag updates a property value for either the session's current profile or for the anonymous user profile.
Typically, the <profile:getProperty> tag is used after the <profile:getProfile> tag is invoked to retrieve a profile for session use. The <profile:getprofile> JSP tag retrieves a user profile and its properties. The <profile:getProperty> and <profile:setProperty> JSP tags let developers retrieve and rapidly edit properties for a large number of users. If the <profile:getProfile> tag is not used before the <profile:getProperty> tag, the specified property value is retrieved from the anonymous user profile.
See the JSP Tag Javadoc for more information on the Java class.
You can retrieve an authenticated user profile by using the <profile:getProfile> JSP tag in a page flow as shown in the code sample in Listing 5-1.
<%@ page import="com.bea.p13n.usermgmt.SessionHelper"%>
<%@ taglib uri="http://www.bea.com/servers/p13n/tags/usermanagement"
   prefix="profile"%>
<%@ taglib uri="netui-tags-databinding.tld" prefix="netui-data"%>
<%@ taglib uri="netui-tags-html.tld" prefix="netui"%>
Profile is: [<code><%= SessionHelper.getProfile(request) %></code>]<br>
<%-- This tag works for authenticated users. --%>
<profile:getProfile profileKey="<%=request.getUserPrincipal().getName()%>"
   profileId="profile"/>
Profile is: [<code><%= profile %></code>]<br>

<%-- You would generally want to do this in your PageFlow, not your JSP. --%>
<netui-data:declareControl controlId="profileControl"
   type="com.bea.p13n.controls.profile.UserProfileControl"/>
<netui-data:callControl resultId="getProfileFromRequestResult"
   controlId="profileControl" method="getProfileFromRequest">
<netui-data:methodParameter
   value="{request}"></netui-data:methodParameter>
</netui-data:callControl>
Profile is: [<code><netui:label value="
   {pageContext.getProfileFromRequestResult}"></netui:label> </code>]<br>
If the user is registered, then the profile can be retrieved without a reference to the session, as shown in the code sample in Listing 5-2. This method is useful if you do not have access to the session object.
| Tip: | To retrieve a user’s profile using this programmatic technique, the user must be logged in and authenticated. If you call com.bea.p13n.security.Authentication.login() to perform the login, the user profile is automatically created. You can also call the WebLogic Server method weblogic.servlet.security.ServletAuthentication.login(); however, note that the user profile is only created after the next access (usually after the first page refresh). Before this subsequent access, you will receive a ProfileNotFound exception when you try to retrieve the user’s profile. |
import com.bea.p13n.usermgmt.profile.ProfileFactory;
import com.bea.p13n.usermgmt.profile.ProfileNotFoundException;
import com.bea.p13n.usermgmt.profile.ProfileWrapper;
import java.rmi.RemoteException;
public class MyHelper
{
    public static String helperMethod(String username)
    {
        try
        {
            ProfileWrapper profile =
               ProfileFactory.getProfile(username,null);
            // do something helpful here.
            return profile.toString();
        }
        catch (RemoteException ex)
        {
        }
        catch (ProfileNotFoundException ex)
        {
        }
        return null;
   }
For anonymous and tracked anonymous users, you must retrieve the profile from the session. Anonymous profiles have no identity. Tracked anonymous profiles have an identity that is not valid for authentication. A safe way to retrieve the identity for a user, based upon the user’s profile type, is shown in Listing 5-3. This code sample retrieves the current ProfileWrapper and gets the username associated with the wrapper.
<%@ page import="com.bea.p13n.usermgmt.SessionHelper"%>
Profile Id is: [<code><%= SessionHelper.getUserId(request) %></code>]<br>
Use the following returned values to determine the user type:
Developers use the getProperty and setProperty actions in the Property control to let users retrieve property values for a property set and update property values for either the session’s current profile or for the anonymous user profile.
| WARNING: | Properties created with this control do not appear in the WebLogic Portal Administration Console, and you must modify and update them programmatically. |
For more information on using the Property control and its properties, see the Javadoc.
Listing 5-4 shows how a user can use the setProperty action in the Property control to edit a Profile Wrapper. An example page flow (and associated JSP) that uses controls to offer a form for the user to set a favorite color is shown in the code sample. This example requires a Generalnfo.usr user profile property set file to exist in the \userprofiles folder of the data project, with a single-valued, restricted, text FavoriteColor property. For more information, see the help in Workshop for WebLogic.
<%@ page language="java" contentType="text/html;charset=UTF-8"%>
<%@ taglib uri="netui-tags-databinding.tld" prefix="netui-data"%>
<%@ taglib uri="netui-tags-html.tld" prefix="netui"%>
<%@ taglib uri="netui-tags-template.tld" prefix="netui-template"%>
<netui:html>
<body>
<netui:form action="setColor">
<table>
<tr valign="top">
<td>Favorite Color:</td>
<td>
<netui:select dataSource="{actionForm.color}"
defaultValue="{pageFlow.usersColor}"
optionsDataSource="{pageFlow.possibleColors}">
</netui:select>
</td>
</tr>
</table>
<br/>
<netui:button value="Set Color" type="submit"/>
</netui:form>
</body>
</netui.html>
Developers can change user profile property values by calling the ProfileWrapper object directly. For more information, see the
Javadoc.
You must specify which set of user or group properties the user should inherit by configuring a ProfileWrapper successor at runtime. A ProfileWrapper is a lightweight object that can access the correct ProfileManager session beans based on the profile identity with which it is initialized. The ProfileManager has a getAllProfileNames method and a listAllProfiles method. The listAllProfiles(int pageSize) method efficiently retrieves all user profiles or group profiles. See the
Javadoc for more detail.
You can use Workshop for WebLogic to delete individual properties from a property set, or you can delete an entire property set.
This section includes the following topics:
To delete individual properties from a property set:
You can also use the <profile:removeProperty> JSP tag or the removeProperty action in the Property control in your page flows to remove existing properties or profiles for users. See the
Javadoc for more information.
If you created a UUP to access external user or group properties, you can use those properties to define rules for personalization, delegated administration, or visitor entitlement.
After you create a UUP to access these properties in the external user store (for example, an openLDAP server) you can access those external properties only through WebLogic Portal's JSP tags, controls, or APIs. Those external properties are not yet accessible in the Administration Console.
You must surface those external properties in the Administration Console if you want to use those properties in defining rules for personalization, delegated administration, or visitor entitlement.
| Note: | If the properties you surface from an external user store are read-only, you cannot update them in the Administration Console. To make those properties writable, your custom UUP would have to become writable. |
To use properties from an external user store:
PropertyMapping. To find the name of the property set, perform the following steps:META-INF/p13n-profile-config.xml file.<!-- User Profile Manager --> section, locate the name entry for your external user store, such as:<property-adapter>
<name>MyLdapUUP</name>
<property-mapping>MyExternalPropertySet</property-mapping>
<ejb-jndi>my_uup.jar#ExternalEntityPropertyManager</ejb.jndi>
</property-adapter>
The <property-mapping> element is the name of the new property set. The name is case sensitive. For example, the property set could be named MyExternalPropertySet.usr.
newLdap.usr. | Tip: | After you have deployed your portal application to production, any modifications you make to user profile properties in Workshop for WebLogic must be pushed to the running server. For more information, see the Production Operations Guide. |
weblogic.security.Encrypt utility. (To determine if this is the best way to encrypt data for your application, see Planning Data Encryption.) For instructions on setting a password in the Administration Console, see
step 10in Configuring an LDAP UUP and Transparent Failover. | Note: | If you encrypt the profile data stored in the p13n database, your Database Administrator will not be able to view the data in the user profile database. In prior releases of WebLogic Portal, the default was clear text, which meant the Database Administrators could view the user profile data. |


|