


|
You can use Test View to execute any data service read or relationship function for which data is available.
When you run a query in Test View results appear in an editable window in text or structured XML form. When updates are available for your data, you can immediately update your back-end data. Query results can also be used as complex parameters for other queries.
In creating support for query functions, BEA Aqualogic Data Services Platform determines Test View options from your query function's signature. Several types of query function signatures are supported including queries with and without parameters, simple and complex parameters, and ad hoc queries.
The following major topics are covered in this chapter:
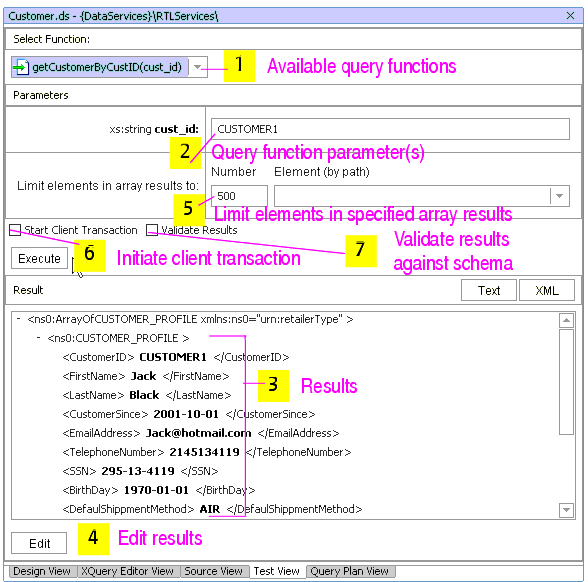
In Test View you can select any read or navigation functions or procedures defined in your data service from a drop-down list.
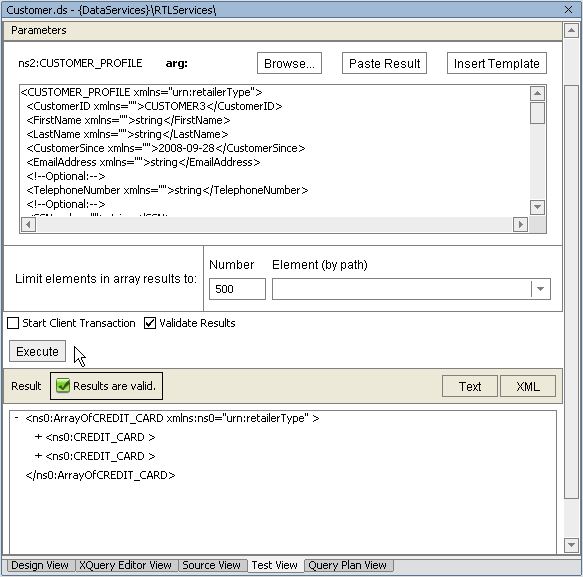
If the query accepts complex parameters, the parameter entry dialog automatically adjusts, as shown in Figure 7-2.

To use Test View, follow these steps:
You can review your generated query in the Output window. See Auditing Query Performance for details.
In the case of a query such as getAllCustomers(), no parameters are needed (Figure 7-3).
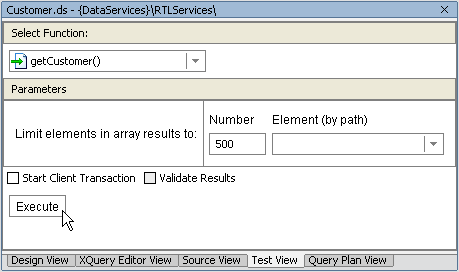
When you click Execute the query will run.
Results are returned in text or XML form. Click on the + next to a complex element (in this case, a table representation) to see more detailed results.
When you have appropriate update permissions — as is commonly the case with "sand box" testing — you can directly edit results using the Edit command (Figure 7-4).
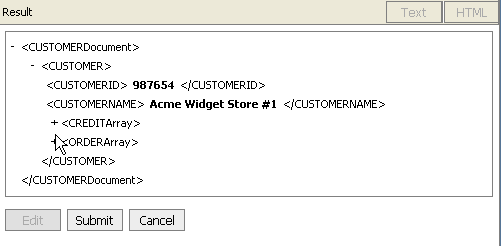
You also have the option of adding a record once you are in Edit mode.
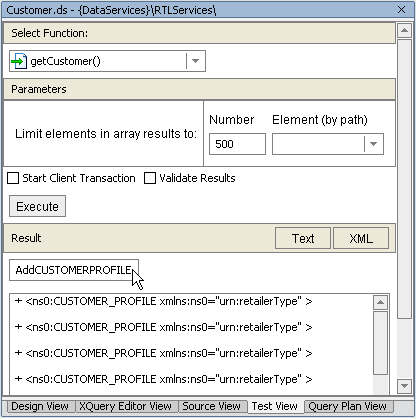
The structure for the root XML Type will be added to end of the data set. You will need to supply the content, of course. If you right-click on the root element of your new record, you can also add complex child elements.
When you are satisfied with the changes click Submit.
When your query requires one or multiple simple parameters, Test View display each parameter in its own field, identified by name and required type.
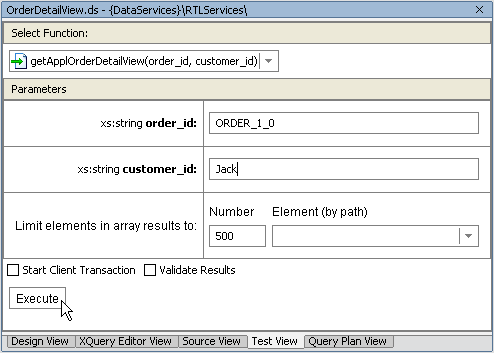
See Running a Query That Needs No Parameters on page 7-4 for details or executing a query and editing and submitting results.
Enterprise-scale queries often require a complex parameter type as input. For example, an inventory query may require a set of parameters which are based on a Web service supplying details of orders received. It is usually easier to just pass the entire object than to specify a large set of individual parameters.
When your query requires a complex parameter, the function will be listed with a parameter as in:
getProfileView(arg)
The arg parameter indicates that a complex parameter type is needed.
For such parameters Test View displays a box (Figure 7-2) into which you can:
For any given data service you can use results from a previously run query as input. This is particularly useful when invoking navigation functions, since navigation functions generally require complex parameters.
| Note: | When pasting prior results it's important to keep in mind that queries returning multiple results (arrays) cannot be input to functions looking for a single object as a parameter. For example, a function that gets orders for a particular customer is likely to return multiple orders. Those results cannot be used as input to a function that returns information about a particular customer. |
The following steps show how results of a singleton query can be repurposed as input for a complex parameter.
Results shown below contain elements called for by the function:
getElecOrderByOrdID(ORDER_ID)
located in the RTLServices/ElecOrder data service.
| Note: | Your results have been returned as a singleton element in an array (highlighted in blue in Figure 7-8). The array element needs to removed before you can successfully execute your navigation function. |
<ns0:ArrayOfELEC_ORDER xmlns:ns0="urn:retailerType">
			<ns0:ELEC_ORDER TYPE="ELEC">
				<OrderID>ORDER_1_0</OrderID>
				...
			</ns0:ELEC_ORDER>
</ns0:ArrayOfELEC_ORDER>
		<ns0:ELEC_ORDER TYPE="ELEC" xmlns:ns0="urn:retailerType">
			<OrderID>ORDER_1_0</OrderID>
			...
		</ns0:ELEC_ORDER>
You can automatically enter a template of the XML type of your data service. In Figure 7-10, a customer ID (CUSTOMER3) and order ID (ORDER_3_0), are provided through the template. Results are also shown.
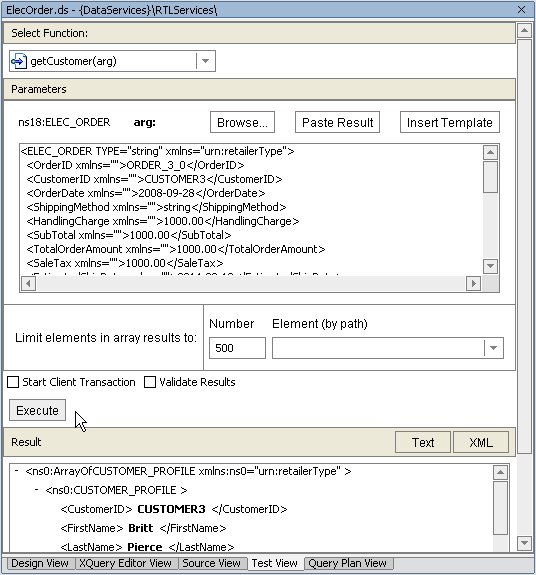
Template parameters are useful when you know the key parameters required by your query.
See Running a Query That Needs No Parameters on page 7-4 for details or executing a query and editing and submitting results.
In Test View procedures are selected and run from the Select Functions drop-down list box in the same was that functions are selected. Running a procedure under Test View shows results only if the procedure returns data or a confirming message as to whether the operation was successful, for example.
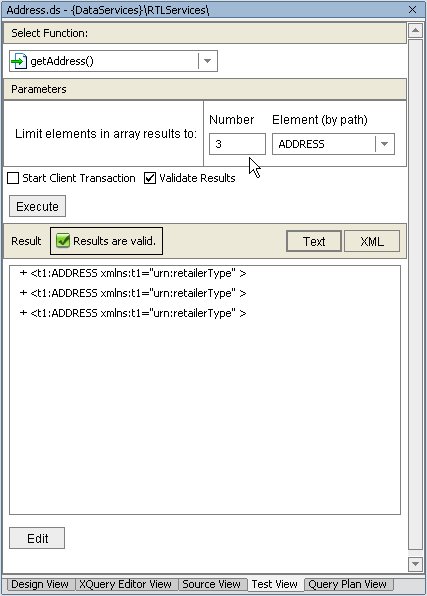
You can filter query results through Test View to n instances of a single element such as the first five of an array of 5,000 customers.
Figure 7-11 shows a function where the results for RTLServices/Address/getAddress() are limited to three Address elements. Without such a limitation, all customer records would be returned.
The Client Transaction Option supports functions that query more than multiple (two or more) relational sources using XA transaction drivers. By default this option is not selected, meaning that the NotSupported EJB transaction method is used. If the option is checked, the Required transaction mode will be used instead.
For general information on the subject see Transactions in EJB Applications WebLogic Server documentation.
Test View results are validated against the data service's schema file when the Validate Results checkbox (shown in Figure 7-11) is selected. When active the following conditions will be flagged as invalid:
Invalid results are reported in the Output window. Such results can be addressed by correcting the return type or associating the return type with a new, corrected schema. See Validating and Saving Your Return Type.
| Notes: | Whenever you attempt to edit results of a query, those results are re-validated. The criteria is the same as that used for the Validate Results option. |
| Note: | Results are validated by calling the XMLBean validate() method, currently documented at the following URL: |
An executing query can be ended through the AquaLogic Data Services Platform Console or by ending your server process. However, you can start a new query by changing your selection in Test View.
You can audit query performance by activating Audit for your application. This is a one-time operation which is accomplished through the AquaLogic Data Services Platform Console.
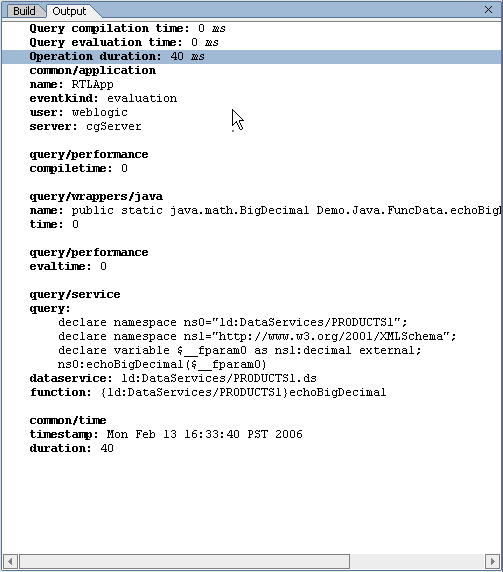
When a query function is invoked through Test View and AquaLogic Data Services Platform auditing is enabled, basic validation and performance information appears in the WebLogic Workshop Output window (View  Windows
  Output). You can find the most recent query results at the bottom of the Output pane.
| Note: | For details on enabling auditing and tuning audit options see the Audit and Log Information chapter in the AquaLogic Data Services Platform Administration Guide. |
By default an audit includes such information as query compilation and execution time, user, server, and so forth (Figure 7-12).
| Note: | Query plan audit properties are not collected when a function is executed from Test View. This is because the function cache is not utilized for functions executed in Test View. |
It is often useful to quickly enter and test queries. You can do this through any data service's Test View. Simply pull down the list of available functions and select either the Ad hoc XQuery option (Figure 7-21).
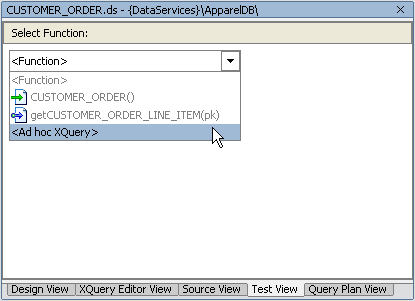
As the name implies, an ad hoc query is not specific to the currently selected data service, if any.
| Note: | An ad hoc query remains available whenever the data service active when it was created is open to Test View. However, ad hoc queries are not visible in Source View; such queries can be saved by first copying the text to an external application. |
Figure 7-22 shows an example ad hoc XQuery. Although the constructor function for the current data service was used (DataServices/CustomerDB/CUSTOMER), it does not need to be present in order for the query to successfully run.
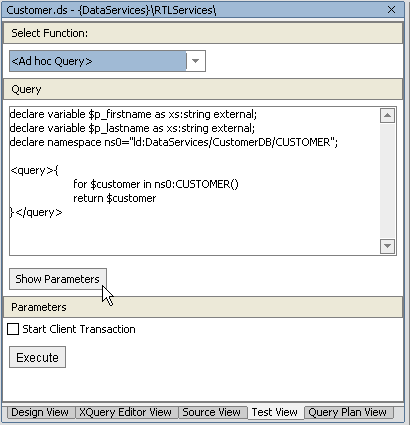
If your query requires simple or complex parameters, these can be exposed using the Show Parameters button.
A Results pane below the Execute button contains the data returned by the query (if any).
If you want to try out the example while running the RTLApp sample program, copy the code in Listing 7-2 to an ad hoc query pane, available from any data service.
The query is designed to take some moments to run. (It can also be used to experiment with monitoring and stopping executing queries through the AquaLogic Data Services Platform Console.)
| Tip: | In order to execute a query under Test View the Check Access Control option in AquaLogic Data Services Platform Console's General tab for your application must be deselected. See the chapter Configuring AquaLogic Data Services Platform Applications in the Administration Guide for details. |
import schema namespace ns2="urn:retailerType" at "ld:DataServices/RTLServices/schemas/CustomerProfile.xsd";

declare namespace ns9="ld:DataServices/RTLServices/Customer";

declare function ns9:getCustomerSlowly() as element(ns2:CUSTOMER_PROFILE)* {

    for $CUSTOMER_PROFILE in ns9:getCustomer(),
        $c1 in ns9:getCustomer()[CustomerID lt $CUSTOMER_PROFILE/CustomerID],
        $c2 in ns9:getCustomer()[CustomerID gt $CUSTOMER_PROFILE/CustomerID],
        $c3 in ns9:getCustomer()[CustomerID eq $CUSTOMER_PROFILE/CustomerID],
        $c4 in ns9:getCustomer()[CustomerID lt $CUSTOMER_PROFILE/CustomerID],
        $c5 in ns9:getCustomer()[CustomerID gt $CUSTOMER_PROFILE/CustomerID],
        $c6 in ns9:getCustomer()[CustomerID eq $CUSTOMER_PROFILE/CustomerID],
        $c7 in ns9:getCustomer()[CustomerID = $CUSTOMER_PROFILE/CustomerID],
        $c8 in ns9:getCustomer()[CustomerID != $CUSTOMER_PROFILE/CustomerID],
        $c9 in ns9:getCustomer()[CustomerID = $CUSTOMER_PROFILE/CustomerID],
        $c10 in ns9:getCustomer()[CustomerID !=

$CUSTOMER_PROFILE/CustomerID],
        $c11 in ns9:getCustomer()[CustomerID eq $CUSTOMER_PROFILE/CustomerID],
        $c12 in ns9:getCustomer()[CustomerID eq $CUSTOMER_PROFILE/CustomerID]
return $CUSTOMER_PROFILE
};
ns9:getCustomerSlowly()
Once an ad hoc query has been entered, its query plan can be reviewed. See Obtaining an Ad Hoc Query Plan.
Two types of information are available to help you analyze the design and performance of your query.
Query Plan View helps in understanding how a query is designed. In addition to being able to view the plan, you can also print it (using the right-click menu option) or save it to a file in XML format.
You can obtain a query plan for any function in your data service. Simply select the Query Plan tab and select a function, just as you would in Test View. In addition, as a convenience, you can obtain an ad hoc query plan for XQuery or SQL.
| Note: | For details see Obtaining an Ad Hoc Query Plan. Also, a standalone ad hoc query utility for XQuery and SQL is provided with AquaLogic Data Services Platform. See Using SQL to Access Data Services in Client Application Developer's Guide for details. |
The interface for Query Plan View is quite similar to that used for testing your query functions. You select a function or procedure from a drop down list and then click the Show Query Plan button (Figure 7-15).
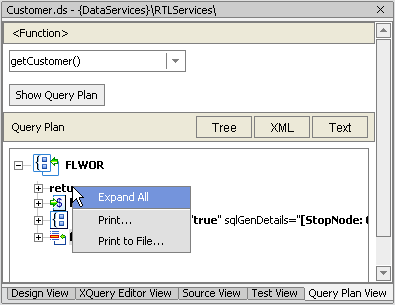
A query plan identifies the following query components:
There are several ways that a query plan can be viewed:
The query plan shows both informational and warning messages. When a section of the plan is flagged with a warning, the plan segment is highlighted in red. If you mouse over the segment, the warning message appears.
Informational messages also can appear with plan segments. Such segments are highlighted in yellow. Table 7-17 identifies the conditions associated with informational and warning messages.
|
|
A right-mouse option allows you to print a query plan to a printer or a file. Right-click on any node in the plan and select either the print or print to a file option.
If you print to a file the filename will be of type XML. The name of the file will be the function name followed by the letters _qp, as in:
getCustomerView_qp.xml
The file can be saved anywhere in your application.
The following query is from the AquaLogic Data Services Platform RTLApp:
(RTLServices/OrderDetailView/getElecOrderDetailView(order_id, customer_id)
From the function signature you know that the query returns data related to order details after it is passed an order ID and a customer ID.
The following pseudocode describes the query:
for electronic orders matching CustomerID and OrderID
return order information and ship-to information
for credit card information matching an AddressID
return credit information and bill-to address information
for electronic line item information matching the line item in the order
return line item information
A compressed version of the query plan is shown in Figure 7-18.
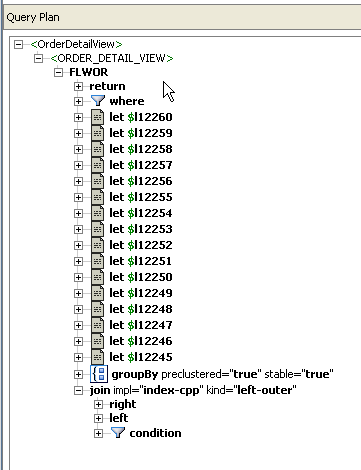
The let statements represent mappings or projections in the data service. This can be useful when trying to trace performance issues.
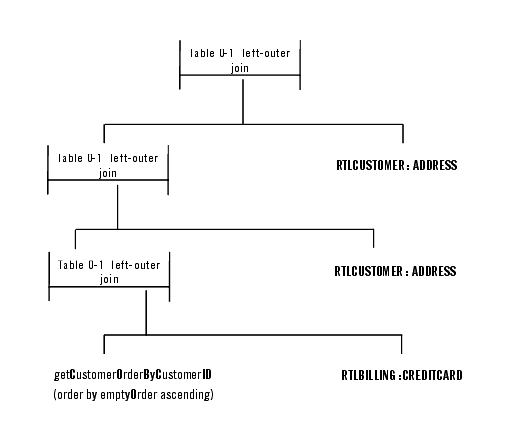
The join conditions are identified in the plan as a left-outer join driven by a complex parameter. By definition, joins have left and right sides, each of which can contain additional joins. One of the best uses of the query plan is to see how the query logic works up the various data threads to return results, as shown in Figure 7-19.
Two options are available in Query Plan.
When you show a query plan for a particular function, you may notice red or yellow highlighting of particular routines. These correspond to warnings or informational messages from the plan interpreter. For example, if a for statement is missing a where clause (potentially leading to slow performance or retrieval of a massive amount of data) a red warning will appear adjacent to the statement.
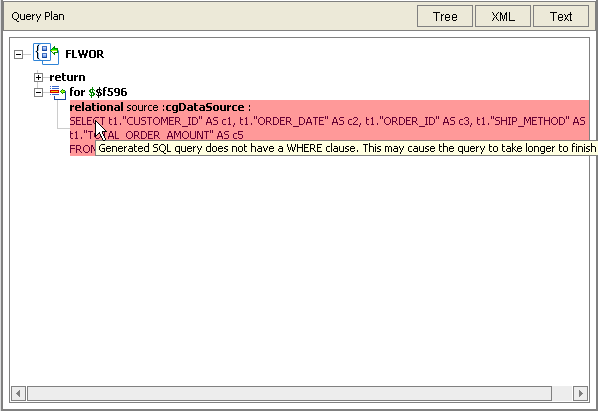
Simply mouse-over the highlighted section of the plan to view the information or warning.
Just as you can create an ad hoc test query, you can also create an ad hoc query plan. This is especially useful when multiple data sources are involved and, potentially, multiple updates across these data sources.
You can obtain a query plan on an ad hoc query through:
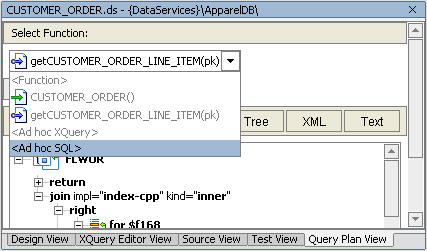
Ad hoc query plans can be developed for either XQuery or SQL (see Figure 7-21). Resulting plans can be printed or saved to a file (see Printing Your Query Plan).
| Note: | An ad hoc query remains available whenever the data service active when it was created is open to Test View. However, ad hoc queries are not visible in Source View and can only be saved by first copying the text to an external application. |
Figure 7-22 shows an example ad hoc XQuery. Although the constructor function for the current data service was used (DataServices/CustomerDB/CUSTOMER), this was unnecessary.

If your query requires simple or complex parameters, these can be exposed using the Show Parameters button.
A Results pane below the Execute button will contain the data returned by the query (if any).
In the RTLApp sample application you can copy the code in Listing 7-2 into an ad hoc query pane. This query is designed to take several minutes to complete. It can also be used to experiment with monitoring and stopping executing queries through the AquaLogic Data Services Platform Console.
import schema namespace ns2="urn:retailerType" at "ld:DataServices/RTLServices/schemas/CustomerProfile.xsd";

declare namespace ns9="ld:DataServices/RTLServices/Customer";

declare function ns9:getCustomerSlowly() as element(ns2:CUSTOMER_PROFILE)* {

    for $CUSTOMER_PROFILE in ns9:getCustomer(),
        $c1 in ns9:getCustomer()[CustomerID lt $CUSTOMER_PROFILE/CustomerID],
        $c2 in ns9:getCustomer()[CustomerID gt $CUSTOMER_PROFILE/CustomerID],
        $c3 in ns9:getCustomer()[CustomerID eq $CUSTOMER_PROFILE/CustomerID],
        $c4 in ns9:getCustomer()[CustomerID lt $CUSTOMER_PROFILE/CustomerID],
        $c5 in ns9:getCustomer()[CustomerID gt $CUSTOMER_PROFILE/CustomerID],
        $c6 in ns9:getCustomer()[CustomerID eq $CUSTOMER_PROFILE/CustomerID],
        $c7 in ns9:getCustomer()[CustomerID = $CUSTOMER_PROFILE/CustomerID],
        $c8 in ns9:getCustomer()[CustomerID != $CUSTOMER_PROFILE/CustomerID],
        $c9 in ns9:getCustomer()[CustomerID = $CUSTOMER_PROFILE/CustomerID],
        $c10 in ns9:getCustomer()[CustomerID !=

$CUSTOMER_PROFILE/CustomerID],
        $c11 in ns9:getCustomer()[CustomerID eq $CUSTOMER_PROFILE/CustomerID],
        $c12 in ns9:getCustomer()[CustomerID eq $CUSTOMER_PROFILE/CustomerID]
return $CUSTOMER_PROFILE
};
ns9:getCustomerSlowly()
Once an ad hoc query has been entered, its query plan can be reviewed. See Using Query Plan View.

You can also enter ad hoc SQL queries and view the resulting query plan. There are several prerequisites:
For example, once the CUSTOMER_ORDER function (DataServices:ApparelDB:CUSTOMER_ORDER) has been published as a table, you can — from any data service — run an ad hoc SQL query as long as your data sources are available.
The following query also includes a parameter:
SELECT * CUSTOMER_ORDER where bill_to_id=?
| Note: | The project name and the name of the schema associated with published SQL are identified through the Default Schema field. If no schema is selected then you would need to fully identify the SQL data source as in: |
SELECT * from DataServices.NewSchema.CUSTOMER_ORDER where bill_to_id=?
The ad hoc SQL query interface provides you with the ability to select appropriate parameter types. Parameter types should be selected in the same order in which they appear in your query (see Figure 7-23).
SELECT * from DataServices.NewSchema.CUSTOMER_ORDER where bill_to_id=?
Standard JDBC parameter types are available in the drop-down parameter list.
AquaLogic Data Services Platform extends SQL/92 to support table parameters. For details on usage and restrictions associated with table parameters see "Table Parameter Support" in the Using SQL to Access Data Services chapter of the Client Application Developer's Guide.
You can obtain an ad hoc query plan on a SQL query that uses table parameters. To do this you need to identify the appropriate valid parameter(s) that are to be processed as table parameters by selecting a checkbox associated with the parameter type (see Figure 7-23).


|