|
|
This chapter provides a brief overview of the Retail Dataspace Sample Application (RTLApp), which is included with a complete AquaLogic Data Services Platform (ALDSP) installation, and also describes a scenario about how this sample application was developed by a fictitious enterprise named Avitek Ltd. The purpose of this scenario is to illustrate how ALDSP can aggregate data from highly disparate data sources, allowing access to that data through a single point of access that itself is easily integrated with other applications.
The following sections are included:
These sections are preceded by a brief description of a fictitious enterprise named Avitek Ltd.
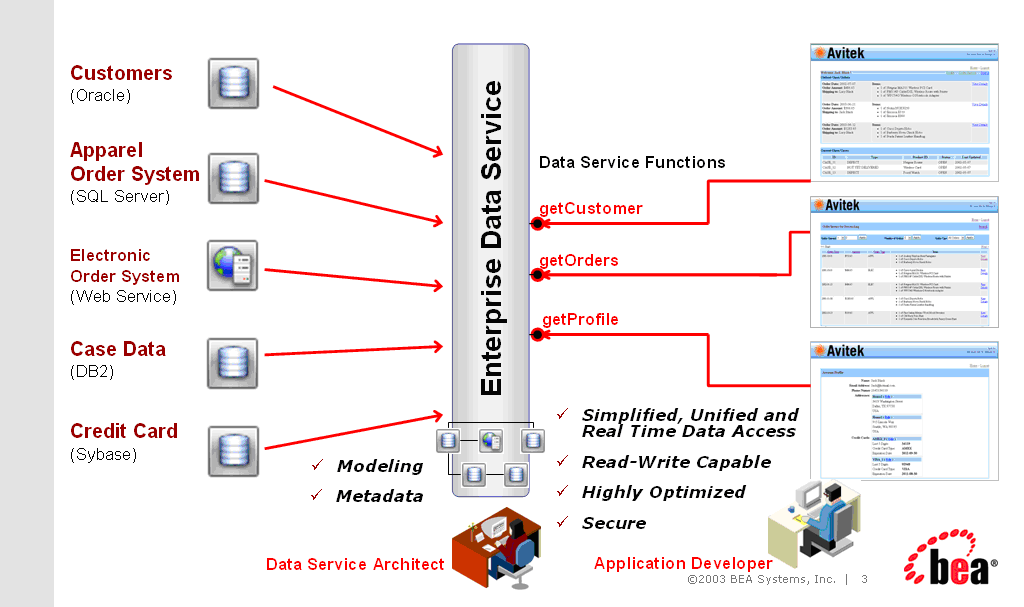
Avitek is a retailer that has grown through acquisitions. The company started out selling apparel but recently merged with an electronic retailer to expand business and consolidate cost centers such as accounting and web development. Because of this acquisition the company now has two very different order management systems (OMS), one each for electronics and apparel orders. Avitek also has a customer relationship management (CRM) system to manage customer profile information. Finally, Avitek has a Customer Service system to manage the support cases for Electronic products.
General immediate and mid-range goals for the newly consolidated IT department include:
An early “low-hanging fruit” project is to build a customer self-service web site which can also be used by support representatives. This web site needs to provide an easy solution to integrating different back-end resources and to providing two-way communication (read/update). It will also need to provide an abstraction layer to hide the complexities of the different systems.
The front-end architecture of the Web site will provide a Java-based Customer Self-Service portal where customers can update their profile information and review or modify their orders. The back-end architecture will access the following five different sources of data (as shown in Figure 1):
The project also needs a code name. RTLApp is selected.
Retail Dataspace Sample Application (RTLApp) includes the following dataspace projects:
Contains a set of data services that form the basis for electronics equipment orders. A web service has been created from this dataspace project that serves as a data source for the RetailDataspace project. (The purpose of the Electronics dataspace project is to show how a web service can be used as a data source by another project.)
Main dataspace project demonstrated by RTLApp. The RetailDataspace project contains data services based on the following data sources:
The Retail Dataspace Sample Application also includes a separate client application, RTLSelfService, which demonstrates an application that invokes the RTLApp data services to display data in a Web application. Building, deploying and running the RTLSelfService application is described in Quick Start Instructions for the RTLSelfService Application.
| Note: | The source files and other application data for RTLApp are created and laid down in your domain directory tree by the wizards that you execute as part of the steps described in the sections that follow. These files do not exist on your machine prior to completing these steps. |
| Note: | If you are using ALDSP version 3.2, please see “How to Configure the Retail Dataspace Sample Application for ALDSP 3.2.” This topic includes simplified instructions for creating and running the retail dataspace (RTLApp) sample web application. |
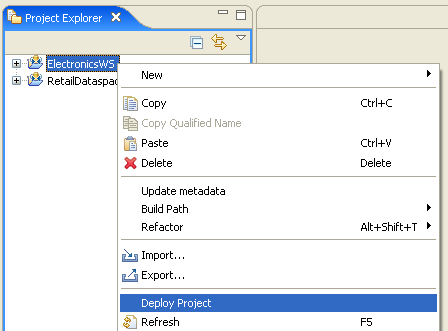
To build and deploy the RTLApp dataspace projects, complete the following steps. If you have already built and deployed the dataspace projects in Data Services Studio, you can skip to Importing the RetailDataspace Resources.
 All Programs BEA Products BEA AquaLogic Data Services Platform 3.0 Data Services Studio.
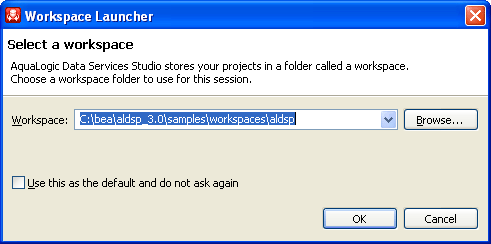
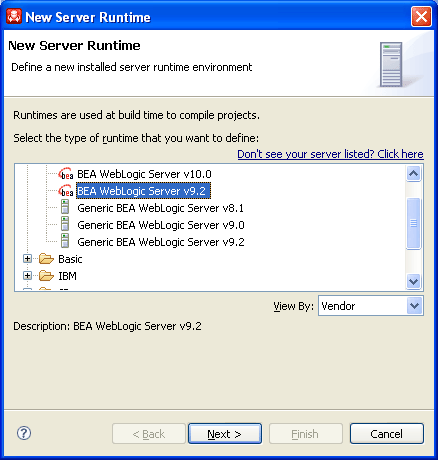
<aldsp_home>/samples/workspaces/aldsp, as in Figure 2, and click OK.Data Services Studio displays a dialog box containing the message, “No server runtimes can be found in this workspace,” and prompts you to click the Installed Runtimes... button.
Data Services Studio displays a Preferences dialog box in which you add the home directory of the WebLogic Server 9.2 runtime that is contained in the same BEA Home directory as your ALDSP 3.0 installation.
Data Services Studio displays the New Server Runtime dialog box, in which you select BEA WebLogic Server v9.2, as in Figure 4.
Data Services Studio then displays the Define a WebLogic Runtime dialog box, in which you specify the home directory of the WebLogic Server 9.2 installation associated with your ALDSP 3.0 installation.
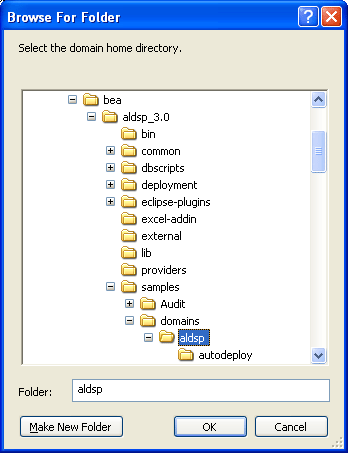
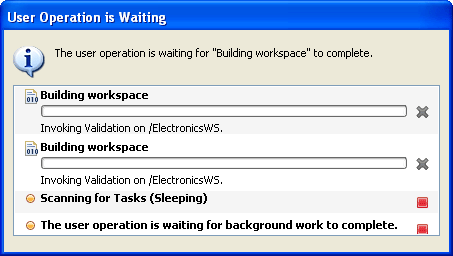
<aldsp_home>/samples/domains/aldsp directory, as in Figure 5, and click OK.Data Services Studio builds the sample dataspace, displaying a progress message box similar to Figure 6.
When the build process for the RTLApp dataspace projects is complete, the main Data Services Studio window is displayed.
The sample retail application illustrates in simplified form the kinds of data integration challenges often encountered by Information Technology (IT) managers and staff. Issues include:
Other questions may occur. Is the data-rich solution scalable? Is it reusable throughout the enterprise? Are the original data sources transparent to the application — or do they become an issue each time you want to make a minor adjustment? When changes to underlying data inevitably occur, how difficult will it be to propagate those changes to the application layer?
A survey commissioned by Avitek Marketing found customers to be dissatisfied with the call-in wait time required to track orders or update customer information. In a focus group the idea of a self-service web site resonated. Customer Service agreed; they have been requesting such a site for years, but the internal costs were always above budget. But now that Marketing is on board …
Site requirements seem simple. Fulfillment identifies that customers will need to be able to:
Bottom line: If customers can perform this level of self-service the company will save a lot of money.
A cross-sectional team of marketing and customer service develop maintenance requirements for the web application:
An application/UI designer begins “spec’ing out” the required JSPs. Pages are the easy part. Data is needed so he shoots off an email to the consolidated IT department.
When an IT data architect analyzes the requirements she turns up a problem. In surveying the information needed by the application — customer data for one data source, order data from two very separate divisions of the company (two more data sources), and customer support data (a fourth data source) — the architect realizes that integrating data from these diverse data sources will be complicated and time consuming with additional maintenance problems down the road. Challenges included:
Perhaps most frustrating: little of the specialized code needed by the application can be reused.
So much for low-hanging fruit.
Developing a unified view into distributed data is one of the most persistent challenges faced by IT departments. Just when you get all the available data sources normalized, new sources appear that must be dealt with, making yesterday’s data integration solution practically obsolete.
This problem is so pervasive that each year thousands of arguably critically-needed applications go unwritten, are delayed, or are delivered in highly-compromised form because of the data integration challenges faced by even the most sophisticated enterprises.
Compared to the above, the RTLApp team preferred a solution that:
When Avitek looked at AquaLogic Data Services Platform, they found a product that addressed the underlying challenges posed by the apparently simple RTLApp:
Specifically, the features that the team found most appealing included:
Data Access. ALDSP allows the application to access information from anywhere in the company — or beyond — through an easily-created virtual data access layer. Once accessed, data can easily be aggregated through a combination of reusable queries and views that are maintained in the ALDSP server.
Query Development. Then, once the data is collected under a single point of access, it is not difficult to create query functions that consolidate data from these disparate sources and present a common, reusable view ready for more specialized queries.
The declarative form of ALDSP artifacts (query functions in data services) makes them very readable.
Query Deployment. Once developed, queries are easily integrated into a client application thorough a variety of access methods such as the ALDSP Mediator API, the ALDSP control in Workshop, JDBC, or web service.
Several BEA technologies are exercised by the RTLApp dataspace projects:
For more information about XQSE, see the following:
The following sections examine key artifacts of the RTLApp dataspace projects and describe examples of some of the query building features provided by ALDSP:
Although the RTLApp is very simple, the underlying data acquisition is challenging because data comes from four heterogeneous data sources. These are:
getCustomerOrderByCustomerID(), that takes a customer ID as input and returns a list of customer open order information through a web service.The following sections describe work done by some of the RTLApp data services and shows how they are organized within a dataspace project. When you create a dataspace project, it is a best practice to construct data services in multiple layers, with the upper layers being increasingly abstract from the physical data sources on which they are based. The RTLapp data services were created in Data Services Studio and exist in the following layers:
Physical data services correspond to the physical data sources that are needed by the dataspace project.
RTLApp adds this layer to present the dataspace project’s data services in a more database-neutral manner that, for example, translates vendor-specific data types or create element names that are more readable or standardized.
RTLApp adds this layer to create discrete data services that combine other data services that draw upon multiple data sources and that expose data operations in the way in which clients will consume them.
RTLApp adds this layer to provide the actual applications that are composed from data services defined in the preceding layers and to determine which operations on those data services are exposed to client applications.
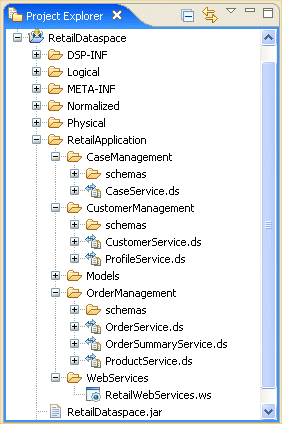
Figure 8 shows the data services that make up the RetailDataspace dataspace project in RTLApp.
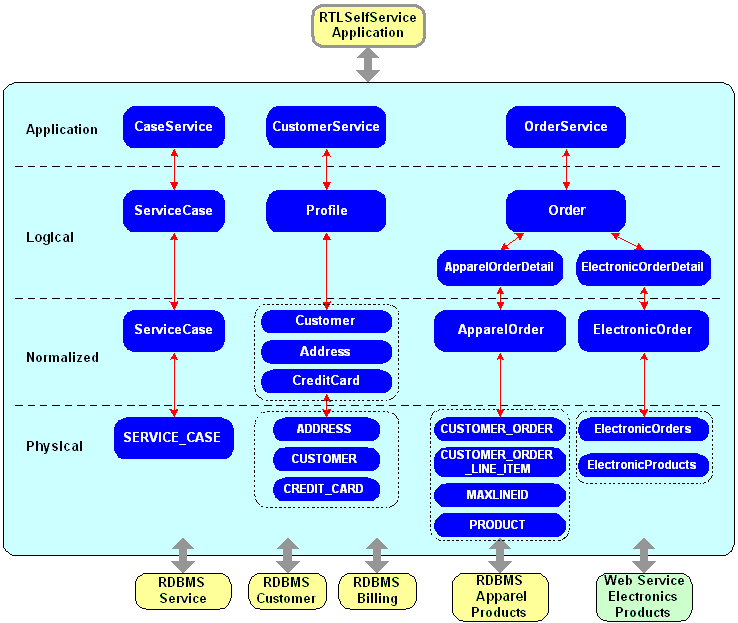
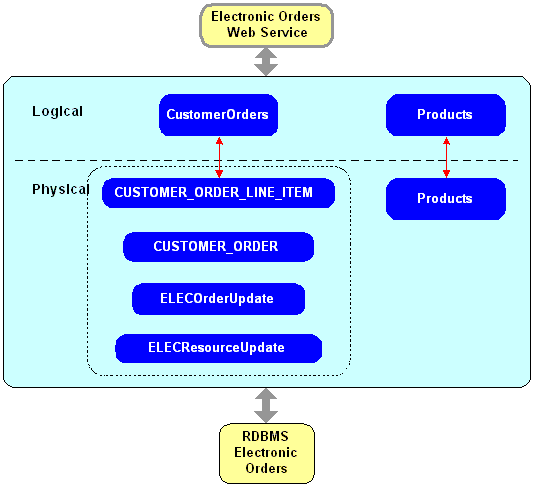
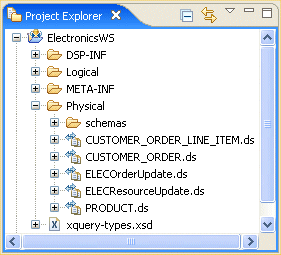
Figure 9 shows the data services that make up the ElectronicsWS dataspace project in RTLApp.
To open the RTLApp dataspace projects, start Data Services Studio, if not already running, by completing the following steps. These steps assume that you have already installed the RTLApp dataspace projects as described in Quick Start Instructions for the Retail Dataspace Sample Application.
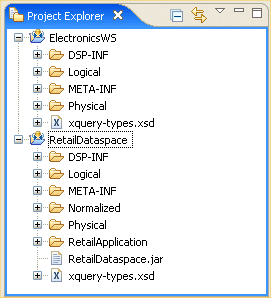
Data Services Studio is displayed on your machine, with the RTLApp dataspace project view appearing in the Project Explorer window, as shown in Figure 10.
Like all dataspace projects in Data Services Studio, components of the RTLApp sample are arranged in folders. This section briefly describes the key folders and their contents.
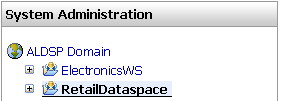
RetailDataspace is the main dataspace project in RTLApp. It encompasses all the data sources and data services that are accessed by client applications to RTLApp, and it shows a number of best practices for data service design and implementation. The ElectronicsWS dataspace project is included specifically to demonstrate the use of a web service as a data source and does not show best practices in the same way; however, a limited number of examples shown in this document are taken from ElectronicsWS as well.
The following key folders are described:
| Note: | Because the RetailDataspace dataspace project demonstrates best practices of data service design, most of the examples shown in this section are taken from that dataspace. |
Physical data services correspond to the physical data sources, described in RTLApp Data Sources, that are needed by the dataspace project. For example, the physical data services in the RetailDataspace project include apparel orders (ApparelDB), credit card information (BillingDB), Customer Relationship Management (CRM) information (CustomerDB), electronic orders (ElectronicsWS), and customer service information (ServiceDB).
In the RTLApp sample, physical data services typically have a read function and, often, one or several navigation functions that correlate to the primary key/foreign key relationship between relational sources.
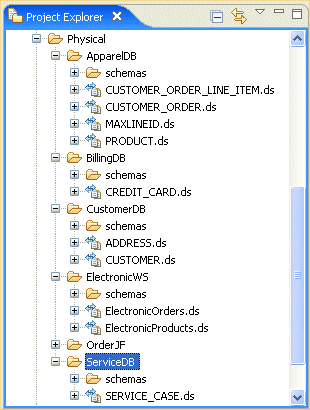
The folders, schema, and physical data services for the data sources included in the ElectronicsWS dataspace project are shown in Figure 12.
The folders, schema, and physical data services for the data sources included in the RetailDataspace project are shown in Figure 12.
The physical data services in RTLApp are based on the data sources listed in Table 1.
Normalized data services are located in a folder called Normalized, and they add a layer of abstraction or translation to the physical data services. At the normalized layer, the RTLApp data services are customized so that the data can be managed and used in a more database-neutral manner. Customizations may include translating vendor-specific data types on some fields and creating more readable, or more standardized, data element names. In addition, customized schema types, schema URLs, and the schema’s target namespace may typically created in this layer. The mapping of the physical data elements to the normalized schema can be done using the XQuery Editor.
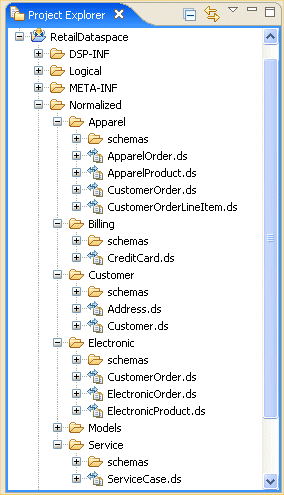
The folders, schema, and data services in the Normalized folder of the RetailDataspace project are shown in Figure 13.
Logical data services (services based on normalized data services or other logical data services) for a dataspace project are located in a folder called Logical. It is in these logical data services that the read and navigation functions drawing on multiple data sources are developed and maintained.
Logical data services expose data operations in the way in which clients should consume them, that reflect how data services should interoperate with each other, and that are enriched with the business data vocabulary of the enterprise. For example, the RetailDataspace dataspace contains the logical data service Profile.ds, which combines the following data tables:
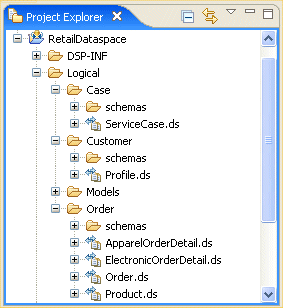
The folders, schema, and data services in the Logical folder of the RetailDataspace project are shown in Figure 14.
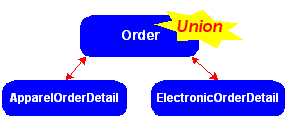
ALDSP also enables you to create a single logical data service that is drawn from disparate data sources. For example, the RetailDataspace dataspace contains a logical data service, Order.ds, that includes: ApparelOrderDetail.ds, which is based upon a relational data source; and ElectronicOrderDetail.ds, which is based upon a web service data source originating in a separate dataspace. The ALDSP feature that enables the union of two data sources is described further in Query Union.
The highest-level abstraction presented in RTLApp is the application layer. Users can define multiple applications composed from data services defined in the previous, or lower, layers.
The folders, schema, and data services in the RetailApplication folder of the RetailDataspace project are shown in Figure 15.
The operations of the RetailApplication data services that can be exposed to client applications can be identified graphically within Data Services Studio. For example, if you click the OrderManagement/OrderSummaryService.ds data service to expose its operations, you notice a small green ball icon next to several operations, shown in Figure 16.
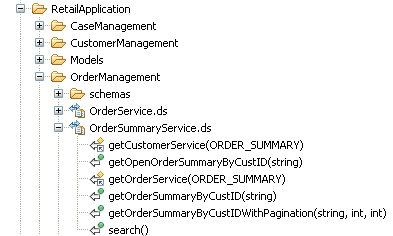
The green ball indicates that the following operations are publicly accessible by applications that invoke data services in the RetailApplication dataspace:
The following operations are not publicly accessible:
In the Workshop IDE, when the ALDSP control is generated for the RetailApplication data services, the client application sees only the public functions. When the Mediator Client JAR file is generated from the RetailApplication data services, only the public functions are contained.
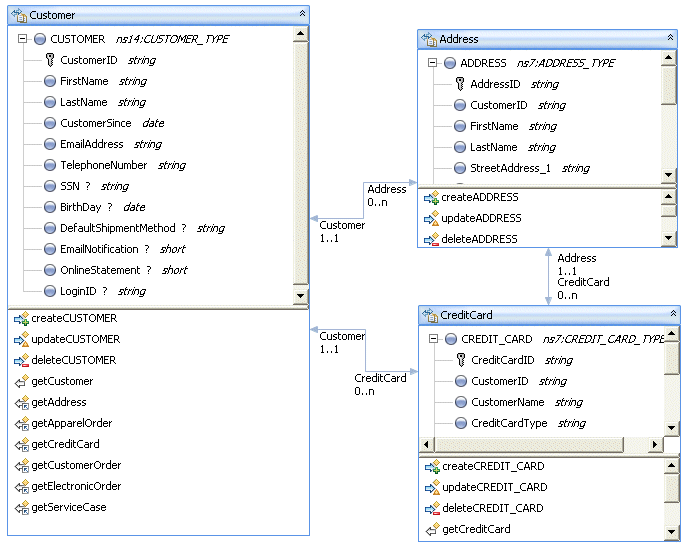
The Models folder of a logical data service folder contains model diagrams that are based on both physical and logical data services. Models are available in every main dataspace layer except in the physical layer. The purpose of models are two-fold:
For example, the model RetailDataspace/Normalized/Models/Customer.md, shown in Figure 17, shows how an order is created: the customer has a relationship with a profile and with a product.
The following sections highlight examples of select features built into ALDSP that provide a simple and convenient way to enable powerful query capabilities inside of data services
The RetailDataspace project provides an example of a query union that concatenates a query for a relational data source to a query for a web service data source. ALDSP supports the ability to display this union in the Update Map, which can support the Create, Update, and Delete (CUD) operations automatically.
The RetailDataspace project uses this capability to combine the following product orders inside a single logical data service, Order.ds:
To display this query union, double click the getOrderByCustID(string) function of the data service RetailDataspace/Logical/Order.ds in the Project Explorer.
The following code is displayed in the Source tab. The code in bold performs the union:
declare function tns:getOrderByCustID($custID as xs:string) as element(ns1:ORDER)*{
    (:this union doesn't work for the update map
    for $APPAREL_ORDER in ns8:getApparelOrderByCustID($custID)
    return $APPAREL_ORDER
    ,
    for $ELECTRONIC_ORDER in ns9:getElectronicOrderByCustID($custID)
    return $ELECTRONIC_ORDER :)

    (:this union works for the update map:)
    for $ORDER1 in (ns8:getApparelOrderByCustID($custID),
         ns9:getElectronicOrderByCustID($custID))
    return $ORDER1
};XQSE is a BEA extension to XQuery that adds procedural constructs — including basic statements, control flow, and user-defined procedures — to XQuery. Thus, XQSE is a superset of XQuery, extending it with additional features that enable a much richer set of data services to be built without leaving the XML/XQuery world.
The following examples describe how XQSE is used in RTLApp.
XQSE extends the base XQuery data model with information about elements that have been updated and then resubmitted to ALDSP. An XML node that contains such changes has the new XQSE type changed-element, which represents an element with changes.
In the RetailDataspace project, the normalized data service ApparelOrder contains a primary update operation, updateAPPAREL_ORDER. This operation passes a changed-element to the physical data service ApplOrderUpdate. ApplOrderUpdate is based on a Java function that updates the value of the element and returns it to the caller. The source of the Java function is included in RetailDataspace\DSP-INF\lib\APPLOrderUOV.jar.
In the RetailDataspace project, the normalized data service CustomerOrder uses XQSE in the function updateELEC_ORDER to determine how to invoke the CustomerOrders.ws web service to update electronics orders. In addition, CustomerOrder is designed as a reflection of the ElectronicsWS logical data service CustomerOrder. This ALDSP capability allows RTLApp to eliminate the web service wrappers (xxxRequest and xxxResponse) that are defined by the WSDL when the ElectronicsWS CustomerOrder data service is exposed as a web service.
For an in-depth walkthrough of this example, see Updating Data Based on a Web Service.
In the RetailDataspace project, the normalized data service CustomerOrder contains a procedure, updateELEC_ORDER, which is implemented through a web service interface. As a result, because we do not want to transfer the data graph between the dataspace and web service protocol, the changed-element is not available in CustomerOrders. Therefore, RTLApp uses XQSE in the changeCustomerOrders function in the logical data service CustomerOrders (of the ElectronicsWS dataspace project) to implement the logic for updating the element representing electronics orders. This logic is as follows:
ALDSP provides a robust set of automated services to handle updates to data services that are based on relational data sources. However, automated update services are not available for data sources that are based on web services. For web service based data sources, ALDSP permits the use of XQSE procedures, which can greatly simplify the creation of custom code for those update tasks. RTLApp provides an example of using XQSE to update the customer orders that are managed by a web service. This example demonstrates a design pattern for isolating a web service resource from the higher-level data services in a dataspace project. The sections that follow provide a detailed walkthough of this example.
As explained in RTLApp Data Sources, orders for electronics products are managed by the web service, CustomerOrders. This web service is created from the logical data service CustomerOrders, which is in the ElectronicsWS dataspace project. This web service is subsequently imported into the physical layer of the RetailDataspace project. The physical data service, ElectronicOrders, uses the imported CustomerOrders web service as a data source.
| Note: | The creation of a web service from a logical data service, and then importing that web service into the physical layer of another dataspace project, is not meant to be a design pattern. However, RTLApp uses this method for two reasons: first, to show that it can be done; and second, to take advantage of an easy-to-use ALDSP capability to generate a simple, ad hoc web service that can serve the purposes of the RTLApp dataspace sample. |
Normalizing a data service enables consuming applications to use the data without regard for the inherent differences of its various underlying source representations. The RetailDataspace project contains two normalized data services, shown in Figure 19, that together abstract the process of using and updating data that is managed by the CustomerOrders web service.
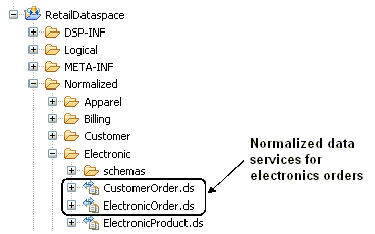
The following data services, circled in Figure 19, are the focus of how XQSE can be used in a data service to update data managed by a web service:
This data service contains normalized elements for processing electronics orders, exposing them to logical data services as simple create-update-delete procedures. The ElectronicOrder data service abstracts the elements and procedures contained in the CustomerOrder logical data service. When create-read-update-delete (CRUD) operations are invoked on the ElectronicOrder data service to process customer orders, the ElectronicOrder data service invokes the corresponding CRUD operations on the normalized CustomerOrder data service.
ustomerOrder
This is the normalized data service that is based on the physical data service ElectronicOrders, which is in turn based upon the CustomerOrders web service that has been imported into the physical layer of the RetailDataspace project. The CustomerOrder data service normalizes the ElectronicOrders physical data service by removing multiple web service wrapper layers that result when that physical data service is created. When the normalized ElectronicOrder data service invokes the CustomerOrder data service to process a customer order update, the CustomerOrder data service uses XQSE to update the value of the customer order in the CustomerOrders web service, as explained in XQSE Procedure Walkthrough.
The CustomerOrder data service therefore functions as a bridge between the normalized ElectronicOrder data service and the physical ElectronicOrders data service.
Figure 20 shows the relationship among the data services in the RetailDataspace project and the CustomerOrders web service when the data managed by that web service is updated.
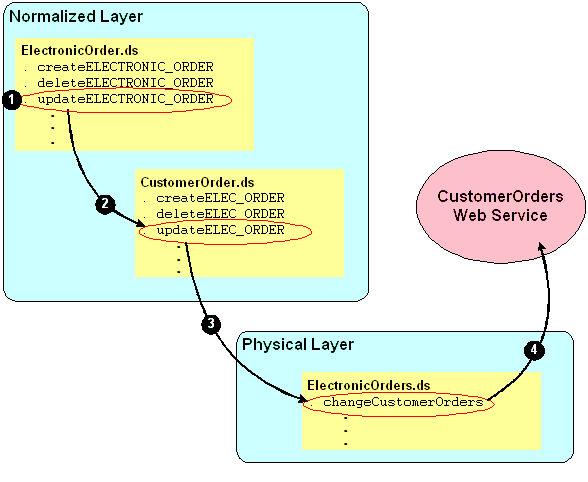
Figure 20 includes the following numbered callouts to highlight execution flow when the normalized data service ElectronicOrder is invoked to update the value of a customer order:
updateELECTRONIC_ORDER operation.pdateELEC_ORDER procedure of the CustomerOrders data service to effect the update of the value of the customer order.updateELEC_ORDER procedure invokes the changeCustomerOrders operation in the physical data service ElectronicOrders to construct a changeCustomerOrders object, which holds the value of the customer order.
The normalized CustomerOrder data service contains the XQSE procedure, updateELEC_ORDER, to perform the web service update, which cannot be accomplished via the automated update services available in ALDSP. Specifically, the updateELEC_ORDER procedure performs the following tasks:
As a result of an invocation on the updateELEC_ORDER procedure, the CustomerOrders web service that has been imported into the physical layer of the RetailDataspace project invokes the logical data service CustomerOrders that is contained in the ElectronicsWS dataspace project. In turn, that CustomerOrders data service updates the electronics orders RDBMS, RTLELECOMS, which is described in RTLApp Data Sources.
To view the updateELEC_ORDER XQSE procedure:
CustomerOrder data service, which appears in the Normalized/Electronic folder of the RetailDataspace dataspace project, as shown in Figure 19.pdateELEC_ORDER.The updateELEC_ORDER procedure is shown in Figure 21.
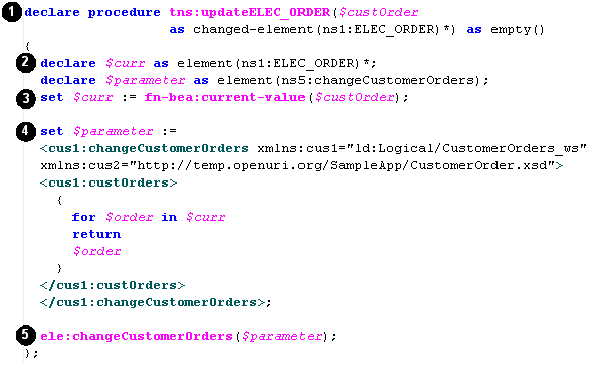
For a description of the statements in the updateELEC_ORDER procedure, refer to the following callouts in Figure 21:
changed-element, which contains the updates for the web service data source. The argument $custOrder is a data graph that simultaneously contains both the old and new values of the customer order.
For more information about XQSE procedure declarations and the changed-element type, see
BEA XQuery Scripting Extension (XQSE) in the XQuery and XQSE Developer’s Guide.
set statement constructs a changeCustomerOrders SDO object, named $parameter, from the array of customer order values contained the $curr variable. changeCustomerOrders procedure in the physical data service ElectronicOrders, passing the changeCustomerOrders SDO object.
RTLSelfService is a companion sample application provided with RTLApp that demonstrates the use of a Web-based client application that invokes data services and displays the resulting data in a Web browser.
The steps for configuring, building, deploying, and running the RTLSelfService application are provided in the following sections:
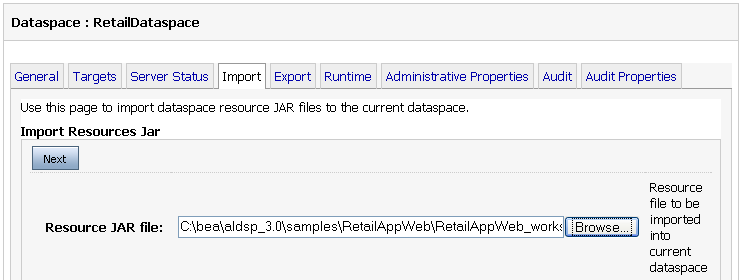
The RTLApp sample application exercises ALDSP functionality that requires certain data service configurations, such as failover, caching, security, and others, to be set prior to building and deploying the RTLapp application in the Workshop IDE. These configurations are contained in the resource file, RetailDataspace.jar, which needs to be imported into the RetailDataspace project as explained in the steps that follow.
All Programs BEA Products BEA AquaLogic Data Services Platform 3.0 Examples AquaLogic Data Services Console.weblogic and password weblogic.<aldsp_home>\samples\workspaces\aldsp\RetailDataspace\RetailDataspace.jar, as in Figure 23.| Note: | If you are using ALDSP version 3.2, please see “How to Configure the Retail Dataspace Sample Application for ALDSP 3.2.” This topic includes simplified instructions for creating and running the retail dataspace (RTLApp) sample web application. |
To build and deploy the RTLSelfService application in the Workshop for WebLogic Platform 9.2 IDE, complete the following steps.
| Note: | The RTLApp sample can be run only in the ALDSP sample domain directory; that is, in the <aldsp_home>/samples/domains/aldsp directory. |
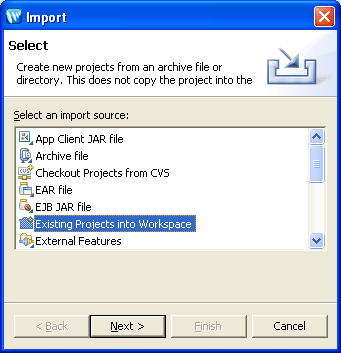
com.bea.dsp.ide.control.feature.link from the <aldsp_home>/eclipse-plugins/workshop9 directory (for example, C:\bea\aldsp_3.0\eclipse-plugins\workshop9), and place it into the <workshop92_home>/eclipse/links directory (for example, C:\bea\workshop92\eclipse\links). All Programs BEA Products Workshop for WebLogic Platform.C:\bea\user_projects\w4WP_workspaces\RTLAppWeb
Import..., and click Existing Projects into Workspace, as in Figure 24:
<aldsp_home>\samples\RetailAppWeb\RetailAppWeb_workshop9.zip
<aldsp_home>/samples/RetailAppWeb/RetailAppWeb_workshop9.tar
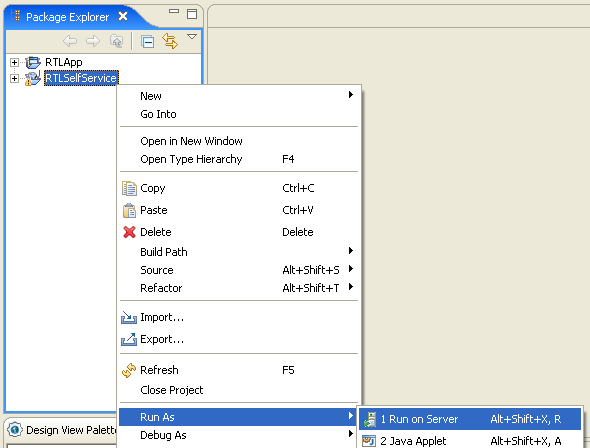
Run on Server, as in Figure 25.<aldsp_home>/samples/domains/aldsp
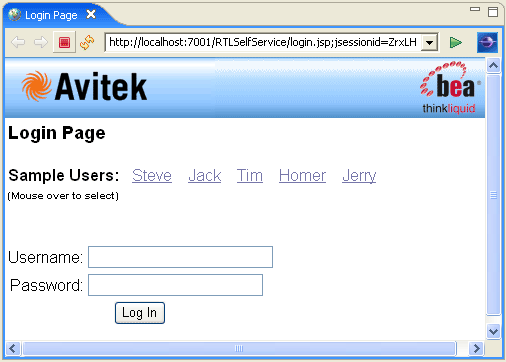
If you have not already done so, start the RTLSelfService Application by completing the steps in Building and Deploying the RTLSelfService Application in the Workshop IDE. When the login page shown in Figure 26 displayed, you can choose from users Steve, Jack, Tim, Homer, or Jerry. Each uses the password weblogic.
Once a customer logs in, she or he sees their MyProfile screen. From there he or she can navigate to information on open orders, order history, support, search, and logout. Customers can edit open orders (see Figure 28) and get details on completed orders. Search allows the user to supply product description information, start or end date, or order amount brackets.
The application also demonstrates some ALDSP facilities including the ability to:
The My Profile page illustrates ALDSP’s ability to perform automatic read/write on distributed data.
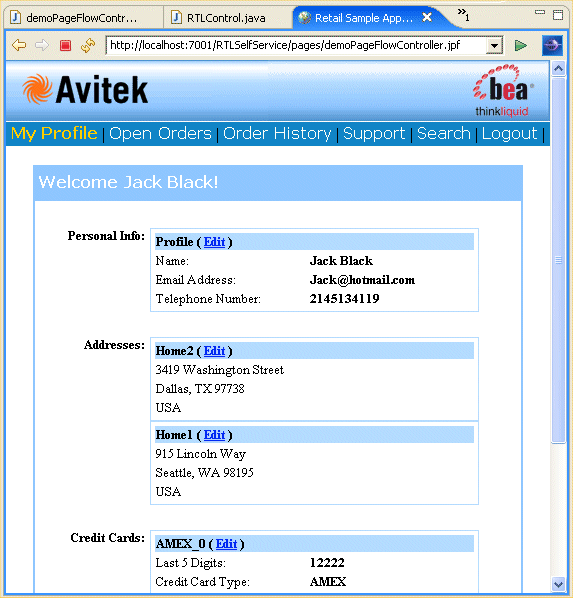
My Profile page consolidates Customer and Credit Card information. Users can change their personal profile information, address information, and credit card information. Changes are initially reflected on their MyProfile page. If satisfied, the user can click Submit All Changes to persist changes to the respective data sources.
The page is based on ProfileView.jsp and the ProfileView data service (ProfileService.ds).
The Open Order page consolidates a customer’s electronics and apparel open orders.
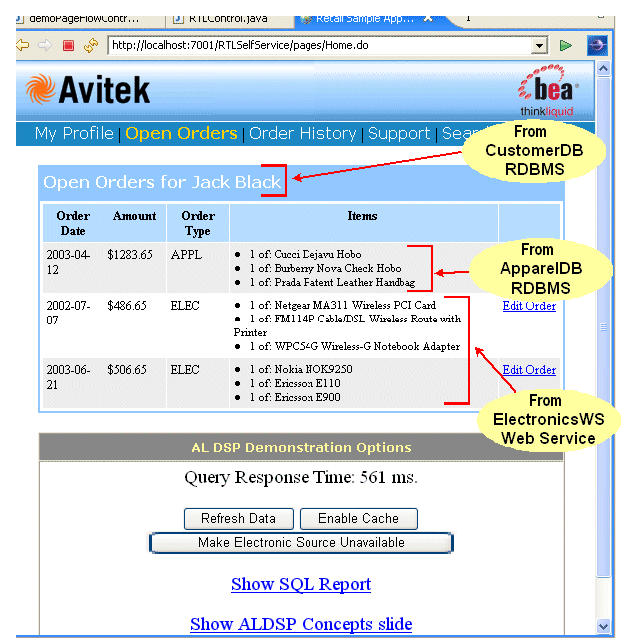
From the user’s perspective, changing data is simply a matter of select and type. However, the underlying update mechanisms for electronic orders (which are maintained as a web service) and apparel orders are quite different.
Electronic orders are derived from a web service. In this case, updating a electronic order demonstrates web service custom update capabilities.
Apparel orders are derived from a relational database and updates are automatic.
The Enable Cache option turns on caching for the function underlying the Open Orders page. You can use the Refresh button to verify that the execution time when cache is enabled is significantly faster than when it is not.
Click the Make Electronics Source Unavailable button to disable the web service. This action also refreshes your Open Orders page. Notice that you can still retrieve partial results (apparel orders) when a data source becomes unavailable.
The Show SQL Report button illustrates accessing data through JDBC. This demonstrates the integration of ALDSP query functions with reporting and business intelligence tools such as Crystal Reports.
The Open Order page is controlled by a JSP named defaultView.jsp. Call-outs in
Figure 5 show underlying data sources. The page derives its font and other look-and-feel characteristics from a cascading stylesheet.
The Order History page displays historical order information for electronic and apparel orders.
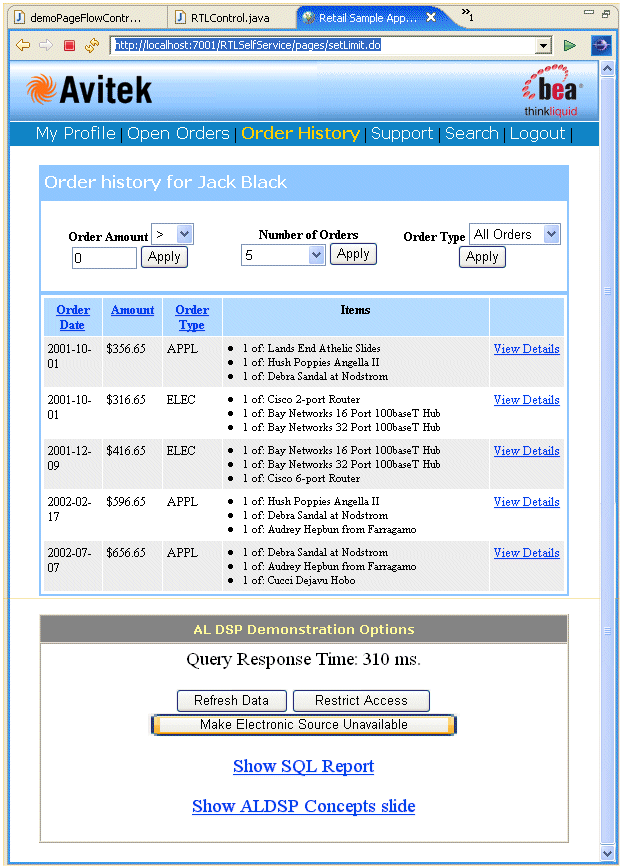
Users have several options associated with viewing their previous orders:
An Apply button is provided to control page refresh.
ALDSP security can be demonstrated when the number of orders is set to All. Then when the Restrict Access option is selected, data is automatically redacted to show only orders where order amounts are less than $500.00.
The Order History page is controlled by a OrderHistory.jsp.
The Support page provides information on any open support cases for the currently logged-in customer.
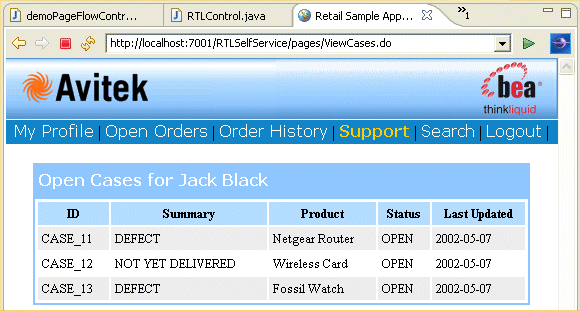
The underlying JSP is caseView.jsp.
Users can search for specific orders based on order dates, items, or amounts. The underlying code executes ad hoc ALDSP query functions.

Users can search on any combination of search field criteria including product description, start or end data, and a range of order amounts.
The JSP for this page initiates a small Java program that incorporates customer input and generates an XQuery based on the selected parameters.
In summary, the RTLApp provides:


|