
![BEA BEA Tuxedo Release [Release Number]](../images/top.gif)
|
|
|
|
|
|
Steps for Creating a BEA Tuxedo CORBA Server Application
This chapter describes the basic steps involved in creating a CORBA server application. The steps shown in this chapter are not definitive; there may be other steps you may need to take for your particular server application, and you may want to change the order in which you follow some of these steps. However, the development process for every CORBA server application has each of these steps in common.
This topic includes the following sections:
This chapter begins with a summary of the steps, and also lists the development tools and commands used throughout this book. Your particular deployment environment might use additional software development tools, so the tools and commands listed and described in this chapter are also not definitive.
The chapter uses examples from the Basic University sample application, which is provided with the BEA Tuxedo software. For complete details about the Basic University sample application, see the Guide to the CORBA University Sample Applications. For complete information about the tools and commands used throughout this book, see the CORBA Programming Reference.
For information about creating multithreaded CORBA server applications, see Creating Multithreaded CORBA Server Applications.
Summary of the CORBA Server Application Development Process
The basic steps to create a server application are:
Step 1: Compile the OMG IDL File for the Server Application
Step 2: Write the Methods That Implement Each Interface's Operations
Step 3: Create the Server Object
Step 4: Define the In-memory Behavior of Objects
Step 5: Compile and Link the Server Application
Step 6: Deploy the Server Application
The BEA Tuxedo software also provides the following development tools and commands:
Step 1: Compile the OMG IDL File for the Server Application
The basic structure of the client and server portions of the application that runs in the BEA Tuxedo domain are determined by statements in the application's OMG IDL file. When you compile your application's OMG IDL file, the IDL compiler generates some or all of the files shown in the following diagram, depending upon which options you specify in the idl command. The shaded components are the generated files that you modify to create a server application.
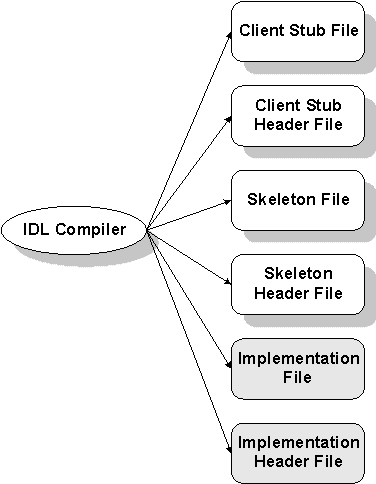
The files produced by the IDL compiler are described in Table 2-1.
Using the IDL Compiler
To generate the files listed in Table 2-1, enter the following command:
idl [options] idl-filename [icf-filename]
In the idl command syntax:
Note: The C++ IDL compiler implementation of pragmas changed in WebLogic Enterprise 5.1 to support CORBA 2.3 functionality and may affect your IDL files. The CORBA 2.3 functionality changes the scope that the pragma prefix definitions can affect. Pragmas do not affect definitions contained within included IDL files, nor do pragma prefix definitions made within included IDL files affect objects outside the included file.
The C++ IDL compiler has been modified to correct the handling of pragma prefixes. This change can effect the repository ID of objects, resulting in failures for some operations, such as a _narrow.
To prevent such failures:
For more information about the IDL compiler, including details on the idl command, see the CORBA Programming Reference.
Generating the Skeleton and Implementation Files
The following command line generates client stub, skeleton, and initial implementation files, along with skeleton and implementation header files, for the OMG IDL file univb.idl:
idl -i univb.idl
For more information about the idl command, see the CORBA Programming Reference. For more information about generating these files for the BEA Tuxedo University sample applications, see the Guide to the CORBA University Sample Applications.
Note: If you plan to specify nondefault object activation or transaction policies, or if you plan to limit the number of interfaces for which you want skeleton and implementation files generated, you need to generate and modify an Implementation Configuration File (ICF) and pass the ICF file to the IDL compiler. For more information, see Specifying Object Activation and Transaction Policies in the ICF File.
Generating Tie Classes
The IDL compiler also provides the -T command-line option, which you can use for generating tie class templates for your interfaces. For more information about implementing tie classes in a CORBA application, see the section Delegation-based Interface Implementation.
Step 2: Write the Methods That Implement Each Interface's Operations
As the server application programmer, your task is to write the methods that implement the operations for each interface you have defined in your application's OMG IDL file.
The implementation file contains:
Within the Tobj_ServantBase::activate_object() and Tobj_ServantBase::deactivate_object()operations, you write code that performs any particular steps related to activating or deactivating an object. This includes reading and writing the object's durable state from and to disk, respectively. If you implement these operations in your object, you must also edit the implementation header file and add the definitions for these operations in each implementation that uses them.
The Implementation File Generated by the IDL Compiler
Although you can create your server application's implementation file entirely by hand, the IDL compiler generates an implementation file that you can use as a starting place for writing your implementation file. The implementation file generated by the IDL compiler contains signatures for the methods that implement each of the operations defined for your application's interfaces.
You typically generate this implementation file only once, using the -i option with the command that invokes the IDL compiler. As you iteratively refine your application's interfaces, and modify the operations for those interfaces, including operation signatures, you add all the required changes to the implementation file to reflect those changes.
Implementing a Factory
As mentioned in the section How Client Applications Access and Manipulate Your Application's CORBA Objects, you need to create factories so that client applications can easily locate the objects managed by your server application. A factory is like any other CORBA object that you implement, with the exception that you register it with the FactoryFinder object. Registering a factory is described in the section Writing the Code That Creates and Registers a Factory.
The primary function of a factory is to create object references, which it does by invoking the TP::create_object_reference() operation. The TP::create_object_reference() operation requires the following input parameters:
For example, in the Basic University sample application, the RegistrarFactory interface specifies only one operation, as follows:
University::Registrar_ptr RegistrarFactory_i::find_registrar()
The find_registrar() operation on the RegistrarFactory object contains the following invocation to the TP::create_object_reference() operation to create a reference to a Registrar object:
CORBA::Object_var v_reg_oref =
            TP::create_object_reference(
                University::_tc_Registrar->id(),
                object_id,
                CORBA::NVlist::_nil()
            );
In the previous code example, notice the following:
University::_tc_Registrar->id()
CORBA::NVlist::_nil()
For information about specifying routing criteria that affect the group to which object references are routed, see Scaling a BEA Tuxedo CORBA Server Application
Step 3: Create the Server Object
Implementing the Server object is not like implementing other language objects. The header class for the Server object has already been created, and the Server object class has already been instantiated for you. Creating the Server object involves implementing a specific set of methods in the prepackaged Server object class. The methods you implement are described in this section.
To create the Server object, create a new file using a common text editor and implement the following operations:
There is only one instance of the Server object in any server application. If your server application is managing multiple CORBA object implementations, the Server::initialize(), Server::create_servant(), and Server::release() operations you write must include code that applies to all those implementations.
The code that you write for most of these tasks involves interaction with the TP Framework. The sections that follow explain the code required for each of these Server object operations and shows sample code from the Basic University sample application.
Initializing the Server Application
The first operation that you implement in your Server object is the operation that initializes the server application. This operation is invoked when the BEA Tuxedo system starts the server application. The TP Framework invokes the following operation in the Server object during the startup sequence of the server application:
CORBA::Boolean Server::initialize(int argc, char** argv)
Any command-line options specified in the CLOPT parameter for your specific server application in the SERVERS section of the BEA Tuxedo domain's UBBCONFIG file are passed to the Server::initialize() operation as argc and argv. For more information about passing arguments to the server application, see Administering a BEA Tuxedo Application at Run Time. For examples of passing arguments to the server application, see the Guide to the CORBA University Sample Applications.
Within the Server::initialize() operation, you include code that does the following, if applicable:
Writing the Code That Creates and Registers a Factory
If your server application manages a factory that you want client applications to be able to locate easily, you need to write the code that registers that factory with the FactoryFinder object, which is invoked typically as the final step of the server application initialization process.
To write the code that registers a factory managed by your server application, you do the following:
This step involves creating an object reference as described in the section Implementing a Factory. In this step, you include an invocation to the TP::create_object_reference() operation, specifying the Interface Repository ID of the factory's OMG IDL interface.The following example creates an object reference, represented by the variable s_v_fact_ref, to the RegistrarFactory factory:
University::RegistrarFactory s_v_fact_ref =
     TP::create_object_reference(
         University::_tc_RegistrarFactory->id(),
         object_id,
         CORBA::NVList::_nil()
     );
This step involves invoking the following operation for each of the factories managed by the server application:
TP::register_factory (CORBA::Object_ptr factory_or,
                      const char* factory_id);
The TP::register_factory() operation registers the server application's factories with the FactoryFinder object. This operation requires the following input parameters:
The following example registers the RegistrarFactory factory with the BEA Tuxedo domain:
TP::register_factory(s_v_fact_ref.in(),
                     University::_tc_RegistrarFactory->id());
Notice the parameter University::_tc_RegistrarFactory->id(). This is the same parameter specified in the TP::create_object_reference() operation. This parameter extracts the Interface Repository ID of the object's OMG IDL interface from its typecode.
Creating Servants
After the server application initialization process is complete, the server application is ready to begin processing client requests. If a request arrives for an operation on a CORBA object for which there is no servant available in memory, the TP Framework invokes the following operation in the Server object:
Tobj_Servant Server::create_servant(const char* interfaceName)
The Server::create_servant() operation contains code that instantiates a servant for the object required by the client request. For example, in C++, this code includes a new statement on the interface class for the object.
The Server::create_servant() operation does not associate the servant with an OID. The association of a servant with an OID takes place when the TP Framework invokes the Tobj_ServantBase::activate_object() operation on the servant, which completes the instantiation of the object. (You cannot associate an OID with an object in the object's constructor.) Likewise, the disassociation of a servant with an OID takes place when the TP Framework invokes the deactivate_object() operation on the servant.
This behavior of a servant in the BEA Tuxedo system makes it possible, after an object has been deactivated, for the TP Framework to make a servant available for another object instantiation. Therefore, do not assume that an invocation of an object's Tobj_ServantBase::deactivate_object() operation results in an invocation of that object's destructor. If you use the servant pooling feature in your server application, you can implement the TP::application_responsibility() operation in an object's Tobj_ServantBase::deactivate_object() operation to pass a pointer to the servant to a servant pool for later reuse. Servant pooling is discussed in the section Servant Pooling.
The Server::create_servant() operation requires a single input argument. The argument specifies a character string containing the Interface Repository ID of the OMG IDL interface of the object for which you are creating a servant.
In the code you write for this operation, you specify the Interface Repository IDs of the OMG IDL interfaces for the objects managed by your server application. During run time, the Server::create_servant()operation returns the servant needed for the object specified by the request.
The following code implements the Server::create_servant() operation in the University server application from the Basic University sample application:
Tobj_Servant Server::create_servant(const char* intf_repos_id)
{
  if (!strcmp(intf_repos_id, University::_tc_RegistrarFactory->id())) {
      return new RegistrarFactory_i();
  }
  if (!strcmp(intf_repos_id, University::_tc_Registrar->id())) {
      return new Registrar_i();
  }
  if (!strcmp(intf_repos_id, University::_tc_CourseSynopsisEnumerator->id())) {
      return new CourseSynopsisEnumerator_i();
  }
  return 0; // unknown interface
}
Releasing the Server Application
When the BEA Tuxedo system administrator enters the tmshutdown command, the TP Framework invokes the following operation in the Server object of each running server application in the BEA Tuxedo domain:
void Server::release()
Within the Server::release() operation, you may perform any application-specific cleanup tasks that are specific to the server application, such as:
Once a server application receives a request to shut down, the server application can no longer receive requests from other remote objects. This has implications on the order in which server applications should be shut down, which is an administrative task. For example, do not shut down one server process if a second server process contains an invocation in its Server::release() operation to the first server process.
During server shutdown, you may want to include the following invocation to unregister each of the server application's factories:
TP::unregister_factory (CORBA::Object_ptr factory_or,
				const char* factory_id)
The invocation of the TP::unregister_factory() operation should be one of the first actions in the Server::release() implementation. The TP::unregister_factory() operation unregisters the server application's factories. This operation requires the following input arguments:
The following example unregisters the RegistrarFactory factory used in the Basic sample application:
TP::unregister_factory(s_v_fact_ref.in(), UnivB::_tc_RegistrarFactory->id());
In the preceding code example, notice the use of the global variable s_v_fact_ref. This variable was set in the Server::initialize() operation that registered the RegistrarFactory object, which is used again here.
Notice also the parameter UnivB::_tc_RegistrarFactory->id(). This is also the same as the interface name used to register the factory.
Step 4: Define the In-memory Behavior of Objects
As stated in the section Managing Object State, you determine what events cause an object to be deactivated by assigning object activation policies, transaction policies, and, optionally, using the application-controlled deactivation feature.
You specify object activation and transaction policies in the ICF file, and you implement application-controlled deactivation via the TP::deactivateEnable() operation. This section explains how you implement both mechanisms, using the Basic University sample application as an example.
The sections that follow describe the following:
Specifying Object Activation and Transaction Policies in the ICF File
The BEA Tuxedo software supports the following activation policies, described in Object Activation Policies:
The BEA Tuxedo software also supports the following transaction policies, described in Integrating Transactions into a CORBA Server Application:
To assign these policies to the objects in your application:
# genicf university.idl
The preceding command generates the file university.icf.
module POA_UniversityB
    {
    implementation CourseSynopsisEnumerator_i
        {
        activation_policy ( method );
        transaction_policy ( optional );
        implements ( UniversityB::CourseSynopsisEnumerator );
        };
    };
module POA_UniversityB
    {
    implementation Registrar_i
        {
        activation_policy ( method );
        transaction_policy ( optional );
        implements ( UniversityB::Registrar );
        };
    };
module POA_UniversityB
    {
    implementation RegistrarFactory_i
        {
        activation_policy ( method );
        transaction_policy ( optional );
        implements ( UniversityB::RegistrarFactory );
        };
    };
implementation RegistrarFactory_i
        {
        activation_policy ( method );
        transaction_policy ( optional );
        implements ( UniversityB::RegistrarFactory );
        };
Step 5: Compile and Link the Server Application
After you have finished writing the code for the Server object and the object implementations, you compile and link the server application.
You use the buildobjserver command to compile and link CORBA server applications. The buildobjserver command has the following format:
buildobjserver [-o servername] [options]
In the buildobjserver command syntax:
For complete information about compiling and linking the University sample applications, see the Guide to the CORBA University Sample Applications. For complete details about the buildobjserver command, see the BEA Tuxedo Command Reference.
There are special considerations for designing and building multithreaded CORBA server applications. See Using the buildobjserver Command.
Note: If you are running the BEA Tuxedo software on IBM AIX 4.3.3 systems, you need to recompile your CORBA applications using the -brtl compiler option.
Step 6: Deploy the Server Application
You or the system administrator deploy the CORBA server application by using the procedure summarized in this section. For complete details on building and deploying the University sample applications, see the Guide to the CORBA University Sample Applications.
To deploy the server application:
tmloadcf -y application-ubbconfig-file
The command-line argument application-ubbconfig-file represents the name of your application's UBBCONFIG file. Note that you may need to remove any old TUXCONFIG files to execute this command.
tmboot -y
You can reboot a server application without reloading the UBBCONFIG file.
For complete details about configuring the University sample applications, see the Guide to the CORBA University Sample Applications. For complete details on creating the UBBCONFIG file for CORBA applications, see Setting Up a BEA Tuxedo Application.
Development and Debugging Tips
This topic includes the following sections:
Use of CORBA Exceptions and the User Log
This topic includes the following sections:
Client Application View of Exceptions
When a client application invokes an operation on a CORBA object, an exception may be returned as a result of the invocation. The only valid exceptions that can be returned to a client application are the following:
The BEA Tuxedo system works to ensure that these CORBA-defined restrictions are not violated, which is described in the section Server Application View of Exceptions.
Because the set of exceptions exposed to the client application is limited, client applications may occasionally catch exceptions for which the cause is ambiguous. Whenever possible, the BEA Tuxedo system supplements such exceptions with descriptive messages in the user log, which serves as an aid in detecting and debugging error conditions. These cases are described in the following section.
Server Application View of Exceptions
This topic includes the following sections:
Exceptions Raised by the BEA Tuxedo System That Can Be Caught by Application Code
The BEA Tuxedo system may return the following types of exceptions to an application when operations on the TP object are invoked:
interface TobjS {
          exception AlreadyRegistered { };
          exception ActivateObjectFailed { string reason; };
          exception ApplicationProblem { };
          exception CannotProceed { };
          exception CreateServantFailed { string reason; };
          exception DeactivateObjectFailed { string reason; };
          exception IllegalInterface { };
          exception IllegalOperation { };
          exception InitializeFailed { string reason; };
          exception InvalidDomain { };
          exception InvalidInterface { };
          exception InvalidName { };
          exception InvalidObject { };
          exception InvalidObjectId { };
          exception InvalidServant { };
          exception NilObject { string reason; };
          exception NoSuchElement { };
          exception NotFound { };
          exception OrbProblem { };
          exception OutOfMemory { };
          exception OverFlow { };
          exception RegistrarNotAvailable { };
          exception ReleaseFailed { string reason; };
          exception TpfProblem { };
          exception UnknownInterface { };
}
The BEA Tuxedo System's Handling of Exceptions Raised by Application Code During the Invocation of Operations on CORBA Objects
A server application can raise exceptions in the following places in the course of servicing a client invocation:
It is possible for the server application to raise any of the following types of exceptions:
interface TobjS {
          exception ActivateObjectFailed { string reason; };
          exception CreateServantFailed { string reason; };
          exception DeactivateObjectFailed { string reason; };
          exception InitializeFailed { string reason; };
          exception ReleaseFailed { string reason; };
}All exceptions raised by server application code that are not caught by the server application are caught by the BEA Tuxedo system. When these exceptions are caught, one of the following occurs:
The following sections show how the BEA Tuxedo system handles exceptions raised by the server application during the course of a client invocation on a CORBA object.
Exceptions Raised in the Server::create_servant() Operation
If any exception is raised in the Server::create_servant() operation, then:
Exceptions Raised in the Tobj_ServantBase::activate_object() Operation
If any exception is raised in the Tobj_ServantBase::activate_object() operation, then:
Exceptions Raised in Operation Implementations
The BEA Tuxedo system requires operation implementations to throw either CORBA system exceptions, or user-defined exceptions defined in OMG IDL that are known to the client application. If these types of exceptions are thrown by operation implementations, then the BEA Tuxedo system returns them to the client application, unless one of the following conditions exists:
"WARN: Application didn't catch TobjS exception. TP Framework throwing CORBA::BAD_OPERATION."
If the exception is TobjS::IllegalOperation, the following supplementary message is written to warn the developer of a possible coding error in the application:
"WARN: Application called TP::deactivateEnable() illegally and didn't catch TobjS exception."
This can occur if the TP::deactivateEnable() operation is invoked inside an object that has the transaction activation policy. (Application-controlled deactivation is not supported for transaction-bound objects.)
As defined by the CORBA standard, a reply sent back to the client can either contain result values from the operation implementation, or an exception thrown in the operation implementation, but not both. In the first case—that is, if the reply status value is NO_EXCEPTION—the reply contains the operation's return value and any inout or out argument values. Otherwise—that is, if the reply status value is USER_EXCEPTION or SYSTEM_EXCEPTION—all the reply contains is the encoding of the exception.
Exceptions Raised in the Tobj_ServantBase::deactivate_object() Operation
If any exception is raised in the Tobj_ServantBase::deactivate_object() operation, the following occurs:
CORBA Marshal Exception Raised When Passing Object Instances
The ORB cannot marshal an object instance as an object reference. For example, passing a factory reference in the following code fragment generates a CORBA marshal exception in the BEA Tuxedo system:
connection::setFactory(this);
To pass an object instance, you should create a proxy object reference and pass the proxy instead, as in the following example:
CORBA::Object myRef = TP::get_object_reference();
ResultSetFactory factoryRef = ResultSetFactoryHelper::_narrow(myRef);
connection::setFactoryRef(factoryRef);
Detecting Error Conditions in the Callback Methods
The BEA Tuxedo system provides a set of predefined exceptions that allow you to specify message strings that the TP Framework writes to the user log if application code gets an error in any of the following callback methods:
You can use these exceptions as a useful debugging aid that allows you to send unambiguous information about why an exception is being raised. Note that the TP Framework writes these messages to the user log only. They are not returned to the client application.
You specify these messages with the following exceptions, which have an optional reason string:
To send a message string to the user log, specify the string in the exception, as in the following example:
throw CreateServantFailed("Unknown interface");Note that when you throw these exceptions, the reason string parameter is required. If you do not want to specify a string with one of these exceptions, you must use the double quote characters, as in the following example:
throw ActivateObjectFailed("");Common Pitfalls of OMG IDL Interface Versioning and Modification
The Server object's implementation of the Server::create_servant() operation instantiates an object based on its interface ID. It is crucial that this interface ID is the same as the one supplied in the factory when the factory invokes the TP::create_object_reference() operation. If the interface IDs do not match, the Server::create_servant() operation usually raises an exception or returns a NULL servant. The BEA Tuxedo system then returns a CORBA::OBJECT_NOT_EXIST exception to the client application. The BEA Tuxedo system does not perform any validation of interface IDs in the TP::create_object_reference() operation.
It is possible for this condition to arise if, during the course of development, different versions of the interface are being developed or many modifications are being made to IDL file. Even if you typically specify string constants for interface IDs in OMG IDL and use these in the factory and the Server::create_servant() operation, it is possible for a mismatch to occur if the object implementation and factory are in different executables. This potential problem may be difficult to diagnose.
You may want to consider the following defensive programming strategies during development to avoid this potential problem. This code should be included only in debugging versions of your application, because it introduces performance inefficiencies that may be unacceptable in the production versions of your software.
Caveat for State Handling in Tobj_ServantBase::deactivate_object()
The Tobj_ServantBase::deactivate_object() operation is invoked when the activation boundary for an object is reached. You may, optionally, write durable state to disk in the implementation of this operation. It is important to understand that exceptions raised in this operation are not returned to the client application. The client application will be unaware of any error conditions raised in this operation unless the object is participating in a transaction. Therefore, in cases where it is important that the client application know whether the writing of state via this operation is successful, we recommend that transactions be used.
If you decide to use the Tobj_ServantBase::deactivate_object() operation for writing state, and the client application needs to know the outcome of the write operations, we recommend that you do the following:
If transactions are not used, we recommend that you write object state within the scope of individual operations on the object, rather than via the Tobj_ServantBase::deactivate_object() operation. This way, if an error occurs, the operation can raise an exception that is returned to the client application.
Servant Pooling
As mentioned in the section Servant Pooling and Stateless Objects, servant pooling provides a means to reduce the cost of object instantiation for method-bound or transaction-bound objects.
How Servant Pooling Works
Normally, during object deactivation (that is, when the TP Framework invokes the Tobj_ServantBase::deactivate_object() operation), the TP Framework deletes the object's servant; however, when servant pooling is used, the TP Framework does not delete the servant at object deactivation. Instead, the server application maintains a pointer to the servant in a pool. When a subsequent client request arrives that can be satisfied by a servant in that pool, the server application reuses the servant and assigns a new object ID. When a servant is reused from a pool, the TP Framework does not create a new servant.
How You Implement Servant Pooling
You implement servant pooling by doing the following:
Note: Support for the TP::application_responsibility() operation has changed in this release. For complete information, see the CORBA Programming Reference.
Delegation-based Interface Implementation
There are two primary ways in which an object can be implemented in a BEA Tuxedo CORBA application: by inheritance, or by delegation. When an object inherits from the POA skeleton class, and is thus a CORBA object, that object is said to be implemented by inheritance.
However, there may be instances in which you want to use a C++ object in a CORBA application in which inheriting from the POA skeleton class is difficult or impractical. For example, you might have a C++ object that would require a major rewrite to inherit from the POA skeleton class. You can bring this non-CORBA object into a CORBA application by creating a tie class for the object. The tie class inherits from the POA skeleton class, and the tie class contains one or more operations that delegate to the legacy class for the implementation of those operations. The legacy class is thereby implemented in the CORBA application by delegation.
About Tie Classes in the BEA Tuxedo System
To create a delegation-based interface implementation, use the -T command-line option of the IDL compiler to generate tie class templates for each interface defined in the OMG IDL file.
Using tie classes in a CORBA application also affects how you implement the Server::create_servant() operation in the Server object. The following sections explain the use of tie classes in the BEA Tuxedo product in more detail, and also explains how to implement the Server::create_servant() operation to instantiate those classes.
In BEA Tuxedo CORBA, the tie class is the servant, and, therefore, serves basically as a wrapper object for the legacy class.
The following figure shows the inheritance characteristics of the interface Account, which serves as a wrapper for a legacy object. The legacy object contains the implementation of the operation op1. The tie class delegates op1 to the legacy class.
Tie classes are transparent to the client application. To the client application, the tie class appears to be a complete implementation of the object that the client application invokes. The tie class delegates all operations to the legacy class, which you provide. In addition, the tie class contains the following:
When to Use Tie Classes
Tie classes are not unique to BEA Tuxedo CORBA, and they are not the only way to implement delegation in a CORBA application. However, the BEA Tuxedo CORBA convenience features for tie classes can greatly reduce the amount of coding you need to do for the basic constructor, destructor, and housekeeping operations for those tie classes.
Using tie classes might be recommended in one of the following situations:
Tie classes are not recommended when:
How to Create Tie Classes in a CORBA Application
To create tie classes in an application in a BEA Tuxedo domain:
The IDL compiler generates a C++ template class, which takes the name of the skeleton, with the string _tie appended to it. The IDL compiler adds this template class to the skeleton header file.
Note that the IDL compiler does not generate the implementation file for the tie class; you need to create this file by hand, as described in the next step.
In the following example, the servant for tie class POA_Account_tie is created, and the legacy class LegacyAccount is instantiated.
Account * Account_ptr = new LegacyAccount();
AccountFactoryServant = new POA_Account_tie<LegacyAccount> (Account_ptr)
Note: When compiling tie classes with the Compaq C++ Tru64 compiler for UNIX, you must include the -noimplicit_include option in the definition of the CFLAGS or CPPFLAGS environment variables used by the buildobjserver command. This option prevents the C++ compiler from automatically including the server skeleton definition file (_s.cpp) everywhere the server skeleton header file (_s.h) is included, which is necessary to avoid multiply-defined symbol errors. See Compaq publications for additional information about using class templates, such as the tie classes, with Tru64 C++.

|

|

|
|
|
|
Copyright © 2001 BEA Systems, Inc. All rights reserved.
|