
|
|
| e-docs > Tuxedo > CORBA ActiveX Online Help > Creating ActiveX Client Applications |
|
CORBA ActiveX Online Help
|
Creating ActiveX Client Applications
This Help topic includes the following sections:
For a description of the concepts you need to understand before developing an ActiveX client application, see Overview.
Summary of the Development Process for ActiveX Client Applications
The steps for creating an ActiveX client application are as follows:
Each step in the process is explained in detail in the following sections. The BEA Tuxedo development environment for ActiveX client applications includes the following:
The BEA Application Builder
The Application Builder is the development tool that creates ActiveX views of CORBA objects. The Application Builder is the primary user interface to the BEA ActiveX Client. It can be used to select which CORBA objects are available to desktop applications, to create ActiveX views of the CORBA objects, and to create packages for deploying ActiveX views of CORBA objects to client machines.
To use an ActiveX view, you load the interfaces of the CORBA objects into the Interface Repository. You then create an ActiveX binding for the CORBA interface. The binding describes the interface of a CORBA object to ActiveX. The combination of the ActiveX client application and the generated binding creates the view of the object.
For information on how to invoke Application Builder, see Starting Application Builder in Tasks.
As shown in Figure 2-1, the Application Builder main window is partitioned into two parts: the Services window and the Workstation Views window.
Figure 2-1 Application Builder Main Window
The Services window presents all the CORBA modules, interfaces, and operations contained in the Interface Repository in the local BEA Tuxedo domain (referred to as the M3 domain in the BEA Application Builder software that is installed as part of the BEA Tuxedo software kit). You can create bindings for all the interfaces in the Interface Repository. At the top of the Services window are entries for each object system that is available from the BEA Tuxedo domain. The ActiveX Client supports only the BEA Tuxedo object system. The objects are displayed in the same hierarchical format used in the Interface Repository, that is, as modules, interfaces, operations, and the parameters contained in operations. The [+] symbol indicates an object that can be expanded to display the other objects. The Workstation Views window presents all the ActiveX bindings that have been created for CORBA interfaces. To create a binding for a CORBA interface, you drag an entry from the Services window and into the Workstation Views window. For a better description of the Application Builder Main Window, see Application Builder Main Window. The steps below refer to the University sample applications shipped with BEA Tuxedo. For more information on the sample applications, see the Guide to the CORBA University Sample Applications in the BEA Tuxedo online documentation.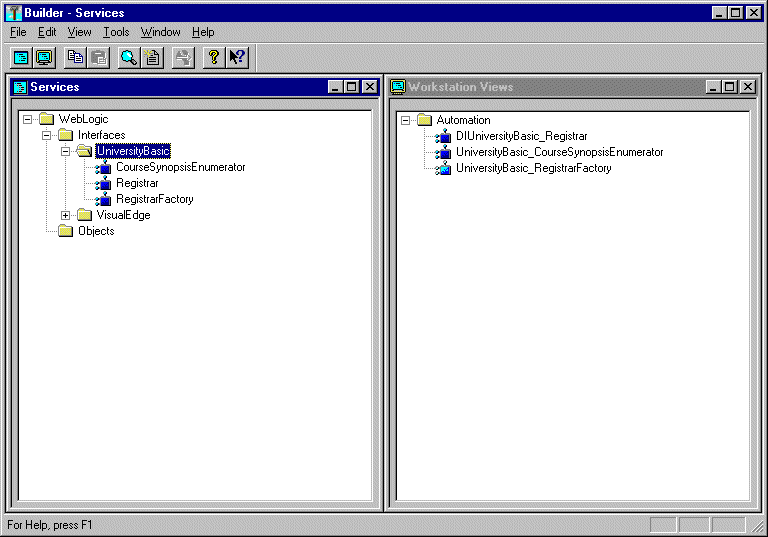
Step 1: Loading the Automation Environmental Objects into the Interface Repository
Load the Automation environmental objects into the Interface Repository so that the interface definitions for the objects are available to ActiveX client applications. From the MS-DOS prompt, enter the following command to load the OMG IDL file (TOBJIN.idl) into the Interface Repository:
prompt> idl2ir -D _TOBJ -I drive:\tuxdir\include drive:\tuxdir\include\tobjin.idl
Step 2: Loading the CORBA Interfaces into the Interface Repository
Before you can create an ActiveX view for a CORBA object, the interfaces of the CORBA object need to be loaded into the Interface Repository. If the interfaces of a CORBA object are not loaded in the Interface Repository, they do not appear in the Services window of the Application Builder. If a desired CORBA interface does not appear in the Services window, use the idl2ir command to load the OMG IDL that defines the CORBA into the Interface Repository. The syntax for the idl2ir command is as follows:
idl2ir [repositoryfile.idl] file.idl
For a complete description of the idl2ir command, see the BEA Tuxedo Command Reference in the BEA Tuxedo online documentation. For example, if the University sample application OMG IDL file has been loaded into the interface repository, the following CORBA interfaces should appear in the Application Builder window:
Step 3: Starting the Interface Repository Server Application
ActiveX client applications read the interface definitions for CORBA objects from the Interface Repository dynamically at run time and translate them to Automation objects. Therefore, the server application for the Interface Repository needs to be started so that the interface definitions are available. Use the UBBCONFIG file to start the server application process for the Interface Repository.
Note: In some cases, the system administrator may have performed this step.
In the UBBCONFIG file for the BEA Tuxedo domain, check that TMIFRSVR, the server application for the Interface Repository, is started. The following entry should appear in the UBBCONFIG file:
TMIFRSVR
SRVGRP = SYS_GRP
SRVID = 6
RESTART = Y
MAXGEN = 5
GRACE = 3600
In addition, make sure that the ISL parameter to start the ISL/ISH is specified. The following entry should appear in the UBBCONFIG file:
ISL
SRVGRP = SYS_GRP
SRVID = 5
CLOPT = "-A -- -n //TRIXIE:2500"
where TRIXIE is the name of the host (server) system and 2500 is the port number.
For more information about starting server applications and specifying the ISL parameter, see Setting Up a BEA Tuxedo Application
in the BEA Tuxedo online documentation.
Step 4: Creating ActiveX Bindings for the CORBA Interfaces
For an ActiveX client application to access a CORBA object, you must generate ActiveX bindings for the interfaces of the CORBA object. You use the Application Builder to create the ActiveX bindings for CORBA interfaces.
To create an ActiveX binding for a CORBA interface:
You can now use the ActiveX view from an ActiveX client application.
Step 5: Loading the Type Library for the ActiveX Bindings
Before you start writing your ActiveX client application, you need to load the type library that describes the ActiveX binding for the CORBA interface in your development tool. Follow your development product's instructions for loading type libraries.
For example, in Visual Basic version 5.0, you use the References option on the Project menu to get a list of available type libraries. You then select the desired type libraries from the list.
By default, the Application Builder places all generated type libraries in \tuxdir\TypeLibraries. The type library for the ActiveX binding of the CORBA interface has the following format:
DImodulename_interfacename.tlb
Step 6: Writing the ActiveX Client Application
The ActiveX client application must do the following:
The following sections use portions of the ActiveX client applications in the Basic University sample application to illustrate the steps.
Including Declarations for the Automation Environmental Objects, Factories, and ActiveX Views of CORBA Objects
To prevent errors at run time, you need to declare the object types of:
The following example is Visual Basic code that declares the Bootstrap and FactoryFinder objects, the factory for the ActiveX view of the Registrar object, and the ActiveX view of the Registrar object:
\\Declare Bootstrap object\\
    Public objBootstrap As DITobj_Bootstrap
\\Declare FactoryFinder object\\
    Public objFactoryFinder As DITobj_FactoryFinder
\\Declare factory object for Registrar Object\\
    Public objRegistrarFactory As DIUniversityB_RegistrarFactory
\\Declare the ActiveX view of the Registrar object\\
    Public objRegistrar As DIUniversityB_Registrar
Establishing Communication with the BEA Tuxedo Domain
When writing an ActiveX client application, there are two steps to establishing communication with the BEA Tuxedo domain:
The following Visual Basic example illustrates using the CreateObject operation to create a Bootstrap object:
Set objBootstrap = CreateObject("Tobj.Bootstrap")You then initialize the Bootstrap object. When you initialize the Bootstrap object, you supply the host and port of the ISL/ISH of the desired BEA Tuxedo domain, as follows:
objBootstrap.Initialize "//host:port"
The host and port combination for the ISL/ISH is defined in the ISL parameter of the UBBCONFIG file. The host and port combination that is specified for the Bootstrap object must exactly match the ISL parameter. The format of the host and port combination, as well as the capitalization, must match. If the addresses do not match, the call to the Bootstrap object will fail and the following message appears in the log file:
Error: Unofficial connection from client at <tcp/ip address>/<portnumber>
For example, if the network address is specified as //TRIXIE::3500 in the ISL parameter in the UBBCONFIG file, specifying either //192.12.4.6.:3500 or //trixie:3500 in the Bootstrap object will cause the connection attempt to fail.
A BEA Tuxedo domain can have multiple ISL/ISHs. If you are accessing a BEA Tuxedo domain with multiple ISL/ISHs, you supply a list of host:port combinations to the Bootstrap object. The Bootstrap object walks through the list until it connects to a BEA Tuxedo domain. The list of ISL/ISHs can also be specified in the TOBJADDR environmental variable.
If you want to access multiple BEA Tuxedo domains, you must create a Bootstrap object for each BEA Tuxedo domain you want to access.
Obtaining References to the FactoryFinder Object
The client application must obtain initial references to the objects that provide services for the application. The Bootstrap object is used to obtain references to the FactoryFinder object, SecurityCurrent object, and TransactionCurrent object. The argument passed to the operation is a string containing the progid of the desired object. You have to get references only for the objects that you plan to use in your ActiveX client application.
The following Visual Basic example shows how to use the Bootstrap object to obtain a reference to the FactoryFinder object:
Set objFactoryFinder = objBootstrap.CreateObject("Tobj.FactoryFinder")Using a Factory to Get an ActiveX View
ActiveX client applications get interface pointers to ActiveX views of CORBA objects from factories. A factory is any CORBA object that returns an object reference to another CORBA object. The ActiveX client application invokes an operation on a factory to obtain an object reference to a CORBA object of a specific type. To use factories, the ActiveX client application must be able to locate the factory it needs. The FactoryFinder object serves this purpose.
Use the CreateObject function to create the FactoryFinder object, and then use one of the FactoryFinder object methods to find a factory. The FactoryFinder object has the following methods:
Returns a sequence of factories that match the input key exactly.
Returns one factory that matches the input key exactly.
Returns a sequence of factories whose ID field in the name component matches the input argument.
Returns one factory whose ID field in the factory's CORBA name component matches the input argument.
Lists factory objects currently registered with the FactoryFinder.
The following Visual Basic example shows how to use the FactoryFinder find_one_factory_by_id() method to get a factory for the Registrar object used in the client application for the BEA Tuxedo University sample applications:
Set objRegistrarFactory =
    objBsFactoryFinder.find_one_factory_by_id ("RegistrarFactory")
Set objRegistrar = RegistrarFactory.find_registrar
Invoking Operations on the ActiveX View
Invoke operations on the ActiveX view by passing it a pointer to the factory and any arguments that the operation requires.
The following Visual Basic example shows how to invoke operations on an ActiveX view:
`Get course details from the Registrar object'
aryCourseDetails =
           objRegistrar.get_course_details(aryCourseNumbers)
Creating an Automation Server for Callbacks
In some application development scenarios, it may be desirable to allow the ActiveX client application to respond to requests from the CORBA server application. Rationales for callbacks from the CORBA server might include notifying the client application when a certain event has occurred, validating security, or obtaining additional information from the client. For example, a client application that tracks stock prices might request of a CORBA server that it be notified when a specified stock changes value. The client might do this by passing a notification object reference to the CORBA server, which the server then uses to call back to notify the client when the stock has changed price. The following description of the process for developing an ActiveX client application that can function as a COM server assumes you are developing the ActiveX client in Visual Basic.
To develop an ActiveX application that can act as a COM server in relation to a CORBA application, you follow the six steps described above. In addition, however, you implement the COM server functionality for a CORBA interface in Visual Basic by creating an appropriate Visual Basic class.
One way to do this is to start by selecting the Add Class option in the Visual Basic Project menu. Add an Implements clause to the class naming the Automation view of the CORBA interface, as it appears in the type library that you created using Application Builder. (See Step 4: Creating ActiveX Bindings for the CORBA Interfaces.) For example:
Implements ChatClient_Listener
This example is taken from the chatroom Visual Basic client sample that is packaged with BEA Tuxedo. The chatroom sample is by default located at:
tuxdir\samples\corba\chatroom
In this example, ChatClient_Listener is the name of the interface. You would then write private Visual Basic subroutines to implement each of the methods included in the interface. For example:
Private Sub ChatClient_Listener_post(ByVal from As String,
ByVal output_line As String, Optional exceptionInfo As Variant)
MsgBox "User " + from + ": " + output_line
End Sub
Creating Instances of the COM Objects
Now that you have implemented the COM object, you can create instances of it in your ActiveX client application and pass those instances to CORBA services. You create instances of these COM objects in exactly the same way that you create instances of any COM object. For example:
Dim aListener as ChatClient_Listener
Set aListener = New MyListener
The call to New creates the instance, where ChatClient_Listener is the name of the interface and MyListener is the name of the class you created to implement it. Once an instance exists, it can be specified as a parameter to a CORBA method. For example:
aModerator.signon "Hansel", aListener
where aModerator is a CORBA object and aListener is the COM object that the CORBA object will call back to as necessary.
Step 7: Deploying the ActiveX Client Application
To distribute ActiveX client applications to other client machines, you need to create a deployment package. A deployment package contains all the data needed by the client application to use ActiveX views of CORBA objects, including the bindings, the type libraries, and the registration information. The deployment package is a self-registering ActiveX control with the file extension.ocx.
To create a deployment package for an ActiveX view:

|

|

|


