Design
This section contains the following topics:
Overview of Design Considerations
Prerequisites for Design Work
Directions for Designing
Step 1. Open a copy of BEA WebLogic Commerce Server Rational Rose model.
Step 2. Create a new MyBuyBeans tour package for the new components.
Step 3. Add a new class diagram to the tour package.
Step 4. Add a BasicBean Component to the class diagram.
Step 5. Add an ItemPriceCalculationPolicy Component to the class diagram.
Step 6. Create a new BeanieHat Component that extends the BasicBean Component.
Step 7. Create a new BeanieHatPricePolicy Component that extends the ItemPriceCalculationPolicy Component.
Step 8. Add attributes to the BeanieHat Component.
Step 9. Save and review the final Rational Rose model.
Overview of Design Considerations
Having received instructions from senior management to extend the MyBuyBeans.com site, the MyBuyBeans technical staff sits down to plan their course of action. Being the leader of the newly assembled team, you decide to first model a solution to the problem.
Senior management has given your team the beanie hat attributes that are of importance to customers: color and the number of propellers. The MyBuyBeans product catalog must contain information on both of these attributes and both customers and MyBuyBeans staff must be able to search for beanie hats using these properties. In addition to these requirements, management has expressed interest in a specialized pricing policy for beanie hats. Being a knowledgeable WebLogic Commerce Server developer, you decide to use WebLogic Commerce Server to develop a solution.
Looking at the Rational Rose model of the existing MyBuyBeans solution, you quickly realize that all items in the MyBuyBeans catalog are represented by a Configurable Entity Component. You also notice that each item has a corresponding Business Policy Component for implementing specialized pricing policies. As such, you decide to extend the existing model with two new Components: BeanieHat and BeanieHatPricePolicy.
Prerequisites for Design Work
In order to fully understand this section of the tour, it is recommended that you have a general understanding of Rational Rose and UML. For information on these two topics, please see the Development Process chapter in the BEA WebLogic Commerce Server Components Developer's Guide.
Directions for Designing
Step 1. Open a copy of BEA WebLogic Commerce Server Rational Rose model.
- Navigate to the model directory found under the WebLogic Commerce Server
installation directory.
- Create a new subdirectory called tour. Be sure to name this new subdirectory
"tour" exactly as given here (all lower-case), or else the rest of the technical
demonstration will not work.
- Create a copy of the Rational Rose model WebLogicCommerce.mdl (found in the
WebLogicCommerce directory) in the new tour directory.
- Start Rational Rose.
- Click on the Open menu item in the File menu.
- Navigate to the model\tour directory found under the WebLogic Commerce
Server installation directory.
- Double click on WebLogicCommerce.mdl. This will open Rational Rose.
Step 2. Create a new MyBuyBeans tour package for the new components.
- Expand the Logical View folder in the Rational Rose navigation window.
- Expand the examples folder.
- Right click on the buybeans folder.
- Highlight the New menu item and then click on the Package menu item.
- Name the new package tour.
Step 3. Add a new class diagram to the tour package.
- Right click on the tour folder.
- Highlight the New menu item and then click on the Class Diagram menu item.
- Name the class diagram Main.
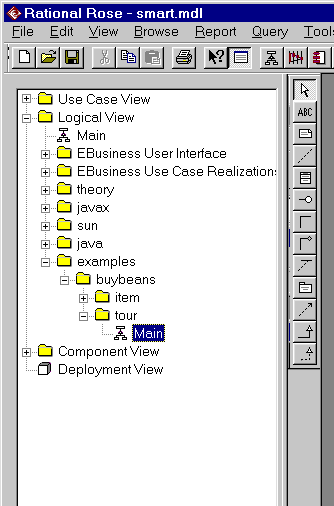
- Double click on the Main class diagram icon.
- Your Rational Rose navigation window should now look something like the
following:
Step 4. Add a BasicBean Component to the class diagram.
- Expand the examples directory in the Logical View folder.
- Expand the buybeans directory.
- Expand the item directory.
- Click and drag the BasicBean class icon onto the Main class diagram window.
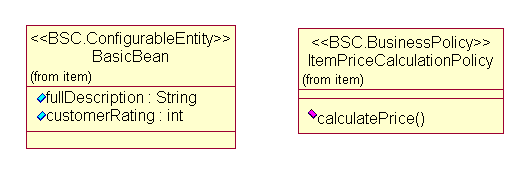
Step 5. Add an ItemPriceCalculationPolicy Component to the class diagram.
- Expand the theory directory in the Logical View folder.
- Expand the smart directory.
- Expand the ebusiness directory. Expand the item directory.
- Click and drag the ItemPriceCalculationPolicy class icon onto the Main class
diagram window.
- Your Main class diagram window should now contain something like the
following:
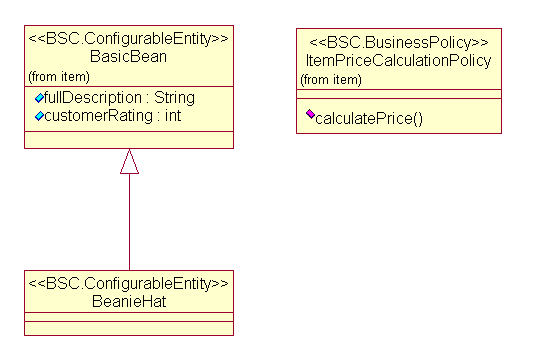
Step 6. Create a new BeanieHat Component that extends the BasicBean Component.
- Click on the Class button on the center toolbar. This button looks like the
following:

- Create a new class by clicking on the Main class diagram window.
- Name the new class BeanieHat.
- Right click on the BeanieHat class and then click on the Open Specification
menu item.
- Select BSC.ConfigurableEntity in the Stereotype pull down menu. Press the OK
button.
- Click on the Generalization button on the center toolbar. This button looks like:

- Place the cursor over the BeanieHat class. Click and drag the cursor over the
BasicBean class and then release the mouse button.
- Your Main class diagram window should now contain something like the
following:
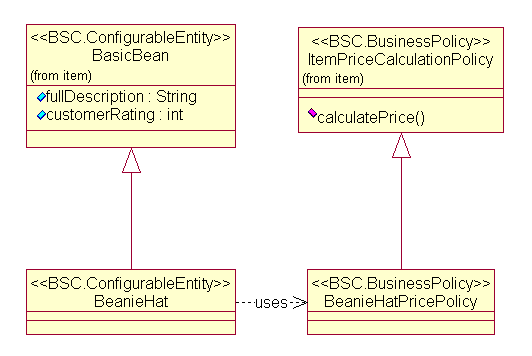
Step 7. Create a new BeanieHatPricePolicy Component that extends the ItemPriceCalculationPolicy Component.
- Click on the Class button on the center toolbar.
- Create a new class by clicking on the Main class diagram window.
- Name the new class BeanieHatPricePolicy.
- Right click on the BeanieHatPricePolicy class and then click on the Open
Specification menu item.
- Select BSC.BusinessPolicy in the Stereotype pull down menu. Press the OK
button.
- Click on the Generalization button on the center toolbar.
- Place the cursor over the BeanieHatPricePolicy class. Click and drag the cursor
over the ItemPriceCalculationPolicy class and then release the mouse button.
- Click on the Dependency button on the center toolbar. This button looks like:

- Place the cursor over the BeanieHat class. Click and drag the cursor over the
BeanieHatPricePolicy class and then release the mouse button. Right click on
the resulting dotted line and then click on the Open Specification menu item.
Name the dependency uses. Press the OK button.
- Your Main class diagram window should now contain something like the
following:
Step 8. Add attributes to the BeanieHat Component.
- Right click on the BeanieHat class in the Main class diagram.
- Click on the Open Specification menu item.
- Click on the Attributes tab in the Class Specification dialog.
- Right click on the attributes list and select the Insert menu item. Name the new
attribute color.
- Double click on the color attribute. This should open an Attribute Specification
dialog.
- Type String in the Type field and select the Public radio button in the Export
Control panel. Press the OK button.
- Right click on the attributes list and select the Insert menu item. Name the new
attribute propellers.
- Double click on the propellers attribute. This should open an Attribute
Specification dialog.
- Type int in the Type field and select the Public radio button in the Export
Control panel. Press the OK button.
- Press the OK button in the Class Specification dialog.
Step 9. Save and review the final Rational Rose model.
- Click on the Save menu item in the File menu.
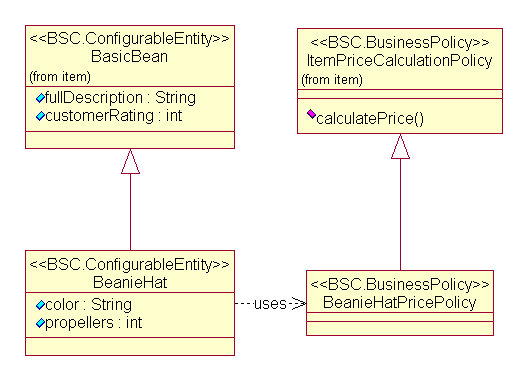
- Your final Main class diagram should contain something like the following:
|
|
|
Copyright © 2000 BEA Systems, Inc. All rights reserved.
Required browser: Netscape 4.0 or higher, or Microsoft Internet Explorer 4.0 or higher.
|