This chapter describes how to use the User Management tool to assign a user's values for the properties in the exampleportal property set.
- From the Administration Tools Home page, click the User Management icon. The
User Management Home page appears.
- From the User Management Home page, click the Users link in the Users banner.
The Search for a User tool appears.
To locate a user, do one of the following:
- To locate the user by name, enter democustomer in the Username field, then
click Search. The search returns the username democustomer and displays a
link at the bottom of the page.
- To see a list of all users within an alphabetized category, click the appropriate
letter corresponding to the first letter of the username. A list of users appear at
the bottom of the page.
- To see a list of all users in the database, use the wildcard feature. Enter a partial
username immediately followed by an asterisk (*).
- Click democustomer to edit this user. The User Property view appears.
- From the drop-down list box, select the exampleportal property set, then click
Search. The page refreshes and shows the user's values for the properties in the
exampleportal property set.
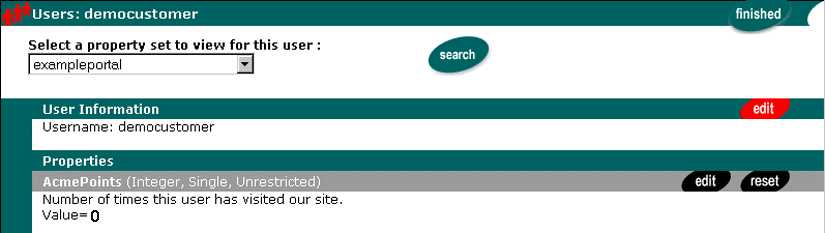
- Click Edit on the AcmePoints Properties bar. The Edit Property Values page
appears.
- Enter 5 in the New Value field, then click Save. The page refreshes and confirms
that the property was set correctly. You have now given democustomer a
non-default value for AcmePoints.

- Click Back to return to the User Properties view page.
- Click Finished to save the user's property set values. The system returns to the
User Properties view page.
- Click Home on the BEA WebLogic Personalization Server banner to return to the
Administration Tools Home page.