

|
|
|
|
|
|
For more information about deploying EJBs in the WLE environment, see Building and Deploying Enterprise JavaBeans (EJBs).
This section describes how to navigate the WebLogic EJB Deployer. It contains the following topics:
Navigating the WebLogic EJB Deployer
This topic describes how to start the WebLogic EJB Deployer in the Unix or Windows environment.
Before you start the WebLogic EJB Deployer, make sure that the CLASSPATH
contains the WebLogic classes (M3.jar
and weblogicaux.jar
), the jar file you want to open, and any others classes used by your EJBs. Listing 2-1 provides an example (on Windows NT) in which the first two command lines show user-specific settings and the final command line shows setting the CLASSPATH
.
Listing 2-1
Setting the CLASSPATH
Before Starting the WebLogic EJB Deployer
set TUXDIR=D:\bea_prod\wledir where jarfilepath
is the path to the JAR file you want to open.
To start the WebLogic EJB Deployer:
$ java weblogic.EJBDeployWizard options where options
are:
Starting the WebLogic EJB Deployer
Setting the CLASSPATH
set WLECP=%TUXDIR%\udataobj\java\jdk
set CLASSPATH=%WLECP%\M3.jar;%WLECP%\weblogicaux.jar;jarfilepath;%CLASSPATH% Running the Startup Command
Option |
Description |
|---|---|
|
Sets the look and feel of the editor. Defaults to system-native.
|
The main screen appears. Figure 2-1 shows an example of the Main Screen (with an opened ejb-jar file).

The WebLogic EJB Deployer contains the following menus:
The File menu contains the following commands:
File menu
Command |
Description |
|---|---|
The Edit menu contains the following commands:
Command |
Description |
|---|---|
The Help menu contains the following commands:
Command |
Description |
|---|---|
Figure 2-3 shows the toolbar.

The Toolbar contains the following command buttons:
Button |
Name |
Description |
|---|---|---|
|
|
||
|
|
||
|
|
||
|
|
||
|
|
||
|
|
||
|
|
To run a command, click the associated command button.
You can configure environment and ejbc settings for the WebLogic EJB Deployer.
To configure the environment settings for the WebLogic EJB Deployer:
The WebLogic EJB Deployer Properties dialog box appears. Figure 2-3 shows an example of the WebLogic EJB Deployer Properties dialog box.

The Environment Properties pane appears. Figure 2-4 shows an example of the Environment Properties pane.
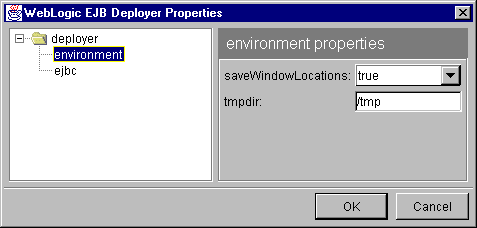
The Environment Properties pane contains the following options:
Name |
Description |
|---|---|
|
Specifies the temporary directory for saving window attributes (default is \tmp
).
|
You can configure the settings that the BEA ejbc compiler uses when it generates container classes. To configure these settings:
The WebLogic EJB Deployer Properties dialog box appears. Figure 2-5 shows an example of the WebLogic EJB Deployer Properties dialog box.
The EJBC Properties pane appears. Figure 2-6 shows an example of the EJBC Properties pane.
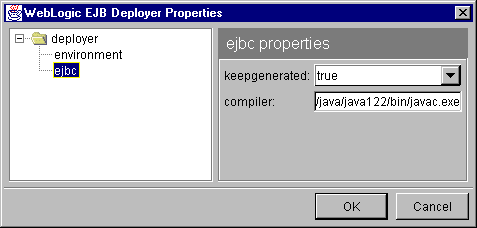
The EJBC Properties dialog box contains the following options:
Name |
Description |
|---|---|
|
Specifies the Java compiler to use for generating container classes.
|
For more information about the ejbc compiler, see the Command Reference.
To exit the WebLogic EJB Deployer:
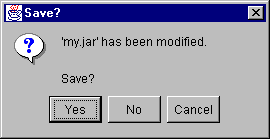
If the WebLogic EJB Deployer detects that changes to any open ejb-jar files have not been saved, it prompts you whether to save it (Yes) or not (No). Figure 2-7 shows an example of the Save prompt.
This section describes the following EJB deployment tasks.
Note: Not all tasks are required to deploy EJBs.
Deploying an EJB involves the following basic steps:
Summary of Deployment Steps
You can also use WebLogic EJB Deployer to simply view the settings in the ejb-jar file's deployment descriptor.
To open an ejb-jar file:

The Open EJB-JAR File dialog box appears. Figure 2-8 shows an example of the Open EJB-JAR File dialog box.
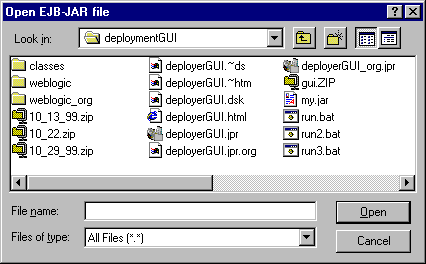
The Open EJB-JAR File dialog box contains the following options:
Name |
Description |
|---|---|
|
Displays a list of directories and files in the selected directory.
|
|
|
Type or double-click the name of the ejb-jar file you want to open.
|
|
The WebLogic EJB Deployer opens the ejb-jar file, validates its contents, and displays it.
The ejb-jar Contents List displays all the elements of the selected ejb-jar file in a tree hierarchy.
You can expand or collapse a list in order to show or hide subordinate items in the hierarchy. A plus (+ ) or minus (- ) sign to the left of an entry indicates whether an item contains subordinate (child) items. To show or hide a subordinate item, click the parent name.
To navigate properties in a deployment descriptor (both standard and optional extended XML elements), click its corresponding entry in the ejb-jar Contents List. The panel associated with the entry appears in the frame to the right.
Table 2-1 lists the panels in the WebLogic EJB Deployer.
Sun Microsystem's Enterprise JavaBeans Specification 1.1 defines which EJB Role is responsible for maintaining each attribute in the deployment descriptor. The WebLogic EJB Deployer allows you to change only the standard information that Deployers are authorized to change, in addition to certain WLE XML extension elements.
Table 2-2 lists the information that you can change using the WebLogic EJB Deployer.
Name |
Panel |
XML Element |
|---|---|---|
Note: If you change a property value, the WebLogic EJB Deployer validates the value when you change focus. If the change fails the validation test, the WebLogic EJB Deployer displays a message in the Errors tab and displays the bean in a red font. The WebLogic EJB Deployer will not allow you to save any changes or deploy the EJB until you have fixed the problem.
This section includes the following topics:
To save changes to the ejb-jar file in the current window:
Saving the Current ejb-jar File

If the WebLogic EJB Deployer detects any errors in the ejb-jar, it displays a message in the Errors tab. You must fix the problem before saving any changes.
To save changes to all open ejb-jar files:
Saving All Open ejb-jar Files

If the WebLogic EJB Deployer detects any errors in an ejb-jar file, it displays a message in the Errors tab. You must fix the problem before saving the file.
To save an ejb-jar file to a different name:
Saving the Current ejb-jar File to a New Name

The Save As dialog box appears. Figure 2-9 shows an example of the Save As dialog box.
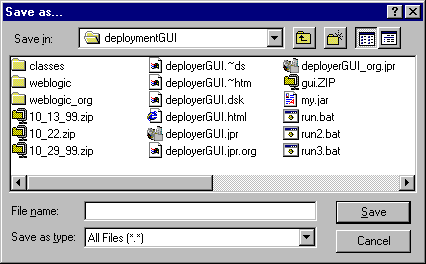
The Save ejb-jar File As dialog box contains the following options:
Name |
Description |
|---|---|
|
Displays a list of directories and files in the selected directory.
|
|
If the WebLogic EJB Deployer detects any errors in the ejb-jar file, it displays a message in the Errors tab. You must fix the problem before saving the file.
To deploy an ejb-jar file:

The Generate container classes dialog box appears. Figure 2-10 shows an example of the Generate container classes dialog box.

This name corresponds to the jndi-name element, which is a WLE XML extension to the deployment descriptor.
To allow Java clients to perform a lookup on the JNDI name for the EJB home and gain access to the object, the name of the EJB home must be registered in the Global WLE JNDI namespace. The JNDI name must be unique among all global factory names in a WLE domain, including EJB homes, CORBA factories, and RMI named objects.
The WebLogic EJB Deployer saves changes to the ejb-jar file automatically.
Next, the WebLogic EJB Deployer generates the container classes for the ejb-jar file, displaying a message dialog box to indicate progress and displaying status messages in the Messages tab. Figure 2-11 shows an example of the message dialog box.

To interrupt this process, click Cancel.
This section includes the following topics:
To close the ejb-jar file in the current window:
Closing the Current ejb-jar File

If the WebLogic EJB Deployer detects that changes have not been saved to the current ejb-jar file, it prompts you whether to save it (Yes) or not (No). Figure 2-12 shows an example of the Save prompt.
To close all open ejb-jar files:

To clear messages from the Messages or Errors tab:
The WebLogic EJB Deployer clears the text.
Note: When you open a new ejb-jar file, the WebLogic EJB Deployer clears the message text automatically.

|
|
|
Copyright © 1999 BEA Systems, Inc. All rights reserved.
|