| Download Docs | Site Map | Glossary | |
|
|
|||
| bea.com | products | dev2dev | support | askBEA |
|
|
|
||||||||
| e-docs > WebLogic Platform > WebLogic Integration > BPM Topics > Learning to Use BPM > Defining Workflow Nodes |
|
Learning to Use BPM
|
Defining Workflow Nodes
Note: The Worklist client application is being deprecated as of this release of WebLogic Integration. For information about the features that are replacing it, see the BEA WebLogic Integration Release Notes.
In this section, after a detailed overview of the workflow nodes, we provide procedures for defining every workflow object of the Order Processing workflow, node by node. By following the procedures in this section, you will learn how to:
You are ready to do the procedures provided in this section of the tutorial if you have done the following:
Overview of the Order Processing Workflow Nodes
The following figure provides a detailed view of the workflow. The numbered steps in the figure are described in the table that follows the figure, which maps the real-world processes to the workflow implementation.
Figure 4-1 Order Processing Nodes: Detailed View

Creating an Event-Triggered Start
The Order Processing workflow is triggered by the XML event that is posted by the Order Processing Trigger workflow. When the workflow is started, its first operation is to initialize workflow variables to the values provided by the XML document posted by the Order Processing Trigger workflow.
Thus, to create our node, we need to do the following:
Creating Variables
Because our start node will extract values from an XML document, we need to set up corresponding variables in which we can store the values we have extracted. The following table lists the variables, their use in the workflow, and the XML elements to which they correspond. Remember that an input parameter is used when the value of a variable is to be passed to another workflow. An output parameter, on the other hand, is used when the value of a variable is to be passed to the current workflow from another workflow.
To create the variables:
Figure 4-2 Variable Properties Dialog Box

When you are done, the Variables folder tree should appear as follows.
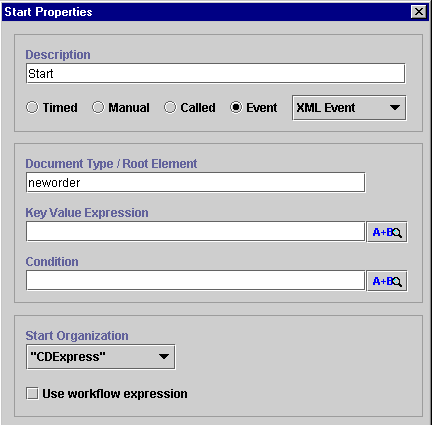
Defining the Start Node Event To ensure that the workflow is triggered by the correct XML document, we specify a root element for the Start node that corresponds to the root element of the XML document posted in the Order Processing Trigger, namely <neworder>. Because the Start node is not tied to a particular instance of the XML document, but should be triggered by all incoming XML documents containing the root element <neworder>, we do not need to set up an event key, as we do for the events we define within the workflow. (For an example, see Creating an Event: Defining the Watch for Cancellation Event.) To set up the event: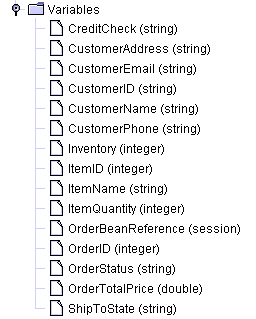
Figure 4-3 Start Properties Dialog Box: Event
Defining XPath Statements
To extract values from an XML document and place them into workflow variables, you use XPath language statements, which function in a similar fashion to query language statements on a database. Although XPath is a powerful language with numerous functions, the function you will most commonly use is text(), which returns the value of an element or attribute. The generic form of the XPath text() function statements that we will use is as follows:
XPath("/root element/child element/text()")
XPath("/root element/@attribute/text()")
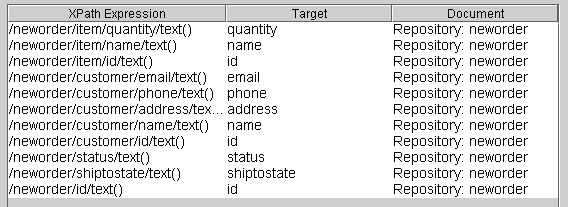
To extract the values from our XML document, then, you will need to set up XPath statements like those shown in the following table.
You can create XPath statements in the Studio through any of the following three methods, which are listed in increasing order of validity checking:
In the following procedure, we use the XPath Wizard to load the Neworder document you exported in Using the XML Repository: Exporting the Neworder XML Document.
To use the XPath Wizard to define XPath expressions:
 button next to the Event Expression field. The Expression Builder dialog box appears.
 . The XML Finder dialog box appears.
Figure 4-4 XML Finder Dialog Box: Repository Tab
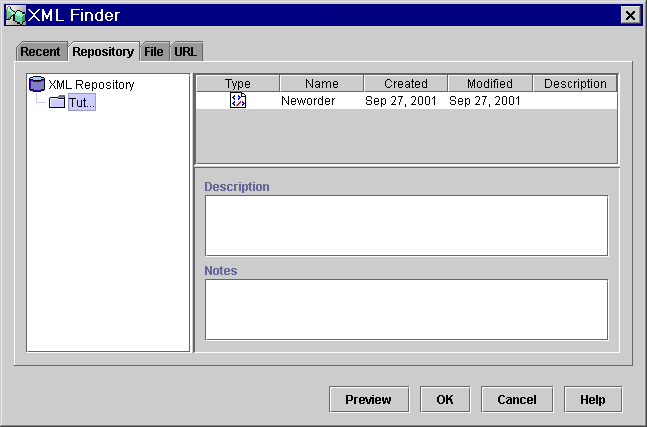
Figure 4-5 Preview Document Window

Figure 4-6 XPath Wizard: Sample Tab

 and checking to see whether the value selected in the document by the Wizard is the value you want to capture.
 . The expression appears in the Workspace (select the Workspace tab to view).
Figure 4-7 XPath Wizard: Workspace Tab

To add the XPath expressions to the Variables list of the Start Properties dialog box:
Figure 4-8 Workflow Variable Assignment Dialog Box

button to invoke the Expression Builder dialog box.
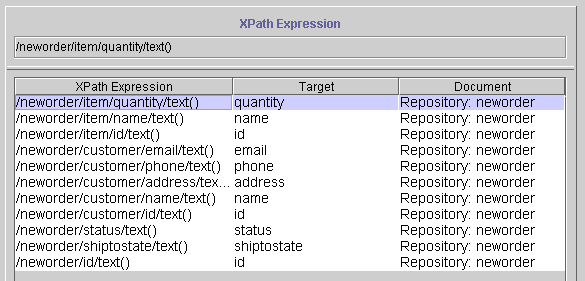
Figure 4-9 Expression Builder Dialog Box
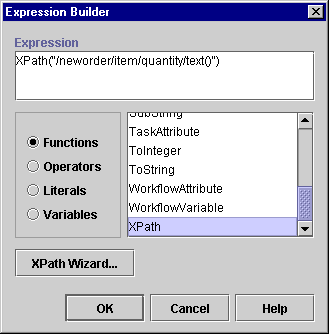
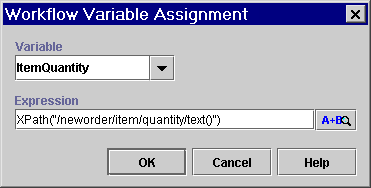
Figure 4-10 Start Node Properties Dialog Box: Variables Tab

Sending an XML Message to a Worklist User: Defining the Check Customer Credit Task
This task assigns the work of checking the customer's credit to the user admin in the Worklist, and then sends an XML message to that user, requesting confirmation of the credit approval.
To define the task, we need to:
Assigning a Task to a User
This procedure explains how to assign the Check Customer Credit task to the user admin.
Before we can add the actions we want for this node, we need to clear the default actions and permissions that were predefined for all T1 task nodes when you created the template definition.
To clear default actions:
To add and define the Assign Task to User action:
Figure 4-11 Assign Task to User Dialog Box

Sending an XML Message to a Client
One way of interacting with a client application user is to define an XML document that you send to the client application. The application should be programmed to identify this XML document, respond to it appropriately, and send an XML document to the server with information that can be used to populate workflow variables.
By default, the Worklist application recognizes a default set of Document Type Definitions (DTDs), consisting of eight request and response DTDs, which you can view in the WLI_HOME/docs/apidocs/com/bea/wlpi/common/doc-files directory of your WebLogic Integration installation. They are described in the following table.
Note: You can also develop custom code to extend the types of XML documents a client application can recognize, or to communicate with a client application via the API. For more information, see Programming BPM Client Applications.
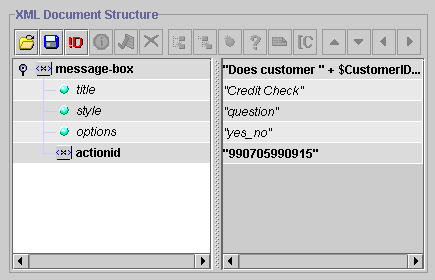
For our Check Customer Credit task, we will use the ClientMsgBoxReq.dtd to send a message box with yes/no buttons. The DTD has the following structure: Listing 4-1 ClientMsgBoxReq XML Document Structure Note: The action ID element and value are provided by the system when you create a Send XML to client action. The following figure shows the tags and values that correspond to the message box we will send. Figure 4-12 Credit Check Message Box
<message-box title="text"
 style="{plain|information|question|warning|error}"
 options="{ok|ok_cancel|yes_no|yes_no_cancel}">
text
   <actionid>	provided by default	</actionid>
</message-box>
Because we want to use the customer ID in the text of the message we send, we will use the CustomerID variable to supply the appropriate value at run time. To capture the result of the user's selection of buttons, we need to extract data from the ClientMsgBoxResp.dtd, specifically from the <message-box option> attribute, as shown in Listing 4-2. Listing 4-2 ClientMsgBoxResp XML Document Structure Thus, to define the complete action, we need to:
<message-box option="{ok|yes|no|cancel}" />
Adding the Send XML to Client Action
To store the result of the user's input to the Check Credit task, we need to create the CreditCheck variable.
Since we can create the variable from within the Send XML to Client dialog box, we will add the Send XML to Client action and create the CreditCheck variable at the same time.
To add the Send XML to Client action and create the CreditCheck variable:

.
Defining the XML Document Structure
To define the message-box XML document structure:
 to add the first attribute.
Assigning the Callback Variable
To extract the result of the user's response to the message box from the XML document returned by the Worklist application, we need to set up an XPath expression to populate the CreditCheck variable.
To assign the callback variable:
Tip: You can also load the ClientMsgBoxResp.dtd file into the XPath Wizard to automatically generate an XML document from which you can build the XPath expression. For procedures on using the XPath Wizard, see Defining XPath Statements.
Marking the Task Done
Because we want to ensure that the task node waits for the user's response to the message box before moving to the next node, we specify the Mark Task Done action as a callback action in the Send XML to Client dialog box, rather than adding it to the Task Properties dialog box. Placing the Mark Task Done action here causes the workflow to wait for the response from the Worklist client before proceeding to the next node.
To add the Mark Task Done callback action:
Figure 4-13 Mark Task as Done Dialog Box

Testing for Equality: Defining the Check Credit Decision
The first decision in our workflow checks whether the customer has passed the credit check, according to the Worklist user's response in the Check Credit task—yes or no.
The decision node is named with the condition that you are evaluating, and this condition must be specified as an expression. Typically the condition compares the value of a variable with another element, such as a constant, or another variable. By default a decision is assigned the condition 1=1 (which always evaluates to true).
To check the Worklist user's response to the credit check question, we will create a test for equality with a constant. That is, we will test whether the response from the user, stored in the variable CreditCheck, equals "yes". If the condition evaluates to true, the flow proceeds to the Check Inventory task; if the condition evaluates to false, the flow proceeds to the Contact Customer task.
To define the C1 decision node:
Adding a Task and Workflow Comment: Defining the Contact Customer Task
If the credit check decision evaluates to false, the flow proceeds to the Contact Customer task, and then terminates. This node sets the variable OrderStatus to cancelled and adds a workflow comment to that effect. The comment will appear in the run-time applications when the workflow is executed.
The task of contacting the customer is then assigned to the role CustomerService, rather than to a particular user. This means that any user associated with the role can execute the task. Also, rather than communicating with the Worklist user via an XML message, we set a task comment that appears along with the task in the Worklist window at run time.
Note: Workflow and task comments are limited to a maximum of 254 characters. The comment length is determined at run time because of the variable length of expressions. Comments exceeding the 254 character limit are truncated at run time with no warning.
To define the Contact Customer task node, we will:
Setting a Workflow Variable
To add and define the Set Workflow Variable action:
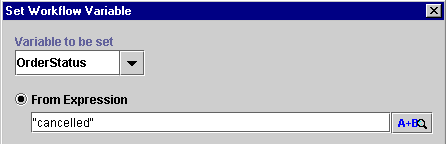
Figure 4-14 Set Workflow Variable Dialog Box
Setting a Workflow Comment
Once we have set the OrderStatus variable, we can use this variable in the expression we build to specify a workflow comment. This comment will appear in the run-time applications as Order cancelled.
To add and define the Set Workflow Comment action:
Figure 4-15 Set Workflow Comment Dialog Box

Setting a Task Comment
The comment we are going to display to the Worklist user is:
Please contact John Doe at 408 534 9567
So that the workflow supplies the variable values at run time, we use the CustomerName and CustomerPhone variables in the expression. Our expression should resemble the following:
Listing 4-3 Contact Customer Task: Task Comment
"Please contact " + $CustomerName + " at" + $CustomerPhone
Note the use of plus signs to concatenate string literals and variables, and the use of spaces to ensure that spaces appear in the final message between variable values and literal text.
To add and define the Set Task Comment action:
Figure 4-16 Set Task Comment Dialog Box

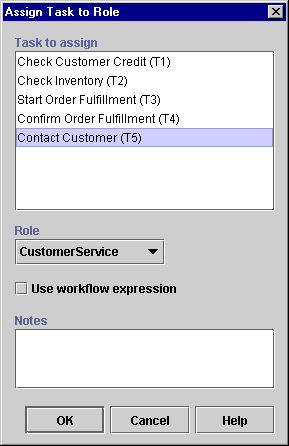
Assigning a Task to a Role
In addition to assigning a task to a user, identified by user name, you can also assign a task to a role, which can be executed by any user associated with that role.
You have a third option, which is to assign a task to a user in a role. This action assigns the task to the user associated with the role name who has the fewest number of tasks assigned to him or her at run time. However, because we are working with only a limited number of users and tasks in our examples, we will assign the task to the role name directly.
This procedure assigns the task to the role CustomerService. The user who is assigned the task (in this case, only the user admin) will see the task comment and should respond to it accordingly before executing the task.
To add and define the Assign Task to Role action:
Figure 4-17 Assign Task to Role Dialog Box
Marking the Task Done
Because this is task is assigned to an end user, we add the Mark Task Done action to the Executed tab in the Task Properties dialog box. Remember, without the Mark Task as Done action, the flow will not move forward from this node.
To add and define the Mark Task Done action:
Creating and Performing a Business Operation: Defining the Check Inventory Task
If the credit check decision evaluates to true, the flow proceeds to the Inventory Check task. This task calls the checkInventory() method on the POBean EJB, which checks the inventory for the item ordered and returns the results to the workflow. The checkInventory() method takes a single parameter, the item ID, and returns the quantity in stock.
Note: For more information on the POBean.jar EJB, see the BEA WebLogic Integration Javadoc.
To call an EJB method, you need to do two things:
Because the checkInventory() method returns a value, namely the inventory quantity for the relevant item, we also need to create a workflow variable in which to store the result.
However, before calling any method on an EJB, you must first call the bean's create() method, which creates an instance of the EJB on the WebLogic Integration server. The create()method also returns a reference to the EJB instance. This reference needs to be stored in a workflow variable known as an instance variable, so that you can invoke multiple methods on the EJB.
Thus, in order to define our Check Inventory task, we need to:
Note: The sample plug-ins that ship with WebLogic Integration include a plug-in action, Check Inventory, that allows you to perform the first four steps listed above in a single, predefined action. This action provides custom code that calls the appropriate POBean methods and passes parameters from and to the workflow, while you only need to specify the workflow variables that should act as the input and output parameters. To view the dialog box for this action, in the Actions dialog box, expand the Sample Actions folder and double-click Check inventory for an available item. For more information on this action and the other sample plug-ins, see Programming BPM Plug-Ins for WebLogic Integration.
Creating a Business Operation
When you create a business operation, you are configuring it globally, which means that it can then be used by any workflow in any organization. The business operation is essentially a user-friendly alias for a method call on a Java class or EJB. You can also add descriptive names for any parameters the method takes, so that other users who want to call the same business operation can know immediately what parameters, and in which order, they need to provide for it.
We do not need to create the Create OrderBean business operation, because we imported it during the import procedure in Importing Workflow Objects: Importing the Tutorial Package File. (The Order Fulfillment workflow also uses this business operation, and we did not want to cause an unresolved reference in that workflow at import time.) Instead, we will simply view it.
However, we will create the Check Inventory business operation that calls the checkInventory() method on the POBean EJB, so that we can then invoke it in our Check Inventory task.
Viewing the Create OrderBean Business Operation
To view the Create OrderBean Business Operation definition:
Figure 4-18 Business Operations Dialog Box

Figure 4-19 Create OrderBean: Define Business Operation Dialog Box

Creating the Check Inventory Business Operation
To create the Check Inventory Business Operation:
Figure 4-20 Check Inventory: Define Business Operation Dialog Box

Figure 4-21 Parameter Dialog Box

Performing a Business Operation
Now that we have created the business operations necessary to call the methods we need from the OrderBean, we need to define the action that invokes them from within the task.
When you define an action that invokes a business operation, you need to specify the following variables/parameters:
The following table summarizes the relationship between the parameters required by the two business operations.
Note that we need to create the OrderBeanReference and Inventory variables before we can use them in our business operations. Because variables used in business operations can be created from within the Perform Business Operation action dialog box, we will combine the procedure for creating the variables with the procedure for adding and defining the actions in the following sections. Performing the Create OrderBean Business Operation When we add and define the action, we will also create the variable listed in the following table.
To add and define the Perform Business Operation action for Create OrderBean:
Figure 4-22 Create OrderBean: Perform Business Operation Dialog Box

Performing the Check Inventory Business Operation
When we add and define the action, we will also create the variable listed in the following table.
To add and define the Perform Business Operation action for Check Inventory:
Figure 4-23 Check Inventory: Perform Business Operation Dialog Box

Marking the Task Done
Because this task contains no actions that execute the task (for example, assigning the task to a Worklist user who executes it), we need to add the Mark Task Done action to the Activated, rather than the Executed, tab of the Task Properties dialog box.
To add and define the Mark Task Done action:
Testing for Inequality: Defining the Check Inventory Decision
The second decision in our workflow checks whether the inventory is sufficient, by comparing the inventory value returned by the Check Inventory business operation with the quantity of items ordered by the customer (that is, the quantity originally specified in the Neworder XML document and stored in the ItemQuantity variable when the workflow is started).
To test whether the inventory is sufficient, we will create a test for inequality between two variables. That is, we will test whether the value of the variable Inventory is greater than or equal to that of the variable ItemQuantity. If the condition evaluates to true, the flow proceeds to the Start Order Fulfillment task; if the condition evaluates to false, the order status is set to "waiting" and the flow proceeds to the Wait for Inventory task.
To define the C2 decision node:
Figure 4-24 Check Inventory Decision

Creating an Event: Defining the Wait for New Inventory Event
If the inventory check decision evaluates to false, the flow proceeds to the Wait for Inventory event, which would be triggered—hypothetically—by the arrival of the relevant XML message on a JMS queue from an inventory-reporting application. Because the node is embedded within the main flow, the flow does not proceed, but remains in a wait state, until the node is triggered. When the node is triggered, the flow loops back to the Inventory Check task to see whether the current inventory is now sufficient to process the order.
Although this event is never actually triggered in the sample workflow because we are not using a real XML document, we can imagine a hypothetical XML document that looks something like the following document.
Listing 4-4 Newinventory XML Document
<newinventory>
   <date> June 18 2001 </date>
   .
   .
   .
   <item>
      <id>236</id>
      <name>CD storage rack</name>
   <item>
</newinventory>
To ensure that the event is triggered at run time only by instances of <newinventory> documents that contain information about the relevant item in stock (in our original XML document, it was a CD storage rack), you define an event key that specifies the relevant element within the message document that the event processor should watch out for—in this case, the item ID. The event key expression is specified as an XPath statement that extracts the value from the relevant element in an XML document.
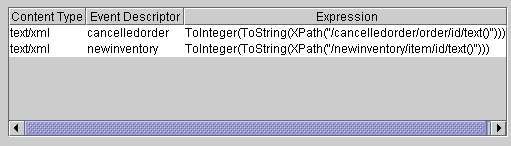
Then, to save the event processor from searching through every workflow instance containing an event with a reference to a <newinventory> document, the event node itself defines a key value expression to match the value extracted by the event key. If the two values match, the event is triggered. The following figure shows how the mechanism works.
Figure 4-25 Relationship Between Incoming XML Document, Event Key Expression, and Key Value Expression
In the example given in Listing 4-4, the event would be triggered, since our original item ID was 236. The way in which the incoming XML document element value, event key configuration expression, and event node key value expression correspond to each other for the Wait for Inventory node is represented in the following table.
Note that an event key configuration expression must evaluate to the same data type as that by the key value expression in a Start or Event node. Since XPath expressions return a node list type, you will usually need to use a typecasting function provided in the workflow expression language to return the correct data type. In our example, since our variable was stored as an integer, we needed to first convert the node list to a string, and then convert the string to an integer. For more information on typecasting and other workflow functions, see "Using Functions" in Using Workflow Expressions in Using the WebLogic Integration Studio. To create our event, then, we must do the following:
Configuring an Event Key
When you configure an event key, you specify the document type or root element of an XML document and an expression that parses the document for the particular element value you want to extract. Once the event key is configured, it is globally available to all workflow templates.
To define the newinventory event key:
Figure 4-26 Event Key Expressions Dialog Box

Figure 4-27 Define Event Key Expression Dialog Box

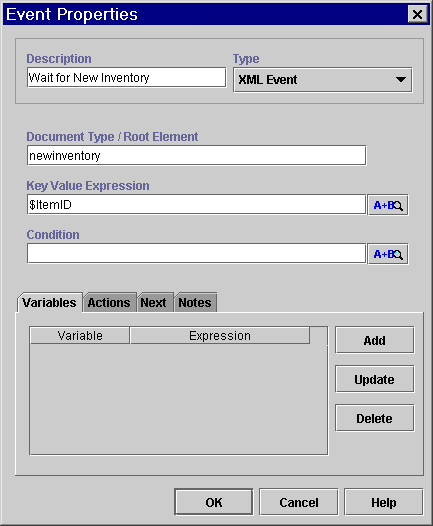
Defining an Event
In the event node, you specify the root element of the incoming XML document, and the key value expression that you wish to match the value provided by the XML document. The key value expression you use in each event node should be unique. You can filter incoming documents further by adding a condition, but we do not use one in this example.
Note: Because the event key facility provides better performance, you should always use it in preference over an event condition. Only use a condition in addition to an event key when you wish to further restrict the XML document instance that should trigger the event.
To define the Wait for Inventory event:
Figure 4-28 Wait for Inventory Event: Event Properties Dialog Box
Calling a Sub-Workflow: Defining the Start Order Fulfillment Task
If the inventory check decision evaluates to true, the workflow proceeds to the Start Order Fulfillment task, which calls the Order Fulfillment workflow. When the sub-workflow is finished executing, control returns to the Start Order Fulfillment task, and when the task is marked done, the flow proceeds to the next node in the main workflow, namely the Confirm Order Fulfillment task.
When you call a sub-workflow, you need to pass any values that have been collected or set during the execution of the main workflow to the sub-workflow's input variables. These include, for example, the customer address information needed for the shipping task, and the parameters required by the POBean calculate() method invoked by the invoice generation task. (You can view the list of variables defined in the imported Order Fulfillment workflow by opening its template definition and expanding its Variables folder in the folder tree. To see whether a variable has been defined as input or output, right-click it, and select Properties from the pop-up menu to invoke the variable's Properties dialog box.)
Similarly, you also need to create and specify variables in which you want to store values that are returned by the sub-workflow, such as the total price order to be provided by the calculate() method.
To define the Start Order Fulfillment task, we need to do the following:
Creating the OrderTotalPrice Variable
To store the result returned from the calculate() method (which is invoked by the Order Fulfillment workflow), we need to create the OrderTotalPrice variable as described in the following table. If necessary, refer to the procedure given in Creating Variables, substituting the values from the following table.
Starting a Called Workflow To start a sub-workflow, you must be sure that the sub-workflow's start node is defined as Called, and that the workflow is active. In this case, we activated the Order Fulfillment workflow when we imported it in Importing Workflow Objects: Importing the Tutorial Package File. To add and define the Start Workflow action:
Figure 4-29 Start Workflow Dialog Box

Defining Input Parameters
When you select a sub-workflow to call in the Start Workflow dialog box, any variables defined as input in the sub-workflow are displayed in the Parameters tab at the bottom of the dialog box.
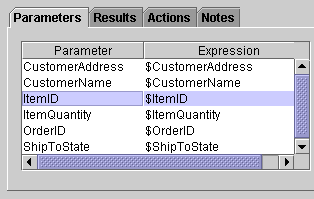
Figure 4-30 Start Order Fulfillment Workflow: Input Parameters
You must now set the values for those parameters. You can use an expression to define a value or, in this case, because we simply want to pass the current variable values, you can specify variable names as the parameter expressions. To define the input parameters for the Start Order Fulfillment workflow: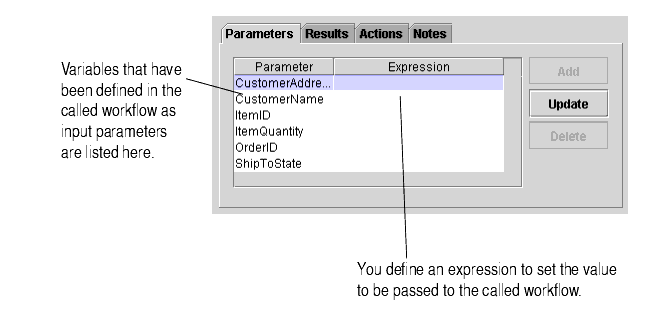
Figure 4-31 Set Parameter Dialog Box

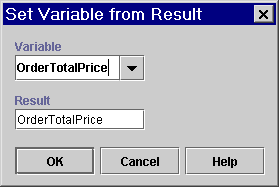
Defining Result Variables
When you select a workflow to call in the Start Workflow dialog box, any variables that have been defined as output parameters by the sub-workflow are displayed on the Results tab at the bottom of the dialog box.
Figure 4-32 Start Order Fulfillment Workflow: Results
We now want to ensure that the results returned from the sub-workflow are stored in the appropriate variables. In this case, because all variable names are the same, we need to specify only the equivalent variable name for each result parameter. To define the result parameters for the Start Order Fulfillment workflow:
Figure 4-33 Set Variable from Result Dialog Box

Marking the Task Done
To ensure that the main workflow waits for the sub-workflow to complete before it continues, we add the Mark Task Done as a sub-action within the Start Workflow action.
To add and define the Mark Task Done action:
Sending an E-mail Message: Defining the Confirm Order Fulfillment Task
Once the Order Fulfillment has been executed, we want to ensure that the Watch for Cancellation event can no longer be triggered, and the workflow can no longer be terminated. The Confirm Order Fulfillment task cancels the Watch for Cancellation event, sets the order status to complete, adds a workflow comment to this effect, and, optionally, sends an e-mail to the customer, confirming the completion of the order.
To set up this task, you may:
Cancelling an Event
Once the Order Fulfillment workflow has executed, and the order has been shipped, the order should not be cancelled. To stop the Watch for Cancellation event from listening for incoming messages, we add a Cancel Event action to the Confirm Order Fulfillment task.
To add the Cancel Event action:
Figure 4-34 Cancel Workflow Event Dialog Box

Setting the Workflow Variable
The following procedure explains how to set the workflow variable OrderStatus with the value complete.
To add the Set Workflow Variable action:
Setting the Workflow Comment
Once the OrderStatus variable is set to complete, you can use this variable in a workflow comment expression. The following procedure explains how to set the workflow comment to Order complete.
To add and define the Set Workflow Comment action:
Sending an E-mail Message
To complete the order, you can have the workflow send an e-mail message to the customer who placed it, confirming the fulfillment of the order.
If you entered your own e-mail address and other data in Posting an Internal XML Event: Editing the Neworder XML Document, you will receive the e-mail when you execute the workflow in Executing and Monitoring the Example Workflows.
Note: The Order Processing template definition provided in the tutorial.jar file does not contain this action because the action requires correct server configuration, as described in the following text.
Attempting to send an e-mail at run time requires the following prerequisites:
If both of these conditions are not met, do not follow this procedure to add the Send E-mail Message action.
If you do opt to add the Send E-mail action, consider using the message shown below as the content for your message.
Subject: Your order #order number
Your order for item (quantity) has been shipped. The total price for your order is amount. Thank you for your business.
To add and define the Send E-mail Message action:
Figure 4-35 Send E-Mail Message Dialog Box

Figure 4-36 Mail Recipient Dialog Box

Figure 4-37 Send E-mail Message Dialog Box: Order Confirmation Message

Marking the Task Done
Because this task contains no actions that execute it, we must add the Mark Task Done action to the Activated tab of the Task Properties dialog box.
To add and define the Mark Task Done action:
Creating an Event: Defining the Watch for Cancellation Event
At any point during the entire process until the Ship Order task of the Order Fulfillment sub-workflow is executed, the Watch for Cancellation event could be triggered—hypothetically—by the arrival of a relevant XML message on a JMS queue from a Web-tier application. Because the node stands outside of the flow, attached directly to the start and done nodes, the flow can be interrupted regardless of the node which it is currently executing. If the node is triggered before the shipping task of the Order Fulfillment workflow is executed, the Order Processing workflow proceeds to the Done node and terminates.
Although this event is never actually triggered in the sample workflow because we are not using a real XML document, we can imagine a hypothetical XML document that looks like the following document.
Listing 4-5 Cancelledorder XML Document
<cancelledorder>
   <date>June 18 2001</date>
   <order>
      <id>9654</id>
   </order>
   <customer>
      <id>232</id>
      <name>Harold Jones</name>
   </customer>
	.
	.
	.
</cancelledorder>
The way in which the incoming XML document, event key configuration expression, and event node key value expression correspond to each other for this node is represented in following table.
Because you already imported the cancelledorder event key, which is also used by the Order Fulfillment workflow (for information, see Overview of the Order Fulfillment Workflow), you do not need to create the event key. You simply need to define the event. Defining the Event To define the Watch for Cancellation event:
Figure 4-38 Watch for Cancellation Event: Event Properties Dialog Box

Save the template definition and it is now ready to be run. The next section describes the Order Fulfillment workflow, which you imported predefined.

|

|

|


 icon, this means that the field does not yet include a valid expression. When you enter a value in the field, the icon disappears.