|
|
This section describes the tasks that you must perform to configure WebLogic Integration for deployment in a single WebLogic Server environment.
To set up and deploy WebLogic Integration in a single-server configuration, complete the following steps:
Configure one of the following databases for your domain:
| Notes: | It is important to configure your database appropriately for production use. You must provide adequate space to store data and log messages, and follow best practices for administering your database. |
| Note: | You can configure your database to use concurrent access. |
For information about database tuning requirements associated with WebLogic Integration applications, see Preparing Your Database and the database-specific notes in Maintaining Availability.
For the latest information about specific databases, see the WebLogic Integration 9.2 Release Notes.
To prepare a WebLogic Integration environment, complete the tasks described in the following sections:
You begin the definition of a WebLogic Integration deployment by creating a domain using the BEA Configuration Wizard.
To create a WebLogic Integration domain using the Configuration Wizard, complete the following steps:
 BEA ProductsToolsConfiguration Wizard.
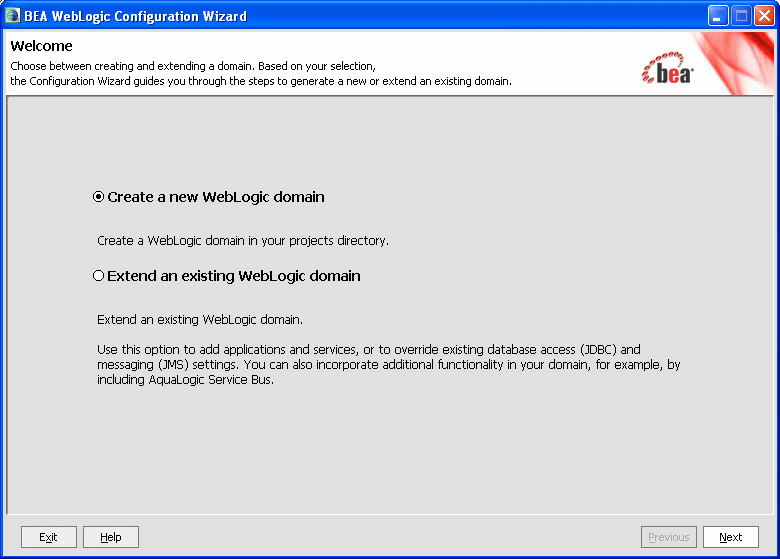
This displays the Welcome page in the BEA WebLogic Configuration Wizard dialog box (see Figure 2-1).
As you proceed through the Configuration Wizard, several pages will appear in a sequence. You need to specify your settings on each page and click Next to proceed to the subsequent page.Table 2-1 lists the pages and the options that you need to select to create the domain successfully.
When you complete the domain configuration using the Configuration Wizard, your new domain is created in the location you specified.
Your WebLogic Integration domain includes two configuration files:
For more information about config.xml, see Understanding Domain Configuration.
For information about wli-config.properties, see wli-config.properties Configuration File.
For information about configuring domains, see "Setting Up WebLogic Domains" in BEA Products Installation and Configuration Documentation.
When preparing a production environment (working in noniterativedev mode), you must create the WebLogic Integration database tables. For the procedure to create these tables, see "Creating the WebLogic Integration Tables" in Configuring a Production Database in Managing WebLogic Integration Solutions.
For more information about conversational state database tables, see "Adding Resources Required by the Application From the wlw-manifext.xml File" in Creating and Configuring the WebLogic Domain in Deploying WebLogic Platform Applications.
If you want to configure SSL for your domain, you can do so by using the WebLogic Server Administration Console. For information about the tasks you must complete, see:
For general information about configuring security for WebLogic Platform applications, see Security.
This section describes how to start, monitor, and shut down the server in your WebLogic Integration domain:
For information concerning starting servers for WebLogic Platform applications, see Starting and Stopping Servers: Quick Reference.
To start the server, complete the following procedure:
From the Start Menu, choose All ProgramsBEA ProductsUser ProjectsDomain NameAdmin Server Console.
For more information about starting the server, see Starting and Stopping Servers: Quick Reference.
Once startup is complete, you can use the WebLogic Server Administration Console to verify deployments and status. For information about using WebLogic Server Administration Console to monitor your server, see Monitor Servers.
If you need to shut down your WebLogic Integration application, use the WebLogic Server Administration Console.
| Note: | It is recommended that you do not close the command window or press Ctrl+c to stop WebLogic Integration. |
For the procedure to shut down your application gracefully, see Control graceful shutdowns.
Once you have configured and secured your WebLogic Integration domain and added the queues and database tables for your application to that domain, you can use the WebLogic Server Administration Console to deploy the EAR file that contains your WebLogic Integration application.
If you did not configure all the queues necessary for your application while configuring your WebLogic Integration domain as described in Creating a WebLogic Integration Domain Using the Configuration Wizard, you can configure them now using the WebLogic Server Administration Console.
| Note: | Async request and async request error queues, as well as database conversational state tables, are created automatically for applications in the WebLogic Workshop development environment. You must create these queues and tables manually for production environments. |
| Note: | If your WebLogic Integration solution uses the RDBMS Event Generator, be sure to configure the Redelivery Delay Override setting appropriately for wli.internal.egrdbms.queue. For the procedure to configure the Redelivery Delay Override, see RDBMS Event Generator. |
You can update environment-specific information in your Application Views and adapter instances either before or after deploying your WebLogic Integration application:
For the procedure to deploy an EAR file, see "Configuring and Deploying a New Enterprise Application or Web Service" in Enterprise Applications in the WebLogic Server Administration Console Online Help. For a complete overview of the procedure to deploy a WebLogic Platform application, see Deploying WebLogic Platform Applications.
For examples of automation scripts that build, configure, and deploy WebLogic Integration applications outside of an interactive console environment, see the WebLogic Integration Solution Samples and the PO Sample that are available in the BEA dev2dev Code Library at the following URL:
| Note: | Code samples and utilities are posted on dev2dev for your convenience. They are not products supported by BEA. |
For a complete list of tools available to automate the application deployment process, see "Automating the Promotion Process" in Overview of WebLogic Platform Development in Deploying WebLogic Platform Applications.
Production environments change over time and as application use increases. This section describes how to update your domain in response to common production environment change scenarios:
For information about promoting WebLogic Platform applications from development environments to production environments, see "Steps to Promote WebLogic Platform Applications" in Overview of WebLogic Platform Development in Deploying WebLogic Platform Applications.
EIS instances are sometimes phased out, and new instances (possibly with new versions of EIS software, new hardware, and so on) are brought online. When this happens, WebLogic Integration administrators need to gracefully transition application views and adapter instances to the new EIS instance, and away from the old.
This situation is similar to an EIS instance failure, but not as urgent. In this case, you suspend the application views and adapter instances pointing at the old EIS instance, and then follow the instructions in EIS Instance Failover to point the application views and adapter instances to the new EIS instance.
As your business requirements change, you may need to develop and deploy new versions of your WebLogic Integration application. To install a new version of your WebLogic Integration application, perform the following steps:
You perform the preceding steps using the WebLogic Server Administration Console. For more information, see "Configuring and Deploying a New Enterprise Application or Web Service" in Enterprise Applications in the Administration Console Online Help.


|