|
|
This section describes how to use the BEA XQuery Mapper to graphically create data transformations. Using the graphical interface, you can map source elements in schemas to target elements in schemas. After doing so, the XQuery Mapper generates an XQuery, which is saved as an .xq file.
This section includes the following topics:
When you install WebLogic Integration or AquaLogic Service Bus, BEA Workshop for WebLogic and the XQuery Mapper plug-in for Eclipse are installed.
As part of your XQuery Mapper installation, a sample project containing default schema is provided. For more information about the Sample Project, see XQuery Mapper Sample Project.
Programs BEA ProductsWorkshop for WebLogic Platform
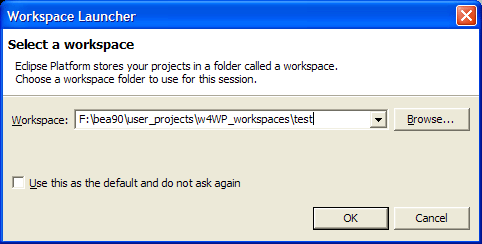
The Workspace Launcher dialog is displayed.
This folder is called your workspace and is the folder in which Workshop stores your projects.
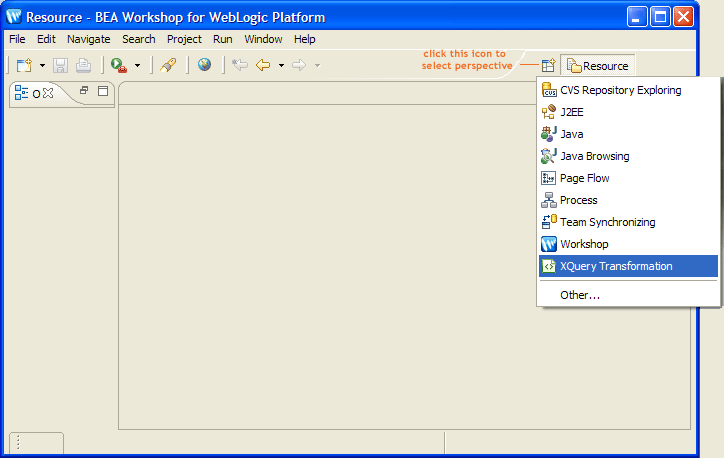
WindowOpen PerspectiveOtherXQuery Transformation.
| Note: | The XQuery Transformation Perspective launches automatically when you open an XQuery file. However, if XQuery Mapper is open (and an XQuery file is not) you must manually launch the XQuery Transformation Perspective. |
A sample project is provided in your installation. It provides schema and XML files that you can use tto create XQuery transformations as described in Examples: Manipulating and Constraining Data Using XQuery.
You can create the sample project using a wizard from within the XQuery Transformation perspective. To do so:
FileNewOtherWebLogic IntegrationTutorial: XQuery Transformation
| Note: | The same sample project is available from the following menu item: FileNewOtherAquaLogic Service BusTutorial: XQuery Transformation |
The sample project is created and contains the following folders and files:
To learn more about creating projects and importing the files you need for those projects, see the following topics:
| Note: | Before creating XQuery transformations, you can create or import your project specific XML schema, WSDL, or MFL files from any location to the XQuery Mapper. Before importing files into Eclipse, it is recommended that you create a folder directory structure that meets your business needs. For more information, see Creating and Importing Schema Files. |
You create a project using the Eclipse New Project wizard. This wizard prompts you to select from a variety of new project types. For XQuery Mapper purposes, you can choose Simple, which allows you to create a basic project.
NewProject.The New Project wizard opens. The wizard prompts you to select one of the following:
Project. Schema files can be created or imported from any location. The following schema types are supported:
.mfl extension. For more information, see the
Format Builder Online Help.This section includes the following topics:
XML schemas are created and stored outside of Eclipse. However, they can also be created using the XML Schema Editor. After schema files are imported or created, they are available in the New XQuery Transformation wizard as shown in the following figure. For information about creating XML Schema, see: Creating XML Schema Files Using XML Schema Editor.
Import. The Eclipse Import wizard is displayed. Using this wizard, schemas can be imported from a variety of sources. The import source you select depends on where the schema is stored.
For example, if importing from a local file system, you are prompted to browse for the locally stored file.
You can create an XML schema file using the XML Schema Editor that is shipped with Eclipse.
NewOther ...The schema file is created in the specified project. You can now specify the schema details and save the file.
| Note: | For more information about using the XML Schema Editor, see the XML Schema Editor Tutorial, which is available at the following URL: |
You can create a WSDL file using the WSDL Editor that is shipped with Eclipse. The XML schema defined in the WSDL files can be used in the transformation.
NewOther ...The WSDL file is created in the specified project.
| Note: | For more information about using the WSDL Editor, see the WSDL Editor Tutorial, which is available at the following URL: |
After MFL files are imported, the files are available in the New XQuery Transformation Wizard.
Import. The Import wizard opens. Using this wizard, schema can be imported from a variety of sources. The import source you select depends on where the schema is stored.
For example, if importing from a local file system you will be prompted to browse for the locally stored file.
MFL files are created using the Format Builder tool, which can be launched from the Windows Start menu or from Eclipse.
For more information about Format Builder, see the Format Builder Online Help.
Click the Design tab to open the XQuery Mapper Design view, which allows you to create transformation maps by selecting source and target data types. In the Design view, you can graphically link Source and Target elements. After creating links between source and target elements, an XQuery file (or map) is generated with an .xq extension. This file is displayed in the Design view. The generated XQuery code is visible by clicking the Source tab.
Source and target data types can be of the following combinations:
XQuery Transformation. The New XQuery Transformation wizard opens.
The Source Types page opens. This page allows you to select source types for the transformation.
| Note: | For schema representations to be available in the Available Source Types and Available Target Types pane, the XML and Non-XML files that contain these schemas must be imported or created. |
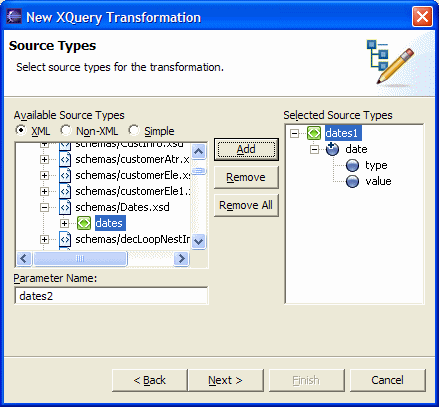
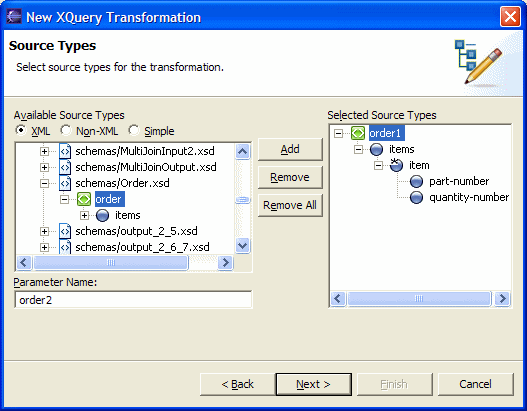
For example, if adding input data from Schemas/Dates.xsd, first select it, then traverse its contents to select date as your input element, as shown in the following figure.
The elements and attributes that make up the selected element are displayed in the Selected Source Types pane.
The Target Types page opens. This page allows you to select the target data types for the transformation.
| Note: | For schema representations to be available in the Available Source Types and Available Target Types pane, XSD and MFL files that contain these schemas must be imported into your Eclipse project. |
The elements and attributes that make up the selected element are displayed in the Selected Target Types pane.
| Note: | Only one target data type can be specified. |
This section includes the following topics:
A basic element transformation involves mapping a source element to a target element. The source and target elements may or may not have the same name, type, or scope. There are many different types of basic element transformation.
The following list provides examples:
This assumes that the map file has been created as described in Selecting Source and Target Data Types to Generate XQuery.
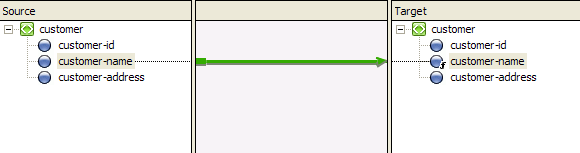
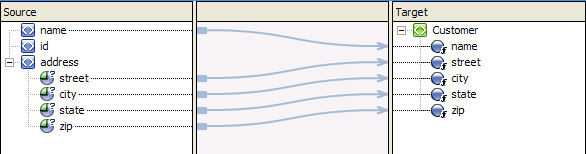
For example, if creating an Element to Element link between the source element customer-name and the target element customer-name simply drag it from the Source pane to the Target pane as shown in the following figure.
A basic attribute transformation involves mapping a source attribute to a target attribute. The source and target attributes may or may not have the same name, type, or scope. There are many different types of basic attribute transformation.
The following list provides examples:
For example, if creating an Attribute to Element link between the street attribute and the street element, drag it from the Source pane to the Target pane as shown in the following figure.
Complex map transformations involve mapping from a complex source (for example, a repeating element) to a complex target (for example, a non-repeating element). The following list provides examples:
This assumes that the map file has been created as described in Selecting Source and Target Data Types to Generate XQuery.
For example, if creating a Repeating Group to Repeating Group link between product and product, drag it from the Source pane to the Target pane as shown in the following figure.
After creating the initial transformation you may want to change, update, or delete it in the Source tab.
This section contains the following topics:
After creating links between source data and target data, an XQuery file is generated to represent the relationship. To learn about the XQuery language supported with XQuery Mapper, see the following URL:
The XQuery code is displayed. Invalid XQuery code is underlined in red.
If desired, you can delete all the XQuery code in the Source view of the XQ file by removing all the XQuery source code inside the function, except the root element, and recreating your links in the Design view.
The Constraints tab of the XQuery Mapper allows you to constrain or manipulate the relationship between source and target repeating elements.
The following Constraint Type options are available in the Constraints tab:
| Note: | For more information about these options, see Using the Union Option of the Constraints Tab. |
When creating structural links between repeating elements in the Design view, XQuery for loops are generated to iterate through the repeating elements. You can use the Where Clause Expression pane of the Constraints tab to limit or constrain the target repeating elements by adding where clauses to the XQuery for loops. In the Where Clause Expression pane of the Constraints tab, you can build complex conditions for the where clause of the XQuery for loop. A complex condition is made up of conditions that are joined together by OR or AND operators, for example:
((data($PurchaseOrderDoc/partId) > 200 and data($PurchaseOrderDoc/partId) <= 400))
During run time, the for loop will iterate only over those repeating elements that meet the complex condition.
For a detailed example on using the Constraints Tab, see Creating a Transformation Between a Repeating Source and Non-Repeating Target.
You can view and modify the link between a source and target element using the Target Expression tab. Using the Target Expression tab, you can build complex expressions between a source and target element.
This section contains the following topics:
By default, the General option is selected and the XQuery code for the link is displayed in the General Expression pane.
The query is written in the XQuery language. To learn more about the XQuery code, see the following URL:
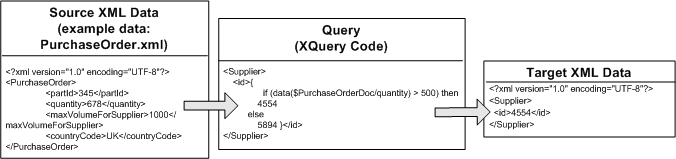
You can add an if-then-else construct to a link using the Target Expression tab. When a query is invoked with an if-then-else, the conditions that make up the if expression are evaluated, depending on the result, different values are returned for a target node. For example, if the value of quantity source node is greater than 500 then 4554 is returned as the value of the ID target node, but if the value of quantity source node is less than or equal to 500, then 5894 is returned as the value of the ID target node, as shown in the example in the following figure.
In addition to the following procedure for adding a simple if-then-else expression to a link, a more complex example is available. For an example, see Creating a Transformation Between a Repeating Source and Non-Repeating Target.
This section describes how to insert calls to functions into a query using the Target Expression tab.
For more information about the XQuery 1.0 and XPath 2.0 functions and operators (W3C Working Draft 23 July 2004), see the following URL:
This section contains the following topics:
A set of standard W3C XQuery functions and operators are provided in XQuery Mapper. When you create a transformation, a query is written in the XQuery language and this query does the data conversion. In the generated query, you can add standard XQuery or user-defined functions. For example, as part of your transformation you might want to convert the XML String to uppercase characters.
Show ViewExpression Functions.Show ViewExpression Variables.The link between these two nodes becomes green.
If the Target Expression tab is not visible, from the menu bar, choose WindowShow ViewTarget Expression.
In the General Expression pane, the XQuery code linking the selected target and source node is displayed and is selected. Keep this selected for the next step.
For this example, from the String Functions folder, select the upper-case function.
For the following step, leave the parameter of the selected function (the $string-var parameter of the upper-case function in this example) in the General Expression pane selected.
| Note: | XQuery functions like trim-left that have been defined by BEA Systems are prefixed with fn-bea:. XQuery functions that are not listed in the Expression Functions pane, but are defined in the XQuery specification can be used with the fn: prefix. |
During run time for this example, the upper-case function will convert all the characters of the source element to upper case.
Using the Expression Variables view of XQuery Mapper you can access variables and their sub elements. You can drag-and-drop variables or their sub elements from the Expression Variables view into the Constraints and Target Expression tabs.
The following types of variables are displayed in the Expression Variables view:
While editing an XQuery file in the Design tab, the Property Editor allows you to view schema properties about the nodes in the current map without opening the source and target XSD or MFL files. So, you can select the element or attribute in the Source, Target, or Expression Variable pane and view the associated schema properties in the Property Editor. The Property Editor displays a read-only view of the schema properties for the selected element.
To turn on the Property Editor view, choose WindowShow ViewProperties.
You can use the Test tab in the XQuery Mapper to verify your XQuery transformations.
This section contains the following topics:
For more information about testing XQuery files, see Testing XQuery Files.
You can use the Test view in the Mapper to validate the transformation defined by you. Select the appropriate icon in the Test view as displayed in the following figure.
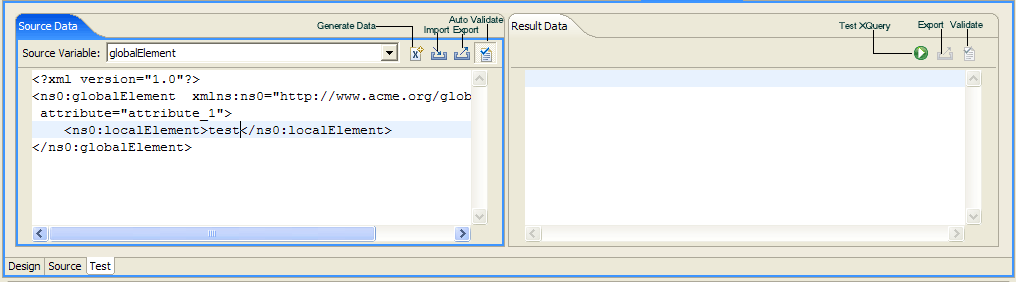
The following functionality is available in the Test view:
When you import source data it is validated against the associated schema and any warnings and errors are marked. You can import XML data for Global Types and Local Elements, however, Global Types and Local elements are not validated, therefore, no errors or warnings will be reported for invalid data. For more information about Global Types and Local Elements, see XML Global Elements, Global Types, Local Elements, and Attributes.
During design time, the Auto Validate icon in the Source Data and the Validate icon in the Result Data panes in the Test View tab of an XQuery file will be enabled only if the selected source parameter or resulting data is a typed global XML element. To learn more, see XML Global Elements, Global Types, Local Elements, and Attributes.
Validate will not be enabled if the selected source parameter or resulting data is one of the following types:
If you select the Auto Validate icon in the Source Data and the Validate icon in the Result Data panes in the Test View tab of an XQuery file, the displayed XML is checked against the schema and any errors are reported during design time. The validation done during design time in the Test View is not the same as the schema validation that occurs during run time. The validation during design time does not modify the resulting XML document, but it does check if any required elements or attributes defined in the schema are not present.
Using the design view you can graphically create, alter, or update transformations. This sections provides information about the graphical representations found in the Design tab of the XQuery Mapper.
This section includes the following topics:
A data link directly transforms data from a source node to a target node. For example, the following figure shows a data link between the priceQuote/customerName element and the quote/name element.

Both priceQuote/customerName and quote/name are XML String elements. During run-time, the data from the priceQuote/customerName element is converted to the quote/name element as shown in the preceding figure.
If you modify the XQuery code linking these two elements, the link between these elements changes from a data link (represented as a blue line) to an implied link (represented as a light gray line).
The following table summarizes the different link representations.
While dragging a node from the Source pane to the Target pane, a temporary link (a dashed line) appears between the two nodes. The color of the dotted line changes depending on the compatibility between the source and target node, as shown in the following table.
After the source node has been dropped on the target node, a line representing a link will be displayed. Depending on the target and source nodes, a dashed line or a solid line will be displayed.
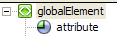
An XML Schema type or element is considered global if it is a direct child of the schema element while an XML Schema type or element is considered local if it is not a direct child of the schema element (is nested to another element) as shown in the following XML Schema.
<?xml version="1.0"?>
<xs:schema xmlns:xs="http://www.w3.org/2001/XMLSchema"
targetNamespace="http://www.acme.org/globalExample"
xmlns="http://www.acme.org/globalExample"
elementFormDefault="qualified"
attributeFormDefault="unqualified">
	<xs:element name="globalElement">
		<xs:complexType>
			<xs:sequence>
				<xs:element name="localElement"
					minOccurs="1" maxOccurs="1"
					type="xs:string" />
			</xs:sequence>
			<xs:attribute name="attribute"
				type="xs:string" use="required"/>
		</xs:complexType>
	</xs:element>
	<xs:complexType name="globalType">
		<xs:sequence>
			<xs:element name="anotherLocalElement"
			minOccurs="0" maxOccurs="unbounded"
			type="xs:string" />
		</xs:sequence>
	</xs:complexType>
</xs:schema>
In the preceding example XML Schema, the globalElement is global because it is a direct child of the schema element while localElement is local because it is child of globalElement.
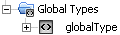
You can also define a global type as shown by the globalType element at the bottom of the preceding XML Schema. While you can only have one global element in an XML Schema, you can declare many elements (with different names) of the same global type in a single XML Schema.
The following table shows the graphical representations of these different XML components in the XQuery Mapper.

|
||

|
||
|
||
|


|