|
|
This chapter discusses how to configure the security realms of WebLogic Portal producers and consumers running in different domains. In the first part of this chapter, we explain the configuration that is required when both the producer and consumer are running in WebLogic Portal version 9.2 or later domains. In the second part of this chapter, the case of mixed domains is discussed, where the producer and consumer can be running in either WebLogic Portal 8.1x or 9.2 or later domains.
This chapter includes the following sections:
This section explains the procedure for configuring WSRP security using custom SAML tokens when the producer and consumer are running in different WebLogic Portal version 9.2 or later domains. Use the procedure described in this section to configure security on production systems where custom SAML tokens are required.
| Note: | By default, with no previous configuration, WebLogic Portal 9.2 and later domains share a common key. This allows you to quickly create, for demonstration or testing purposes, federated portals that require user authentication without undergoing the configuration procedure described in this section. |
| WARNING: | It is recommended that you do not use the default key described in the previous note in a production environment. Using this default setting allows any consumer to connect to your producer. |
This section includes these topics:
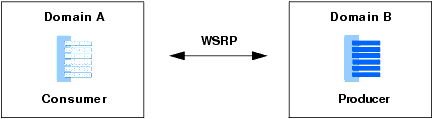
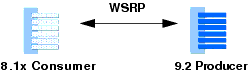
In a typical scenario, consumer and producer applications are running in separate WebLogic Portal 9.2 or later domains, as shown in Figure 15-1.
By default, WebLogic Portal specifies SAML as the default security token type for WSRP. If you are running in a demonstration or development environment, no further configuration is required. However, for a production environment it is recommended that you perform the SAML configuration described in this section.
This section describes an example federated portal application where the producer and consumer are running in different WebLogic Portal 9.2 or later domains. This example provides a basis for discussing how to configure SAML security between these domains.
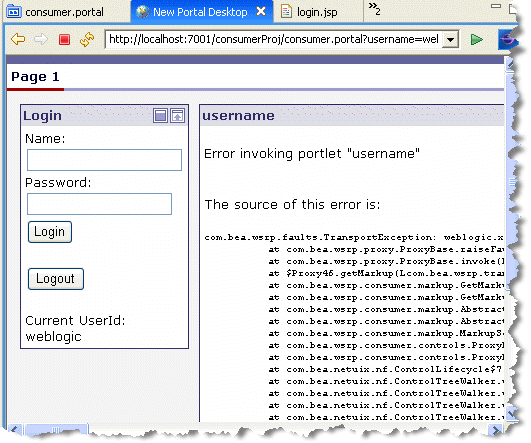
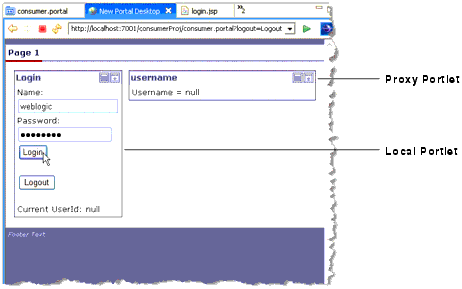
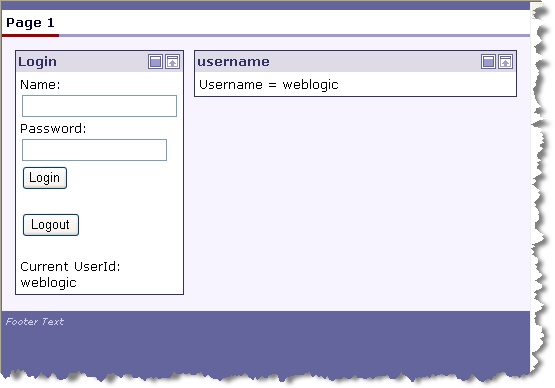
The portal shown in Figure 15-2 includes a local portlet on the left and a remote (proxy) portlet on the right. The local portlet is a login portlet. When a user logs in successfully, the producer portlet displays the user’s name. As you will see, however, unless SAML security is properly configured, an error results when a user logs in to the portal.

As you can see in Figure 15-2, the proxy portlet renders without error before a user logs in. It isn’t until a user attempts to log in that a SAML message is sent, resulting in an error.
Checkpoint: This section described an example federated portal where the consumer and producer are running in separate WebLogic Portal domains. In the following sections, we explain how to configure the consumer and producer so that the SAML token sent from the consumer is accepted by the producer.
To correct the error shown in the previous section, you need to configure both the consumer and the producer. This section discusses the consumer configuration.
| Tip: | Anytime you generate a new key, you must copy the keystore to the entire cluster. |
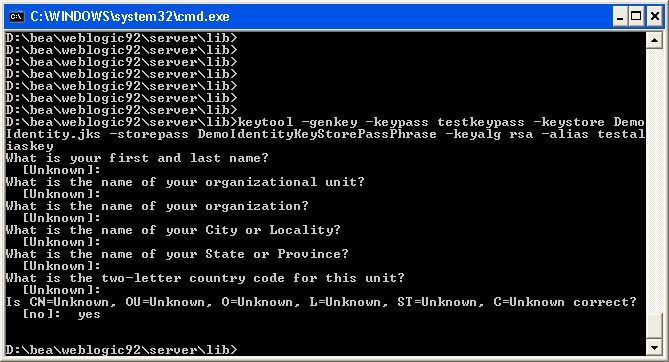
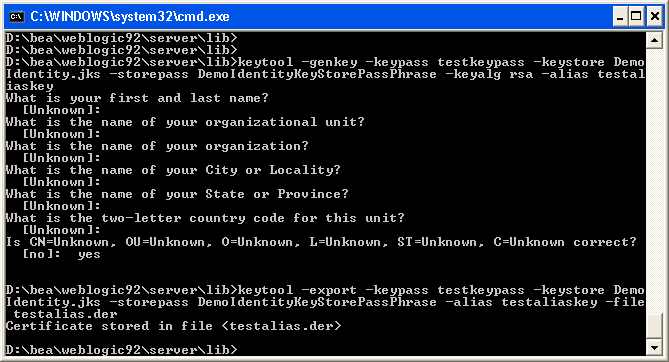
This section explains how to generate a key on the consumer using the keytool utility, a Java utility distributed by Sun Microsystems that manages private keys and certificates. For detailed information on keytool, refer to the Sun Microsystems website.
| Note: | By default, the consumer has a keystore that the server uses for its SSL key. The default keystore is called DemoIdentity.jks. If you are using a different keystore, then modify the one that you are currently using. |
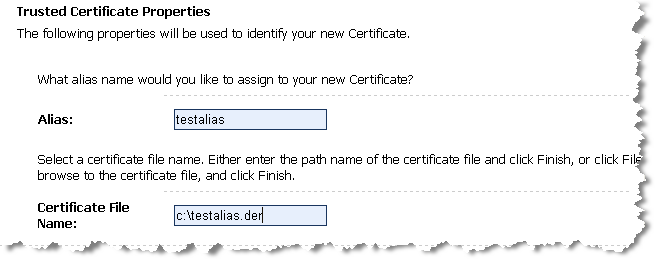
WEBLOGIC_HOME/server/lib directory. testalias.
keytool -genkey -keypass testkeypass -keystore DemoIdentity.jks -storepass DemoIdentityKeyStorePassPhrase -keyalg rsa -alias testalias
The options used in the example keytool command include the following:
Export the key from the consumer server. In the same command window that you used to generate the key, in the same directory, run the keytool command with the -export option, as shown in Figure 15-4. For example, the following command generates a key file called testalias.der.
keytool -export -keypass testkeypass -keystore DemoIdentity.jks -storepass DemoIdentityKeyStorePassPhrase -alias testalias -file testalias.der
This section explains the procedure for configuring the consumer to use the key that you generated.
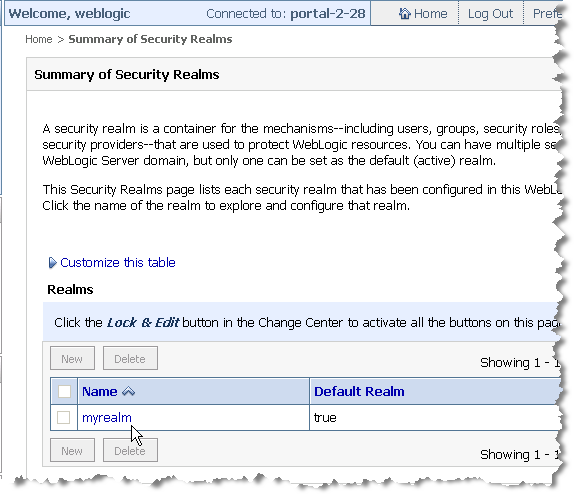
| Tip: | A security realm is a container for the mechanisms– including users, groups, security roles, security policies, and security providers– that are used to protect WebLogic resources. You can have multiple security realms in a WebLogic Server domain, but only one can be set as the default (active) realm. The default is called myrealm. |
where serverIP is the IP address of the server on which the consumer application is running, and port is the server’s port number. For example:
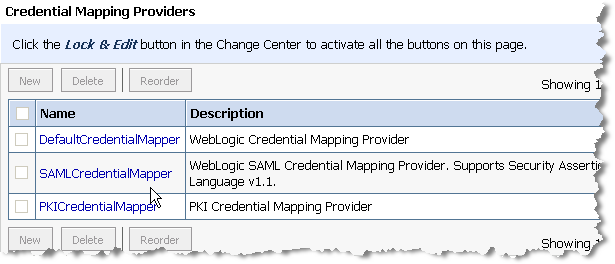
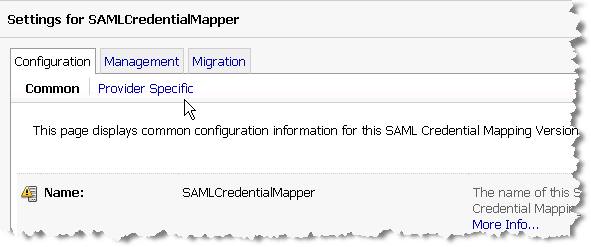
| Tip: | The SAML Credential Mapper provider acts as a producer of SAML security assertions, allowing WebLogic Server to act as a source site for using SAML for single sign-on. |
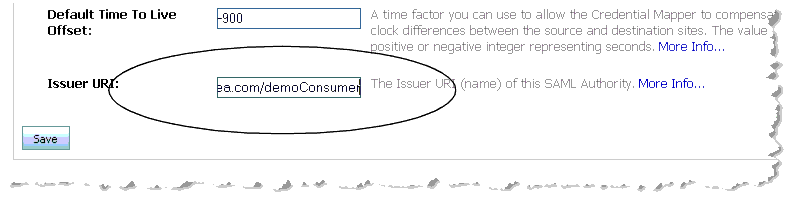
http://www.bea.com/demoConsumer
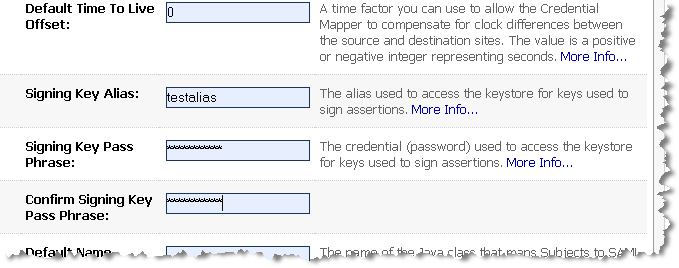
| Tip: | It is recommended that you set the Default Time To Live to 120 seconds, the Cred Cache Min Viable TTL to 10 seconds, and the Default Time To Live Offset to 0. Then, select the Management tab and in the relying party configuration, set the Assertion Time To Live Offset to the difference between the clock times of the consumer and producer (consumer time minus producer time). |
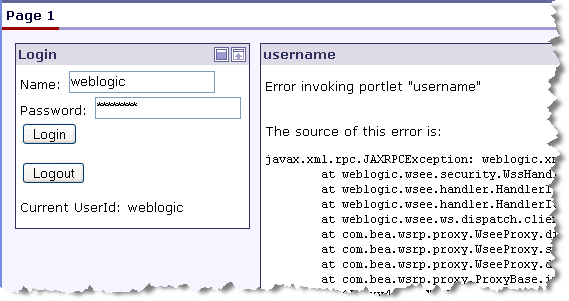
Checkpoint: At this point, the SAML credential mapper provider on the consumer is configured to use the keystore you generated. If you were to try to log in to the login portlet, you would receive an error, as shown in Figure 15-15. This is because the producer does not yet recognize the new key sent from the consumer. In the next steps, you will configure the producer to accept the key sent from the consumer.
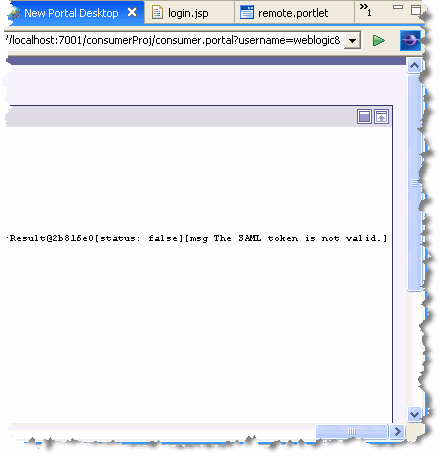
| Tip: | If you scroll the portal to the right, you will see that the error message says “The SAML token is not valid,” as shown in Figure 15-16: |
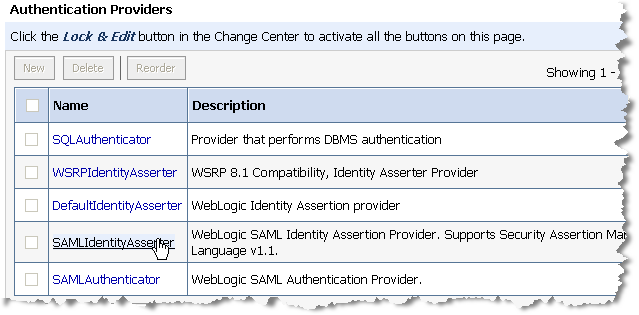
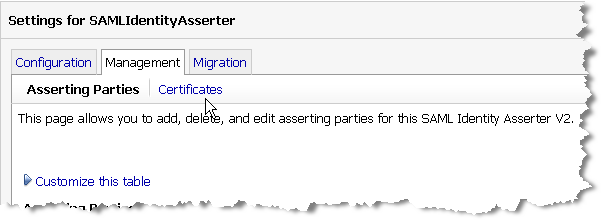
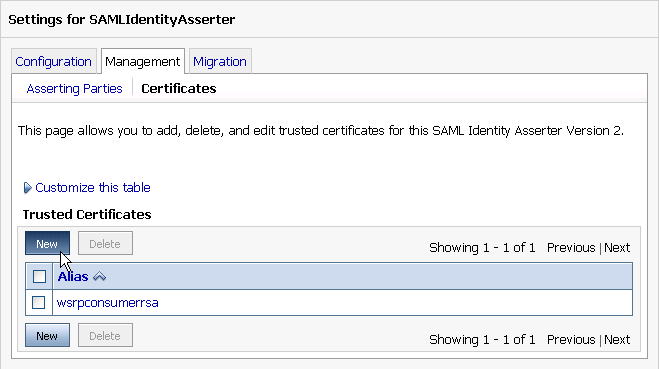
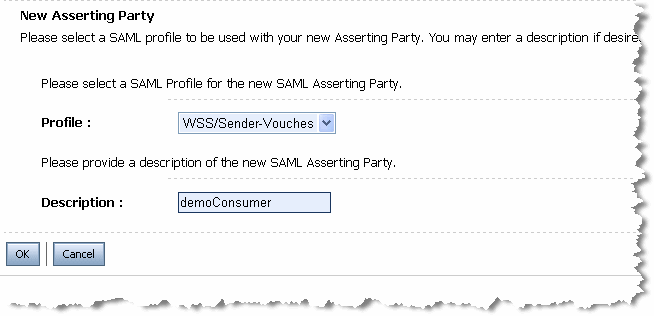
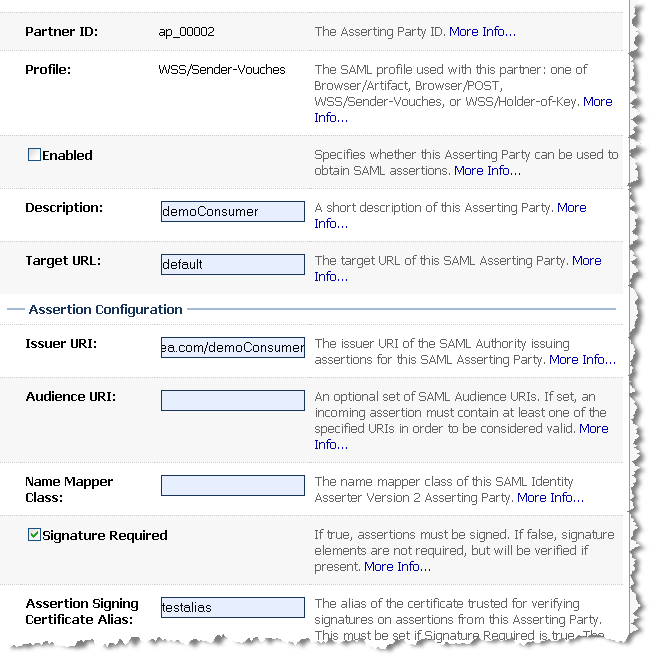
This section explains how to configure the producer. To do this, you import the certificate into the SAML asserter, and configure the asserting party properties.
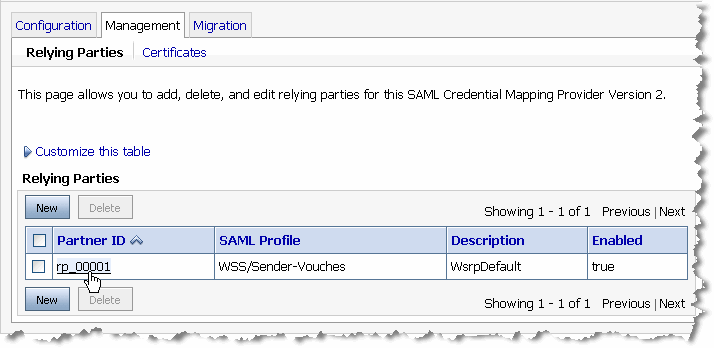
testailias.der) that you generated on the consumer to the producer using any method you want, such as FTP or SMB. You can place the file in any directory on the destination machine. testalias. | Tip: | The WsrpDefault asserting party is set up for the producer’s default WSRP key. If the consumer and producer applications were running on the same server, the WSRP key of the consumer would be accepted by the producer. It is a good practice to delete the WsrpDefault party for an application that is in production. |
demoConsumer. If there were no problems, the message, Settings updated successfully, appears.
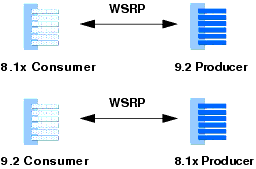
Producer and consumer applications developed with WebLogic Portal 9.2 or later versions are compatible with producers and consumers developed with WebLogic Portal 8.1x. That is, a portal developed with WebLogic Portal 9.2 or later versions can consume portlets deployed in a WebLogic Portal 8.1x domain. Similarly, portlets exposed in a WebLogic Portal 9.2 or later producer can be consumed by an 8.1x consumer. These two use cases are summarized in Figure 15-26.
This section discusses addresses both of these use cases. The following topics are discussed:
This section explains how to achieve SAML-based security compatibility between a WebLogic Portal 9.2 or later version consumer and an 8.1x producer, as summarized in Figure 15-27.

| Tip: | By default, with no configuration changes made to either side, WSRP between a 9.2 or later version consumer and 8.1x producer works. That is, a 9.2 or later version consumer can consume a portlet from an 8.1x producer with no configuration changes. However, if you want to use your own key for the 9.2 or later version consumer, you need to follow the procedure outlined in this section. |
The portal shown in Figure 15-28 includes a local portlet on the left and a remote (proxy) portlet on the right. The remote portlet is deployed in an 8.1x producer. The local portlet is a login portlet. Before SAML security is properly configured, when a user logs in, the name that is returned is null.
The following sections explain how to configure the consumer with a key that can sign the SAML assertion sent to the producer. The basic tasks include:
This section explains how to generate a key on the consumer using the keytool utility, a Java utility distributed by Sun Microsystems that manages private keys and certificates. For detailed information on keytool, refer to the Sun Microsystems website.
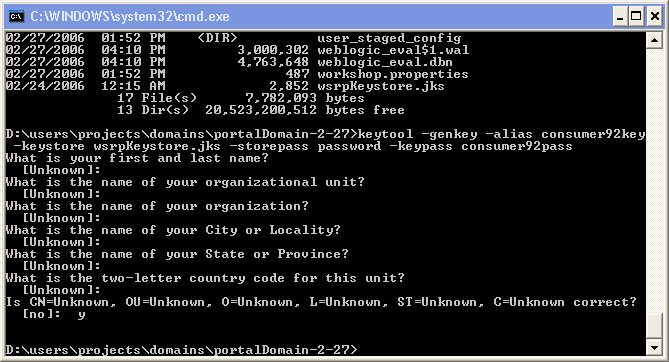
WEBLOGIC_HOME/server/lib directory. consumer92key.
keytool -genkey -alias consumer92key -keystore wsrpKeystore.jks -storepass password -keypass consumer92pass
The options used in the example keytool command include the following:
wsrp-consumer-security-config.xml from the J2EE Shared Library to your project. To do this in Workshop for WebLogic, open the Merged Projects view, find the file in the WEB-INF directory of your consumer web application. Right-click the file and select Copy to Project. For more information on copying files from J2EE Shared Libraries, see the Production Operations Guide and the Portal Development Guide. wsrp-consumer-security-config.xml in the WEB-INF directory of your consumer web application. Change the <consumer-name> element from wsrpConsumer to another arbitrary name. For example, change:
<consumer-name>wsrpConsumer<consumer-name>
<consumer-name>consumer9x<consumer-name>
Checkpoint: If you try to log in to the remote portlet again, you will receive an error, as shown in Figure 15-30. This error is caused by the fact that the producer cannot find the key that was sent from the consumer. The next step is to configure the security realm for the consumer domain.
http://servername:portnumber/console
where servername is your server’s IP name, and portnumber is the server’s port. For example:
| Tip: | PKI, or public key infrastructure, allows the exchange of data through the use of a public and a private cryptographic key pair that is obtained and shared through a trusted authority. For more information, see “Configure Credential Mapping Providers,” in the WebLogic Server documentation. |
| Tip: | By leaving the remote resource attributes blank, the credential will be accepted by all producers. If you want to specify a producer, enter the appropriate information in this dialog. |
where consumerName is the consumer name you entered previously in the wsrp-consumer-security-config.xml file. (Note that the name is followed by a double underscore.)
For this example, the correct value for Local User is: consumer9x__81_COMPAT.
consumer92key.consumer92pass.consumer92__81_COMPAT. keytool utility to export the key that you created previously. You will use this key in the next set of steps to configure the WebLogic Portal 8.1x producer. For example:
keytool -export -alias consumer92key -keystore wsrpKeystore.jks -storepass password -keypass consumer92pass -file consumer92.der
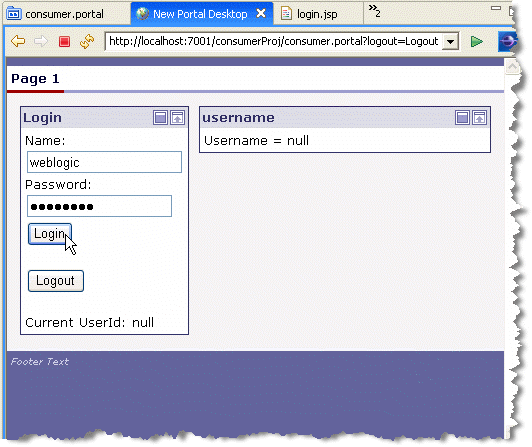
Checkpoint: In the previous steps, you associated this consumer, consumer92, to a key to sign the SAML assertion. If you now try to log in to the remote portlet, the previously seen error does not appear. This means that the consumer is now properly associated with a key. However, now after logging in, the user name is null, as shown in Figure 15-34. This is because this consumer is not yet known to the producer. The next set of steps demonstrate how to configure the WebLogic Portal 8.1x producer to accept the WebLogic Portal 9.2 or later version consumer’s key.
| Tip: | It is interesting to note an important difference between the behavior of a WebLogic Portal 9.2 or later version producer and a WebLogic Portal 8.1x producer. If a WebLogic Portal 9.2 or later version producer cannot verify what the consumer is sending, you will receive an error. If a WebLogic Portal 8.1x producer cannot verify what the consumer is sending, the producer ignores this condition and continues with an anonymous user. In addition, if an 8.1x consumer sends an unverifiable message to a 9.2 or later version producer, the producer likewise ignores the condition and continues with an anonymous user. |
This section explains how to configure the WebLogic Portal 8.1x producer. To do this, you import the key into the producer’s keystore.
BEA_HOME/weblogic81/user_projects/domains/portalDomain
keytool -import -keystore wsrpKeystore.jks -file c:\consumer92.der -storepass password -alias consumer9x -keypass consumer92pass
| Note: | The alias argument must match the consumer name you used when you created the key on the consumer. In this example, that name is consumer9x. |
After the producer server is restarted, you can once again test the remote portlet in the consumer application. When you log into the portal, you will see that the remote portlet now recognizes the user as logged in, as shown in Figure 15-35.
The preceding example demonstrated how to configure SAML security between a WebLogic Portal 9.2 or later version consumer and a WebLogic Portal 8.1x producer. In the next example, you will see the reverse: configuring SAML security between a WebLogic Portal 8.1x consumer and a WebLogic Portal 9.2 or later version producer.
This section explains how to achieve security compatibility between a WebLogic Portal 8.1x consumer and an 9.2 or later version producer, as summarized in Figure 15-36.
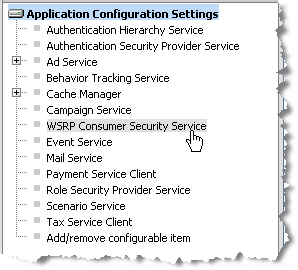
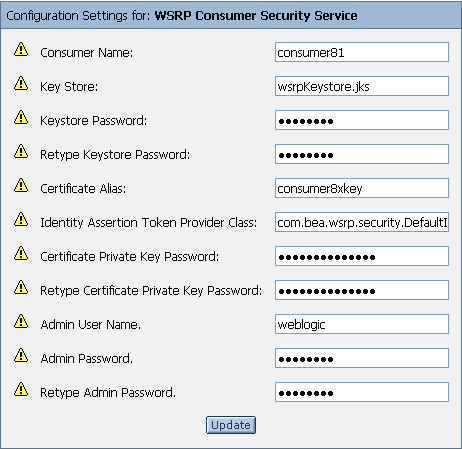
This section explains how to configure the 8.1x consumer. The basic steps include generating a key and configuring the WSRP Consumer Security Service in the WebLogic Administration Portal.
This section explains how to use the keytool utility to generate a key on the consumer. Keytool, a Java utility distributed by Sun Microsystems, manages private keys and certificates. For detailed information on keytool, refer to the Sun Microsystems website.
BEA_HOME/weblogic81/user_projects/domains/portal
keytool -genkey -keystore wsrpKeystore.jks -alias consumer8xkey -storepass password -keypass consumer8xpass
The options used in the example keytool command include the following:
http://localhost:7001/applicationName/login.jsp
where applicationName is the name of the WebLogic Portal consumer application.
keytool -export -alias consumer8xkey -keystore wsrpKeystore.jks -file consumer81.der
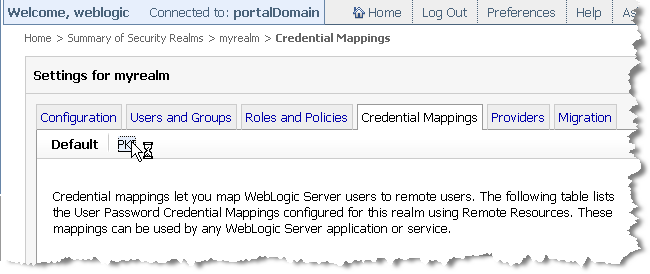
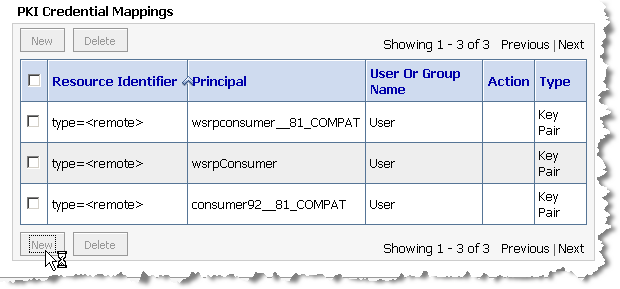
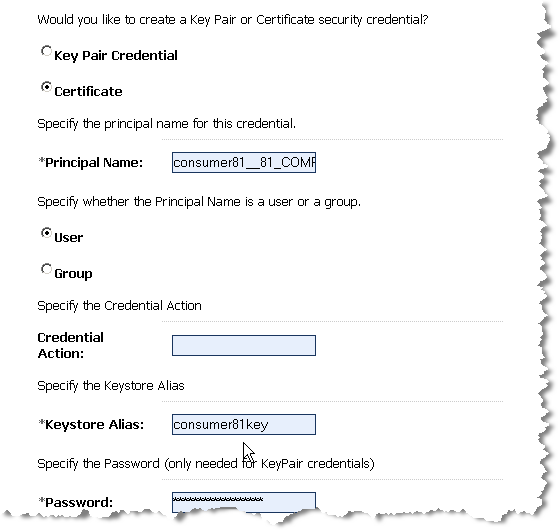
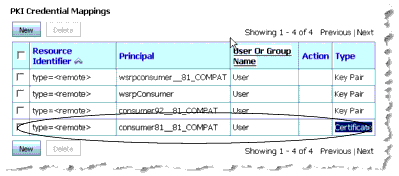
This section explains how to configure the producer. To do this, you must configure the producer’s PKI credential mappings to include the consumer’s certificate.
keytool -import -keystore wsrpKeystore.jks -file consumer81.der -alias consumer8xkey -keypass consumer8xpass
| Tip: | PKI, or public key infrastructure, allows the exchange of data through the use of a public and a private cryptographic key pair that is obtained and shared through a trusted authority. For more information, see “Configure Credential Mapping Providers,” in the WebLogic Server documentation. |
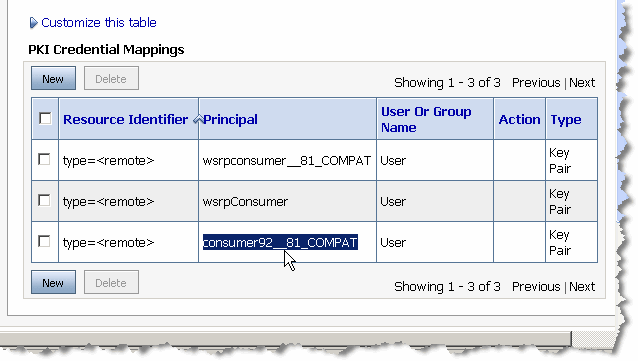
| Tip: | By leaving the fields blank, this indicates that the credential is recognized for all consumers. If you want to restrict the credential to a specific consumer, you can fill in the required information. |
consumerName__81_COMPAT, where consumerName is the name of the consumer. In this example, the name is consumer8x. consumer8xkey. consumer81pass. Figure 15-43 shows the completed dialog.
To test the configuration, log in to the consumer portal. As shown in Figure 15-45, the user name weblogic appears in the proxy portlet. This indicates success: the user was logged in successfully on the producer.
A name mapper is a class that maps one user name to another. Use a name mapper when the producer and consumer have different names for the same user. This section explains how to write and configure a name mapper class on both the consumer and the producer.
If you want to use a name mapping class on the producer or the consumer, the basic steps include:
WebLogic Portal provides two user name mapping interfaces:
Implement this interface on the consumer to map a user name on the consumer to a new name. See Implementing SAMLCredentialNameMapper on the Consumer for an example.
Implement this interface on the producer to map a user name sent from the consumer to a user name on the producer. See Implementing SAMLIdentityAssertionNameMapper on the Producer for an example.
Implement SAMLCredentialNameMapper on the consumer to provide name mapping on the consumer. Listing 15-1 shows an example implementation of SAMLCredentialNameMapper.
The mapSubject() method gets a Subject (user) and returns a SAMLNameMapperInfo object. The method provides logic to test the user name and replace it with a new user name. This new user name is then returned in a SAMLNameMapperInfo object, which is then passed to the producer.
For detailed information on this interface, see the Javadoc.
package com.bea.wsrp.qa.security;

import java.util.Collection;
import java.util.Set;
import javax.security.auth.Subject;

import weblogic.security.SubjectUtils;
import weblogic.security.providers.saml.SAMLCredentialNameMapper;
import weblogic.security.providers.saml.SAMLNameMapperInfo;
import weblogic.security.service.ContextHandler;
import weblogic.security.spi.WLSGroup;

public class CustomSAMLNameMapperImpl implements SAMLCredentialNameMapper {

	private String nameQualifier = null;

	public CustomSAMLNameMapperImpl (){ }

	/************ SAMLCredentialNameMapper implementation**************/

	public synchronized void setNameQualifier(String nameQualifier)
	{
		this.nameQualifier = nameQualifier;
	}

	public SAMLNameMapperInfo mapName (String name, ContextHandler handler)
	{
		return new SAMLNameMapperInfo(nameQualifier, name, null);
	}

	public SAMLNameMapperInfo mapSubject (Subject subject, ContextHandler handler)
	{
		// Provider checks for null Subject...
		Set groups = subject.getPrincipals(WLSGroup.class);
		String userName = null;

		userName = SubjectUtils.getUsername(subject);
		if (userName == null || userName.equals("")) {
			System.out.println("mapSubject: Username string is null or
                      empty, returning null");
			return null;
		}

		if (userName.equals("testUser"))
		{
			userName = "testUser_Mapped";
		}

		// Return mapping information...
		return new SAMLNameMapperInfo(nameQualifier, userName, groups);
	}
}
Implement SAMLIdentityAssertionNameMapper on the producer to provide name mapping. Listing 15-2 shows an example implementation of SAMLIdentityAssertionNameMapper. In this example, if you log in on the consumer as testUser_Mapped, the name mapper class retrieves that user name on the producer and logs you in as testUser_Producer.
The mapNameInfo() method gets a SAMLNameMapperInfo object from the consumer. This object contains the name with which the user logged in on the consumer. The method provides logic to test the user name from the consumer and replace it with a user name on the producer.
For detailed information on this interface, see the Javadoc.
package com.bea.wsrp.qa.security;
import java.util.Collection;
import java.util.Set;
import javax.security.auth.Subject;

import weblogic.security.SubjectUtils;
import weblogic.security.providers.saml.SAMLIdentityAssertionNameMapper;
import weblogic.security.providers.saml.SAMLNameMapperInfo;
import weblogic.security.service.ContextHandler;
import weblogic.security.spi.WLSGroup;

public class CustomSAMLNameMapperImpl implements SAMLIdentityAssertionNameMapper
{
	private String nameQualifier = null;

	public CustomSAMLNameMapperImpl (){ }


	/************ SAMLIdentityAssertionNameMapper implementation**************/

	public String getGroupAttrName ()
	{
		return SAMLNameMapperInfo.BEA_GROUP_ATTR_NAME;
	}

	public String getGroupAttrNamespace ()
	{
		return SAMLNameMapperInfo.BEA_GROUP_ATTR_NAMESPACE;
	}

	public Collection mapGroupInfo(SAMLNameMapperInfo info, ContextHandler handlr)
	{
		return info.getGroups();
	}

	public String mapNameInfo(SAMLNameMapperInfo info, ContextHandler handler)
	{
		String userName = info.getName();

		if (userName == null || userName.equals("")) {
			System.out.println("mapNameInfo: Username string is null or
                       empty, returning null");
			return null;
		}

		if (userName.equals("testUser_Mapped"))
		{
			userName = "testUser_Producer";
		}

		return userName;
	}
}
Whether you are implementing a mapper class on the producer or the consumer, the class must be in the server’s classpath. For information on adding classes to the server classpath, refer to the WebLogic Server topic “Adding Startup and Shutdown Classes to the Classpath.”
You need to use the WebLogic Server Administration Console add the mapper classes to the security realm of the producer and/or consumer.
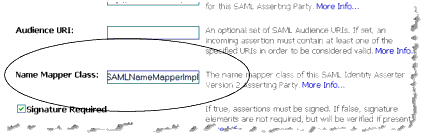
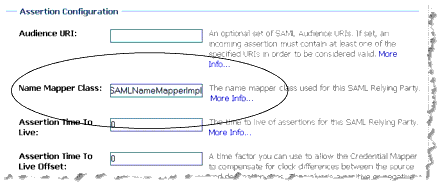
To add a mapper class to the producer:
com.bea.wsrp.qa.security.CustomSAMLNameMapperImpl
To add a mapper class to the producer:
| Tip: | For more information on relying party configuration, see the WebLogic Server topic, “Configuring a Relying Party.” |
com.bea.wsrp.qa.security.CustomSAMLNameMapperImpl
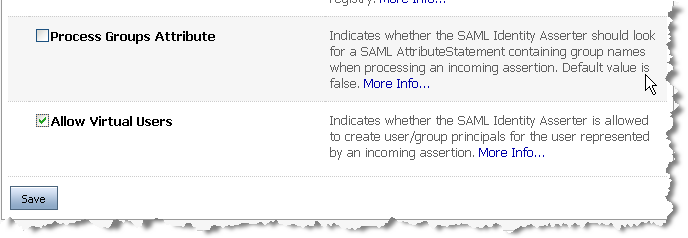
You can configure the producer to automatically create a new user if it does not recognize the user name sent from the consumer. This feature is useful if you do not want to manually create a unique user name on the producer for every user who might log in from a consumer application. You can use this feature as long as the producer is configured to recognize the consumer’s SAML token, as explained previously in this chapter.
To configure the producer to allow virtual users:


|