|
|
|
|
| |
Developing a WebLogic JMS Application
The following sections describe how to develop a WebLogic JMS application:
Note: For more information about the JMS classes described in this section, access the JMS Javadoc, including the latest Errata, supplied on the Sun Microsystems Javasoft Web site at the following locations: http://www.javasoft.com/products/jms/Javadoc-102a/index.html
and
http://www.javasoft.com/products/jms/errata_051801.html
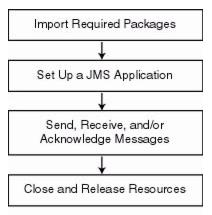
When developing a WebLogic JMS application, you must perform the steps identified in the following figure.
Figure 4-1 WebLogic JMS Application Development Flow-Required Steps
In addition to the application development steps defined in the previous figure, you can also optionally perform any of the following steps during your design development:
Except where noted, all application development steps are described in the following sections.
The following table lists the packages that are commonly used by WebLogic JMS applications.
|
JavaSoft JMS API. This package is always used by WebLogic JMS applications. |
|
|
WebLogic JMS public API for use with server session pools, an optional application server facility described in the JMS specification. |
|
|
WebLogic-specific JMS public API that provides additional classes and methods, as described in WebLogic JMS Extensions. |
Include the following package import statements at the beginning of your program:
import javax.jms.*;
import java.util.*;
import java.io.*;
import javax.naming.*;
import javax.transaction.*;
If you implement a server session pool application, also include the following class on your import list:
import weblogic.jms.ServerSessionPoolFactory;
If you want to utilize any of the WebLogic JMS extension classes described in the previous table, also include the following statement on your import list:
import weblogic.jms.extensions.*;
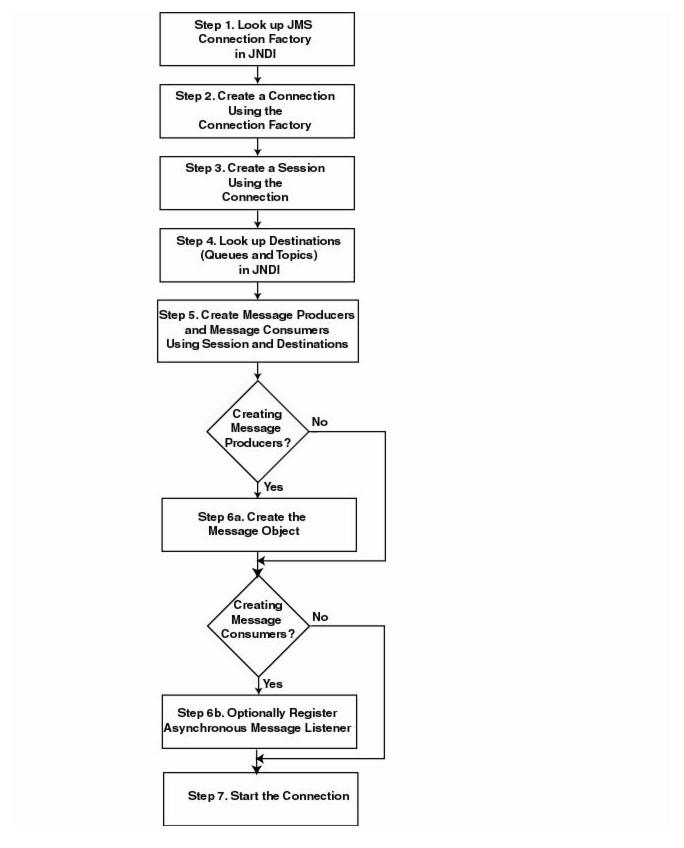
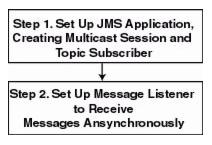
Before you can send and receive messages, you must set up a JMS application. The following figure illustrates the steps required to set up a JMS application.
Figure 4-2 Setting Up a JMS Application
The setup steps are described in the following sections. Detailed examples of setting up a Point-to-point (PTP) and Publish/subscribe (Pub/sub) application are also provided. The examples are excerpted from the examples.jms package provided with WebLogic Server in the samples/examples directory.
Before proceeding, ensure that the system administrator responsible for configuring WebLogic Server has configured the required JMS features, including the connection factories, JMS servers, and destinations. For more information, see "Managing JMS" in the Administration Guide.
For more information about the JMS classes and methods described in these sections, see WebLogic JMS Classes or the javax.jms or weblogic.jms.ServerSessionPoolFactory, or weblogic.jms.extensions javadoc.
For information about setting up transacted applications and JTA user transactions, see Using Transactions with WebLogic JMS.
Step 1: Look Up a Connection Factory in JNDI
Before you can look up a connection factory, it must be defined as part of the configuration information. WebLogic JMS provides one default connection factory, that is included as part of the configuration by default. The WebLogic JMS system administrator may add or update connection factories during configuration. For information on configuring connection factories and the defaults that are available, see "Managing JMS" in the Administration Guide.
Once the connection factory has been defined, you can look it up by first establishing a JNDI context (context) using the NamingManager.InitialContext() method. For any application other than a servlet application, you must pass an environment used to create the initial context. For more information, see the NamingManager.InitialContext() javadoc.
Once the context is defined, to look up a connection factory in JNDI, execute one of the following commands, for PTP or Pub/sub messaging, respectively:
QueueConnectionFactory queueConnectionFactory =
  (QueueConnectionFactory) context.lookup(CF_name);
TopicConnectionFactory topicConnectionFactory =
  (TopicConnectionFactory) context.lookup(CF_name);
The CF_name argument specifies the connection factory name defined during configuration.
For more information about the ConnectionFactory class, see ConnectionFactory or javax.jms.ConnectionFactory javadoc.
Step 2: Create a Connection Using the Connection Factory
You can create a connection for accessing a queue or topic using the ConnectionFactory methods described in the following sections.
For more information about the Connection class, see Connection or the javax.jms.Connection javadoc.
The QueueConnectionFactory provides the following two methods for creating a queue connection:
public QueueConnection createQueueConnection(
) throws JMSException
public QueueConnection createQueueConnection(
  String userName,
  String password
) throws JMSException
The first method creates a QueueConnection; the second method creates a QueueConnection using a specified user identity. In each case, a connection is created in stopped mode and must be started in order to accept messages, as described in Step 7: Start the Connection.
For more information about the QueueConnectionFactory class methods, see the javax.jms.QueueConnectionFactory javadoc. For more information about the QueueConnection class, see the javax.jms.QueueConnection javadoc.
The TopicConnectionFactory provides the following two methods for creating a topic connection:
public TopicConnection createTopicConnection(
) throws JMSException
public TopicConnection createTopicConnection(
  String userName,
  String password
) throws JMSException
The first method creates a TopicConnection; the second method creates a TopicConnection using a specified user identity. In each case, a connection is created in stopped mode and must be started in order to accept messages, as described in Step 7: Start the Connection.
For more information about the TopicConnectionFactory class methods, see the javax.jms.TopicConnectionFactory javadoc. For more information about the TopicConnection class, see the javax.jms.TopicConnection javadoc.
Step 3: Create a Session Using the Connection
You can create one or more sessions for accessing a queue or topic using the Connection methods described in the following sections.
Note: A session and its message producers and consumers can only be accessed by one thread at a time. Their behavior is undefined if multiple threads access them simultaneously.
For more information about the Session class, see Session or the javax.jms.Session javadoc.
The QueueConnection class defines the following method for creating a queue session:
public QueueSession createQueueSession(
  boolean transacted,
  int acknowledgeMode
) throws JMSException
You must specify a boolean argument indicating whether the session will be transacted (true) or non-transacted (false), and an integer that indicates the acknowledge mode for non-transacted sessions, as described in Acknowledge Modes Used for Non-Transacted Sessions. The acknowledgeMode attribute is ignored for transacted sessions. In this case, messages are acknowledged when the transaction is committed using the commit() method.
For more information about the QueueConnection class methods, see the javax.jms.QueueConnection javadoc. For more information about the QueueSession class, see the javax.jms.QueueSession javadoc.
The TopicConnection class defines the following method for creating a topic session:
public TopicSession createTopicSession(
  boolean transacted,
  int acknowledgeMode
) throws JMSException
You must specify a boolean argument indicating whether the session will be transacted (true) or non-transacted (false), and an integer that indicates the acknowledge mode for non-transacted sessions, as described in Acknowledge Modes Used for Non-Transacted Sessions. The acknowledgeMode attribute is ignored for transacted sessions. In this case, messages are acknowledged when the transaction is committed using the commit() method.
For more information about the TopicConnection class methods, see the javax.jms.TopicConnection javadoc. For more information about the TopicSession class, see the javax.jms.TopicSession javadoc.
Step 4: Look Up a Destination (Queue or Topic)
Before you can look up a destination, the destination must be configured by the WebLogic JMS system administrator, as described in "Managing JMS" in the Administration Guide.
Once the destination has been configured, you can look up a destination by establishing a JNDI context (context), which has already been accomplished in Step 1: Look Up a Connection Factory in JNDI, and executing one of the following commands, for PTP or Pub/sub messaging, respectively:
Queue queue = (Queue) context.lookup(Dest_name);
Topic topic = (Topic) context.lookup(Dest_name);
The Dest_name argument specifies the destination name defined during configuration.
If you do not use a JNDI namespace, you can use the following QueueSession or TopicSession method to reference a queue or topic, respectively:
public Queue createQueue(
  String queueName
) throws JMSException
public Topic createTopic(
  String topicName
) throws JMSException
The syntax for the queueName and/or topicName string is JMS_Server_Name/Destination_Name (for example, myjmsserver/mydestination). To view source code that uses this syntax, refer to the findqueue() example in Creating Destinations Dynamically.
Note: The createQueue() and createTopic() methods do not create destinations dynamically; they create only references to destinations that already exist. For information about creating destinations dynamically, see Creating Destinations Dynamically.
For more information about these methods, see the javax.jms.QueueSession and javax.jms.TopicSession javadoc, respectively.
Once the destination has been defined, you can use the following Queue or Topic method to access the queue or topic name, respectively:
public String getQueueName(
) throws JMSException
public String getTopicName(
) throws JMSException
To ensure that the queue and topic names are returned in printable format, use the toString() method.
For more information about the Destination class, see Destination or javax.jms.Destination javadoc.
Step 5: Create Message Producers and Message Consumers Using the Session and Destinations
You can create message producers and message consumers by passing the destination reference to the Session methods described in the following sections.
Note: Each consumer receives its own local copy of a message. Once received, you can modify the header field values; however, the message properties and message body are read only. You can modify the message body by executing the corresponding message type's reset() method to clear the existing contents and enable write permission.
For more information about the MessageProducer and MessageConsumer classes, see MessageProducer and MessageConsumer, or the javax.jms.MessageProducer and javax.jms.MessageConsumer javadocs, respectively.
Create QueueSenders and QueueReceivers
The QueueSession object defines the following methods for creating queue senders and receivers:
public QueueSender createSender(
  Queue queue
) throws JMSException
public QueueReceiver createReceiver(
  Queue queue
) throws JMSException
public QueueReceiver createReceiver(
  Queue queue,
  String messageSelector
) throws JMSException
You must specify the queue object for the queue sender or receiver being created. You may also specify a message selector for filtering messages. Message selectors are described in more detail in Filtering Messages.
If you pass a value of null to the createSender() method, you create an anonymous producer. In this case, you must specify the queue name when sending messages, as described in Sending Messages.
Once the queue sender or receiver has been created, you can access the queue name associated with the queue sender or receiver using the following QueueSender or QueueReceiver method:
public Queue getQueue(
) throws JMSException
For more information about the QueueSession class methods, see the javax.jms.QueueSession javadoc. For more information about the QueueSender and QueueReceiver classes, see the javax.jms.QueueSender and javax.jms.QueueReceiver javadocs, respectively.
Create TopicPublishers and TopicSubscribers
The TopicSession object defines the following methods for creating topic publishers and topic subscribers:
public TopicPublisher createPublisher(
  Topic topic
) throws JMSException
public TopicSubscriber createSubscriber(
  Topic topic
) throws JMSException
public TopicSubscriber createSubscriber(
  Topic topic,
  String messageSelector,
  boolean noLocal
) throws JMSException
Note: The methods described in this section create non-durable subscribers. Non-durable topic subscribers only receive messages sent while they are active. For information about the methods used to create durable subscriptions enabling messages to be retained until all messages are delivered to a durable subscriber, see Setting Up Durable Subscriptions. In this case, durable subscribers only receive messages that are published after the subscriber has subscribed.
You must specify the topic object for the publisher or subscriber being created. You may also specify a message selector for filtering messages and noLocal flag (described later in this section). Message selectors are described in more detail in Filtering Messages.
If you pass a value of null to the createPublisher() method, you create an anonymous producer. In this case, you must specify the topic name when sending messages, as described in Sending Messages.
An application can have a JMS connection that it uses to both publish and subscribe to the same topic. Because topic messages are delivered to all subscribers, the application can receive messages it has published itself. To prevent this behavior, a JMS application can set a noLocal flag to true.
Once the topic publisher or subscriber has been created, you can access the topic name associated with the topic publisher or subscriber using the following TopicPublisher or TopicSubscriber method:
Topic getTopic(
) throws JMSException
In addition, you can access the noLocal variable setting associated with the topic subscriber using the following TopicSubscriber method:
boolean getNoLocal(
) throws JMSException
For more information about the TopicSession class methods, see the javax.jms.TopicSession javadoc. For more information about the TopicPublisher and TopicSubscriber classes, see the javax.jms.TopicPublisher and javax.jms.TopicSubscriber javadocs, respectively.
Step 6a: Create the Message Object (Message Producers)
Note: This step applies to message producers only.
To create the message object, use one of the following Session or WLSession class methods:
public BytesMessage createBytesMessage(
) throws JMSException
public MapMessage createMapMessage(
) throws JMSException
public Message createMessage(
) throws JMSException
public ObjectMessage createObjectMessage(
) throws JMSException
public ObjectMessage createObjectMessage(
  Serializable object
) throws JMSException
public StreamMessage createStreamMessage(
) throws JMSException
public TextMessage createTextMessage(
) throws JMSException
public TextMessage createTextMessage(
  String text
) throws JMSException
public XMLMessage createXMLMessage(
  String text
) throws JMSException
For more information about the Session and WLSession class methods, see the javax.jms.Session and weblogic.jms.extensions.WLSession javadocs, respectively. For more information about the Message class and its methods, see Message, or the javax.jms.Message javadoc.
Step 6b: Optionally Register an Asynchronous Message Listener (Message Consumers)
Note: This step applies to message consumers only.
To receive messages asynchronously, you must register an asynchronous message listener by performing the following steps:
Note: For an example of the onMessage() method interface, see
Example: Setting Up a PTP Application.
If you wish to issue the close() method within an onMessage() method call, the system administrator must select the Allow Close In OnMessage checkbox when configuring the connection factory. For more information on configuring JMS, see "Managing JMS" in the Administration Guide.
public void setMessageListener(
  MessageListener listener
) throws JMSException
You can unset a message listener by calling the MessageListener() method with a value of null.
Once a message listener has been defined, you can access it by calling the following MessageConsumer method:
public MessageListener getMessageListener(
) throws JMSException
Note: WebLogic JMS guarantees that multiple onMessage() calls for the same session will not be executed simultaneously.
If a message consumer is closed by an administrator or as the result of a server failure, a ConsumerClosedException is delivered to the session exception listener, if one has been defined. In this way, a new message consumer can be created, if necessary. For information about defining a session exception listener, see Defining a Session Exception Listener.
The MessageConsumer class methods are inherited by the QueueReceiver and TopicSubscriber classes. For additional information about the MessageConsumer class methods, see MessageProducer and MessageConsumer or the javax.jms.MessageConsumer javadoc.
You start the connection using the Connection class start() method.
For additional information about starting, stopping, and closing a connection, see Starting, Stopping, and Closing a Connection or the javax.jms.Connection javadoc.
Example: Setting Up a PTP Application
The following example is excerpted from the examples.jms.queue.QueueSend example, provided with WebLogic Server in the samples/examples/jms/queue directory. The init() method shows how to set up and start a QueueSession for a JMS application. The following shows the init() method, with comments describing each setup step.
Define the required variables, including the JNDI context, JMS connection factory, and queue static variables.
public final static String JNDI_FACTORY=
  "weblogic.jndi.WLInitialContextFactory";
public final static String JMS_FACTORY=
  "weblogic.examples.jms.QueueConnectionFactory";
public final static String
   QUEUE="weblogic.examples.jms.exampleQueue";

private QueueConnectionFactory qconFactory;
private QueueConnection qcon;
private QueueSession qsession;
private QueueSender qsender;
private Queue queue;
private TextMessage msg;
Set up the JNDI initial context, as follows:
InitialContext ic = getInitialContext(args[0]);
  .
  .
  .
private static InitialContext getInitialContext(
  String url
) throws NamingException
{
  Hashtable env = new Hashtable();
  env.put(Context.INITIAL_CONTEXT_FACTORY, JNDI_FACTORY);
  env.put(Context.PROVIDER_URL, url);
  return new InitialContext(env);
}
Note: When setting up the JNDI initial context for a servlet, use the following method:
InitialContext ic = newInitialContext();
Create all the necessary objects for sending messages to a JMS queue. The ctx object is the JNDI initial context passed in by the main() method.
public void init(
  Context ctx,
  String queueName
) throws NamingException, JMSException
{
Step 1
Look up a connection factory in JNDI.
qconFactory = (QueueConnectionFactory) ctx.lookup(JMS_FACTORY);
Step 2
Create a connection using the connection factory.
qcon = qconFactory.createQueueConnection();
Step 3
Create a session using the connection. The following code defines the session as non-transacted and specifies that messages will be acknowledged automatically. For more information about transacted sessions and acknowledge modes, see Session.
  qsession = qcon.createQueueSession(false,
    Session.AUTO_ACKNOWLEDGE);
Step 4
Look up a destination (queue) in JNDI.
queue = (Queue) ctx.lookup(queueName);
Step 5
Create a reference to a message producer (queue sender) using the session and destination (queue).
qsender = qsession.createSender(queue);
Step 6
msg = qsession.createTextMessage();
Step 7
  qcon.start();
}
The init() method for the examples.jms.queue.QueueReceive example is similar to the QueueSend init() method shown previously, with the one exception. Steps 5 and 6 would be replaced by the following code, respectively:
qreceiver = qsession.createReceiver(queue);
qreceiver.setMessageListener(this);
In the first line, instead of calling the createSender() method to create a reference to the queue sender, the application calls the createReceiver() method to create the queue receiver.
In the second line, the message consumer registers an asynchronous message listener.
When a message is delivered to the queue session, it is passed to the examples.jms.QueueReceive.onMessage() method. The following code excerpt shows the onMessage() interface from the QueueReceive example:
public void onMessage(Message msg)
{
  try {
  String msgText;
  if (msg instanceof TextMessage) {
      msgText = ((TextMessage)msg).getText();
  } else { // If it is not a TextMessage...
    msgText = msg.toString();
  }
System.out.println("Message Received: "+ msgText );
  if (msgText.equalsIgnoreCase("quit")) {
     synchronized(this) {
       quit = true;
    this.notifyAll(); // Notify main thread to quit
     }
  }
   } catch (JMSException jmse) {
     jmse.printStackTrace();
   }
}
The onMessage() method processes messages received through the queue receiver. The method verifies that the message is a TextMessage and, if it is, prints the text of the message. If onMessage() receives a different message type, it uses the message's toString() method to display the message contents.
Note: It is good practice to verify that the received message is the type expected by the handler method.
For more information about the JMS classes used in this example, see WebLogic JMS Classes or the javax.jms javadoc.
Example: Setting Up a Pub/Sub Application
The following example is excerpted from the examples.jms.topic.TopicSend example, provided with WebLogic Server in the samples/examples/jms/topic directory. The init() method shows how to set up and start a topic session for a JMS application. The following shows the init() method, with comments describing each setup step.
Define the required variables, including the JNDI context, JMS connection factory, and topic static variables.
public final static String JNDI_FACTORY=
  "weblogic.jndi.WLInitialContextFactory";
public final static String JMS_FACTORY=
  "weblogic.examples.jms.TopicConnectionFactory";
public final static String
  TOPIC="weblogic.examples.jms.exampleTopic";
protected TopicConnectionFactory tconFactory;
protected TopicConnection tcon;
protected TopicSession tsession;
protected TopicPublisher tpublisher;
protected Topic topic;
protected TextMessage msg;
Set up the JNDI initial context, as follows:
InitialContext ic = getInitialContext(args[0]);
  .
  .
  .
private static InitialContext getInitialContext(
  String url
) throws NamingException
{
    Hashtable env = new Hashtable();
    env.put(Context.INITIAL_CONTEXT_FACTORY, JNDI_FACTORY);
    env.put(Context.PROVIDER_URL, url);
    return new InitialContext(env);
}
Note: When setting up the JNDI initial context for a servlet, use the following method:
InitialContext ic = newInitialContext();
Create all the necessary objects for sending messages to a JMS queue. The ctx object is the JNDI initial context passed in by the main() method.
public void init(
  Context ctx,
  String topicName
) throws NamingException, JMSException
{
Step 1
Look up a connection factory using JNDI.
    tconFactory =
      (TopicConnectionFactory) ctx.lookup(JMS_FACTORY);
Step 2
Create a connection using the connection factory.
tcon = tconFactory.createTopicConnection();
Step 3
Create a session using the connection. The following defines the session as non-transacted and specifies that messages will be acknowledged automatically. For more information about setting session transaction and acknowledge modes, see Session.
    tsession = tcon.createTopicSession(false,
      Session.AUTO_ACKNOWLEDGE);
Step 4
Look up the destination (topic) using JNDI.
topic = (Topic) ctx.lookup(topicName);
Step 5
Create a reference to a message producer (topic publisher) using the session and destination (topic).
tpublisher = tsession.createPublisher(topic);
Step 6
msg = tsession.createTextMessage();
Step 7
    tcon.start();
  }
The init() method for the examples.jms.topic.TopicReceive example is similar to the TopicSend init() method shown previously with on exception. Steps 5 and 6 would be replaced by the following code, respectively:
tsubscriber = tsession.createSubscriber(topic);
tsubscriber.setMessageListener(this);
In the first line, instead of calling the createPublisher() method to create a reference to the topic publisher, the application calls the createSubscriber() method to create the topic subscriber.
In the second line, the message consumer registers an asynchronous message listener.
When a message is delivered to the topic session, it is passed to the examples.jms.TopicSubscribe.onMessage() method. The onMessage() interface for the TopicReceive example is the same as the QueueReceive onMessage() interface, as described in Example: Setting Up a PTP Application.
For more information about the JMS classes used in this example, see WebLogic JMS Classes or the javax.jms javadoc.
Once you have set up the JMS application as described in Setting Up a JMS Application, you can send messages. To send a message, you must perform the following steps:
For more information about the JMS classes for sending messages and the message types, see the javax.jms.Message javadoc. For information about receiving messages, see Receiving Messages.
Step 1: Create a Message Object
This step has already been accomplished as part of the client setup procedure, as described in Step 6a: Create the Message Object (Message Producers).
This step may have been accomplished when setting up an application, as described in Step 6a: Create the Message Object (Message Producers). Whether or not this step has already been accomplished depends on the method that was called to create the message object. For example, for TextMessage and ObjectMessage types, when you create a message object, you have the option of defining the message when you create the message object.
If a value has been specified and you do not wish to change it, you can proceed to step 3.
If a value has not been specified or if you wish to change an existing value, you can define a value using the appropriate set method. For example, the method for defining the text of a TextMessage is as follows:
public void setText(
  String string
) throws JMSException
Note: Messages can be defined as null.
Subsequently, you can clear the message body using the following method:
public void clearBody(
) throws JMSException
For more information about the methods used to define messages, see the javax.jms.Session javadoc.
Step 3: Send the Message to a Destination
You can send a message to a destination using a message producer-queue sender (PTP) or topic publisher (Pub/sub)-and the methods described in the following sections. The Destination and MessageProducer objects were created when you set up the application, as described in Setting Up a JMS Application.
Note: If multiple topic subscribers are defined for the same topic, each subscriber will receive its own local copy of a message. Once received, you can modify the header field values; however, the message properties and message body are read only. You can modify the message body by executing the corresponding message type's reset() method to clear the existing contents and enable write permission.
For more information about the MessageProducer class, see MessageProducer and MessageConsumer or the javax.jms.MessageProducer javadoc.
Send a Message Using Queue Sender
You can send messages using the following QueueSender methods:
public void send(
  Message message
) throws JMSException
public void send(
  Message message,
  int deliveryMode,
  int priority,
  long timeToLive
) throws JMSException
public void send(
  Queue queue,
  Message message
) throws JMSException
public void send(
  Queue queue,
  Message message,
  int deliveryMode,
  int priority,
  long timeToLive
) throws JMSException
You must specify a message. You may also specify the queue name (for anonymous message producers), delivery mode (DeliveryMode.PERSISTENT or DeliveryMode.NON_PERSISTENT), priority (0-9), and time-to-live (in milliseconds). If not specified, the delivery mode, priority, and time-to-live attributes are set to one of the following:
If you define the delivery mode as PERSISTENT, you should configure a backing store for the destination, as described in "Managing JMS" in the Administration Guide.
Note: If no backing store is configured, then the delivery mode is changed to NON_PERSISTENT and messages are not written to the persistent store.
If the queue sender is an anonymous producer-that is, if when the queue was created, the name was set to null-then you must specify the queue name (using one of the last two methods) to indicate where to deliver messages. For more information about defining anonymous producers, see Create QueueSenders and QueueReceivers.
For example, the following code sends a persistent message with a priority of 4 and a time-to-live of one hour:
QueueSender.send(message, DeliveryMode.PERSISTENT, 4, 3600000);
For additional information about the QueueSender class methods, see the javax.jms.QueueSender javadoc.
Send a Message Using TopicPublisher
You can send messages using the following TopicPublisher methods:
public void publish(
  Message message
) throws JMSException
public void publish(
  Message message,
  int deliveryMode,
  int priority,
  long timeToLive
) throws JMSException
public void publish(
  Topic topic,
  Message message
) throws JMSException
public void publish(
  Topic topic,
  Message message,
  int deliveryMode,
  int priority,
  long timeToLive
) throws JMSException
You must provide a message. You may also specify the topic name, delivery mode (DeliveryMode.PERSISTENT or DeliveryMode.NON_PERSISTENT), priority (0-9), and time-to-live (in milliseconds). If not specified, the delivery mode, priority, and time-to-live attributes are set to one of the following:
If you define the delivery mode as PERSISTENT, you should configure a backing store, as described in "Managing JMS" in the Administration Guide.
Note: If no backing store is configured, then the delivery mode is changed to NON_PERSISTENT and no messages are stored.
If the topic publisher is an anonymous producer-that is, if when the topic was created, the name was set to null-then you must specify the topic name (using either of the last two methods) to indicate where to deliver messages. For more information about defining anonymous producers, see Create TopicPublishers and TopicSubscribers.
For example, the following code sends a persistent message with a priority of 4 and a time-to-live of one hour:
TopicPublisher.publish(message, DeliveryMode.PERSISTENT,
  4,3600000);
For more information about the TopicPublisher class methods, see the javax.jms.TopicPublisher javadoc.
Dynamically Configuring Message Producer Configuration Attributes
As described in the previous section, when sending a message, you can optionally specify the delivery mode, timeout, and time-to-live values. If not specified, the delivery mode, priority, and time-to-live attributes are set to the connection factory or destination override configuration attributes defined for the producer, as described "Managing JMS" in the Administration Guide.
Alternatively, you can set the delivery mode, timeout, and time-to-live values dynamically using the message producers set methods to override the configured values.
The following table lists the message producer set and get methods for each dynamically configurable attribute.
Note: The delivery mode, timeout, and time-to-live attribute settings can be overridden by the destination using the Delivery Mode Override, Priority Override, and Time To Live Override destination configuration attributes, as described in Administration Console Online Help.
|
public void setDeliveryMode( |
||
|
public void setPriority( |
||
|
public void setTimeToLive( |
Note: JMS defines optional MessageProducer methods for disabling the message ID and timestamp information. However, these methods are ignored by WebLogic JMS.
For more information about the MessageProducer class methods, see the javax.jms.MessageProducer javadoc.
Example: Sending Messages Within a PTP Application
The following example is excerpted from the examples.jms.queue.QueueSend example, provided with WebLogic Server in the samples/examples/jms/queue directory. The example shows the code required to create a TextMessage, set the text of the message, and send the message to a queue.
msg = qsession.createTextMessage();
  .
  .
  .
public void send(
  String message
) throws JMSException
{
  msg.setText(message);
  qsender.send(msg);
}
For more information about the QueueSender class and methods, see the javax.jms.QueueSender javadoc.
Example: Sending Messages Within a Pub/Sub Application
The following example is excerpted from the examples.jms.topic.TopicSend example, provided with WebLogic Server in the samples/examples/jms/topic directory. The following example shows the code required to create a TextMessage, set the text of the message, and send the message to a topic.
msg = tsession.createTextMessage();
  .
  .
  .
public void send(
  String message
) throws JMSException
{
  msg.setText(message);
  tpublisher.publish(msg);
}
For more information about the TopicPublisher class and methods, see the javax.jms.TopicPublisher javadoc.
Once you have set up the JMS application as described in Setting Up a JMS Application, you can receive messages.
To receive a message, you must create the receiver object and specify whether you want to receive messages asynchronously or synchronously, as described in the following sections. Guidelines for programming client servlet applications to receive messages are provided in Receiving Messages with Client Servlets.
The order in which messages are received can be controlled by the following:
Once received, you can modify the header field values; however, the message properties and message body are read only. You can modify the message body by executing the corresponding message type's reset() method to clear the existing contents and enable write permission.
For more information about the JMS classes for receiving messages and the message types, see the javax.jms.Message javadoc. For information about sending messages, see Sending Messages.
Receiving Messages Asynchronously
This procedure is described within the context of setting up the application. For more information, see Step 6b: Optionally Register an Asynchronous Message Listener (Message Consumers).
Note: You can control the maximum number of messages that may exist for an asynchronous session and that have not yet been passed to the message listener by setting the Messages Maximum attribute when configuring the connection factory.
Receiving Messages Synchronously
To receive messages synchronously, use the following MessageConsumer methods:
public Message receive(
) throws JMSException
public Message receive(
  long timeout
) throws JMSException
public Message receiveNoWait(
) throws JMSException
In each case, the application receives the next message produced. If you call the receive() method with no arguments, the call blocks indefinitely until a message is produced or the application is closed. Alternatively, you can pass a timeout value to specify how long to wait for a message. If you call the receive() method with a value of 0, the call blocks indefinitely. The receiveNoWait() method receives the next message if one is available, or returns null; in this case, the call does not block.
The MessageConsumer class methods are inherited by the QueueReceiver and TopicSubscriber classes. For additional information about the MessageConsumer class methods, see the javax.jms.MessageConsumer javadoc.
Example: Receiving Messages Synchronously Within a PTP Application
The following example is excerpted from the examples.jms.queue.QueueReceive example, provided with WebLogic Server in the samples/examples/jms/queue directory. Rather than set a message listener, you would call qreceiver.receive() for each message. For example:
qreceiver = qsession.createReceiver(queue);
qreceiver.receive();
The first line creates the queue receiver on the queue. The second line executes a receive() method. The receive() method blocks and waits for a message.
Example: Receiving Messages Synchronously Within a Pub/Sub Application
The following example is excerpted from the examples.jms.topic.TopicReceive example, provided with WebLogic Server in the samples/examples/jms/topic directory. Rather than set a message listener, you would call tsubscriber.receive() for each message.
tsubscriber = tsession.createSubscriber(topic);
Message msg = tsubscriber.receive();
msg.acknowledge();
The first line creates the topic subscriber on the topic. The second line executes a receive() method. The receive() method blocks and waits for a message.
Receiving Messages with Client Servlets
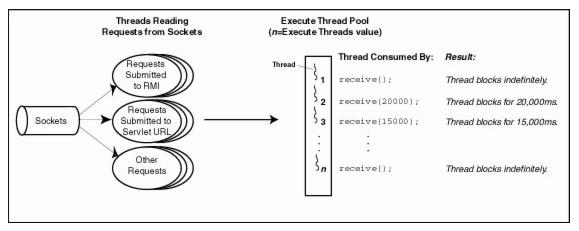
The WebLogic Server execute thread pool has a finite number of threads available for processing requests. The number of threads available is defined by the system administrator when configuring the Server using the Execute Threads attribute. By default, 15 threads are available.
It is possible for all threads in the execute thread pool to be blocked causing a server deadlock, as illustrated in the following figure.
Note: Only blocking servlet JMS requests running in the servers JVM may potentially deadlock the server. RMI requests cannot cause a server to deadlock.
Figure 4-3 Example of a Deadlock in the Execute Thread Pool
As shown in the previous figure, once all configured threads from the execute thread pool are blocked, no threads are available for new requests. If the RMI requests and other pending servlet URLs are waiting for threads to become available to complete the blocking calls, the blocked calls never resume (because all available threads are blocked) and the server becomes deadlocked.
For example, if a receive() method is blocking a thread, and its corresponding send() method has been submitted to the RMI or servlet, the send() may not be able to access a thread in which to run. The receive() method blocks the thread until it receives its data from the send() method; the send() method cannot access a thread and execute because all of the threads are blocked, resulting in a deadlock.
To prevent a server deadlock, you should avoid the following:
Message polling is an inefficient use of resources. You should use a different, more efficient method for activating a thread when needed, and exit, rather than wait for future requirements, when the thread is no longer needed.
You should design the servlet applications to receive messages asynchronously using the onMessage() method, as described in Receiving Messages Asynchronously. In this way, no threads are wasted waiting for messages to be received.
Note: WebLogic JMS also implements an optional JMS facility for defining a server-managed pool of server sessions. This facility enables an application to process messages concurrently. For more information, see Defining Server Session Pools.
Server session pools can also be implemented using Message Driven Beans. For information on using message driven beans to implement server session pools, see to Using WebLogic EJB.
If your servlet program design requires messages to be received synchronously, it is recommended that you use one of the following methods, listed in order of preference:
Note: Use of this option should be minimized, as it may deadlock a busy server.
For more information about the methods described in this section, see Receiving Messages or the javax.jms javadoc.
Note: This section applies only to non-transacted sessions for which the acknowledge mode is set to CLIENT_ACKNOWLEDGE, as described in Acknowledge Modes Used for Non-Transacted Sessions. Synchronously received AUTO_ACKNOWLEDGE messages may not be received; they have already been acknowledged.
An application can request that JMS redeliver messages (unacknowledge them) using the following method:
public void recover(
) throws JMSException
The recover() method performs the following steps:
Messages in queues are not necessarily redelivered in the same order that they were originally delivered, nor to the same queue consumers.
Acknowledging Received Messages
Note: This section applies only to non-transacted sessions for which the acknowledge mode is set to CLIENT_ACKNOWLEDGE, as described in Acknowledge Modes Used for Non-Transacted Sessions.
To acknowledge a received message, use the following Message method:
public void acknowledge(
) throws JMSException
The acknowledge() method acknowledges the current message and all previous messages received since the last client acknowledge. Messages that are not acknowledged may be redelivered to the client.
This method is effective only when issued by a non-transacted session for which the acknowledge mode is set to CLIENT_ACKNOWLEDGE. Otherwise, the method is ignored.
When you have finished using the connection, session, message producer or consumer, connection consumer, or queue browser created on behalf of a JMS application, you should explicitly close them to release the resources.
Enter the close() method to close JMS objects, as follows:
public void close(
) throws JMSException
For more information about the impact of the close() method for each object, see the appropriate javax.jms javadoc. In addition, for more information about the connection or Session close() method, see Starting, Stopping, and Closing a Connection or Closing a Session, respectively.
The following example is excerpted from the examples.jms.queue.QueueSend example, provided with WebLogic Server in the samples/examples/jms/queue directory. This example shows the code required to close the message consumer, session, and connection objects.
public void close(
) throws JMSException
{
  qreceiver.close();
  qsession.close();
  qcon.close();
}
In the QueueSend example, the close() method is called at the end of main() to close objects and free resources.
The following sections describe how to manage connections:
An exception listener asynchronously notifies an application whenever a problem occurs with a connection. This mechanism is particularly useful for a connection waiting to consume messages that might not be notified otherwise.
Note: The purpose of an exception listener is not to monitor all exceptions thrown by a connection, but to deliver those exceptions that would not be otherwise be delivered.
You can define an exception listener for a connection using the following Connection method:
public void setExceptionListener(
  ExceptionListener listener
) throws JMSException
You must specify an ExceptionListener object for the connection.
The JMS Provider notifies an exception listener, if one has been defined, when it encounters a problem with a connection using the following ExceptionListener method:
public void onException(
  JMSException exception
)
The JMS Provider specifies the exception that describes the problem when calling the method.
You can access the exception listener for a connection using the following Connection method:
public ExceptionListener getExceptionListener(
) throws JMSException
Accessing Connection Meta Data
You can access the meta data associated with a specific connection using the following Connection method:
public ConnectionMetaData getMetaData(
) throws JMSException
This method returns a ConnectionMetaData object that enables you to access JMS meta data. The following table lists the various type of JMS meta data and the get methods that you can use to access them.
|
public Enumeration getJMSXPropertyNames( |
For more information about the ConnectionMetaData class, see the javax.jms.ConnectionMetaData javadoc.
Starting, Stopping, and Closing a Connection
To control the flow of messages, you can start and stop a connection temporarily using the start() and stop() methods, respectively, as follows.
The start() and stop() method details are as follows:
public void start(
) throws JMSException
public void stop(
) throws JMSException
A newly created connection is stopped-no messages are received until the connection is started. Typically, other JMS objects are set up to handle messages before the connection is started, as described in Setting Up a JMS Application. Messages may be produced on a stopped connection, but cannot be delivered to a stopped connection.
Once started, you can stop a connection using the stop() method. This method performs the following steps:
Typically, a JMS Provider allocates a significant amount of resources when it creates a connection. When a connection is no longer being used, you should close it to free up resources. A connection can be closed using the following method:
public void close(
) throws JMSException
This method performs the following steps to execute an orderly shutdown:
When you close a connection, all associated objects are also closed. You can continue to use the message objects created or received via the connection, except the received message's acknowledge() method. Closing a closed connection has no effect.
Note: Attempting to acknowledge a received message from a closed connection's session throws an IllegalStateException.
The following sections describe how to manage sessions, including:
An exception listener asynchronously notifies a client in the event a problem occurs with a session. This is particularly useful for a session waiting to consume messages that might not be notified otherwise.
Note: The purpose of an exception listener is not to monitor all exceptions thrown by a session, only to deliver those exceptions that would otherwise be undelivered.
You can define an exception listener for a session using the following WLSession method:
public void setExceptionListener(
  ExceptionListener listener
) throws JMSException
You must specify an ExceptionListener object for the session.
The JMS Provider notifies an exception listener, if one has been defined, when it encounters a problem with a session using the following ExceptionListener method:
public void on Exception(
  JMSException exception
)
The JMS Provider specifies the exception encountered that describes the problem when calling the method.
You can access the exception listener for a session using the following WLSession method:
public ExceptionListener getExceptionListener(
) throws JMSException
Note: Because there can only be one thread per session, an exception listener and message listener (used for asynchronous message delivery) cannot execute simultaneously. Consequently, if a message listener is executing at the time a problem occurs, execution of the exception listener is blocked until the message listener completes its execution. For more information about message listeners, see Receiving Messages Asynchronously.
As with connections, a JMS Provider allocates a significant amount of resources when it creates a session. When a session is no longer being used, it is recommended that it be closed to free up resources. A session can be closed using the following Session method:
public void close(
) throws JMSException
Note: The close() method is the only Session method that can be invoked from a thread that is separate from the session thread.
This method performs the following steps to execute an orderly shutdown:
When you close a session, all associated producers and consumers are also closed.
Note: If you wish to issue the close() method within an onMessage() method call, the system administrator must select the Allow Close In OnMessage checkbox when configuring the connection factory. For more information, see " JMS Connection Factories" in the Administration Console Online Help.
Creating Destinations Dynamically
You can create destinations dynamically using:
The associated procedures for creating dynamic destinations are described in the following sections.
Using the JMSHelper Class Methods
You can dynamically submit an asynchronous request to create a queue or topic, respectively, using the following JMSHelper methods:
static public void createPermanentQueueAsync(
  Context ctx,
  String jmsServerName,
  String queueName,
  String jndiName
) throws JMSException
static public void createPermanentTopicAsync(
  Context ctx,
  String jmsServerName,
  String topicName,
  String jndiName
) throws JMSException
You must specify the JNDI initial context, name of the JMS server to be associated with the destination, name of the destination (queue or topic), and name used to look up the destination within the JNDI namespace.
Each method updates the following:
Note: Either method call can fail without throwing an exception. In addition, a thrown exception does not necessarily indicate that the method call failed.
The time required to create the destination on the JMS server and propagate the information to the JNDI namespace can be significant. The propagation delay increases if the environment contains multiple servers. It is recommended that you test for the existence of the queue or topic, respectively, using the session createQueue() or createTopic() method, rather than perform a JNDI lookup. By doing so, you can avoid some of the propagation-specific delay.
For example, the following method, findQueue(), attempts to access a dynamically created queue, and if unsuccessful, sleeps for a specified interval before retrying. A maximum retry count is established to prevent an infinite loop.
private static Queue findQueue (
  QueueSession queueSession,
  String jmsServerName,
  String queueName,
  int retryCount,
  long retryInterval
) throws JMSException
{
   String wlsQueueName = jmsServerName + "/" + queueName;
   String command = "QueueSession.createQueue(" +
  wlsQueueName + ")";
   long startTimeMillis = System.currentTimeMillis();
   for (int i=retryCount; i>=0; i--) {
  try {
    System.out.println("Trying " + command);
    Queue queue = queueSession.createQueue(wlsQueueName);
    System.out.println(command + "succeeded after " +
      (retryCount - i + 1) + " tries in " +
      (System.currentTimeMillis() - startTimeMillis) +
      " millis.");
    return queue;
  } catch (JMSException je) {
    if (retryCount == 0) throw je;
  }
  try {
    System.out.println(command + "> failed, pausing " +
      retryInterval + " millis.");
    Thread.sleep(retryInterval);
  } catch (InterruptedException ignore) {}
   }
   throw new JMSException("out of retries");
}
You can then call the findQueue() method after the JMSHelper class method call to retrieve the dynamically created queue once it becomes available. For example:
JMSHelper.createPermanentQueueAsync(ctx, domain, jmsServerName,
  queueName, jndiName);
Queue queue = findQueue(qsess, jmsServerName, queueName,
  retry_count, retry_interval);
For more information on the JMSHelper class, refer to the weblogic.jms.extensions.JMSHelper javadoc.
Temporary destinations enable an application to create a destination, as required, without the system administration overhead associated with configuring and creating a server-defined destination.
The WebLogic JMS server can use the JMSReplyTo header field to return a response to the application. The application may optionally set the JMSReplyTo header field of its messages to its temporary destination name to advertise the temporary destination that it is using to other applications.
Temporary destinations exist only for the duration of the current connection, unless they are removed using the delete() method, described in Deleting a Temporary Destination.
Because messages are never available if the server is restarted, all PERSISTENT messages are silently made NON_PERSISTENT. As a result, temporary destinations are not suitable for business logic that must survive a restart.
Note: Before creating a temporary destination (queue or topic), you must use the Adminstration Console to configure the JMS server to use temporary destinations. This is done by using the JMS Server's Temporary Template attribute to select a JMS template that is configured in the same domain. For more information about configuring a JMS server, see "JMS Server" in the Administration Console Online Help.
The following sections describe how to create a temporary queue (PTP) or temporary topic (Pub/sub).
You can create a temporary queue using the following QueueSession method:
public TemporaryQueue createTemporaryQueue(
) throws JMSException
For example, to create a reference to a TemporaryQueue that will exist only for the duration of the current connection, use the following method call:
QueueSender = Session.createTemporaryQueue();
You can create a temporary topic using the following TopicSession method:
public TemporaryTopic createTemporaryTopic(
) throws JMSException
For example, to create a reference to a temporary topic that will exist only for the duration of the current connection, use the following method call:
TopicPublisher = Session.createTemporaryTopic();
Deleting a Temporary Destination
When you finish using a temporary destination, you can delete it (to release associated resources) using the following TemporaryQueue or TemporaryTopic method:
public void delete(
) throws JMSException
Setting Up Durable Subscriptions
WebLogic JMS supports durable and non-durable subscriptions.
For durable subscriptions, WebLogic JMS stores a message in a file or database until the message has been delivered to the subscribers or has expired, even if those subscribers are not active at the time that the message is delivered. A subscriber is considered active if the Java object that represents it exists. Durable subscriptions are supported for Pub/sub messaging only.
For non-durable subscriptions, WebLogic JMS delivers messages only to applications with an active session. Messages sent to a topic while an application is not listening are never delivered to that application. In other words, non-durable subscriptions last only as long as their subscriber objects. By default, subscribers are non-durable.
The following sections describe:
To support durable subscriptions, a client identifier (client ID) must be defined for the connection.
Note: The JMS client ID is not necessarily equivalent to the WebLogic Server username, that is, a name used to authenticate a user in the WebLogic security realm. You can, of course, set the JMS client ID to the WebLogic Server username, if it is appropriate for your JMS application.
The client ID can be supplied in two ways:
public void setClientID(
  String clientID
) throws JMSException
You must specify a unique client ID. If you use this alternative approach, you can use the default connection factory (if it is acceptable for your application) and avoid the need to modify the configuration information. However, applications with durable subscriptions must ensure that they call setClientID() immediately after creating their topic connection. For information on the default connection factory, see "Managing JMS" in the Administration Guide.
If a client ID is already defined for the connection, an IllegalStateException is thrown. If the specified client ID is already defined for another connection, an InvalidClientIDException is thrown.
Note: When specifying the client ID using the setClientID() method, there is a risk that a duplicate client ID may be specified without throwing an exception. For example, if the client IDs for two separate connections are set simultaneously to the same value, a race condition may occur and the same value may be assigned to both connections. You can avoid this risk of duplication by specifying the client ID during configuration.
To display a client ID and test whether or not a client ID has already been defined, use the following Connection method:
public String getClientID(
) throws JMSException
Note: Support for durable subscriptions is a feature unique to the Pub/sub messaging model, so client IDs are used only with topic connections; queue connections also contain client IDs, but JMS does not use them.
Durable subscriptions should not be created for a temporary topic, because a temporary topic is designed to exist only for the duration of the current connection.
You can create subscribers for a durable subscription using the following TopicSession methods:
public TopicSubscriber createDurableSubscriber(
  Topic topic,
  String name
) throws JMSException
public TopicSubscriber createDurableSubscriber(
  Topic topic,
  String name,
  String messageSelector,
  boolean noLocal
) throws JMSException
You must specify the name of the topic for which you are creating a subscriber, and the name of the durable subscription. You may also specify a message selector for filtering messages and a noLocal flag (described later in this section). Message selectors are described in more detail in Filtering Messages. If you do not specify a messageSelector, by default all messages are searched.
An application can use a JMS connection to both publish and subscribe to the same topic. Because topic messages are delivered to all subscribers, an application can receive messages it has published itself. To prevent this, a JMS application can set a noLocal flag to true. The noLocal value defaults to false.
The durable subscription name must be unique per client ID. For information on defining the client ID for the connection, see Defining the Client ID.
Only one session can define a subscriber for a particular durable subscription at any given time. Multiple subscribers can access the durable subscription, but not at the same time. Durable subscriptions are stored within the file or database.
Deleting Durable Subscriptions
To delete a durable subscription, you use the following TopicSession method:
public void unsubscribe(
  String name
) throws JMSException
You must specify the name of the durable subscription to be deleted.
You cannot delete a durable subscription if any of the following are true:
To modify a durable subscription, perform the following steps:
This step is optional. If not explicitly performed, the deletion will be executed implicitly when the durable subscription is recreated in the next step.
The durable subscription is recreated based on the new values.
Note: When recreating a durable subscription, be careful to avoid creating a durable subscription with a duplicate name. For example, if you attempt to delete a durable subscription from a JMS server that is unavailable, the delete call fails. If you subsequently create a durable subscription with the same name on a different JMS server, you may experience unexpected results when the first JMS server becomes available. Because the original durable subscription has not been deleted, when the first JMS server again becomes available, there will be two durable subscriptions with duplicate names.
Setting and Browsing Message Header and Property Fields
WebLogic JMS provides a set of standard header fields that you can define to identify and route messages. In addition, property fields enable you to include application-specific header fields within a message, extending the standard set. You can use the message header and property fields to convey information between communicating processes.
The primary reason for including data in a property field rather than in the message body is to support message filtering via message selectors. Data in the message body cannot be accessed via message selectors. For example, suppose you use a property field to assign high priority to a message. You can then design a message consumer containing a message selector that accesses this property field and selects only messages of expedited priority. For more information about selectors, see Filtering Messages.
JMS messages contain a standard set of header fields that are always transmitted with the message. They are available to message consumers that receive messages, and some fields can be set by the message producers that send messages. Once a message is received, its header field values can be modified.
For a description of the standard messages header fields, see Message Header Fields.
The following table lists the Message class set and get methods for each of the supported data types.
Note: In some cases, the send() method overrides the header field value set using the set() method, as indicated in the following table.
|
public void setJMSCorrelationID( Note: The byte[] JMSCorrelationID is available for external JMS providers and is not supported by WebLogic JMS. Calling setJMSCorrelationIDAsBytes() throws a java.lang.UnsupportedOperationException. |
public String getJMSCorrelationID( public byte[] getJMSCorrelationIDAsBytes( |
|
|
JMSDestination1 |
public void setJMSDestination( |
|
|
public void setJMSDeliveryMode( |
||
|
public void setJMSExpiration( |
||
|
public void setJMSMessageID( In addition to the set method, the weblogic.jms.extensions.JMSHelper class provides the following methods to convert between WebLogic JMS 6.0 and pre-6.0 JMSMessageID formats: |
||
|
public void setJMSPriority( |
||
|
public void setJMSRedelivered( |
||
|
public void setJMSReplyTo( |
||
|
public void setJMSTimeStamp( |
||
| 1 The corresponding set() method has no impact on the message header field when the send() method is executed. If set, this header field value will be overridden during the send() operation. |
The examples.jms.sender.SenderServlet example, provided with WebLogic Server in the samples/examples/jms/sender directory, shows how to set header fields in messages that you send and how to display message header fields after they are sent.
For example, the following code, which appears after the send() method, displays the message ID that was assigned to the message by WebLogic JMS:
System.out.println("Sent message " +
  msg.getJMSMessageID() + " to " +
  msg.getJMSDestination());
Setting Message Property Fields
To set a property field, call the appropriate set method and specify the property name and value. To read a property field, call the appropriate get method and specify the property name.
The sending application can set properties in the message, and the receiving application can subsequently view them. The receiving application cannot change the properties without first clearing them using the following clearProperties() method:
public void clearProperties(
) throws JMSException
This method does not clear the message header fields or body.
Note: The JMSX property name prefix is reserved for JMS. The connection meta data contains a list of JMSX properties, which can be accessed as an enumerated list using the getJMSXPropertyNames() method. For more information, see Accessing Connection Meta Data.
The JMS_ property name prefix is reserved for provider-specific properties; it is not intended for use with standard JMS messaging.
The property field can be set to any of the following types: boolean, byte, double, float, int, long, short, or String. The following table lists the Message class set and get methods for each of the supported data types.
|
public void setBooleanProperty( |
public boolean getBooleanProperty( |
|
|
public void setByteProperty( |
public byte getByteProperty( |
|
|
public void setDoubleProperty( |
public double getDoubleProperty( |
|
|
public void setFloatProperty( |
public float getFloatProperty( |
|
|
public void setIntProperty( |
||
|
public void setLongProperty( |
public long getLongProperty( |
|
|
public void setShortProperty( |
public short getShortProperty( |
|
|
public void setStringProperty( |
public String getStringProperty( |
In addition to the set and get methods described in the previous table, you can use the setObjectProperty() and getObjectProperty() methods to use the objectified primitive values of the property type. When the objectified value is used, the property type can be determined at execution time rather than during the compilation. The valid object types are boolean, byte, double, float, int, long, short, and String.
You can access all property field names using the following Message method:
public Enumeration getPropertyNames(
) throws JMSException
This method returns all property field names as an enumeration. You can then retrieve the value of each property field by passing the property field name to the appropriate get method, as described in the previous table, based on the property field data type.
The following table is a conversion chart for message properties. It allows you to identify the type that can be read based on the type that has been written.
You can test whether or not a property value has been set using the following Message method:
public boolean propertyExists(
  String name
) throws JMSException
You specify a property name and the method returns a boolean value indicating whether or not the property exists.
For example, the following code sets two String properties and an int property:
msg.setStringProperty("User", user);
msg.setStringProperty("Category", category);
msg.setIntProperty("Rating", rating);
For more information about message property fields, see Message Property Fields or the javax.jms.Message javadoc.
Browsing Header and Property Fields
Note: Only queue message header and property fields can be browsed. You cannot browse topic message header and property fields.
You can browse the header and property fields of messages on a queue using the following QueueSession methods:
public QueueBrowser createBrowser(
  Queue queue
) throws JMSException
public QueueBrowser createBrowser(
  Queue queue,
  String messageSelector
) throws JMSException
You must specify the queue that you wish to browse. You may also specify a message selector to filter messages that you are browsing. Message selectors are described in more detail in Filtering Messages.
Once you have defined a queue, you can access the queue name and message selector associated with a queue browser using the following QueueBrowser methods:
public Queue getQueue(
) throws JMSException
public String getMessageSelector(
) throws JMSException
In addition, you can access an enumeration for browsing the messages using the following QueueBrowser method:
public Enumeration getEnumeration(
) throws JMSException
The examples.jms.queue.QueueBrowser example, provided with WebLogic Server in the samples/examples/jms/queue directory, shows how to access the header fields of received messages.
For example, the following code line is an excerpt from the QueueBrowser example and creates the QueueBrowser object:
qbrowser = qsession.createBrowser(queue);
The following provides an excerpt from the displayQueue() method defined in the QueueBrowser example. In this example, the QueueBrowser object is used to obtain an enumeration that is subsequently used to scan the queue's messages.
   public void displayQueue(
   ) throws JMSException
  {
    Enumeration e = qbrowser.getEnumeration();
    Message m = null;

    if (! e.hasMoreElements()) {
      System.out.println("There are no messages on this queue.");
    } else {
      System.out.println("Queued JMS Messages: ");
      while (e.hasMoreElements()) {
        m = (Message) e.nextElement();
        System.out.println("Message ID " + m.getJMSMessageID() +
                          " delivered " + new Date(m.getJMSTimestamp())
                          " to " + m.getJMSDestination());
      }
    }
When a queue browser is no longer being used, you should close it to free up resources. For more information, see Releasing Object Resources.
For more information about the QueueBrowser class, see the javax.jms.QueueBrowser javadoc.
In many cases, an application does not need to be notified of every message that is delivered to it. Message selectors can be used to filter unwanted messages, and subsequently improve performance by minimizing their impact on network traffic.
Message selectors operate as follows:
Because message selectors cannot reference the contents (body) of a message, some information may be duplicated in the message property fields (except in the case of XML messages).
You specify a selector when creating a queue receiver or topic subscriber, as an argument to the QueueSession.createReceiver() or TopicSession.createSubscriber() methods, respectively. For information about creating queue receivers and topic subscribers, see Step 5: Create Message Producers and Message Consumers Using the Session and Destinations.
The following sections describe how to define a message selector using SQL statements and XML selector methods, and how to update message selectors. For more information about setting header and property fields, see Setting and Browsing Message Header and Property Fields and Setting Message Property Fields, respectively.
Defining Message Selectors Using SQL Statements
A message selector is a boolean expression. It consists of a String with a syntax similar to the where clause of an SQL select statement.
The following excerpts provide examples of selector expressions.
salary > 64000 and dept in ('eng','qa')
(product like 'WebLogic%' or product like '%T3')
  and version > 3.0
hireyear between 1990 and 1992
  or fireyear is not null
fireyear - hireyear > 4
The following example shows how to set a selector when creating a queue receiver that filters out messages with a priority lower than 6.
String selector = "JMSPriority >= 6";
qsession.createReceiver(queue, selector);
The following example shows how to set the same selector when creating a topic subscriber.
String selector = "JMSPriority >= 6";
qsession.createSubscriber(topic, selector);
For more information about the message selector syntax, see the javax.jms.Message javadoc.
Defining XML Message Selectors Using XML Selector Method
For XML message types, in addition to using the SQL selector expressions described in the previous section to define message selectors, you can use the following method:
String JMS_BEA_SELECT(String type, String expression)
You specify the syntax type, which for this release must be set to xpath (XML Path Language), and an XPath expression. The XML path language is defined in the XML Path Language (XPath) document, which is available at the XML Path Language web site at: http://www.w3.org/TR/xpath
The methods return a null value under the following circumstances:
For example, consider the following XML excerpt:
<order>
  <item id="007">
    <name>Hand-held Power Drill</name>
    <description>Compact, assorted colors.</description>
    <price>$34.99</price>
  <item id="123">
    <name>Mitre Saw</name>
    <description>Three blades sizes.</description>
    <price>$69.99</price>
  <item id="66">
    <name>Socket Wrench Set</name>
    <description>Set of 10.</description>
    <price>$19.99</price>
</order>
The following example shows how to retrieve the text node name of the second item in the previous example. The method call returns the following string: Mitre Saw.
JMS_BEA_SELECT(`xpath', `/order/item[2]/name/text()');
The following example shows how to retrieve the ID attribute of the third item. This method call returns the following string: 66.
JMS_BEA_SELECT(`xpath', `/order/item[3]/attribute::id');
The following example shows how to retrieve all elements of item.
JMS_BEA_SELECT(`xpath', `/order/item');
You can use the following MessageConsumer method to display a message selector:
public String getMessageSelector(
) throws JMSException
This method returns either the currently defined message selector or null if a message selector is not defined.
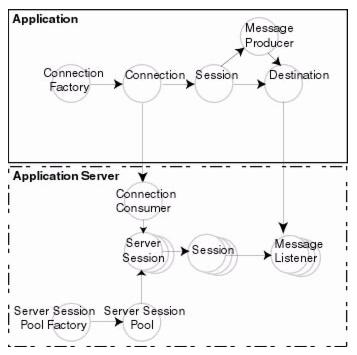
WebLogic JMS implements an optional JMS facility for defining a server-managed pool of server sessions. This facility enables an application to process messages concurrently.
The following figure illustrates the server session pool facility, and the relationship between the application and the application server components.
Figure 4-4 Server Session Pool Facility
As illustrated in the figure, the application provides a single-threaded message listener. The connection consumer, implemented by JMS on the application server, performs the following tasks to process one or more messages:
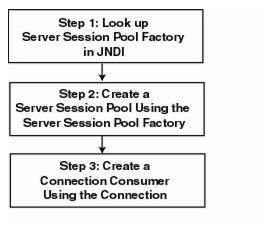
The following figure illustrates the steps required to prepare for concurrent message processing.
Figure 4-5 Preparing for Concurrent Message Processing
Notes: When you create a server session pool (step 2), WebLogic Server first tests the weblogic.allow.create.jms.ServerSessionPool ACL to ensure the user has create permission. This permission is granted to everyone, by default. You can update this property to restrict the permission to a set of users and groups or you can delete the property to disable the server session pool feature. For more information about configuring ACLs, see "Managing Security" in the Administration Guide.
Applications can use other application server providers' session pool implementations within this flow. Server session pools can also be implemented using Message Driven Beans. For information on using message driven beans to implement server session pools, see Using WebLogic EJB.
If the session pool and connection consumer were defined during configuration, you can skip this section. For more information on configuring server session pools and connection consumers, see Managing JMS in the Administration Guide.
WebLogic JMS does not support the optional TopicConnection.createDurableConnectionConsumer() operation. For more information on this advanced JMS operation, refer to the JavaSoft JMS Specification version 1.0.2.
Step 1: Look Up Server Session Pool Factory in JNDI
You use a server session pool factory to create a server session pool.
WebLogic JMS defines one ServerSessionPoolFactory object, by default: weblogic.jms.ServerSessionPoolFactory:<name>, where <name> specifies the name of the JMS server to which the session pool is created.
Once it has been configured, you can look up a server session pool factory by first establishing a JNDI context (context) using the NamingManager.InitialContext() method. For any application other than a servlet application, you must pass an environment used to create the initial context. For more information, see the NamingManager.InitialContext() javadoc.
Once the context is defined, to look up a server session pool factory in JNDI use the following code:
factory = (ServerSessionPoolFactory) context.lookup(<ssp_name>);
The <ssp_name> specifies a qualified or non-qualified server session pool factory name.
For more information about server session pool factories, see ServerSessionPoolFactory or weblogic.jms.ServerSessionPoolFactory javadoc.
Step 2: Create a Server Session Pool Using the Server Session Pool Factory
You can create a server session pool for use by queue (PTP) or topic (Pub/sub) connection consumers, using the ServerSessionPoolFactory methods described in the following sections.
For more information about server session pools, see ServerSessionPool or the javax.jms.ServerSessionPool javadoc.
Create a Server Session Pool for Queue Connection Consumers
The ServerSessionPoolFactory provides the following method for creating a server session pool for queue connection consumers:
public ServerSessionPool getServerSessionPool(
  QueueConnection connection,
  int maxSessions,
  boolean transacted,
  int ackMode,
  String listenerClassName
) throws JMSException
You must specify the queue connection associated with the server session pool, the maximum number of concurrent sessions that can be retrieved by the connection consumer (to be created in step 3), whether or not the sessions are transacted, the acknowledge mode (applicable for non-transacted sessions only), and the message listener class that is instantiated and used to receive and process messages concurrently.
For more information about the ServerSessionPoolFactory class methods, see the weblogic.jms.ServerSessionPoolFactory javadoc. For more information about the ConnectionConsumer class, see the javax.jms.ConnectionConsumer javadoc.
Create a Server Session Pool for Topic Connection Consumers
The ServerSessionPoolFactory provides the following method for creating a server session pool for topic connection consumers:
public ServerSessionPool getServerSessionPool(
  TopicConnection connection,
  int maxSessions,
  boolean transacted,
  int ackMode,
  String listenerClassName
) throws JMSException
You must specify the topic connection associated with the server session pool, the maximum number of concurrent sessions that can be retrieved by the connection (to be created in step 3), whether or not the sessions are transacted, the acknowledge mode (applicable for non-transacted sessions only), and the message listener class that is instantiated and used to receive and process messages concurrently.
For more information about the ServerSessionPoolFactory class methods, see the weblogic.jms.ServerSessionPoolFactory javadoc. For more information about the ConnectionConsumer class, see the javax.jms.ConnectionConsumer javadoc.
Step 3: Create a Connection Consumer
You can create a connection consumer for retrieving server sessions and processing messages concurrently using one of the following methods:
For more information about the ConnectionConsumer class, see ConnectionConsumer or the javax.jms.ConnectionConsumer javadoc.
Create a Connection Consumer for Queues
The QueueConnection provides the following method for creating connection consumers for queues:
public ConnectionConsumer createConnectionConsumer(
  Queue queue,
  String messageSelector,
  ServerSessionPool sessionPool,
  int maxMessages
) throws JMSException
You must specify the name of the associated queue, the message selector for filtering messages, the associated server session pool for accessing server sessions, and the maximum number of messages that can be assigned to the server session simultaneously. For information about message selectors, see Filtering Messages.
For more information about the QueueConnection class methods, see the javax.jms.QueueConnection javadoc. For more information about the ConnectionConsumer class, see the javax.jms.ConnectionConsumer javadoc.
Create a Connection Consumer for Topics
The TopicConnection provides the following two methods for creating ConnectionConsumers for topics:
public ConnectionConsumer createConnectionConsumer(
  Topic topic,
  String messageSelector,
  ServerSessionPool sessionPool,
  int maxMessages
) throws JMSException
public ConnectionConsumer createDurableConnectionConsumer(
  Topic topic,
  String messageSelector,
  ServerSessionPool sessionPool,
  int maxMessages
) throws JMSException
For each method, you must specify the name of the associated topic, the message selector for filtering messages, the associated server session pool for accessing server sessions, and the maximum number of messages that can be assigned to the server session simultaneously. For information about message selectors, see Filtering Messages.
Each method creates a connection consumer; but, the second method also creates a durable connection consumer for use with durable subscribers. For more information about durable subscribers, see Setting Up Durable Subscriptions.
For more information about the TopicConnection class methods, see the javax.jms.TopicConnection javadoc. For more information about the ConnectionConsumer class, see the javax.jms.ConnectionConsumer javadoc.
Example: Setting Up a PTP Client Server Session Pool
The following example illustrates how to set up a server session pool for a JMS client. The startup() method is similar to the init() method in the examples.jms.queue.QueueSend example, as described in Example: Setting Up a PTP Application. This method also sets up the server session pool.
The following illustrates the startup() method, with comments highlighting each setup step.
Include the following package on the import list to implement a server session pool application:
import weblogic.jms.ServerSessionPoolFactory
Define the session pool factory static variable required for the creation of the session pool.
private final static String SESSION_POOL_FACTORY=
  "weblogic.jms.ServerSessionPoolFactory:examplesJMSServer";

private QueueConnectionFactory qconFactory;
private QueueConnection qcon;
private QueueSession qsession;
private QueueSender qsender;
private Queue queue;
private ServerSessionPoolFactory sessionPoolFactory;
private ServerSessionPool sessionPool;
private ConnectionConsumer consumer;
Create the required JMS objects.
public String startup(
  String name,
  Hashtable args
) throws Exception
{
  String connectionFactory = (String)args.get("connectionFactory");
  String queueName = (String)args.get("queue");
  if (connectionFactory == null || queueName == null) {
   throw new   IllegalArgumentException("connectionFactory="+connectionFactory+
                                         ", queueName="+queueName);
    }
  Context ctx = new InitialContext();
  qconFactory = (QueueConnectionFactory)
  ctx.lookup(connectionFactory);
  qcon =qconFactory.createQueueConnection();
  qsession = qcon.createQueueSession(false,
  Session.AUTO_ACKNOWLEDGE);
  queue = (Queue) ctx.lookup(queueName);
  qcon.start();
Step 1
Look up the server session pool factory in JNDI.
  sessionPoolFactory = (ServerSessionPoolFactory)
        ctx.lookup(SESSION_POOL_FACTORY);
Step 2
Create a server session pool using the server session pool factory, as follows:
  sessionPool = sessionPoolFactory.getServerSessionPool(qcon, 5,
     false, Session.AUTO_ACKNOWLEDGE,
     examples.jms.startup.MsgListener);
The code defines the following:
Create a connection consumer, as follows:
  consumer = qcon.createConnectionConsumer(queue, "TRUE",
  sessionPool, 10);
The code defines the following:
For more information about the JMS classes used in this example, see WebLogic JMS Classes or the javax.jms javadoc.
Example: Setting Up a Pub/Sub Client Server Session Pool
The following example illustrates how to set up a server session pool for a JMS client. The startup() method is similar to the init() method in the examples.jms.topic.TopicSend example, as described in Example: Setting Up a Pub/Sub Application. It also sets up the server session pool.
The following illustrates startup() method, with comments highlighting each setup step.
Include the following package on the import list to implement a server session pool application:
import weblogic.jms.ServerSessionPoolFactory
Define the session pool factory static variable required for the creation of the session pool.
private final static String SESSION_POOL_FACTORY=
  "weblogic.jms.ServerSessionPoolFactory:examplesJMSServer";

private TopicConnectionFactory tconFactory;
private TopicConnection tcon;
private TopicSession tsession;
private TopicSender tsender;
private Topic topic;
private ServerSessionPoolFactory sessionPoolFactory;
private ServerSessionPool sessionPool;
private ConnectionConsumer consumer;
Create the required JMS objects.
public String startup(
  String name,
  Hashtable args
) throws Exception
{
  String connectionFactory = (String)args.get("connectionFactory");
  String topicName = (String)args.get("topic");
  if (connectionFactory == null || topicName == null) {
   throw new   IllegalArgumentException("connectionFactory="+connectionFactory+
                                         ", topicName="+topicName);
    }
  Context ctx = new InitialContext();
  tconFactory = (TopicConnectionFactory)
  ctx.lookup(connectionFactory);
  tcon = tconFactory.createTopicConnection();
  tsession = tcon.createTopicSession(false,
  Session.AUTO_ACKNOWLEDGE);
  topic = (Topic) ctx.lookup(topicName);
  tcon.start();
Step 1
Look up the server session pool factory in JNDI.
  sessionPoolFactory = (ServerSessionPoolFactory)
        ctx.lookup(SESSION_POOL_FACTORY);
Step 2
Create a server session pool using the server session pool factory, as follows:
  sessionPool = sessionPoolFactory.getServerSessionPool(tcon, 5,
     false, Session.AUTO_ACKNOWLEDGE,
     examples.jms.startup.MsgListener);
The code defines the following:
Create a connection consumer, as follows:
  consumer = tcon.createConnectionConsumer(topic, "TRUE",
  sessionPool, 10);
The code defines the following:
For more information about the JMS classes used in this example, see WebLogic JMS Classes or the javax.jms javadoc.
Multicasting enables the delivery of messages to a select group of hosts that subsequently forward the messages to subscribers.
The benefits of multicasting include:
Multicast messages are not guaranteed to be delivered to all members of the host group. For messages requiring reliable delivery and recovery, you should not use multicasting.
For an example of when multicasting might be useful, consider a stock ticker. When accessing stock quotes, timely delivery is more important than reliability. When accessing the stock information in real-time, if all or a portion of the contents is not delivered, the client can simply request the information to be resent. Clients would not want to have the information recovered, in this case, as by the time it is redelivered, it would be out-of-date.
The following figure illustrates the steps required to set up multicasting.
Figure 4-6 Setting Up Multicasting
Note: Multicasting is only supported for the Pub/sub messaging model, and only for non-durable subscribers.
Monitoring statistics are not provided for multicast sessions or consumers.
Before setting up multicasting, the connection factory and destination must be configured to support multicasting, as follows:
Note: It is strongly recommended that you seek the advice of your network administrator when configuring the multicast IP address, port, and time-to-live attributes to ensure that the appropriate values are set.
For more information on the multicasting configuration attributes, see the Administration Console Online Help. The multicast configuration attributes are also summarized in Configuration Checklists.
Step 1: Set Up the JMS Application, Creating Multicast Session and Topic Subscriber
Set up the JMS application as described in Setting Up a JMS Application, however, when creating sessions, as described in Step 3: Create a Session Using the Connection, specify that the session would like to receive multicast messages by setting the acknowledgeMode value to MULTICAST_NO_ACKNOWLEDGE.
Note: Multicasting is only supported for the Pub/sub messaging model.
For example, the following method illustrates how to create a multicast session for the Pub/sub messaging model.
tsession = tcon.createTopicSession(
  false,
  WLSession.MULTICAST_NO_ACKNOWLEDGE
);
In addition, create a topic subscriber, as described in Create TopicPublishers and TopicSubscribers.
For example, the following code illustrates how to create a topic subscriber:
tsubscriber = tsession.createSubscriber(myTopic);
Note: The createSubscriber() method fails if the specified destination is not configured to support multicasting.
Multicasting is only supported for non-durable subscribers. An attempt to create a durable subscriber on a multicast session will cause a JMSException to be thrown.
Step 2: Set Up the Message Listener
Multicast topic subscribers can only receive messages asynchronously. If you attempt to receive synchronous messages on a multicast session, a JMSException is thrown.
Set up the message listener for the topic subscriber, as described in Receiving Messages Asynchronously.
For example, the following code illustrates how to establish a message listener.
tsubscriber.setMessageListener(this);
When receiving messages, WebLogic JMS tracks the order in which messages are sent by the destinations. If a multicast subscriber's message listener receives the messages out of sequence, resulting in one or more messages being skipped, a SequenceGapException will be delivered to the ExceptionListener for the session(s) present. If a skipped message is subsequently delivered, it will be discarded. For example, in the following figure, the subscriber is receiving messages from two destinations simultaneously.
Figure 4-7 Multicasting Sequence Gap
Upon receiving the "4" message from Destination 1, a SequenceGapException is thrown to notify the application that a message was received out of sequence. If subsequently received, the "3" message will be discarded.
Note: The larger the messages being exchanged, the greater the risk of encountering a SequenceGapException.
Dynamically Configuring Multicasting Configuration Attributes
During configuration, for each connection factory the system administrator configures the following information to support multicasting:
If the messages maximum is reached, a DataOverrunException is thrown and messages are automatically discarded based on the overrun policy.
Alternatively, you can set the messages maximum and overrun policy using the Session set methods.
The following table lists the Session set and get methods for each dynamically configurable attribute.
|
public void setMessagesMaximum( |
||
|
public void setOverrunPolicy ( |
Note: The values set using the set methods take precedence over the configured values.
For more information about these Session class methods, see the weblogic.jms.extensions.WLSession javadoc. For more information on these multicast configuration attributes, see "JMS Destinations" in the Administration Console Online Help.
Note: The following example is a very simplified illustration of how the Multicast TTL (time-to-live) destination configuration attribute impacts the delivery of messages across routers. It is strongly advised that you seek the assistance of your network administrator when configuring the multicast TTL attribute to ensure that the appropriate value is set.
The Multicast TTL is independent of the message time-to-live.
The following example illustrates how the Multicast TTL destination configuration attribute impacts the delivery of messages across routers. For more information on the multicast configuration attributes, see "JMS Destinations" in the Administration Console Online Help.
Consider the following network diagram.
Figure 4-8 Multicast TTL Example
In the figure, the network consists of three subnets: Subnet A containing the multicast publisher, and Subnets B and C each containing one multicast subscriber.
If the Multicast TTL attribute is set to 0 (indicating that the messages cannot traverse any routers and are delivered on the current subnet only), when the multicast publisher on Subnet A publishes a message, the message will not be delivered to any of the multicast subscribers.
If the Multicast TTL attribute is set to 1 (indicating that messages can traverse one router), when the multicast publisher on Subnet A publishes a message, the multicast subscriber on Subnet B will receive the message.
Similarly, if the Multicast TTL attribute is set to 2 (indicating that messages can traverse two routers), when the multicast publisher on Subnet A publishes a message, the multicast subscribers on Subnets B and C will receive the message.
|
|
|
Copyright © 2000 BEA Systems, Inc. All rights reserved.
|