JMS is a standard API for accessing enterprise messaging systems. Specifically, WebLogic JMS:
Enables Java applications sharing a messaging system to exchange messages.
Simplifies application development by providing a standard interface for creating, sending, and receiving messages.
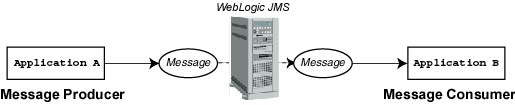
The following figure illustrates WebLogic JMS messaging.
Figure 9-1 WebLogic Server JMS Messaging
As illustrated in the figure, WebLogic JMS accepts messages from producer applications and delivers them to consumer applications.
Configuring JMS
Using the Administration Console, you define configuration attributes to:
Create JMS servers and target a WebLogic Server instance or a Migratable Target where the JMS server will be deployed.
Create and/or customize values for JMS servers, connection factories, destinations (physical queues and topics), distributed destinations (sets of physical queue and topic members within a cluster), destination templates, destination sort order (using destination keys), persistent stores, paging stores, session pools, and connection consumers.
Set up custom JMS applications.
Define thresholds and quotas.
Enable any desired JMS features, such as server clustering, concurrent message processing, destination sort ordering, persistent messaging, paging, flow control, and load balancing for distributed destinations.
WebLogic JMS provides default values for some configuration attributes; you must provide values for all others. If you specify an invalid value for any configuration attribute, or if you fail to specify a value for an attribute for which a default does not exist, WebLogic Server will not boot JMS when you restart it. A sample examplesJMSServer configuration is provided with the product in the Examples Server. For more information about starting the Examples Server, see "Starting the Default, Examples, and Pet Store Servers" in the Installation Guide. There are also instructions for manually configuring a basic JMS implementation in Starting WebLogic Server and Configuring JMS.
When you port WebLogic JMS applications from a previous release of Weblogic Server, the configuration information is automatically converted, as described in "Porting WebLogic JMS Applications" in Programming WebLogic JMS.
To configure WebLogic JMS attributes, follow the procedures described in the following sections, or in the Administration Console Online Help, to create and configure the JMS objects.
Once WebLogic JMS is configured, applications can send and receive messages using the JMS API. For more information about developing WebLogic JMS applications, refer to "Developing a WebLogic JMS Application" in Programming WebLogic JMS.
Note: To assist with your WebLogic JMS configuration planning, Programming WebLogic JMS provides configuration checklists for the attribute requirements and/or options that support various JMS features.
JMS Resource Naming Rules for Domain Interoperability
Within a WebLogic domain, each server instance, machine, cluster, virtual host, and any other resource type must be named uniquely and must not use the same name as the domain. These unique naming rules also apply to all JMS resources in either a single WebLogic domain or in a multi-domain environment.
Naming Rules for JMS Resources In a Single Domain Environment
For WebLogic JMS intra-domain interoperability, either between standalone or clustered server instances, the unique resource naming rule applies to all configurable JMS objects, such as JMS servers, stores (file or JDBC), templates, connection factories, session pools, and connection consumers. For example, you cannot have two similarly named JMS servers (e.g., myJMSServer) targeted to two different server instances within a domain.
An exception to this unique naming rule within a domain, however, is for JMS queue and topic destinations on different JMS servers in a domain, as follows:
Queue destinations can use the same name as other queues on different JMS servers; topic destinations can also use the same name as other topics on different JMS servers.
Queue destinations cannot use the same name as topic destinations, nor can queues nor topics use the same name as any other configurable objects.
Naming Rules for JMS Resources In a Multi-Domain Environment
With the exception of JMS connection factories, the single domain naming rules for WebLogic JMS resources also apply to achieve successful inter-domain operability when using the Messaging Bridge to access other WebLogic domains. This rule includes domains from different releases of WebLogic Server.
For example, you cannot create a WebLogic Server instance named myserver in a version 7.0 domain named mydomain70 if there is already a server instance named myserver in a version 6.1 domain named mydomain61. Similarly, on the JMS subsystem level, you cannot have two JMS servers or stores with the same name, even when they reside in separate domains.
Therefore, you must adhere to the following rules when interoperating between WebLogic domains:
All domain names must be unique across your enterprise.
All WebLogic Server instance names must be unique within a domain and across all interoperating domains.
All JMS server names must be unique within a domain and across all interoperating domains.
If a JMS store (file or JDBC) is being used for persistent messages, all store names must be unique within a domain and across all interoperating domains.
The following sections review how to start WebLogic Server and the Administration console, as well as provide a procedure for configuring a basic JMS implementation.
Starting the Default WebLogic Server
The default role for a WebLogic Server is the Administration Server. If a domain consists of only one WebLogic Server, that server is the Administration Server. If a domain consists of multiple WebLogic Servers, you must start the Administration Server first, and then you start the Managed Servers.
The Administration Console is the Web-based administrator front-end (administrator client interface) to WebLogic Server. You must start the server before you can access the Administration Console for a server.
This section describes how to configure a basic JMS implementation using the Administration Console.
Under the Services node in the left pane, click the JMS node to expand the list.
For storing persistent messages in a disk-based file, you must create a JMS file store. If your are using the JMS Paging feature, you must also configure an additional "paging" JMS file store for temporarily swapping message bodies out to disk when memory is exhausted.
Create a directory on the file system where the JMS file store will be kept.
Click the Stores node in the left pane, and then click the Configure a new JMS File Store link in the right pane.
On the General tab, give the store a name, specify a directory, and optionally, select a Synchronous Write policy to determine how the file store writes data to disk. Then click Create.
For storing persistent messages in a JDBC-accessible database, you must create a JMS JDBC store. (If you need to create a JDBC connection pool, then first complete steps A-D; otherwise, you can skip to step E.) If your are using the JMS Paging feature, you must also configure a "paging" JMS file store for temporarily swapping message bodies out to disk.
Click the JDBC node in the left pane to expand it.
Click the Connection Pools node in the left pane, and then click the Configure a new JDBC Connection Pool link in the right pane.
On the Configuration tabs, set the attributes for the connection pool, such as Name, URL, and database Properties. Click Apply on each tab when you're done making changes.
On the Targets tab, target a WebLogic Server instance or a server cluster on which to deploy the connection pool by selecting either the Servers tab or the Clusters tab. Select a target by moving it from the Available list into the Chosen List, and then click Apply.
Return to the JMS -> Stores node, and then click the Configure a new JMSJDBCStore link in the right pane.
Give the JDBC Store a name, select a connection pool, and a prefix name. Then click Create.
Optionally, create a JMS Template to define multiple destinations with similar attribute settings. You also need a JMS Template to create temporary queues.
Click the Templates node in the left pane, and then click the Configure a new JMS Template link in the right pane.
On the General tab, give the template a name, and then click Create.
Fill in the Thresholds & Quotas, Override, and Redelivery tabs, as appropriate. Click Apply on each tab when you're done making changes.
Click the Server node in the left pane, and then click the Configure a new JMSServer link in the right pane.
On the General tab, give the server a name, select a Store if you created one, select a Paging Store if you created one, and select a Template if you created one. Then click Create.
Fill in the Thresholds & Quotas tab, as appropriate. Click Apply when you're done making changes.
On the Targets tab, target a WebLogic Server instance or a Migratable Target server on which to deploy the JMS server by selecting either the Servers tab or the Migratable Targets tab. Select a target by moving it from the Available list into the Chosen List, and then click Apply.
Create the JMS Destinations, which are queues (Point-To-Point) or topics (Pub/Sub):
Under the Servers node in the left pane, click your new JMS server instance to expand the list, and then click the Destinations node.
Click either the Configure a new JMSQueue or Configure a new JMSTopic link in the right pane.
On the General tab, give the destination a name and a JNDI name. Fill in the other attributes, as appropriate, and then click Create.
Fill in the Thresholds & Quotas, Override, Redelivery, and Multicast (topics only) tabs, as appropriate. Click Apply on each tab when you're done making changes.
Create a Connection Factory to enable your JMS clients to create JMS connections:
Click to the expand the Connection Factory node and in the left pane, and then click the Configure a new JMS Connection Factory link in the right pane.
On the General tab, give the connection factory a name and a JNDI name. Fill in the other attributes, as appropriate, and then click Create.
Fill in the Transactions and Flow Control tabs, as appropriate. Click Apply on each tab when you're done making changes.
On the Targets tab, target a WebLogic Server instance or a server cluster on which to deploy the connection factory by selecting either the Servers tab or the Clusters tab. Select a target by moving it from the Available list into the Chosen List, and then click Apply.
Optionally, use the Destination Keys node to define the sort order for a specific destination. For more information, see Configuring Destination Keys.
Optionally, use the Distributed Destinations node to make your physical destinations part of a logical distributed destination set within a server cluster. For more information, see Configuring Distributed Destinations.
Optionally, create JMS Session Pools, which enable your applications to process messages concurrently, and Connection Consumers (queues or topics) that retrieve server sessions and process messages. For more information, see Configuring Session Pools and Configuring Connection Consumers.
Configuring JMS Servers
A JMS server manages connections and message requests on behalf of clients. To create a JMS server, use the Servers node in the Administration Console and define the following:
General configuration attributes, including:
Name of the JMS server.
Persistent store (file or JDBC database) required for persistent messaging. If you do not assign a persistent store for a JMS server, persistent messaging is not supported on that server. For more information on configuring JMS stores, see Configuring Stores.
Paging store (file store recommended) required for paging. If you do not assign a paging store for a JMS server, paging is not support on that server. For more information of configuring paging, see Using Message Paging.
Temporary template that is used to create all temporary destinations, including temporary queues and temporary topics.
Thresholds and quotas for messages and bytes (maximum number, and high and low thresholds), and whether or not bytes paging and/or messages paging is enabled.
Target a WebLogic Server instance or a Migratable Target on which to deploy a JMS server.
Servers - When a target WebLogic Server boots, the JMS server boots as well. If no target WebLogic Server is specified, the JMS server will not boot.
Note: The deployment of a JMS server differs from that of a connection factory or template. A JMS server is deployed on a single WebLogic Server instance or on a migratable target (see next bullet item); whereas, a connection factory or template can be instantiated on multiple WebLogic Server instances simultaneously.
Migratable Targets - Migratable targets define a set of WebLogic Server instances in a cluster that can potentially host an "exactly-once" service, such as JMS. When a migratable target server boots, the JMS server boots as well on the user-preferred server in the cluster. However, a JMS server and all of its destinations can migrate to another server within the cluster in response to a WebLogic Server failure or due to a scheduled migration or system maintenance. For more information on configuring a migratable target for JMS, see "Managing JMS" in Programming WebLogic JMS.
For instructions on creating and configuring a JMS server, see "JMS Server Tasks" in the Administration Console Online Help.
Configuring Connection Factories
Connection factories are objects that enable JMS clients to create JMS connections. A connection factory supports concurrent use, enabling multiple threads to access the object simultaneously. WebLogic JMS provides a preconfigured default connection factory, weblogic.jms.ConnectionFactory, that can be disabled on a per-server basis, as described in "Server --> Services --> JMS" in the Administration Console Online Help. Otherwise, you can configure one or more connection factories to create connections with predefined attributes that better suit your application — as long as each connection factory is uniquely named. WebLogic Server adds them to the JNDI space during startup, and the application then retrieves a connection factory using WebLogic JNDI.
You can establish cluster-wide, transparent access to destinations from any server in a cluster either by enabling the default connection factory for each server instance, or by configuring one or more connection factories and targeting them to one or more server instances in the cluster. This way, each connection factory can be deployed on multiple WebLogic Servers. For more information on configuring JMS clustering, see "Managing JMS" in Programming WebLogic JMS.
To configure connection factories, use the Connection Factories node in the Administration Console to define the following:
General configuration attributes, including:
Name of the connection factory.
Name for accessing the connection factory within the JNDI namespace.
Client identifier (client ID) for clients with durable subscribers. For more information about durable subscribers, see "Developing a WebLogic JMS Application" in Programming WebLogic JMS.
Default message delivery attributes (Priority, Time To Live, Time To Deliver, and Delivery Mode).
Maximum number of outstanding messages that may exist for an asynchronous session and the overrun policy (that is, the action to be taken, for multicast sessions, when this maximum is reached).
Whether or not the close() method is allowed to be called from the onMessage() method.
Whether all messages or only previously received messages are acknowledged.
For distributed destinations, determine whether non-anonymous producers created through a connection factory are load balanced on a per-call basis.
For distributed destinations, determine whether server affinity is used when load balancing consumers or producers in a distributed destination.
Transaction attributes—Transaction time-out, whether Java Transaction API (JTA) user transactions are allowed, whether a transaction (XA) queue or XA topic connection factory is returned, and whether server-side transactions are enabled.
Flow Control attributes—Allow a message producer to adjust its message flow. For more information about configuring flow control, see Establishing Message Flow Control.
Target a WebLogic Server instance or a server cluster. Targets enable you to limit the set of servers, groups, and/or clusters on which a connection factory may be deployed.
Server—Target a single WebLogic Server instance on which to deploy a connection factory.
Cluster—Target a cluster on which to deploy a connection factory, in order to support cluster-wide, transparent access to destinations from any server in the cluster.
For the default connection factory, weblogic.jms.ConnectionFactory, all configuration attributes are set to their default values. If the default connection factory definition is appropriate for your application, you do not need to configure any additional connection factories for your application.
Note: Using the default connection factory, you have no control over the WebLogic Server on which the connection factory may be deployed. If you would like to target a particular server, create a new connection factory and specify the appropriate server target(s).
For instructions on creating and configuring a connection factory, see "Connection Factory Tasks" in the Administration Console Online Help.
Some connection factory attributes are dynamically configurable. When dynamic attributes are modified at run time, the new values become effective for new connections only, and do not affect the behavior of existing connections.
Configuring Destinations
A destination identifies a queue (Point-To-Point) or a topic (Pub/Sub) for a JMS server. After defining a JMS server, configure one or more destination for each JMS server.
You configure destinations explicitly or by configuring a destination template that can be used to define multiple destinations with similar attribute settings, as described in Configuring JMS Templates.
Note: You can also configure multiple physical destinations as members of a single distributed destination set within a cluster. Therefore, if one instance within the cluster fails, then other instances of the same destination will be able to provide service to JMS producers and consumers. For more information, see Configuring Distributed Destinations.
To configure destinations explicitly, use the Destinations node in the Administration Console to define the following configuration attributes:
General configuration attributes, including:
Name and type (queue or topic) of the destination.
Name for accessing the destination within the JNDI namespace.
Whether or not a store is enabled for storing persistent messages.
The JMS template used for creating destinations.
Keys used to define the sort order for a specific destination.
Thresholds and quotas for messages and bytes (maximum number, and high and low thresholds), and whether or not bytes paging and/or messages paging is enabled on the destination.
Message attributes that can be overridden, including priority, time-to-live, time-to-deliver, and delivery mode.
Message redelivery attributes, including redelivery delay override, redelivery limit, and error destination.
Multicasting attributes (for topics only), including multicast address, time-to-live (TTL), and port.
For instructions on creating and configuring a destination, see "JMS Destination Tasks" in the Administration Console Online Help.
Some destination attributes are dynamically configurable. When attributes are modified at run time, only incoming messages are affected; stored messages are not affected.
Configuring JMS Templates
A JMS template provides an efficient means of defining multiple destinations with similar attribute settings. JMS templates offer the following benefits:
You do not need to re-enter every attribute setting each time you define a new destination; you can use the JMS template and override any setting to which you want to assign a new value.
You can modify shared attribute settings dynamically simply by modifying the template.
To define the JMS template configuration attributes for destinations, use the Templates node in the Administration Console. The configurable attributes for a JMS template are the same as those configured for a destination. These configuration attributes are inherited by the destinations that use them, with the following exceptions:
If the destination that is using a JMS template specifies an override value for an attribute, the override value is used.
If the destination that is using a JMS template specifies a message redelivery value for an attribute, that redelivery value is used.
The Name attribute is not inherited by the destination. This name is valid for the JMS template only. You must explicitly define a unique name for all destinations.
The JNDI Name, Enable Store, and Template attributes are not defined for JMS templates.
The Multicast attributes are not defined for JMS templates because they apply only to topics.
Any attributes that are not explicitly defined for a destination are assigned default values. If no default value exists, be sure to specify a value within the JMS template or as a destination attribute override. If you do not do so, the configuration information remains incomplete, the WebLogic JMS configuration fails, and the WebLogic JMS does not boot.
For instructions on creating and configuring a JMS template, see "JMS Template Tasks" in the Administration Console Online Help.
Configuring Destination Keys
Use destination keys to define the sort order for a specific destination.
To create a destination key, use the Destination Keys node in the Administration Console and define the following configuration attributes:
Name of the destination key
Property name on which to sort
Expected key type
Direction in which to sort (ascending or descending)
For instructions on creating and configuring a destination key, see "Destination Key Tasks" in the Administration Console Online Help.
Configuring Stores
A persistent store consists of a file or database that is used for persistent messaging. To create a file or database store, use the Stores node in the Administration Console and define the following configuration attributes:
For a JMS JDBC database store—provide the JDBC connection pool and database table name prefix for use with multiple instances, as explained in About JMS JDBC Store Table Prefixes.
Warning: You cannot configure a transaction (XA) connection pool to be used with a JDBC database store. For more information, see JMS JDBC Transactions.
JMS persistent stores can increase the amount of memory required during initialization of a WebLogic Server instance as the number of stored messages increases. If initialization fails due to insufficient memory while rebooting WebLogic Server, increase the heap size of the Java Virtual Machine (JVM) proportionally to the number of messages that are currently stored in the JMS persistent store. Then, try rebooting the server again. For more information on setting heap sizes, see "Tuning WebLogic Server Applications" in the WebLogic Performance and Tuning Guide.
For instructions on creating and configuring a store, see "JMS File Store Tasks" and "JMS JDBC Store Tasks" for information about file and JDBC database stores, respectively, in the Administration Console Online Help.
About JMS JDBC Stores
Through the use of JDBC, JMS enables you to store persistent messages in a database, which is accessed through a designated JDBC connection pool. The JMS database can be any database that is accessible through a JDBC driver. WebLogic JMS detects some drivers for the following databases:
Pointbase
Microsoft SQL (MSSQL) Server
Oracle
Sybase
Cloudscape
Informix
IBM DB2
Times Ten
The weblogic/jms/ddl directory within the weblogic.jar file contains JMS DDL files for these databases, which are actually text files containing the SQL commands that create the JMS database tables. To use a different database, simply copy and edit any one of these .ddl files.
Note: The JMS samples provided with your WebLogic Server distribution are set up to work with the Pointbase Java database. An evaluation version of Pointbase is included with WebLogic Server and a demoPool database is provided.
If your existing JMS JDBC stores somehow become corrupted, you can regenerate them using the utils.Schema utility. For more information see, "JDBC Database Utility" in Programming WebLogic JMS.
JMS JDBC Transactions
You cannot configure a transaction (XA) JDBC connection pool to be used with a JMS JDBC store. JMS must use a JDBC connection pool that uses a non-XAResource driver (you cannot use an XA driver or a JTS driver). JMS does the XA support above the JDBC driver.
This is because WebLogic JMS is its own resource manager. That is, JMS itself implements the XAResource and handles the transactions without depending on the database (even when the messages are stored in the database). This means that whenever you are using JMS and a database (even if it is the same database where the JMS messages are stored), then it is two-phase commit transaction. For more information about using transactions with WebLogic JMS, see "Using Transactions with WebLogic JMS" in Programming WebLogic JMS.
From a performance perspective, you may boost your performance if the JDBC connection pool used for the database work exists on the same WebLogic Server as the JMS queue—the transaction will still be two-phase, but it will be handled with less network overhead. Another performance boost might be achieved by using JMS file stores rather than JMS JDBC stores.
JMS JDBC Security
Optionally, you can restrict the JDBC connection pool resource. In previous releases of WebLogic Server, ACLs were used to protect WebLogic resources. In WebLogic Server version 7.0, security policies answer the question "who has access" to a WebLogic resource. A security policy is created when you define an association between a WebLogic resource and a user, group, or role. A WebLogic resource has no protection until you assign it a security policy. For instructions on how to set up security for all WebLogic Server resources, see "Setting Protections for WebLogic Resources" in the Administration Console Online Help.
Using Oracle Primary Keys with a JMS JDBC Store
For Oracle databases, Advanced Oracle Replication cannot replicate tables with the LONG or LONG RAW data type columns, but instead requires the use of Primary Keys. To achieve this, modify the default Oracle DDL file to manually add Primary Keys to the JMSStore table used by a JMS JDBC Store.
The jms_oracle.ddl file is preconfigured and supplied in the WebLogic CLASSPATH (in the WL_HOME/server/lib/weblogic.jar file, where WL_HOME is the top-level directory of your WebLogic Server installation).
For cases where the JMSStore and JMSState tables already exist, then these tables must be dropped and recreated to use a modified DDL file.
Use the JAR utility supplied with the JDK to extract the JMS Store DDL files to the weblogic/jms/ddl directory, using the following command:
jar xf weblogic.jar /weblogic/jms/ddl
Edit the jms_oracle.ddl text file as follows:
Locate the CREATE TABLE JMSSTORE entry, and then add PRIMARY KEY NOT NULL, as follows:
CREATE TABLE JMSStore (recordHandle int PRIMARY KEY NOT NULL, recordState int, record LONG RAW);
Also, remove the following CREATE INDEX entry:
CREATE INDEX JMSMSGQ_X ON JMSStore (recordHandle);
Save your changes to the DDL file.
Follow the "Regenerating JDBC Database Stores" instructions in Programming WebLogic JMS to regenerate the JMS Store tables that will be using your customized jms_oracle.ddl file.
About JMS JDBC Store Table Prefixes
The JMS database contains two system tables that are generated automatically and are used internally by JMS:
<prefix>JMSStore
<prefix>JMSState
The prefix name uniquely identifies JMS tables in the persistent store. Specifying unique prefixes allows multiple stores to exist in the same database. You configure the prefix via the Administration Console when configuring a JMS JDBC store. A prefix is prepended to table names when the DBMS requires fully qualified names, or when you must differentiate between JMS tables for two WebLogic Servers, enabling multiple tables to be stored on a single DBMS.
Warning: No two JMS JDBC stores should be allowed to use the same database tables, as this will result in data corruption.
Specify the prefix using the following format, which will result in a valid table name when prepended to the JMS table name:
[[[catalog.]schema.]prefix]JMSStore
where catalog identifies the set of system tables being referenced by the DBMS and schema translates to the ID of the table owner. For example, in a production database the JMS administrator could maintain a unique table for the Sales department, as follows:
[[[Production.]JMSAdmin.]Sales]JMSStore
The resulting table will be created in the Production catalog, under the JMSAdmin schema, and will be named SalesJMSStore.
Note: For some DBMS vendors, such as Oracle, there is no catalog to set or choose, so this format simplifies to [[schema.]prefix]. For more information, refer to your DBMS documentation for instructions on how to write and use a fully-qualified table name.
Recommended JDBC Connection Pool Settings for JMS JDBC Stores
WebLogic Server provides robust JDBC connection pools that can automatically reconnect to failed databases after they come back online, without requiring you to restart WebLogic Server. To take advantage of this capability, and make your use of JMS JDBC stores more robust, configure the following attributes on the JDBC connection pool associated with the JMS JDBC store:
Server session pools enable an application to process messages concurrently. After you define a JMS server, optionally, configure one or more session pools for each JMS server.
Use the Session Pools node in the Administration Console and define the following configuration attributes:
Connection factory with which the server session pool is associated and is used to create sessions.
Message listener class used to receive and process messages concurrently.
Transaction attributes (acknowledge mode and whether or not the session pool creates transacted sessions).
Maximum number of concurrent sessions.
For instructions on creating and configuring a session pool, see "Session Pool Tasks" in the Administration Console Online Help.
Some session pool attributes are dynamically configurable, but the new values do not take effect until the session pools are restarted.
Configuring Connection Consumers
Connection consumers are queues (Point-To-Point) or topics (Pub/Sub) that retrieve server sessions and process messages. After you define a session pool, configure one or more connection consumers for each session pool.
To configure connection consumers, use the Session Pools node in the Administration Console to define the following configuration attributes:
Maximum number of messages that can be accumulated by the connection consumer.
JMS selector expression used to filter messages. For information about defining selectors, see Developing a WebLogic JMS Application" in Programming WebLogic JMS.
Destination on which the connection consumer will listen.
To create and configure a connection consumer, and for detailed information about each of the connection consumer configuration attributes, see "Connection Consumer" in the Administration Console Online Help.
Monitoring JMS
Using the Administration Console, you can monitor statistics for the following JMS objects: JMS servers, connections, sessions, destinations, message producers, message consumers, server session pools, and durable subscribers.
JMS statistics continue to increment as long as the server is running. Statistics are reset only when the server is rebooted.
Note: For instructions on monitoring JMS connections to WebLogic Server, refer to the Servers section in the Administration Console Online Help.
Monitoring JMS Objects
To view run-time information for active JMS servers, destinations, and session pools:
Start the Administration Console.
Select the JMS node under Services, in the left pane, to expand the list of JMS servers.
Select the Server node under JMS in the left pane.
The JMS server information is displayed in the right pane.
Select the JMS server that you want to monitor from the list or, from the JMS servers displayed in the right pane.
Select the Monitoring tab to display the following text links:
Monitor all Active JMS Servers
Monitor all Active JMS Destinations
Monitor all Active JMS Session Pool Runtimes
Click the appropriate text link to view monitoring data for that JMS object.
Select the Destinations node under Servers in the left pane, to expand the list of JMS topic and queue destinations.
The JMS destination information is displayed in a table format in the right pane, with the Durable Subscriber Runtimes column listing the number of durable subscribers running (if any) for the destination topics listed in the table.
To view durable subscriber information for a specific topic, click the icon (or actual number) in the Durable Subscriber Runtimes column for the desired topic.
Monitoring Distributed Destination System Subscriptions and Proxy Topic Members
In certain JMS configuration for Weblogic Server 7.0, distributed destinations may automatically create proxy topic members or system subscriptions between the topic or queue members. If this occurs, system subscriptions and proxy topic members will appear in MBean statistics, as well as in the Administration Console, when monitoring distributed destination members. They may also appear in the durable subscription names and in the consumer counts for the distributed destination members.
The following points describe the behavior of system subscriptions and proxy topic members:
Distributed Topic Proxy Members — A WebLogic Server instance that has a configured JMS connection factory, but which has not been configured to host a local distributed topic member for a remote distributed topic, may automatically create and host a local proxy topic member for the remote distributed topic. This occurs when the first non-durable subscription for the distributed topic is created on the server's connection factory. The dynamically-created proxy topic member resides within a dynamically-created JMS server. Each of the manually-configured distributed topic members will create a system subscription for each dynamically-created proxy topic member. The non-durable consumers are then created on the proxy topic member.
Distributed Topic System Subscriptions — System subscriptions are used to forward messages between configured distributed destination members. For example, when there are n members in a distributed topic, each member has at least n-1 system subscribers. In addition, for each proxy topic member, there will also be a system subscription on each distributed topic member.
Distributed Queue System Subscriptions — Distributed queue members that have enabled the Forward Delay attribute on the distributed queue (by changing the default value of -1 seconds), may also create system subscribers. The system subscribers are used to forward messages from queue members with no consumers to queue members that do have consumers.
Durable System Subscriptions — When a JMS file or JDBC store is configured for a distributed topic member, system subscriptions are created as durable subscribers. They are displayed by name in the Administration Console.
Tuning JMS
The following sections explain how to get the most out of your applications by implementing the administrative performance tuning features available with WebLogic JMS.
The following sections describe the tuning options available when using persistent stores with WebLogic Server JMS.
Configuring a Synchronous Write Policy for JMS File Stores
By default, WebLogic JMS file stores guarantee up-to-the-message integrity by using synchronous writes. Disabling synchronous writes improves file store performance, often quite dramatically, but at the expense of possibly losing sent messages or generating duplicate received messages (even if messages are transactional) in the event of an operating system crash or a hardware failure. Simply shutting down an operating system will not generate these failures, as an OS flushes all outstanding writes during a normal shutdown. Instead, these failures can be emulated by shutting the power off to a busy server.
Note: The Synchronous Write Policy is ignored if the file store is used exclusively for paging non-persistent messages to disk.
Table 9-1 explains the options available when configuring a Synchronous Write Policy for all JMS file stores running on WebLogic Server.
Table 9-1 Synchronous Write Policy Attributes
Attribute
Description
Disabled
File store writes are allowed to use both the operating system's cache as well as the file system's on-disk cache. This policy is the fastest but the least reliable. It can be more than 100 times faster than the other policies, but power outages or operating system failures can cause lost and/or duplicate messages.
Cache-Flush
The default policy. Transactions cannot complete until all of their writes have been flushed down to disk. This policy is reliable and scales well as the number of simultaneous users increases.
Direct-Write
File store writes are written directly to disk. This policy is supported on Sun Solaris and Windows systems. If the Direct-Write policy is set on an unsupported platform, the file store automatically uses the Cache-Flush policy instead.
The Direct-Write policy's reliability and performance depend on the platform's use of on-disk caches with respect to direct writes. For example, UNIX systems do not use on-disk caches for direct writes, while Windows systems generally do. The following points illustrate the pros and cons of using on-disk caching (when possible) with this policy:
With on-disk caching enabled, the Direct-Write policy can be 2-5 times faster than the Cache-Flush policy, except in highly scalable cases where it may be slightly slower.
With on-disk caching disabled, the Direct-Write policy is faster than the Cache-Flush policy in one-to-many cases, but much slower otherwise.
The Direct-Write policy scales well with on-disk caching enabled, but does not scale with it disabled. (Note that Sun Solaris does not allow enabling the on-disk cache for direct writes).
Warning: Unlike Sun Solaris, use of the Direct-Write policy on Windows may leave transaction data in the on-disk cache without writing it to disk immediately. This is not transactionally safe, as a power failure can cause loss of on-disk cache data, resulting in lost and/or duplicate messages. For reliable writes using Direct-Write on Windows, either disable all write caching for the disk (enabled by default), or use a disk with a battery backed cache.
To disable the on-disk cache for a hard disk on Windows, do the following: Start -> Settings -> Control Panel -> System -> Hardware tab -> click the Device Manager button -> Disk Drives -> double-click the drive name -> Disk Properties tab -> clear the Write Caching Enabled check box. Some file systems, however, do not allow this value to be changed (for example, a RAID system that has a reliable cache).
Comparing Policy Settings
The following tables compare the synchronous write policies with respect to reliability, performance, and scalability. Use the following key to interpret the expected results based on your synchronous write policy settings.
Disk Cache On/Off: the on-disk write cache is enabled/disabled
1-m Perf: very few clients
m-m Perf: many clients
M-M Perf: a large amount of concurrent clients
Reliability Low/High: High reliability is needed for exactly-once (transactional) messaging
Table 9-2 Relative Performance (compare within same column)
Policy
Disk Cache
1-m Perf
m-m Perf
M-M Perf
Reliability
Disabled
On
****
****
****
Low (depends on OS cache)
Off
****
****
****
Low
Cache-Flush
On
*
**
***
High
Off
*
**
***
High
Direct-Write
On
**
***
**
Medium (High with reliable disk-cache
Off
**
*
*
High
Table 9-3 Relative Scalability (compare within same row)
Policy
Disk Cache
1-m Perf
m-m Perf
M-M Perf
Disabled
On
****
****
****
Off
****
****
****
Cache-Flush
On
*
**
***
Off
*
**
***
Direct-Write
On
*
**
***
Off
*
*
*
Using Message Paging
With the message paging feature, you can free up virtual memory during peak message load periods. This feature can greatly benefit applications with large message spaces.
JMS message paging saves memory for both persistent and non-persistent messages, as even persistent messages cache their data in memory. Paged persistent messages continue to be written to the regular backing store (file or database); and paged non-persistent messages are written to the JMS server's message paging store, which is configured separately.
A paged-out message does not free all of the memory that it consumes. The message header and message properties remain in memory for use with searching, sorting, and filtering.
Note: Messages sent in a transacted session are only eligible for paging after the session is committed. Prior to that, the message will only be held in memory; therefore, the heap size of the Java Virtual Machine (JVM) should be appropriately tuned to accommodate the projected peak amount of client load from all active sessions until they are committed. For more information on tuning your heap size, see "Tuning Java Virtual Machines (JVMs)" in WebLogic Performance and Tuning.
Configuring Paging
Unless paging is configured and enabled, all messages (even persistent ones) are held in memory. You can configure paging for a new or existing JMS server and/or its destinations through the Administration Console. Using the attributes on the JMS Server node you can specify a paging store for a JMS server, enable bytes and/or messages paging, and configure bytes/messages high and low thresholds to start and stop paging.
Similarly, using the attributes on the Destinations node, you can configure bytes/messages paging for all topics and queues configured on a JMS server. The destinations use the paging store that is configured for the JMS server.
Also, if you use JMS templates to configure multiple destinations, you can use the attributes on the Templates node to configure paging quickly on all your destinations. To override a template's paging configuration for specific destinations, you can enable or disable paging on any destination.
For instructions on configuring a new JMS server, templates, and destinations (Topics or Queues), see "JMS Server," "JMS Destination," and "JMS Template" in the Administration Console Online Help.
Note: For performance tuning purposes, you can modify the paging thresholds to any legal value at any time. Once paging is enabled, however, you cannot dynamically disable it by resetting a byte or message threshold back to -1. To prevent paging from occurring, set the byte/message high threshold to a very large number (maximum is 263 -1), so that paging is not triggered.
Configuring a Paging Store for a JMS Server
Each JMS server must have its own paging store, which is used exclusively for paging out non-persistent messages for the JMS server and its destinations. It's best to use a JMS file store rather than a JMS JDBC store, as the JDBC store will perform poorly in comparison without any real benefit.
To configure a new paging store:
Start the Administration Console.
Click the JMS Store node. The right pane shows all the JMS stores.
Click the Create a new JMS File Store text link. The right pane shows the tabs associated with configuring a new file store.
Enter values in the attribute fields.
Click Create to create a file store instance with the name you specified in the Name field. The new instance is added under the JMS Stores node in the left pane.
If you have multiple JMS servers in your domain, repeat steps 3-5 for each server instance.
Configuring Paging on a JMS Server
To enable and configure paging on an existing JMS server:
Click the JMS Servers node. The right pane shows all the servers defined in your domain.
Click the server that you want to configure for paging. The right pane shows the tabs associated with configuring the server.
On the General tab, use the Paging Store list box to select the store that you configured to store the paged messages. Click Apply to save your changes.
On the Thresholds & Quotas tab, configure bytes paging:
Select the Bytes Paging Enabled check box.
In the Bytes Threshold High field, enter an amount that will start bytes paging when the number of bytes on the JMS server exceeds this threshold.
In the Bytes Threshold Low field, enter an amount that will stop bytes paging once the number of bytes on the JMS server falls below this threshold.
On the Thresholds & Quotas tab, configure messages paging:
Select the Messages Paging Enabled check box.
In the Messages Threshold High field, enter an amount that will start messages paging when the number of messages on the JMS server exceeds this threshold.
In the Messages Threshold Low field, enter an amount that will stop messages paging once the number of messages on the JMS server falls below this threshold.
Click Apply to save the new bytes and/or messages paging values.
Repeat steps 2-6 to configure paging for additional JMS servers in the domain.
Note: Each JMS server must have its own paging store.
After you configure your JMS server (or servers) for paging, do one of the following:
If you are not configuring a JMS server's destinations for paging, reboot WebLogic Server to activate paging.
JMS templates provide an efficient way to define multiple destinations (topics or queues) with similar attribute settings. To configure paging on a template for destinations, do the following:
Click the JMS node in the left pane.
Click the JMS Templates node. The right pane shows all the templates defined in the domain.
Click the template that you want to configure for paging. The right pane shows the tabs associated with configuring the template.
On the Thresholds & Quotas tab, configure bytes paging:
Select the Bytes Paging Enabled check box.
In the Bytes Threshold High field, enter an amount that will start bytes paging when the number of bytes on the JMS server exceeds this threshold.
In the Bytes Threshold Low field, enter an amount that will stop bytes paging once the number of bytes on the JMS server falls below this threshold.
On the Thresholds & Quotas tab, configure messages paging:
Select the Messages Paging Enabled check box.
In the Messages Threshold High field, enter an amount that will start messages paging when the number of messages on the JMS server exceeds this threshold.
In the Messages Threshold Low field, enter an amount that will stop messages paging once the number of messages on the JMS server falls below this threshold.
Click Apply to save the new bytes and/or messages paging values.
Repeat steps 3-6 to configure paging for additional JMS templates.
After configuring all of your JMS templates for paging, reboot WebLogic Server to activate paging.
Configuring Paging on Destinations
Follow these directions if you are configuring paging on destinations without using a JMS template.
Under JMS Servers, expand a server instance that is already configured for paging.
Click the Destinations node. The right pane shows all of the server's topics and queues.
Click the topic or queue that you want to configure for paging. The right pane shows the tabs associated with configuring the topic or queue.
On the Thresholds & Quotas tab, configure bytes paging:
Select the Bytes Paging Enabled check box.
In the Bytes Threshold High field, enter an amount that will start bytes paging when the number of bytes on the JMS server exceeds this threshold.
In the Bytes Threshold Low field, enter an amount that will stop bytes paging once the number of bytes on the JMS server falls below this threshold.
On the Thresholds & Quotas tab, configure messages paging:
Select the Messages Paging Enabled check box.
In the Messages Threshold High field, enter an amount that will start messages paging when the number of messages on the JMS server exceeds this threshold.
In the Messages Threshold Low field, enter an amount that will stop messages paging once the number of messages on the JMS server falls below this threshold.
Click Apply to save the new bytes and/or messages paging values.
Repeat steps 3-6 to configure paging for additional JMS destinations.
After you configure all your destinations for paging, reboot WebLogic Server to activate paging.
Configuring a Destination to Override Paging on a JMS Template
Follow these directions if you want to override a template's settings and enable or disable paging on a specific destination.
Under JMS Servers, expand a server instance that is already configured for paging.
Click the Destinations node. The right pane shows all of the server's topics and queues.
Click the topic or queue that you want to configure for paging. The right pane shows the topics or queues associated with the server instance.
On the Thresholds & Quotas tab, configure the Bytes Paging Enabled and/or Messages Paging Enabled attributes on the destination according to how you want to override the JMS template for the destination.
To disable paging for the destination, select False in the Bytes Paging Enabled and/or the Messages Paging Enabled list boxes.
To enable paging for the destination, select True in the Bytes Paging Enabled and/or the Messages Paging Enabled list boxes.
Click Apply to save the new bytes and/or messages paging values.
Repeat steps 2-5 to configure paging for additional JMS destinations on the same server instance.
Once all of your destinations are configured for paging, then reboot WebLogic Server to activate paging.
JMS Paging Attributes
The following sections briefly describe the paging attributes available with WebLogic Server JMS.
JMS Server Paging Attributes
Table 9-4 describes the paging attributes that you define when configuring paging on a JMS Server. For detailed information about other JMS Server attributes, and the valid and default values for them, see "JMS Server" in the Administration Console Online Help.
Table 9-4 JMS Server Attributes
Attribute
Description
Bytes Paging Enabled
If the Bytes Paging Enabled check box is not selected (False), then server bytes paging is explicitly disabled.
If the Bytes Paging Enabled check box is selected (True), a paging store has been configured, and both the Bytes Threshold Low and Bytes Threshold High attributes are greater than -1, then server bytes paging is enabled.
If either the Bytes Threshold Low or Bytes Threshold High attribute is undefined, or defined as -1, then server bytes paging is implicitly disabled—even though the Bytes Paging Enabled check box is selected (True).
Messages Paging Enabled
If the Messages Paging Enabled check box is not selected (False), then server messages paging is explicitly disabled.
If the Messages Paging Enabled check box is selected (True), a paging store has been configured, and both the Messages Threshold Low and Messages Threshold High attributes are greater than -1, then server messages paging is enabled.
If either the Messages Threshold Low or Messages Threshold High attribute is undefined, or defined as -1, then server paging is implicitly disabled—even though the Messages Paging Enabled check box is selected (True).
Paging Store
The name of the persistent store where non-persistent messages are paged. A paging store cannot be the same store used for persistent messages or durable subscribers.
Two JMS servers cannot use the same paging store; therefore, you must configure a unique paging store for each server.
JMS Template Paging Attributes
Table 9-5 describes the paging attributes that you define when configuring paging on JMS templates for destinations. For detailed information about other JMS template attributes, and the valid and default values for them, see "JMS Template" in the Administration Console Online Help.
Table 9-5 JMS Template Attributes
Attribute
Description
Bytes Paging Enabled
If the Bytes Paging Enabled check box is not selected (False), then destination-level bytes paging is disabled for the JMS template's destinations—unless the destination setting overrides the template.
If the Bytes Paging Enabled check box is selected (True), a paging store has been configured for the JMS Server, and both the Bytes Threshold Low and Bytes Threshold High attributes are greater than -1, then destination-level bytes paging is enabled for the JMS template's destinations—unless the destination setting overrides the template.
If no value is defined in the JMS Template MBean, then the value defaults to False and bytes paging is disabled for the JMS template's destinations.
Messages Paging Enabled
If the Messages Paging Enabled check box is not selected (False), then destination-level messages paging is disabled for the template's destination—unless the destination setting overrides the template.
If the Messages Paging Enabled check box is selected (True), a paging store has been configured for the JMS Server, and both the Messages Threshold Low and Messages Threshold High attributes are greater than -1, then destination-level messages paging is enabled for this destination—unless the destination setting overrides the template.
If no value is defined in the JMS Template MBean, then the value defaults to False and messages paging is disabled for the template's destinations.
JMS Destination Paging Attributes
Table 9-6 describes the attributes that you define when configuring paging on destinations. For detailed information about other JMS destination attributes, and valid and default values for them, see "JMS Destination" in the Administration Console Online Help.
Table 9-6 JMS Destination Attributes
Attribute
Description
Bytes Paging Enabled
If Bytes Paging Enabled is set to False, then destination-level bytes paging is disabled for this destination.
If Bytes Paging Enabled is set to True, a paging store has been configured for the JMS Server, and both the Bytes Threshold Low and Bytes Threshold High attributes are greater than -1, then destination-level bytes paging is enabled for this destination.
If Bytes Paging Enabled is set to Default, then this value inherits the template's value—if a template is specified. If no template is configured for the destination, then the Default value is equivalent to False.
Messages Paging Enabled
If Messages Paging Enabled is set to False, then destination-level messages paging is disabled for this destination.
If Messages Paging Enabled is set to True, a paging store has been configured for the JMS Server, and both the Messages Threshold Low and Messages Threshold High attributes are greater than -1, then destination-level messages paging is enabled for this destination.
If Messages Paging Enabled is set to Default, then this value inherits the template's value—if a template is specified. If no template is configured for the destination, then the Default value is equivalent to False.
Note: If server paging is enabled, and destination-level paging is disabled for a given destination, than messages on the destination can still be paged if server paging is triggered. However, when destination-level paging is disabled for a given destination, then the destination's high thresholds will not force the destination to page out messages when they are exceeded.
Paging Threshold Attributes
Table 9-7 briefly describes the bytes and messages paging thresholds available with JMS servers, templates, and destinations. For detailed information about other JMS server, template, and destination attributes, and the valid and default values for them, see "JMS Server," "JMS Destination," and "JMS Template" in the Administration Console Online Help.
Table 9-7 Paging Threshold Attributes
Attribute
Description
Bytes Threshold High
Start paging when the number of bytes exceeds this threshold.
Bytes Threshold Low
Stop paging when the number of bytes falls back below this threshold.
Messages Threshold High
Start paging when the number of messages exceeds this threshold.
Messages Threshold Low
Stop paging when the number of messages falls back below this threshold.
The thresholds are defined for servers, templates, and destinations as follows:
If either bytes high/low threshold value is not defined (or is defined as -1), then the number of bytes is not used to determine when and what to page.
If either messages high/low threshold value is not defined (or is defined as -1), then the number of messages is not used to determine when and what to page.
A server or template/destination must have the Bytes/Messages Paging Enabled attribute set to True in order for paging to take place. If the thresholds are set, but paging is not enabled, messages are still logged on the server indicating threshold conditions.
Establishing Message Flow Control
With the WebLogic JMS flow control feature, you can enable a JMS server or destination to slow down message producers when it determines that it is becoming overloaded. Specifically, when a JMS server/destination exceeds its specified bytes or messages thresholds, it becomes armed and instructs producers to limit their message flow (messages per second).
Producers limit their production rate based on a set of flow control attributes configured for producers via the JMS connection factory. Starting at a specified flow maximum number of messages, a producer evaluates whether the server/destination is still armed at prescribed intervals (for example, every 10 seconds for 60 seconds). If at each interval, the server/destination is still armed, then the producer continues to move its rate down to its prescribed flow minimum amount.
As producers slow themselves down, the threshold condition gradually corrects itself until the server/destination is unarmed. At this point, a producer is allowed to increase its production rate, but not necessarily to the maximum possible rate. In fact, its message flow continues to be controlled (even though the server/destination is no longer armed) until it reaches its prescribed flow maximum, at which point it is no longer flow controlled.
Configuring Flow Control
Producers receive a set of flow control attributes from their session, which receives the attributes from the connection, and which receives the attributes from the connection factory. You configure the flow control attributes on the JMS connection factory via the Administration Console.
These attributes allow the producer to adjust its message flow. Specifically, the producer receives attributes that limit its flow within a minimum and maximum range. As conditions worsen, the producer moves toward the minimum; as conditions improve; the producer moves toward the maximum. Movement toward the minimum and maximum are defined by two additional attributes that specify the rate of movement toward the minimum and maximum. Also, the need for movement toward the minimum and maximum is evaluated at a configured interval.
To configure message flow control on a connection factory, follow these steps:
Expand the JMS node.
Click the Connection Factories node. The JMS Connection Factories table displays in the right pane showing all the connection factories defined in your domain.
Click the connection factory you want to establish message flow control for. A dialog displays in the right pane showing the tabs associated with modifying a connection factory.
On the Flow Control tab, define the attributes as described in following table:
Table 9-8 Flow Control Attributes
Attribute
Description
Flow Control Enabled
Determines whether a producer can be flow controlled by the JMS server.
Flow Maximum
The maximum number of messages per second for a producer that is experiencing a threshold condition.
If a producer is not currently limiting its flow when a threshold condition is reached, the initial flow limit for that producer is set to Flow Maximum. If a producer is already limiting its flow when a threshold condition is reached (the flow limit is less than Flow Maximum), then the producer will continue at its current flow limit until the next time the flow is evaluated.
Once a threshold condition has subsided, the producer is not permitted to ignore its flow limit. If its flow limit is less than the Flow Maximum, then the producer must gradually increase its flow to the Flow Maximum each time the flow is evaluated. When the producer finally reaches the Flow Maximum, it can then ignore its flow limit and send without limiting its flow.
Flow Minimum
The minimum number of messages per second for a producer that is experiencing a threshold condition. This is the lower boundary of a producer's flow limit. That is, WebLogic JMS will not further slow down a producer whose message flow limit is at its Flow Minimum.
Flow Interval
An adjustment period of time, defined in seconds, when a producer adjusts its flow from the Flow Maximum number of messages to the Flow Minimum amount, or vice versa.
Flow Steps
The number of steps used when a producer is adjusting its flow from the Flow Minimum amount of messages to the Flow Maximum amount, or vice versa. Specifically, the Flow Interval adjustment period is divided into the number of Flow Steps (for example, 60 seconds divided by 6 steps is 10 seconds per step).
Also, the movement (that is, the rate of adjustment) is calculated by dividing the difference between the Flow Maximum and the Flow Minimum into steps. At each Flow Step, the flow is adjusted upward or downward, as necessary, based on the current conditions, as follows:
The downward movement (the decay) is geometric over the specified period of time (Flow Interval) and according to the specified number of Flow Steps. (For example, 100, 50, 25, 12.5).
The movement upward is linear. The difference is simply divided by the number of steps.
Click Apply to store new attribute values.
For detailed information about other connection factory attributes, and the valid and default values for them, see "JMS Connection Factory" in the Administration Console Online Help.
Flow Control Thresholds
The attributes used for configuring bytes/messages thresholds are defined as part of the JMS server and JMS destination. Table 9-9 defines how these thresholds start and stop flow control on a JMS server and/or JMS destination.
Table 9-9 Flow Control Threshold Attributes
Attribute
Description
Bytes/Messages Threshold High
When the number of bytes/messages exceeds this threshold, the JMS server/destination becomes armed and instructs producers to limit their message flow.
Bytes/Messages Threshold Low
When the number of bytes/messages falls below this threshold, the JMS server/destination becomes unarmed and instructs producers to begin increasing their message flow.
Flow control is still in effect for producers that are below their message flow maximum. Producers can move their rate upward until they reach their flow maximum, at which point they are no longer flow controlled.
For detailed information about other JMS server and JMS destination attributes, and the valid and default values for them, see "JMS Server" and "JMS Destination" in the Administration Console Online Help.
Tuning a Distributed Destination
The following sections describe how to tune a distributed destination by configuring the Load Balancing and Server Affinity attributes on the JMS Connection Factory. For more information about configuring a distributed destination, see Configuring Distributed Destinations.
Configuring Message Load Balancing for a Distributed Destination
The Load Balancing Enabled attribute on the JMS Connection Factory —> Configuration —> General tab defines whether non-anonymous producers created through a connection factory are load balanced on a per-call basis. Applications that use distributed destinations to distribute or balance their producers and consumers across multiple physical destinations, but do not want to make a load balancing decision each time a message is produced, can turn off the Load Balancing Enabled attribute.
To ensure a fair distribution of the messaging load among a distributed destination, the initial physical destination (queue or topic) used by producers is always chosen at random from among the distributed destination members.
To configure load balancing on a connection factory:
Expand the JMS node.
Click the Connection Factories node. The JMS Connection Factories table displays in the right pane showing all the connection factories defined in your domain.
Click the connection factory on which you want to establish message load balancing. A dialog displays in the right pane showing the tabs associated with modifying a connection factory.
Define the Load Balancing Enabled attribute in the General tab.
Load Balancing Enabled = True For Queue.sender.send() methods, non-anonymous producers are load balanced on every invocation across the distributed queue members.
For TopicPublish.publish() methods, non-anonymous producers are always pinned to the same physical topic for every invocation, irrespective of the Load Balancing Enabled setting.
Load Balancing Enabled = False Producers always produce to the same physical destination until they fail. At that point, a new physical destination is chosen.
Anonymous producers (producers that do not designate a destination when created), are load-balanced each time they switch destinations. If they continue to use the same destination, then the rules for non-anonymous producers apply (as stated previously).
Configuring Server Affinity for a Distributed Destination
The Server Affinity Enabled attribute on the JMS Connection Factory —> Configuration —> General tab defines whether a WebLogic Server that is load balancing consumers or producers across multiple physical destinations in a distributed destination set, will first attempt to load balance across any other physical destinations that are also running on the same WebLogic Server.
Note: The Server Affinity Enabled attribute does not affect queue browsers. Therefore, a queue browser created on a distributed queue can be pinned to a remote distributed queue member even when Server Affinity is enabled.
To disable server affinity on a connection factory:
Expand the JMS node.
Click the Connection Factories node. The JMS Connection Factories table displays in the right pane showing all the connection factories defined in your domain.
Click the connection factory on which you want to disable server affinity. A dialog displays in the right pane showing the tabs associated with modifying a connection factory.
Define the Server Affinity Enabled attribute in the General tab.
Server Affinity Enabled = True A WebLogic Server instance that is load balancing consumers or producers across multiple physical destinations in a distributed destination set, will first attempt to load balance across any other physical destinations that are also running on the same WebLogic Server.
Server Affinity Enabled = False A WebLogic Server instance will load balance consumers or producers across physical destinations in a distributed destination set and disregard any other physical destinations also running on the same WebLogic Server.
A distributed destination is a set of physical destinations (queues or topics) that are called under a single JNDI name so they appear to be a single, logical destination to a client when the members of the set are actually distributed across multiple servers within a cluster, with each destination member belonging to a separate JMS server.
By enabling you to configure multiple physical queues and topics as members of a distributed destination, WebLogic JMS supports high availability and load balancing of the JMS destinations within a cluster. For instructions on using a distributed destination with your applications, see "Developing a WebLogic JMS Application" in Programming WebLogic JMS.
Guidelines for Configuring Distributed Destinations
You configure distributed JMS destinations through the Services —> JMS —> Distributed Destinations node. To facilitate the configuration process, these instructions are divided into procedures that address the following scenarios:
New implementations of WebLogic JMS with no physical destinations or existing configurations of WebLogic JMS that do not require previously configured destinations to be part of a distributed destination:
Configuration Best Practices for Distributed Destinations
To simplify the management and development of distributed destination applications, BEA recommends deploying a distributed destination consistently across the cluster by using similar configurations for each participating JMS server and it's associated physical destinations. This should include consistent configuration of JMS stores, message paging, error destinations, message/bytes quotas, and connection factories. For example, when persistent messaging is configured, you should ensure that each distributed member is associated with a similar JMS store, with regards to capacity and performance.
The recommended method for maintaining configuration consistency for distributed destination members is to use JMS templates, since they are the most reliable way to centralize any custom configuration that is common to each physical destination. For newly created distributed destination members configured using the Administration Console, use the JMS template that is automatically created for those members, as described in Automatic JMS Template Creation. And for a distributed destination created to represent existing physical destinations, use the JMS template associated with those physical destinations if one exists; otherwise, configure one, as described in Configuring JMS Templates.
Warning: To avoid application failure issues, consistent security permissions must be configured on each participating distributed destination member. For example, if one member of a distributed destination has different send restrictions than the other members, an application may sometimes be allowed to send to the distributed destination, and yet other times it may be forbidden.
When a distributed destination is created with new distributed topic or queue members through the Administration Console, a corresponding JMS template is automatically created with default attribute values for those members. The new JMS template appears under the JMS Templates node with the same name as the distributed destination. The thresholds, quotas, and other attributes for the distributed destination members can be reset using this template. For more information on using JMS templates, see Configuring JMS Templates.
JMS Server Removal Precaution
In a clustered configuration, untargeting or deleting a JMS server that is hosting a distributed destination member — without first manually deleting that member from the distributed destination configuration — can cause the configuration file (config.xml) to become unbootable. For instructions on deleting distributed destination members, see Deleting a JMS Distributed Queue Member and Deleting a JMS Distributed Topic Member.
Creating a Distributed Topic and Creating Members Automatically
Follow these steps to configure a distributed topic and automatically create its topic members on JMS servers that are part of a WebLogic Server cluster (for high availability) or on an single WebLogic Server instance that is not part of a cluster.
Expand the JMS node and the Distributed Destinations node.
Click the Configure a new Distributed Topic link in the right pane. A Configuration dialog shows the tabs associated with configuring a new distributed topic.
Define the attributes in the General tab according to the following table.
Table 9-10 Distributed Topic Attributes on the General Tab
Attribute
Description
Name
Uniquely identify the distributed topic within a WebLogic Server domain.
JNDI Name
Enter the name used to bind the distributed topic into the JNDI namespace. Applications use the JNDI Name to look up the distributed topic.
A distributed topic that does not have a JNDI Name can be referenced by passing the Name of the distributed destination to: javax.jms.TopicSession.createTopic().
On the Auto Deploy tab, indicate the WebLogic Server instances where you want the distributed topic members to be automatically created.
Click the Create members on the selected Servers (and JMS Servers) text link. An auto deploy dialog prompts you to select one of the following options:
Select a cluster at which to target the distributed topic, and then click Next.
or
Accept the None option to bypass this dialog so you can select an individual server or servers that are part of the cluster. (In this case, skip to Step 10).
If you selected a cluster, do the following to select WebLogic Server instances within the cluster:
All WebLogic Server instances that are members of the cluster and that are not already hosting a distributed topic are listed and are selected by default. To exclude a server instance from hosting the distributed topic, clear the corresponding check box.
Click Next to proceed to the next dialog.
Skip to Step 11 to select the JMS servers that are available on the selected WebLogic Servers for creating distributed topic members.
If you selected None on the Cluster dialog in Step 8, select a single WebLogic Server instance in the domain:
From the list box, select an individual server where you want to create a distributed topic member.
Click Next to proceed to the next dialog.
All JMS servers that are deployed on the selected WebLogic Server instances, and that are not already hosting a distributed topic, are listed and are selected by default. To exclude a JMS server from hosting the distributed topic member, clear the corresponding check box.
If there are no existing distributed topic members on the selected JMS servers, one new JMS Topic will be created on each JMS server and added as a member of the distributed topic.
Click Next to proceed to the final Auto Deploy dialog.
Click Apply to save your Auto Deploy selections.
Click the Configuration --> Members tab to view the topic members that were automatically created for the new distributed topic.
Expand the JMS —> Templates node to view the JMS template that was automatically created with the same name as the distributed topic.
Creating a Distributed Topic and Adding Existing Physical Topics as Members Manually
For existing implementations of WebLogic JMS that require previously configured destinations to be members of a distributed destination set, follow these steps to configure a distributed topic and manually add your existing physical topics as members:
Expand the JMS node and the Distributed Destinations node.
Click the Configure a new Distributed Topic link in the right pane. A Configuration dialog shows the tabs associated with configuring a new distributed topic.
Define the attributes in the General tab according to the following table.
Table 9-11 Distributed Topic Attributes on the General Tab
Attribute
Description
Name
Uniquely identify the distributed topic within a WebLogic Server domain.
JNDI Name
Enter the name used to bind the distributed topic into the JNDI namespace. Applications use the JNDI Name to look up the distributed topic.
A distributed topic that does not have a JNDI Name can be referenced by passing the Name of the distributed destination to: javax.jms.TopicSession.createTopic().
On the Thresholds & Quotas tab, define the following attributes for all of the distributed topic members:
Thresholds and quotas for messages and bytes (maximum number and high/low thresholds).
Whether or not bytes paging and/or messages paging is enabled on the distributed topic.
If a distributed topic member's underlying physical topic already has a JMS Template with configured thresholds and quotas, these attributes do not apply to that topic member. For more information about these attributes, see "JMS Distributed Topic -> Configuration -> Thresholds & Quotas" in the Administration Console Online Help.
Click Apply to store new attribute values.
Note: If you want to automatically create topic members on JMS servers that are part of a WebLogic Server cluster (for high availability) or on an single WebLogic Server instance that is not part of a cluster, see Creating a Distributed Topic and Creating Members Automatically.
On the Configuration -->Members tab, create distributed topic members for your existing physical topics.
Click the Configure a new Distributed Topic Member link in the right pane. A Configuration dialog shows the tabs associated with configuring a new distributed topic member.
Define the attributes in the General tab according to the following table.
Table 9-12 Distributed Topic Member Attributes on the General Tab
Attribute
Description
Name
Uniquely identify the distributed topic member within a WebLogic Server domain.
JMSTopic
Select the underlying physical topic that is associated with the distributed topic member.
Weight
Define the weight (that is, a measure of ability to handle message load) of the topic member with respect to other topic members in the distributed destination.
The random distribution load-balancing algorithm uses the weight assigned to the physical destinations to compute a weighted distribution for the set of physical destinations. For more information, see "Developing a WebLogic JMS Application" in Programming WebLogic JMS.
Click Create to create the new distributed topic member. The new member is added to the Distributed Topic table.
If necessary, repeat steps 8-10 to continue adding topic members to the distributed topic.
Creating a Distributed Queue and Creating Members Automatically
Follow these steps to configure a distributed queue and automatically create its queue members on JMS servers that are part of a WebLogic Server cluster (for high availability) or on an single WebLogic Server instance that is not part of a cluster.
Expand the JMS node and the Distributed Destinations node.
Click the Configure a new Distributed Queue link in the right pane. A Configuration dialog shows the tabs associated with configuring a new distributed queue.
Define the attributes in the General tab according to the following table.
Table 9-13 Distributed Queue Attributes on the General Tab
Attribute
Description
Name
Uniquely identify the distributed queue within a WebLogic Server domain.
JNDI Name
Enter the name used to bind the distributed queue into the JNDI namespace. Applications use the JNDI Name to look up the distributed queue.
A distributed queue that does not have a JNDI Name can be referenced by passing the Name of the distributed destination to javax.jms.QueueSession.createQueue().
Define the amount of time, in seconds, that a distributed queue member with messages, but which has no consumers, will wait before forwarding its messages to other queue members that do have consumers.
Click Create to create the distributed queue.
On the Thresholds & Quotas tab, define the following attributes for all of the distributed queue members:
Thresholds and quotas for messages and bytes (maximum number and high/low thresholds).
Whether or not bytes paging and/or messages paging is enabled on the distributed queue.
On the Auto Deploy tab, indicate the WebLogic Server instances where you want the distributed queue members to be automatically created.
Click the Create members on the selected Servers (and JMS Servers) text link. A dialog prompts you to select one of the following options:
Select a cluster at which to target the distributed queue, and then click Next.
or
Accept the None option to bypass this dialog so you can select an individual server that is not in a cluster. (In this case, skip to Step 10).
If you selected a cluster, do the following to select WebLogic Server instances within the cluster:
All servers that are members of the cluster, and which are not already hosting a distributed queue, are listed and are selected by default. To exclude a server from hosting the distributed queue, clear the corresponding check box.
Click Next to proceed to the next dialog.
Skip to Step 11 to select the JMS servers that are available on the selected WebLogic Servers for creating distributed queue members.
If you selected None on the Cluster dialog in Step 8, select a single WebLogic Server instance in the domain:
From the list box, select an individual server where you want to create the distributed queue member.
Click Next to proceed to the next dialog.
All JMS servers that are deployed on the selected WebLogic Servers, and which are not already hosting a distributed queue, are listed and are selected by default. To exclude a JMS server from hosting the distributed queue member, clear the corresponding check box.
If there are no existing distributed queue members on the selected JMS servers, one new JMS Queue will be created on each JMS server and added as a member of the distributed queue.
Click Next to proceed to the final Auto Deploy dialog.
Click Apply to save your Auto Deploy selections.
Click the Configuration --> Members tab to view the queue members that were automatically created for the new distributed queue.
Expand the JMS —> Templates node to view the JMS template that was automatically created with the same name as the distributed queue.
Creating a Distributed Queue and Adding Existing Physical Queues as Members Manually
For existing implementations of WebLogic JMS that require previously configured destinations to be members of a distributed destination set, follow these steps to configure a distributed queue and manually add your existing physical queues as members.
Expand the JMS node and the Distributed Destinations node.
Click the Configure a new Distributed Queue link in the right pane. A Configuration dialog shows the tabs associated with configuring a new distributed queue.
Define the attributes in the General tab according to the following table.
Table 9-14 Distributed Queue Attributes on the General Tab
Attribute
Description
Name
Uniquely identify the distributed queue within a WebLogic Server domain.
JNDI Name
Enter the name used to bind the distributed queue into the JNDI namespace. Applications use the JNDI Name to look up the distributed queue.
A distributed queue that does not have a JNDI Name can be referenced by passing the Name of the distributed destination to javax.jms.QueueSession.createQueue().
Define the amount of time, in seconds, that a distributed queue member with messages, but which has no consumers, will wait before forwarding its messages to other queue members that do have consumers.
Click Create to create the distributed queue.
On the Thresholds & Quotas tab, define the following attributes for all of the distributed queue members:
Thresholds and quotas for messages and bytes (maximum number and high/low thresholds).
Whether or not bytes paging and/or messages paging is enabled on the distributed queue.
If a distributed queue member's underlying physical queue already has a JMS Template with configured thresholds and quotas, these attributes will not apply to that queue member. For more information about these attributes, see "JMS Distributed Queue -> Configuration -> Thresholds & Quotas" in the Administration Console Online Help.
Click Apply to store new attribute values.
Note: If you want to automatically create queue members on JMS servers that are part of a WebLogic Server cluster (for high availability) or on an single WebLogic Server instance that is not part of a cluster, see Creating a Distributed Queue and Creating Members Automatically.
Click the Configuration --> Members tab to define the queue members for the distributed queue.
Click the Configure a new Distributed Queue Member text link in the right pane. A Configuration dialog shows the tabs associated with configuring a new distributed queue member.
Define the attributes on the General tab according to the following table.
Table 9-15 Distributed Queue Member Attributes on the General Tab
Attribute
Description
Name
Uniquely identify the distributed queue member within a WebLogic Server domain.
JMSQueue
Select the underlying physical queue that is associated with the distributed queue member.
Weight
Define the weight (that is, a measure of ability to handle message load) of the queue member with respect to other queue members in the distributed destination.
The random distribution load-balancing algorithm uses the weight assigned to the physical destinations to compute a weighted distribution for the set of physical destinations. For more information, see "Developing a WebLogic JMS Application" in Programming WebLogic JMS.
Click Create to create the new distributed queue member. The new member is added to the Distributed Queue table.
Repeat steps 8-10 to continue adding members to the distributed queue.
Creating a JMS Distributed Queue Member
Follow these steps to add an existing physical queue as a member of distributed queue.
Expand the JMS —> Distributed Destinations node. The Distributed Destinations table displays in the right pane showing all the distributed queues and topics.
Click the distributed queue that you want to add a member to. The Distributed Queue table shows all the distributed queue members that belong to the distributed queue.
Click the Configure a new Distributed Queue Member text link. A dialog shows the Configuration tab for configuring a new distributed queue member.
Define the configuration attributes for the distributed queue.
Uniquely identify the distributed queue member within a WebLogic Server domain.
Select the underlying physical queue that is associated with the distributed queue member.
Define the weight (that is, a measure of ability to handle message load) of the queue member with respect to other topic members in the distributed destination. For more information about load balancing for distributed destinations, see "Developing a WebLogic JMS Application" in Programming WebLogic JMS.
Click Create to create a distributed queue member with the name you specified in the Name field. The new member is added to the Distributed Queue Member table in the right pane.
Click Apply to save any changes you made.
Deleting a JMS Distributed Queue Member
Follow these steps to delete a member of distributed queue configuration, and if necessary, to delete the queue member's underlying physical queue. For example, you must first delete a queue member from a distributed destination when planning to untarget or delete the JMS server that is hosting the member; otherwise, simply untargeting or deleting the JMS server can cause the configuration file (config.xml) to become unbootable.
Expand the JMS —> Distributed Destinations node. The Distributed Destinations table displays in the right pane showing all the distributed queues and topics.
Click the distributed queue that you want to delete a member from. The Distributed Queue table shows all the distributed queue members that belong to the distributed queue.
Click the Delete icon in the row of the distributed queue member that you want to delete. A dialog prompts you to confirm your deletion request.
If you want to also remove the underlying physical queue, select the Also Delete check box.
Click Remove to delete the distributed queue member (and the underlying physical queue if selected).
The Distributed Queue table redisplays in the right pane. The distributed queue member is deleted from the Distributed Queue table.
Creating a JMS Distributed Topic Member
Follow these steps to add an existing physical queue as a member of distributed queue.
Expand the JMS —> Distributed Destinations node. The Distributed Destinations table displays in the right pane showing all the distributed queues and topics.
Click the distributed topic that you want to add a member to. The Distributed Topic table shows all the distributed topic members that belong to the distributed topic.
Click the Configure a new Distributed Topic Member text link. A dialog shows the Configuration tab for configuring a new distributed topic member.
Define the general configuration attributes for the distributed topic.
Uniquely identify the distributed topic member within a WebLogic Server domain.
Select the underlying physical topic that is associated with the distributed topic member.
Define the weight (that is, a measure of ability to handle message load) of the topic member with respect to other topic members in the distributed destination. For more information about load balancing distributed destinations, see "Developing a WebLogic JMS Application" in Programming WebLogic JMS.
Click Create to create a distributed topic member with the name you specified in the Name field. The new member is added to the Distributed Topic table in the right pane.
Click Apply to save any changes you made.
Deleting a JMS Distributed Topic Member
Follow these steps to delete a member of distributed topic, and if necessary, to delete the topic member's underlying physical topic. For example, you must first delete a topic member from a distributed destination when planning to untarget or delete the JMS server that is hosting the member; otherwise, simply untargeting or deleting the JMS server can cause the configuration file (config.xml) to become unbootable.
Expand the Distributed Destinations node. The Distributed Destinations table displays in the right pane showing all the distributed queues and topics.
Click the distributed topic that you want to delete a member from. The Distributed Topic table shows all the distributed topic members that belong to the distributed topic.
Click the Delete icon in the row of the distributed topic member that you want to delete. A dialog prompts you to confirm your deletion request.
If you want to also remove the underlying physical queue, select the Also Delete check box.
Click Remove to delete the distributed topic member (and the underlying physical topic if selected).
The Distributed Topic table redisplays in the right pane. The distributed topic member is deleted from the Distributed Topic table.
Deleting a Distributed Destination
If you need to delete an entire distributed destination, you must remove it in the following sequence:
Delete all the members of the distributed queue or distributed topic, as explained in the following sections:
Delete the distributed destination itself by expanding the JMS —> Distributed Destinations node, and then clicking the trash icon next to the distributed destination that you want to delete.
Note: You can only delete a distributed destination when all its members have been properly deleted.
You can delete the JMS template that is associated with the distributed destination. However, make sure that this template is not being used by other JMS servers or destinations. To delete a JMS Template, expand the JMS —> Templates node, and then click the trash icon in the row of the JMS template that you want to delete.
The following sections describe how to terminate a JMS application gracefully if a server fails and how to migrate JMS data after server failure.
Programming Considerations
You may want to program your JMS application to terminate gracefully in the event of a WebLogic Server failure. For example:
If a WebLogic Server Instance Fails and...
Then...
You are connected to the failed WebLogic Server instance
A JMSException is delivered to the connection exception listener. You must restart the application once the server is restarted or replaced.
You are not connected to the failed WebLogic Server instance
You must re-establish everything once the server is restarted or replaced.
A JMS Server is targeted on the failed WebLogic Server instance
A ConsumerClosedException is delivered to the session exception listener. You must re-establish any message consumers that have been lost.
Migrating JMS Data to a New Server
WebLogic JMS uses the migration framework implemented in the WebLogic Server core, which allows WebLogic JMS to properly respond to migration requests and bring a WebLogic JMS server online and offline in an orderly fashion. This includes both scheduled migrations as well as migrations in response to a WebLogic Server failure.
Once properly configured, a JMS server and all of its destination members can migrate to another WebLogic Server within a cluster.
You can recover JMS data from a failed WebLogic Server by starting a new server and doing one or more of the tasks in the following table:
If your JMS application uses. . .
Perform the following task. . .
Persistent messaging—JDBC Store
If the JDBC database store physically exists on the failed server, migrate the database to a new server and ensure that the JDBC connection pool URL attribute reflects the appropriate location reference.
If the JDBC database does not physically exist on the failed server, access to the database has not been impacted, and no changes are required.
Persistent messaging—File Store
Migrate the file to the new server, ensuring that the pathname within the WebLogic Server home directory is the same as it was on the original server.
Transactions
Migrate the transaction log to the new server by copying all files named <servername>*.tlog. This can be accomplished by storing the transaction log files on a dual-ported disk that can be mounted on either machine, or by manually copying the files.
If the files are located in a different directory on the new server, update that server's TransactionLogFilePrefix server configuration attribute before starting the new server.
Note: If migrating following a system crash, it is very important that the transaction log files be available when the server is restarted at its new location. Otherwise, transactions in the process of being committed at the time of the crash might not be resolved correctly, resulting in data inconsistencies.
All uncommitted transactions are rolled back.
Note: JMS persistent stores can increase the amount of memory required during initialization of WebLogic Server as the number of stored messages increases. When rebooting WebLogic Server, if initialization fails due to insufficient memory, increase the heap size of the Java Virtual Machine (JVM) proportionally to the number of messages that are currently stored in the JMS persistent store and try the reboot again.