|
| e-docs > WebLogic Server > Developing WebLogic Server Applications > WebLogic Server Deployment |
|
Developing WebLogic Server Applications
|
This release of WebLogic Server introduces a new deployment protocol, two-phase deployment, which helps prevent inconsistent deployment states across servers, especially clustered servers. See Two-Phase Deployment.
You can deploy an application using the WebLogic Server Administration Console, weblogic.Deployer utility, WebLogic Builder, or auto-deployment. These deployment tools are discussed in Deployment Tools and Procedures.
The following sections discuss WebLogic Server deployment:
The new two-phase deployment protocol helps to maintain domain consistency. In previous versions of WebLogic Server, when you deployed an application, the administration server sent a copy of the application file(s) to all the targeted servers, which then loaded the application. If deployment to any of those servers failed or partially failed, the entire deployment's state across its target servers became inconsistent.
In the current release of WebLogic Server, deployment first prepares the application across all target servers and then activates the application in a separate phase. If a deployment of an application fails in either the preparation or activation phase, then the cluster deployment is failed.
For information about using the earlier WebLogic Server deployment protocol, see Using WebLogic Server 6.x Deployment Protocol.
The new deployment protocol supports the following new features for deployed applications:
Stopping and restarting your Admin Server cancels pending deployment requests. If your are deploying to a cluster and one of the targeted servers in the cluster is down, an Admin Server restart will prevent the targeted server from receiving the deployment request when the targeted server comes back up.
Prepare Phase and Activate Phase
The two-phase model makes inconsistent deployment states in clusters less likely by confirming the success of the prepare phase before deploying the application on any targeted servers. A deployment that fails during the prepare phase will not enter the activation phase.
The prepare phase of deployment, the first phase, distributes or copies files and prepares the application and its components for activation, validating them and performing error checks on them. The purpose of the prepare phase is to ensure that the application and its components are in a state in which they can be reliably deployed.
The second phase, the activate phase, is the actual deployment, or activation, of the application and its component with the relevant server subsystem. After the activate phase, the application is made available to clients.
Deployment Order for Resources and Applications
By default, WebLogic Server deploys server-level resources (JDBC followed by JMS) before deploying applications and standalone modules, followed by startup classes. The order of startup class execution is configurable, as described in Ordering Startup Class Execution and Deployment.
Setting the Order of Applications
Applications are deployed in this order: connectors, then EJBs, then Web Applications. WebLogic Server 7.0 allows you to select the load order for applications. See the ApplicationMBean LoadOrder attribute in Application.
Ordering Components Within an Application
If the application is an EAR, the individual components are loaded in the order in which they are declared in the application.xml deployment descriptor. See Editing Enterprise Application Deployment Descriptors.
Ordering Startup Class Execution and Deployment
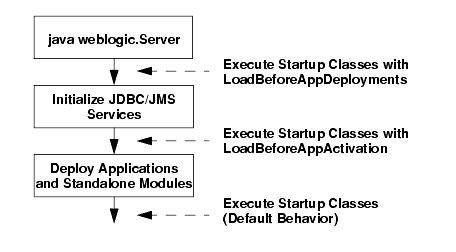
By default WebLogic Server startup classes are run after the server initializes JMS and JDBC services, and after applications and standalone modules have been deployed.
If you want to perform startup tasks after JMS and JDBC services are available, but before applications and modules have been activated, you can select the Run Before Application Deployments option in the Administration Console (or set the StartupClassMBean's LoadBeforeAppActivation attribute to "true").
If you want to perform startup tasks before JMS and JDBC services are available, you can select the Run Before Application Activations option in the Administration Console (or set the StartupClassMBean's LoadBeforeAppDeployments attribute to "true").
The following figure summarizes the time at which WebLogic Server executes startup classes.
Figure 5-1 Startup Class Execution
BEA provides the examples.jms.startup API code example which demonstrates how to establish a JMS message consumer from a WebLogic startup class. See the full Javadocs for StartupClassMBean for more information.
Note: WebLogic Server 7.0 optionally installs API code examples in WL_HOME\samples\server\src\examples, where WL_HOME is the top-level directory of your WebLogic Server installation. You can start the examples server, and obtain information about the samples and how to run them.
In this release of WebLogic Server, the staging mode controls whether or not, where, and by whom application files are copied for deployment. Staging means the copying of application files to the locations from which they will be deployed. Each server has a staging mode. Once an application is deployed, its staging mode cannot be changed. See Best Practices for Application Deployment for help on when to use staging modes.
A server in nostage mode will run applications deployed to it directly from their source directories. In this mode, the web application container detects changes to JSPs and servlets.
The stage mode means that the Administration Server copies source files to the staging directory on target servers when you perform a deployment operation. The target servers then initialize and run the application from this directory.
The deployment should be copied to a directory with the same name as the application name under each target server's staging directory.
The external stage mode means that the application will be run from a staging directory, to which an external entity is expected to distribute the files. This mode is useful in environments that are managed by third-party tools.
Note: In order to use either nostage or external_stage modes, the files to deploy must be accessible to the Administration Server machine. You can either copy the files to the Administration Server machine or place them on a shared directory that is available from the Administration Server machine.
The following table describes how staging attribute and path settings affect an application's deployment:
Configuring Staging Modes and Directories
By default, when you deploy an application to a managed server, it is staged to the target server staging area (ServerMBean.StagingDirectoryName) and deployed from there. You can disable staging using the ServerMBean.StagingMode attribute or the ApplicationMBean.StagingMode attribute. The ServerMBean.StagingMode attribute applies to all applications deployed to that server. It can be overridden by ApplicationMBean.StagingMode.
See Best Practices for Application Deployment for help on when to use staging modes.
For Javadoc on the attributes mentioned here, see Javadocs for WebLogic Classes.
You can configure the system to perform some common tasks described in the sections that follow.
Deploy Application from its Source Location
Configure the StagingMethod attribute on the application or on a specific server to be set to nostage. If you configure this on the application, you must do so when the application is configured in the server using the weblogic.Deployer tool.
This mode is useful for incremental development on a single server, and is also handy in a shared disk environment where multiple servers are using the same copy of the application.
Deploy Application from a Known Staging Area
Configure the StagingDirName attribute on each server to point to a well-known directory. You must place the actual EAR/JAR/WAR/RAR file in a directory having the name of the application within that directory.
Distribute Application Files to Managed Servers
If you set the StagingMode attribute to stage, WebLogic Server will copy the files from the source to the staging directory. To deploy using stage mode:
Deploy an Application Using external_stage Mode
external_stage mode requires that you either manually copy deployment files to Managed Servers or have an application or script copy the file for you. To deploy an application to Managed Servers using external_stage mode:
Deployment Tools and Procedures
WebLogic Server deployment tools provide interfaces to the deployment API described in Deployment Management API.
The deployment instructions provided in this document presume that you have created a functional J2EE application that uses the correct directory structure and contains the appropriate deployment descriptors. Deployment descriptors, which are text files formatted with XML tags, describe the contents of the application directory or archive. The J2EE specifications define standard, portable deployment descriptors for J2EE applications and their components. BEA defines additional WebLogic-specific deployment descriptors for deploying an application and its components in the WebLogic Server environment. For more information, see XML Deployment Descriptors.
The following is a list of WebLogic Server deployment tools:
The weblogic.Deployer utility is new in WebLogic Server 7.0 and replaces the earlier weblogic.deploy utility, which has been deprecated. The weblogic.Deployer utility is a Java-based deployment tool that provides a command-line interface to the WebLogic Server deployment API. This utility was developed for administrators and developers who need to initiate deployment from the command line, a shell script, or any automated environment other than Java.
This section describes how to use the weblogic.Deployer utility to perform the following tasks:
Deploying Using weblogic.Deployer Utility
To deploy an application or its components using the weblogic.Deployer utility:
% java weblogic.Deployer [options] [-activate|-deactivate|-remove|-cancel|-list] [files]
You can also list the specific -files in the archive that are to be deployed (or redeployed, or undeployed, or unprepared, or deactivated, or removed). The file list can include file names and directories relative to the root of the application. If you specify a directory, its entire subtree is deployed or redeployed.
weblogic.Deployer Actions and Options
Table 5-2 weblogic.Deployer Actions
weblogic.Deployer options include:
Table 5-3 weblogic.Deployer Options
Example Uses of the weblogic.Deployer Utility
Below are example usages of the weblogic.Deployer utility.
java weblogic.Deployer -adminurl http://admin:7001 -name app -source /myapp/app.ear -targets server1,server2 -activate
Deploying a New Application to a Cluster
java weblogic.Deployer -adminurl http://admin:7001 -name app -source /myapp/app.ear -targets cluster1 -activate -enforceClusterConstraints
Redeploying an Entire Application
java weblogic.Deployer -source /myapp/app.ear -adminurl http://admin:7001 -name app -activate
Notes: Ensure that you specify the -source option or provide the list of updated files. Without this, the operation will have no effect as the system will assume that nothing has been changed in the application.
When redeploying a Web Application, the system defaults to deploying the application on the Administration Server. To change the settings, use the -source and -targets options.
Deploying a Module Newly Added to an EAR
If you have added the module newmodule.war to the deployed application myapp.ear and updated the module in the application.xml file, you can deploy newmodule.war in myapp.ear using the following:
java weblogic.Deployer -username myname -password mypassword -name myapp.ear -activate -targets newmodule.war@myserver -source /myapp/myapp.ear
Note that this command will deploy the new module without redeploying the other modules in the application.
Redeploying Part of an Exploded Application, or Refreshing
java weblogic.Deployer -adminurl http://admin:7001 -name app -activate jsps/login.jsp
where jsps is a directory in the top level of the exploded web application. Note that partial redeployment is only supported on exploded WAR files. The path is relative to the root of the application as originally deployed. For example, if you modified the login.jsp file in a working directory, you would need to first copy the updated file into the appropriate source directory of the exploded application before entering the weblogic.Deployer command.
Deactivating an Application on All Active Targets, Making It Unavailable
java weblogic.Deployer -adminurl http://admin:7001 -name app -deactivate
Reactivating a Deactivated Application
java weblogic.Deployer -adminurl http://7001 -name app -activate
Removing an Application from All Targeted Servers
java weblogic.Deployer -adminurl http://admin:7001 -name app -targets server -remove
java weblogic.Deployer -adminurl http://admin:7001 -cancel -id tag
java weblogic.Deployer -adminurl http://admin:7001 -list
Deploying or Redeploying an Application to a Single Server
java weblogic.Deployer -activate -name ArchivedEarJar -source C:/MyApps/JarEar.ear -target server1
Deploying an Application to an Additional Server
java weblogic.Deployer -activate -name ArchivedEarJar -target server2
The wldeploy Ant task enables you to perform weblogic.Deployer functions using attributes specified in an Ant .xml file. You can use wldeploy along with other WebLogic Server Ant tasks to create a single Ant build script that:
See Using Ant Tasks to Configure a WebLogic Server Domain in the Administration Guide for more information about wlserver and wlconfig.
Note: The WebLogic Server Ant tasks are incompatible with Ant versions prior to 1.5. Also, if you use a version of Ant that is not included with WebLogic Server, you must specify the wldeploy task definition in your build.xml file, as described in Basic Steps for Using wldeploy.
Basic Steps for Using wldeploy
On Windows NT, execute the setWLSEnv.cmd command, located in the directory WL_HOME\server\bin, where WL_HOME is the top-level directory of your WebLogic Platform installation.
On UNIX, execute the setWLSEnv.sh command, located in the directory WL_HOME/server/bin, where WL_HOME is the top-level directory of your WebLogic Server installation.
<taskdef name="wldeploy" classname="weblogic.ant.taskdefs.management.WLDeploy"/>
prompt> ant
Sample build.xml Files for wldeploy
The following output shows a wldeploy target that deploys an application to a single WebLogic Server instance:
<target name="deploy">
   <wldeploy action="activate"
      source="${build}/ejb11_basic_statelessSession.ear" name="ejbapp"
      user="a" password="a" verbose="true" adminurl="t3://localhost:7001"
      debug="true" targets="myserver"/>
</target>
The following table describes the attributes of the wldeploy Ant task. For more information about the definition of various terms, see weblogic.Deployer Actions and Options
|
The deployment action to perform. Valid values are activate, deactivate, remove, cancel, list and unprepare. |
|||
|
Identification used for obtaining status or cancelling the deployment. |
|||
|
Specifies whether the deployment uses nostage deployment mode. |
|||
|
Specifies whether wldeploy returns immediately after making a deployment call (by deploying as a background task). |
|||
|
To avoid having the plain text password appear in the build file or in process utilities such as ps, first store a valid username and encrypted password in a configuration file using the weblogic.Admin STOREUSERCONFIG command. Then omit both the username and password attributes in your Ant build file. When the attributes are omitted, wldeploy attempts to login using values obtained from the default configuration file. If you want to obtain a username and password from a non-default configuration file and key file, use the userconfigfile and userkeyfile attributes with wldeploy. |
|||
|
Specifies whether the server is located on a different machine. This affects how filenames are transmitted. |
|||
|
Specifies the location of a user configuration file to use for obtaining the administrative username and password. Use this option, instead of the user and password attributes, in your build file when you do not want to have the plain text password shown in-line or in process-level utilities such as ps. Before specifying the userconfigfile attribute, you must first generate the file using the weblogic.Admin STOREUSERCONFIG command as described in STOREUSERCONFIG in the WebLogic Server Command-Line Reference. |
|||
|
Specifies the location of a user key file to use for encrypting and decrypting the username and password information stored in a user configuration file (the userconfigfile attribute). Before specifying the userkeyfile attribute, you must first generate the key file using the weblogic.Admin STOREUSERCONFIG command. |
|||
|
Specifies whether wldeploy displays verbose output messages. |
|||
|
This is a global attribute used by WebLogic Server Ant tasks. It specifies whether the task should fail if it encounters an error during the build. This attribute is set to true by default. |
WebLogic Server Administration Console
This section discusses deployment tasks performed through the Administration Console. The Console supports the same functionality as the weblogic.Deployer utility. It allows deployers to submit new or updated applications and to query the status and remove pending deployments.
Configuring J2EE Applications for Deployment Using the Administration Console
To configure a J2EE Application using the WebLogic Server Administration Console:
Deploying J2EE Applications with the Administration Console
To deploy a J2EE application using the WebLogic Server Administration Console:
Viewing Deployed Components with the Administration Console
To view a deployed component in the Administration Console:
Undeploying Components with the Administration Console
To undeploy a deployed component from the WebLogic Server Administration Console:
Undeploying a component does not remove the <component> name from WebLogic Server. The component remains undeployed for the duration of the Server session, as long as you do not change it once it has been undeployed. You cannot re-use the deployment name with the deploy argument until you reboot the server. You can re-use the deployment name to update the deployment, as described in the following section.
Updating Applications with the Administration Console
To update a deployed J2EE application:
To add a module to a deployed application and deploy the added module:
WebLogic Builder is a WebLogic Server tool for generating and editing deployment descriptors for J2EE applications. It can also deploy applications to single servers.
Auto-deployment is a method for quickly deploying an application on the administration server. It is recommended that this method be used only in a single-server development environment for testing an application. Use of auto-deployment in a production environment or for deployment of components on managed servers is not recommended.
If auto-deployment is enabled, when an application is copied into the \applications directory of the administration server, the administration server detects the presence of the new application and deploys it automatically (if the administration server is running). If WebLogic Server is not running when you copy the application to the \applications directory, the application is deployed the next time the WebLogic Server is started. Auto-deployment deploys only to the administration server
Note: Due to the strict file locking limitations of Windows NT, if your applications are exploded, all the components within your applications must also be exploded. In other words, WebLogic Server cannot support a JAR file within an exploded application or component.
Enabling and Disabling Auto-Deployment
You can run WebLogic Server in two different modes: development and production. You use development mode to test your applications. Once they are ready for a production environment, you deploy your applications on a server that is started in production mode.
Development mode enables a WebLogic Server to automatically deploy and update applications that are in the domain_name/applications directory (where domain_name is the name of a WebLogic Server domain). In other words, development mode lets you use auto-deploy.
Production mode disables the auto-deployment feature. Instead, you must use the WebLogic Server Administration Console or the weblogic.Deployer tool.
By default, a WebLogic Server runs in development mode. To specify the mode for a server, do one of the following:
If you use the startWebLogic startup script, edit the script and set the STARTMODE variable as follows:
STARTMODE = false enables deployment mode
STARTMODE = true enables production mode
If you start a server entering the weblogic.Server command directly on the command line, use the -Dweblogic.ProductionModeEnabled option as follows:
-Dweblogic.ProductionModeEnabled=false enables deployment mode
-Dweblogic.ProductionModeEnabled=true enables production mode
For more information on starting WebLogic Server in development and production modes, refer to "Starting and Stopping WebLogic Servers."
This is a convenience feature for deploying applications during development. It allows deploying of applications or individual J2EE modules to the administration server just by copying the deployment into a predefined auto-deployment directory. This directory is located under the domain directory, e.g., mydomain/applications.
Undeploying and Redeploying Archived Applications
An application or its component that was auto-deployed can be dynamically redeployed while the server is running. To dynamically redeploy a JAR, WAR or EAR file, simply copy the new version of the file over the existing file in the \applications directory.
This feature is useful for developers who can simply add the copy to the \applications directory as the last step in their makefile, and the server will then be updated.
If you delete the application from the \applications directory, the application will be undeployed and removed from the configuration.
Redeploying Applications in Exploded Format
You can also dynamically redeploy applications or components that have been auto-deployed in exploded format. When an application has been deployed in exploded format, the administration server periodically looks for a file named REDEPLOY in the exploded application directory. If the timestamp on this file changes, the administration server redeploys the exploded directory.
If you want to update files in an exploded application directory, do the following:
An exploded application contains a META-INF top-level directory; this contains the application.xml file.
An exploded Web application contains a WEB-INF top-level directory; this contains the web.xml file.
An exploded EJB application contains a META-INF F top-level directory; this contains the ejb-jar.xml file.
An exploded connector contains a META-INF top-level directory; this contains the ra.xml file.
Note: The REDEPLOY file works only for an entire deployed application or a deployed standalone module. If you have deployed an exploded Enterprise Application, the REDEPLOY file controls redeployment for the entire application—not for individual modules (for example, a Web Application) within the Enterprise Application. If you deploy a Web Application by itself as an exploded archive directory, the REDEPLOY file controls redeployment for the entire Web Application.
When the administration server detects the changed timestamp, it redeploys the contents of the exploded directory.
A deployment task is initiated through a DeployerRuntimeMBean—a singleton (an object for which only one instance exists) that resides on a WebLogic Administration Server. DeployerRuntimeMBean provides methods for activating, deactivating, and removing an application. These methods return a DeploymentTaskRuntimeMBean that encapsulates the request and provides the means for tracking its progress. DeploymentTaskRuntimeMBean provides ongoing status of the request through TargetStatus objects, one per target.
The WebLogic Server deployment management API is defined by the following WebLogic Server MBeans:
The deployment management API is asynchronous. The client must poll the status or utilize ApplicationMBean notifications to determine when the task is complete.
For more information about WebLogic Server deployment management APIs, see the weblogic.management.deploy Javadoc.
Best Practices for Application Deployment
The following are some best practices for deploying applications.
In an iterative development environment, it is most efficient to maintain all files in an exploded form and deploy the application directly from its source location.
If you are working in a single server environment (deploying only to the administration server), you can use directory-based auto deployment. In other words, you can simply place the exploded application in the mydomain/applications directory to deploy it. For more information, see Auto-Deployment in this document.
Testing Changes to Web Applications or Web Services
Testing Changes to EJBs and Resource Adapters
To incorporate changes made to the EJB or Resource Adapter deployment descriptors, modify the META-INF/REDEPLOY file in the mydomain/applications directory, so that the auto deployer detects the change. This redeploys the EJB or Resource Adapter.
Note: If the EJB is part of an enterprise application, the entire application is redeployed.
If you are working in a multiple server environment, it is recommended that you use the weblogic.Deployer tool to deploy applications.
Testing Changes in a Multiple Server Environment
If you have made any changes to application files, you must communicate these changes to the server using the weblogic.Deployer tool. This allows the changes to be incorporated into the deployed application.
The following steps illustrate how you communicate changes made to a Web application to the server. The steps are identical for any type of application. However, you should note that if an EJB is part of an enterprise application, the entire application and application components are redeployed.
java weblogic.Deployer -adminurl http://adminAddr:7001 -name webapp -activate -source /myapp/webapp -targets managedserver1,managedserver2
java weblogic.Deployer -adminurl http://adminAddr:7001 -name webapp -activate jsps/login.jsp
In the above example, login.jsp is distributed and incorporated to all servers where the Web application is deployed.
File Structures for Exploded Applications
For more information about packaging deployable units, see WebLogic Server Application Packaging and Classloading.
If a directory contains multiple modules but no overall application descriptor file, each module should be contained in its own directory and have its own descriptor files. In other words, in non-archived applications each module must be independent of the other modules, just as in an archive.
sourceDirectory\
               \Module1
                     WEB-INF\
                             web.xml
                             Module1FilesDir
               \Module2
                     META-INF\
                             ejb-jar.xml
                             Module2FilesDir
For exploded non-EAR deployments, the source directory should always be either A or B:
A.
 \Module1
         WEB-INF\
                web.xml
                Module1FilesDir
 \Module1
         WEB-INF\
                web.xml
                Module1FilesDir
 \Module2
         META-INF\
                ejb-jar.xml
                Module2FilesDir
 \Module3
         META-INF\
                ra.xml
                Module3FilesDir
The following directory structures are not supported and do not make sense:
sourceDirectory/
META-INF/ejb-jar.xml
WEB-INF/web.xml
webfiles/
ejbfiles/
moduledir/
WEB-INF/web.xml
webfiles
ejb.jar
moduledir/
WEB-INF/web.xml
web1files
web2/WEB-INF/web.xml
web2/webfiles
Use the system defaults of -nostage for administration server and -stage for managed servers, unless:
You should only use auto-deployment in development setups for single server deployments.
Exploded Enterprise Applications
Exploded deployments with multiple modules should always have an application descriptor defined in META-INF/application.xml.
If you redeploy a module or file to which other modules in the application have references, you must also redeploy the referencing modules.
Sharing Classes between Components That Are Part of an Enterprise Application
To share classes between components that are part of an Enterprise Application, use the MANIFEST classpath. A JAR utility containing the shared classes is packed in the EAR next to the other component archives. Each component needing to use these classes creates a Class-Path entry in a file named META-INF/MANIFEST.MF within the component's archive. This scheme is part of the J2EE standard and should be used if you require portability between application servers.
For more information, refer to Manifest Class-Path.
Using WebLogic Server 6.x Deployment Protocol
By default, the two-phase deployment protocol is used for deploying new applications by all available deployment tools. The current administration server still supports the WebLogic Server 6.x deployment protocol, and this protocol is used when:
See Deploying Applications in the WebLogic Server 6.1 Administration Guide.
Note: When using the WebLogic Server 6.x deployment protocol, a server instance creates a .wlnotdelete directory to manage the deployment process. You should not delete this directory or its contents.
Updating to Two Phase Deployment
To configure an application that uses 6.x protocol to start using the two-phase protocol, remove the application from the domain—removing its configuration—and then re-activate the application, as follows:
java weblogic.Deployer -adminurl http://admin:7001 -name app -targets server -remove
java weblogic.Deployer -activate -name ArchivedEarJar -source C:/MyApps/JarEar.ear -target server1
The application will redeploy using the new protocol.
Additional Deployment Documentation
For more information on WebLogic Server deployment, see the following documentation:
|
How to use WebLogic Builder to edit and generate XML deployment descriptor files for J2EE applications and their components. |
|
|
Understanding Cluster Configuration and Application Deployment |
|

|

|

|