If you haven't started Workshop for WebLogic yet, follow these steps to do
so.
... on Microsoft Windows
If you are using a Windows operating system, follow these instructions.
From the Start menu, click All Programs > BEA
Products > Workshop for WebLogic Platform 10.0
...on Linux
If you are using a Linux operating system, follow these instructions.
Run BEA_HOME/workshop_10.0/workshop4WP/workshop4WP
In the Workspace Launcher dialog, click the Browse
button. (If Workshop for WebLogic is already running, select File > Switch
Workspace. )
In the Select Workspace Directory dialog, navigate to a
directory of your choice and click Make New Folder.
Name the new folder JSFTutorial, press the
Enter key and click OK.
In the Workspace Launcher dialog, click OK.
Close the Welcome view.
To Create a New Web Project and a New EAR Project
Right-click anywhere within the Project Explorer view
and select New >
Dynamic Web Project.
Click Next.
In the Project Name field, enter JSFWeb.
Place a checkmark next to Add project to an EAR.
Confirm that the field EAR Project Name shows the value:
JSFWebEAR.
Click Next.
Place a check mark next to the facet JSF (circled in red
in the image below).
Click Finish.
When you are asked to switch to the J2EE perspective, in the Open
Associated Perspective dialog, click Yes.
To Import Files into the Web Project
In this step you will import control files into your web project, control files
that provide access to customer data.
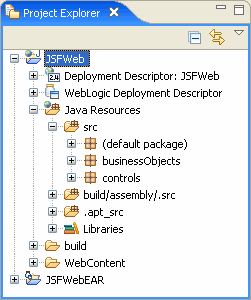
On the Project Explorer tab, open the nodes JSFWeb
> Java Resources.
Open Windows Explorer (or your operating system's equivalent) and navigate
to the directory BEA_HOME/workshop_10.0/
workshop4WP/eclipse/plugins/com.bea.workshop.product.wl.samples_1.0.0/tutorials/resources/jsf/ and
locate the folders businessObjects and controls.
Drag the folders businessObjects and controls
into the Project Explorer tab directly onto the folder JSFWeb/Java
Resources/src.
Confirm that the following directory and file structure exists before proceeding.
To Add a WebLogic Server
In this step you will point to a server where you can deploy your application.
Right-click anywhere within the Servers tab, and select
New > Server.
In the New Server dialog, select BEA Systems
>
BEA WebLogic Server v10.0.
Click Next.
In the Domain home field, use the pulldown to set the
domain to BEA_HOME/wlserver_10.0/samples/domains/workshop.
(Note: if you are using a newly created server domain for the JSF tutorial,
then use the Browse button to navigate to that new server domain, e.g.,
BEA_HOME/user_projects/domains/base_domain.)
Click Next.
In the Available projects column, select JSFWebEAR.
Click the Add button to move the selected project to the Configured
projects column.
Click Finish.
A new server is added to the Servers tab.
You can use the Servers tab to manage your servers
and project deployments as you develop your applications.
To deploy or undeploy a project from a server,
right-click the server and select Add and Remove Projects.