Step 1: Create an EAR Project and a Web Application Project
In this step you will create two projects: an EAR project and a Web Application
project. These are the basic building blocks required for designing and testing
a new Workshop for WebLogic web application.
An EAR project configures and stores resources of other components that are
part of it, components such as web applications, EJBs, databases, etc. An EAR
project has two main roles: (1) It is a composite project made up of other
projects, such as web projects, EJB projects, and others. (2) It is a resource
project containing library modules and JARs which other projects utilize.
The web application project you create belongs to the EAR project.
To Start Workshop for WebLogic and Create a New Workspace
If you haven't started Workshop for WebLogic yet, use these steps to do so.
... on Microsoft Windows
If you are using a Windows operating system, follow these instructions.
From the Start menu, click All Programs > BEA
Products > Workshop for WebLogic Platform 10.0
...on Linux
If you are using a Linux operating system, follow these instructions.
Run BEA_HOME/workshop_10.0/workshop4WP/workshop4WP
(If you have already started Workshop for WebLogic, select File >
Switch Workspace.)
In the Workspace Launcher dialog, click the Browse
button.
In the Select Workspace Directory dialog, navigate to a
directory of your choice and click Make New Folder.
Name the new folder WebAppTutorial, press
the Enter key and Click OK.
In the Workspace Launcher dialog, click OK.
Close the Welcome view.
To Create a New Web Project and a New EAR Project
Right-click anywhere within the Project Explorer view
and select New >
Dynamic Web Project.
Click Next.
In the Project Name field, enter CustomerCare
Place a check mark next to Add project to an EAR.
Confirm that the EAR Project Name is CustomerCareEAR.
Click Finish.
When
your web project is first created, it is displayed in the Project
Explorer
view by default. The Project Explorer view shows a logical view of your workspace
and its resources.
The image to the right shows your workspace in the Navigator view. To switch
to the Navigator view select Window > Show View > Navigator.
The Navigator view shows your workspace as it is saved on disk.
There are now two projects in your workspace: the web project CustomerCare
and the EAR project CustomerCareEAR. The two projects
appear as sibling projects, since they are on the same level of the
directory tree. But when the projects are compiled and deployed, the EAR project
CustomerCareEAR is really a container project for the web project customerCare.
The CustomerCare Web Project
The .settings folder: Any directory that begins with a
"." contains metadata generated by Workshop for WebLogic.
You should not edit the files in this directory. The .settings folder contains
the preferences selected for each project.
The build folder contains .class files and other compiled
code. You should not edit the files in this directory.
The src folder contains the web project's JAVA files. These
files are user editable.
The WebContent folder contains the web project's JSP files
and other web-related resources, such as configuration files (in the WEB-INF
folder).
The CustomerCareEAR EAR Project
The .settings and build folders are described
above.
The EarContent folder contains configuration files for
the EAR project.
EarContent/APP-INF/lib: Any JARs in this directory are available
to any project referenced by the EAR project.
EarContent/META-INF/application.xml: Lists
the modules referenced by the EAR, for example, the web application customerCare.
EarContent/META-INF/weblogic-application.xml: List the library
modules referenced by the EAR project. These resources can be used by any
module referenced by the EAR.
To Import Files into Your Web Project
In this step you will import control files into your web project, control
files that provide access to a customer database. An alternative design would
locate these controls in a utility project (File > New > Project > J2EE >
Utilty Project), which would make the controls available to all projects in
the EAR. But for the sake of simplicity and expediency we have placed
the controls directly in the web project.
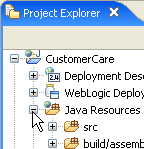
On the Project Explorer view, open the nodes CustomerCare
> Java Resources.
Open Windows Explorer (or your operating system's equivalent) and navigate
to the directory BEA_HOME/workshop_10.0/
workshop4WP/eclipse/plugins/com.bea.workshop.product.wl.samples_1.0.0/tutorials/resources/webApp/ and locate the controls and model folder.
Watch Out! Don't open the webService folder
by mistake!
Drag the folders controls and model into
the Project Explorer tab and drop them directly onto the
folder customerCare/Java Resources/src.
Before proceeding, confirm that the following directory and file structure
exists.
To Add a WebLogic Server Domain
In this step you will point to a server where you can deploy your application.
Note: if you have executed this tutorial before your server
may already contain previous deployments of the tutorial-related projects. Before
proceeding, it is recommended that you either (1) remove
previous tutorial code from your server or (2) create
a new server domain.
Confirm that you are in the J2EE perspective (Window > Show
Perspective > J2EE ).
Click the Servers tab.
Right-click anywhere within the Servers tab, and select
New > Server.
In the New Server dialog, select BEA Systems
>
BEA WebLogic v10.0 Server. Click Next.
In the Domain home dropdown, select the location BEA_HOME/wlserver_10.0/samples/domains/workshop.
(Note: if you are using a newly created server domain for this tutorial,
then use the Browse button to navigate to that server domain,
for example, BEA_HOME/user_projects/domains/base_domain.)
Click Next.
In the Available projects column, select CustomerCareEAR.
Click the Add button to move the select project to the Configured
projects column.
Click Finish.
A new server is added to the Servers tab.
You can use the Servers tab to manage your servers
and project deployments as you develop your applications.
To deploy or undeploy a project from a server,
right-click the server and select Add and Remove Projects.
For more properties, double-click a server.
Click one of the following arrows to navigate
through the tutorial:
 When
your web project is first created, it is displayed in the Project
Explorer
view by default. The Project Explorer view shows a logical view of your workspace
and its resources.
When
your web project is first created, it is displayed in the Project
Explorer
view by default. The Project Explorer view shows a logical view of your workspace
and its resources.