Step 4: Test the Web Service
In this section, you will define and start a server and then use the server's built-in test functionality to test the web service you created in the preceding sections.
Workshop for WebLogic creates a server as part of installation and
you will use this local server for testing the application you will create through this tutorial. You must set up the server before you can test any applications.
To Create the Server
- In the J2EE perspective, the following views should be visible as
tabs at the bottom (by default) of the IDE: Problems, Tasks, Properties, Servers, Database Explorer, Snippets.
- Click the Servers view tab, right-click in its window,
then click New > Server.

- In the New Server dialog, under Select the server
type, confirm that BEA Systems > BEA
WebLogic Server v10.0 is selected, then click Next.
- In the Domain home box, ensure that the dropdown shows the domain directory as the following,
where <BEA_HOME> is the location of your BEA installation:
<BEA_HOME>/wlserver_10.0/samples/domains/workshop
- Click Finish.
To Assign the Server to
the EAR Project
Now you'll associate the server you just created with the EAR project. The
EAR project, which contains your web service project, will be deployed to it.
- In the Package Explorer, right-click ServicesWebEAR,
then click Properties.
- In the Properties dialog, in the left pane, select Server.
In the right pane, in the Default server box, select BEA
WebLogic Server v10.0.
- Click OK.
To Start the Server
- In the Servers view, right-click BEA WebLogic
Server v10.0, then click Start.
Note: If you are working through this tutorial for a second time, you must remove
previous, duplicate projects (modules) from the server
To Test a Web Service
A web service does not do anything unless a request is received from a client. For testing your web service, Workshop for WebLogic provides a test client through which you can send messages to the service and review the response message. The test client runs in the IDE as an editor window.
To test the web service:
- In the Package Explorer view, expand the services
package.
- Right-click MailingListService.java and
select Run As > Run On Server.
- In the Run On Server dialog, select the Set server as project
default check box. This will reduce the number of steps in the next part
of this tutorial, as the IDE will remember your server choice.
- Click Finish.
- After the server starts and the application is deployed (note the status bar in the lower right corner of the IDE), the IDE displays the test client as shown here:
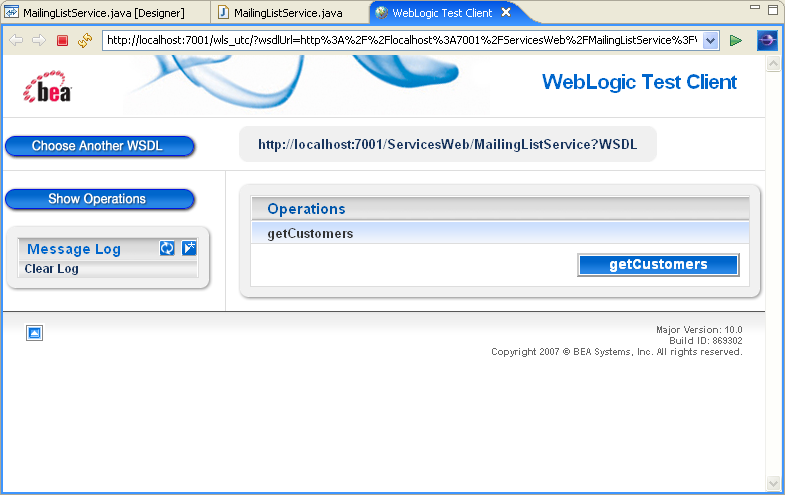
This web service has only one operation (getCustomers).
If there were input values required by getCustomers,
there would be input fields that would allow you to specify values. Clicking
the getCustomers button sends a request message to
the web service.
- Click the getCustomers button now to invoke the getCustomers
method.
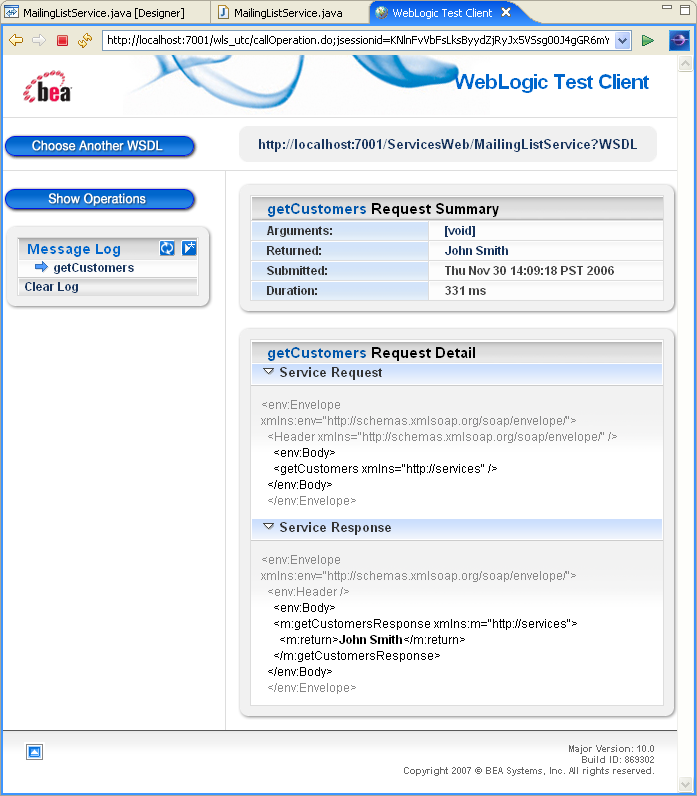
The test client displays the results of invoking the web service operation
(including the returned value) and also the detail of the SOAP-encoded request
that was sent to the web service and the response that was received, including
the string returned by the getCustomers operation/method:
"John Smith".
- You can test your web service operation again by clicking Show
Operations at the top left corner. You can also examine the automatically
generated WSDL (Web Service Description Language) file by clicking the
link at the top of the Test Client page.