This topic describes how to set up and use a WebLogic Server with the Workshop family of products. The topics discussed here are:
- Defining the Server inside the IDE
- Updating the Server Definition
- Deploying Applications Manually
- Using Remote Debugging
- Troubleshooting
Defining the Server Inside the IDE
To define a server:
- Before you run an application for the first time, the Run > Debug command allows you to define your server.
- To define a new server, right click on J2EE Server and choose New.
- Specify a name for the server in the Name field.
This name is for internal use in the IDE only.
Click New to specify the server type.

- Select from the available WebLogic Server versions: either v10.0, v8.1,
v9.0/9.1, or 9.2.
Click Next to continue.
- If you selected BEA WebLogic Sever v10.0 or 9.2 , in
the Domain
home field, either (1) select an available workshop
domain from the dropdown list, (2) browse to another previous installed
domain home, or (3) create a new domain by clicking the link.
Click Finish.
If you selected BEA WebLogic Server v9.0 and v9.1 or v8.1, in the JRE field, select a value from the dropdown list. Note that you must specify the full JDK (not just the JRE that is the default).
Fill in the Application Server Directory field by browsing to a previously installed 9.0/9.1 or 8.1 WebLogic home.
Click Next.
The next screen gives you an opportunity to change common settings such as the domain, adminstrator's username/password, and the debug port.
Click Finish. - You will be returned to the Debug dialog. Click
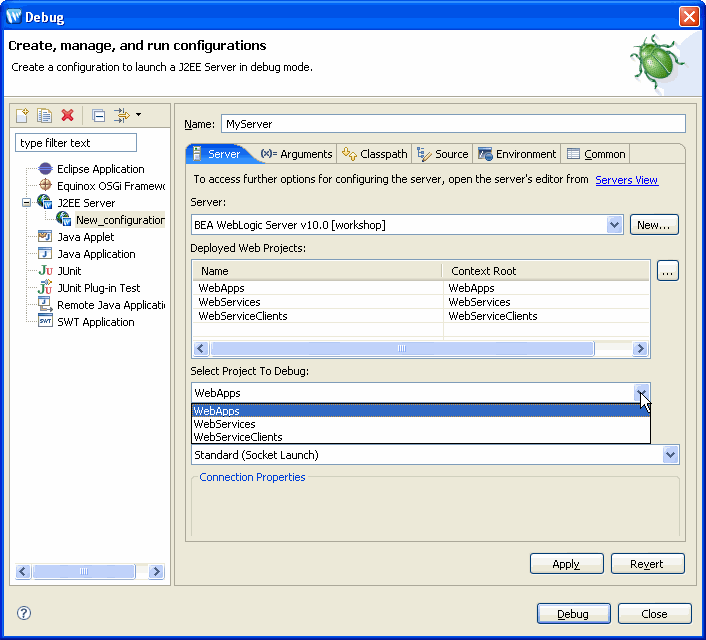
 (beside the Deployed Projects box) to specify which projects will be deployed to this server.

- After you click Finish, the projects will be listed in the Deployed Projects box.
For the Select Project to Debug field, use the pull-down to specify which project will be debugged.
Because of the possibility of name space collisions, when debugging JSP's, only one project at a time can be debugged on the server. If you wish to debug JSP's in another project, you must first change the Select Project to Debug field. For details on switching projects when debugging JSP's see Special Considerations When Debugging JSPs.
- Note the Connection Type default setting is for local servers that are managed within the IDE.
- Click Apply and the server definition is complete. A new server entry appears in Servers view.
- If you wish to debug your application at this point, click Debug to run the selected application in debug mode. Otherwise, click Close.
- You may also also update the server definition to specify deployment and runtime options.


Updating the Server Definition
To update the definition for a server:
- Double-click on the server name in the Servers view
to see the Server Overview.

From Server Overview you can view and set deployment and runtime properties.
Note the Run module directly from the workspace option. This is a WTP feature that allows you to run your application in "exploded" mode where the application runs directly from your workspace. If you wish your application compiled into a WAR file and deployed, you must uncheck this option.
Click here for information on manual deployment.
- For WebLogic Server versions 8.1 and 9.0/9.1, you can click on the Properties tab
to alter the
properties that were set when the server was configured.

Hot Deployment
Workshop supports hot deployment of JSPs and other artifacts like Struts actions.
If you update a JSP, changes are automatically published to the server and you can simply click the Refresh button to see them running live on the server. Other changes are automatically redeployed and the application is restarted as necessary.
Deploying Applications Manually (for versions 8.1 and 9.0/9.1 only)
To deploy an application manually requires that you create an alternate configuration. For information on how to create an alternate configuration, consult your server documentation.
To deploy the alternate configuration:
- Double click the server name in the Servers view. The Server Overview will be displayed.
Manual deployment is only allowed when the Run module directly from the workspace option is selected.
For WebLogic Server 8.1, you will see this screen that allows you to specify a custom configuration XML file OR to use the existing config.xml without updating.

For WebLogic Server 9.0/9.1, you will see this screen that allows you to use the existing config.xml without updating. For WebLogic Server 9.0/9.1, you cannot specify the name of a custom configuration file. When you click on Manual deployment with existing configuration, the field specifying the config.xml file name is read-only and the Select button is disabled.

Using Remote Debugging
To debug on a remote server (or on a local server which is started and managed outside of the IDE), you must configure the server for remote debugging, deploy the application manually and then define the remote server's address.
Step 1: Configuring the Server to Allow Remote Debugging
Configuring the server for remote debugging is a feature of the server. This information is provided for your convenience. For definitive documentation, consult your server documentation.
WebLogic Server 8.1
Workshop uses standard JPDA and self-generated line maps. The JSR-45 debug information has to be disabled. The class debug information has to be enabled by placing the following attributes in the application weblogic.xml file:
<?xml version="1.0" encoding="UTF-8"?>
<!DOCTYPE weblogic-web-app PUBLIC "-//BEA Systems, Inc.//DTD Web Application 8.1//EN" "http://www.bea.com/servers/wls810/dtd/weblogic810-web-jar.dtd" >
<weblogic-web-app>
 <jsp-descriptor>
        <jsp-param>
            <param-name>compileFlags</param-name>
            <param-value>-g</param-value>
        </jsp-param>
        <jsp-param>
            <param-name>keepgenerated</param-name>
             <param-value>true</param-value>
        </jsp-param>
 </jsp-descriptor>
</weblogic-web-app>
Add the following line to the script file used to start Weblogic Server, e.g. startWeblogic.cmd
set JAVA_OPTIONS=-Xdebug -Xnoagent -Xrunjdwp:transport=dt_socket,address=8453,server=y,suspend=n
The Weblogic Server console should display the message:
Listening for transport dt_socket at address: 8453
WebLogic 9.2 and 10.0
Workshop uses standard JPDA and self-generated line maps. The class debug information has to be enabled by placing the following attributes in the application weblogic.xml file:
<?xml version="1.0" encoding="UTF-8"?>
<weblogic-web-app xmlns="http://www.bea.com/ns/weblogic/90">
    <jsp-descriptor>
        <keepgenerated>true</keepgenerated>
<working-dir>C:\MyApp\jsp-servlet\struts-example_1_1\work</working-dir>
        <backward-compatible>true</backward-compatible>
		<debug>true</debug>
    </jsp-descriptor>
    <context-root>/</context-root>
</weblogic-web-app>
Step 2: Preparing the Application for Remote Debugging
Before attempting to debug an application on a remote server, you must:
- Build the application (not required if Build Automatically is set).
- Deploy the application manually. You can deploy as an exploded application or use a WAR or EAR file to deploy.
- Clear, the work/temp directory to remove files without debug information.
- Make sure the deployed application version matches with the one in IDE.
Step 3: (Optional) Enabling JSP Servlet Source Debugging on Separate Server
When remote debugging an application on a physically separate machine, the debugger will hit JSP breakpoints but the IDE will not show the correct source line in JSP, becasue Workshop is trying to locate the JSP servlet source for line mapping but the files are not available to the IDE.
To enable source debugging of servlets on a separate server, map the following directory (on the remote server) to a local directory, and use the Source Lookup Path dialog, or the Source tab in the Launch Configuration dialog (the Run > Run command), to add the mapped directory to Source Lookup Path.
For Weblogic Server 9.x:
The JSP servlet src output folder is specified in \WEB-INF\weblogic.xml in the web application, this needs to be configured when setting up remote Weblogic Server for debugging:
  <jsp-descriptor>
    <keepgenerated>true</keepgenerated>
    <working-dir>C:\MyApp\jsp-servlet\struts-example_1_1\work</working-dir>
    <backward-compatible>true</backward-compatible>
    <debug>true</debug>
  </jsp-descriptor>
For Weblogic 8.1:
  $WLS_DOMAIN\server\.wlnotdelete\extract
    e.g.:
  C:\bea\user_projects\domains\mydomain\myserver\.wlnotdelete\extract\myserver___wstudio_autoconfig_deployment___struts-example_1_1_dbg
Step 4: Defining the Remote Server and Debugging the Application
To define a remote server:
- Define the server.
- Click Run > Debug to modify the server definition for remote operation. Click on the name of your server under J2EE Server.
Change the Connection Type to Standard (Socket Attach) and specify the Host and Port.
- The Allow termination of remote VM checkbox is not recommended because it allows the IDE to do a hard stop of the server, even if the server is in mid-transaction.
- Click Apply to save your changes.
- Click Debug to run the application in debug mode.
Note that when debugging an application on a remote server, you must not disable the Run module directly from the workspace option when you update server settings.
Troubleshooting
Kodo License Problems
If you try to run a Kodo JPA application on WebLogic Server (9.1 or 9.2) and you get the error:
kodo.persistence.PersistenceException: No product license key was found...
you must merge the Kodo license.bea content into the WebLogic server license.bea file. To do this,
- Edit the file WebLogic-server-Home\license.bea .
- Edit the file Project\src\license.bea, copy the content of the <license-group> .. </license-group> tags and paste into the WebLogic-server-Home\license.bea file. NOTE: Make sure to paste the Kodo license content within enclosing <bea-licenses> ... </bea-licenses> tags but outside of <license-group format="1.0" product="WebLogic Platform" release="xx">.
Resolving JPA Libraries Correctly on WebLogic Server 9.1
Workshop requires the final release JPA JAR files. WebLogic Server 9.1 ships with an older version of the JARs. This situation does not arise with WebLogic Server 9.2.
If you receive a No Such Method exception error when you run a JPA applcation (e.g., Kodo or Hiberate) on a version 9.1 copy of WebLogic Server, you can use the following workaround to make your application work correctly.
The workaround to fix this error is:
Step 1: Insert the JPA JARs at the beginning of the server's CLASSPATH
For Hibernate-based applications:
set HIB_JARS=C:\<Project>\WEB-INF\lib\ejb3-persistence.jar;
set CLASSPATH=%HIB_JARS%;%CLASSPATH%
For Kodo-based applications: http://download.oracle.com/docs/cd/E13189_01/kodo/docs40/full/html/ref_guide_deploy.html#ref_gu
set KODO_JARS=D:\<Project>\WEB-INF\lib\kodo.jar;D:\<Project>\WEB-INF\lib\jpa.jar
set CLASSPATH=%KODO_JARS%;%CLASSPATH%
Step 2: Use WAR deployment for testing. (Uncheck the Run module directly from workspace option on the Server Overview.) In this mode, the IDE uses startWebLogic.cmd to start the server, thereby locating the correct JPA libraries.