Using a JMS Control
You can add a JMS control to any of the following:
- another control
- a page flow
- a web service
To Insert a New JMS Control
To create a new JMS control and insert it into your source code in a single step:
- Make sure you have opened the target web service, page flow controller or control in the editor window.
- Right click on the editor window and choose Insert > Control.
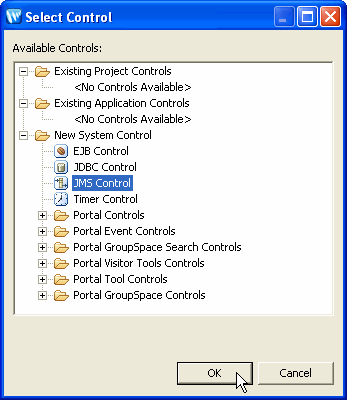
Under New System Control, click on JMS Control and click OK.
- Follow the instructions in Creating a New JMS Control.
To Insert an Existing JMS Control
- Make sure you have opened the target web service, page flow controller or control in the editor window.
- Right click on the editor window and choose Insert > Control.
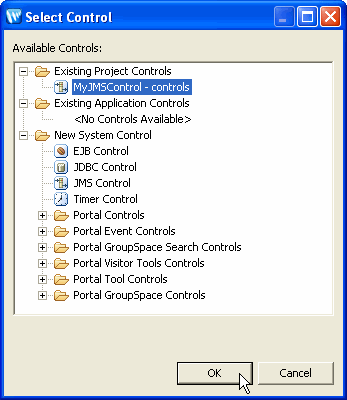
Click on the name of the control and click OK.
Once you've set up the JMS control, you can add code to send and receive messages via JMS.
JMS Control Properties
The properties of the JMS control can be set using the Properties view when the client .java file is open in the editor and the cursor is located in the JMS control name. You specify the messaging style (queue, topic or automatic) and provide the JNDI identification for the queue or topic. You also specify a connection factory for the control. For detailed information on the @JMSControl annotation and its attributes, see the JMS control documentation .
JMS Control Methods
The JMS control has the following default methods:
-
getConnection() - returns the javax.jms.Connection
getDestination() - returns the javax.jms.Destination
getSession() - gives you programmatic access to the JMS session. -
setHeader(HeaderType, Object) - Sets a JMS header to be assigned to the next JMS message sent.
setHeaders(Map) - Sets multiple JMS headers to be assigned to the next JMS message sent.
setProperties(Map) - Sets JMS properties to be assigned to the next JMS message sent.
setProperty(String, Object) - Sets a JMS property to be assigned to the next JMS message sent.
- One of the following methods for sending a message to the service, depending on what value you selected for the Message Type when you created the control: sendTextMessage(), sendBytesMessage(), sendObjectMessage(), or sendJMSMessage(). You can use one or more of these methods, or you can define your own methods for sending a message to the service.
All of the methods you define on the JMS control send or publish to the queue or topic named by the sendJndiName attribute of the @JMSControl annotation.
Consult the JMS control documentation for more information.