In this step, you will explore the features of the Workshop interface.
The tasks in this step are:
- Start Workshop
- Create a New Workspace
- Configure WebLogic Server
- Understand the Starting Window (Workbench)
- Display Relevant Help Topics on the Workbench
- Display Context Help within the Workbench
- Access the Complete Documentation
A hallmark of Eclipse is providing shortcuts and multiple access points for operations. As you work through this tutorial and other Workshop documentation, you will find different methods to accomplish the same tasks.
Start Workshop
If you haven't started Workshop yet, follow these steps: Start Workshop.
Create a New Workspace (Optional)
If you would like to execute the tutorial in a separate workspace follow these steps: Create a New Workspace.
Note: If you already have a workspace open, this will restart Workshop. Before restarting, you might want to launch help in standalone mode to avoid an interruption the restart could cause, then locate this topic in the new browser. See Using Help in a Standalone Mode for more information.
Configure WebLogic Server
In this step you will add a WebLogic Server domain for use with Workshop. This server domain contains runtime libraries required by the application and the application will be deployed to this server.
- Users who already have WebLogic Server installed should follow the instructions to Configure WebLogic Server.
- Users who do not have WebLogic Server installed should follow the instructions to Download, Install, and Configure WebLogic Server.
Understanding the Starting Window (Workbench)
When you open Workshop, the initial window displays the Welcome view. The Welcome view displays useful links for various local and online resources. You can return to the Welcome view at any time with the Help > Welcome command. Take a few moments now to explore the links.
Close the welcome screen by clicking on Workbench in the top right corner, or clicking the X close icon on the Welcome view.
Underneath the Welcome view is the Eclipse workbench. The window contains a menu bar, tool bars, the editor, and information panes (called views in Eclipse terminology).

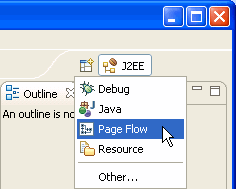
The window layout is called a perspective and can be extensively customized. Perspectives are intended to provide related tools for performing specific tasks with specific resources. The initial perspective is called the J2EE perspective (shown in the upper right corner of the window). Other useful perspectives are provided. You can switch perspectives at any time by choosing Window > Open Perspective or by using the dropdown on the menu bar.

The J2EE perspective is the standard perspective for developing J2EE enterprise applications with Workshop. Note the Project Explorer view at the left which allows you to move through the projects/folders/files of your workspace (currently empty).
Information panes (views) in the workbench can be moved, torn off, displayed side by side, stacked, minimized or maximized. Each file displayed in the editor can be maximized or minimized to icons at the edge of the window (fast views). Menu bars and tool bars can be added, removed or customized. Managing the components of a perspective is described in the help system which you can access by clicking Help > Help Contents and choosing Workbench User Guide.
You can create and save your own perspectives. Workshop will also change the perspective when you perform other tasks. For example, a different perspective is typically used when creating a page flow or debugging.
To Display Relevant Help Topics on the Workbench
When you are getting started with Workshop, you may find it useful to have a list of help topics that relates to the currently selected screen element.
Click Window > Show View > Other , expand Help and click Help and OK. The Help View will be added to the workbench as shown below.

Click on different views or editor tabs on the screen and the Help view will update to show topics relevant to that part of the screen.
Display Context Help within the Workbench
You can also get help from dialogs. For example, if you click File > New > Project and then press the F1 key, a help box appears to the right of the main dialog.

To Access the Complete Documentation
The workbench is described extensively in the documentation provided on the Help menu.
To launch the documentation, click Help > Help Contents. If you are new to Eclipse, we recommend that you browse the workbench help (including the getting started and conceptual material) before proceeding with this tutorial.
Note the icons above the content pane that allow you to go back and foward (similar to standard browser back and forward buttons) and the icon through which you can see the current topic's position in the table of contents.
![]()
Note also that the help viewer is launched in a separate window, in your default web browser.
For help with Workshop features, choose Workshop User Guide from the Contents list.
The Search field at the top of the help window allows you to search for specific topics. Note that all documentation (for Eclipse, Workshop, and all available plug-ins) will be searched unless you click Search Scope to narrow the search to a subset of the online documentation.
Click one of the following arrows to navigate through the tutorial: