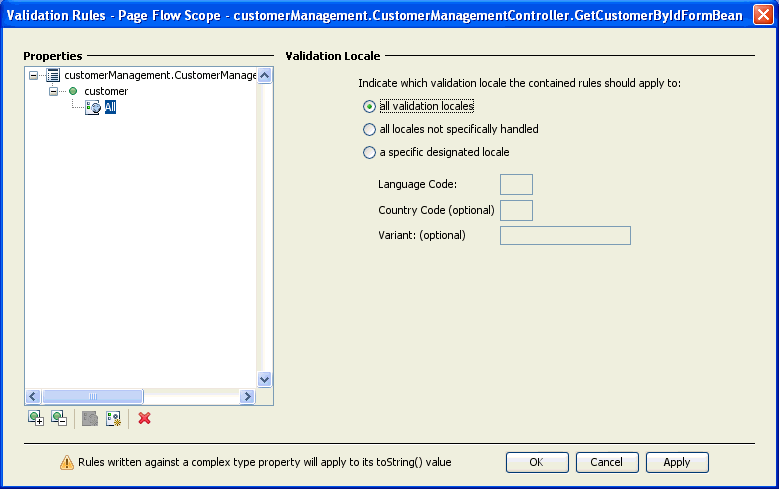
Use this dialog to set validation rules for input forms. Validation is applied to the form bean that is constructed form submitted data. This dialog lets you specify:
The action/form bean you right-click determines which form bean will be validated.
The scope you chose determines the location and type of the validation annotation.

The top level node in the Properties area shows the form bean to which validation applies. In the image above validation is applied to the form bean customerManagement.CustomerManagementController.GetCustomerByIdFormBean.
Page Flow Default Message Bundle field lets you specify the set of error messages that are used when validation errors arise. The bundle specified here will be the default bundle for all validation errors in the page flow class, this bundle will be used unless otherwise specified at the action or form bean scope. See Validation: Set Message Bundle for details.

The field-level nodes in the Properties area shows all of the fields of a particular form bean. Field-level nodes are indicated by a green ball icon (see the image above) for simple types; a larget green ball with a "C" for complex types. The form bean below has one field: Customer.
The fields in the Display Name (optional) section allow the user to use a different name for the validated property when validation error messages arise. This name can be provided either as literal text or a message key from the associated bundle. Using a substitute name, an error message can be "The last name field is required", instead of "lastName is required"
There are three basic options for validation error message:
The Source dropdown list has three corresponding values:
(1) Framework Default: on this setting, any framework-based error messages will be used, provided that your framework is configured for these messages. For example, if your application were already configured to use Struts validation, select this option.
(2) Annotation in this File: on this setting, the value of the Display Name field (directly below the Key field) sets the displayName attribute on the validation annotation. For example, assuming that "The Customer field" is entered in the Display Name field, then the following validation annotation will be created:
      @Jpf.ValidatableProperty(
          ...
          displayName="The Customer field",
          ...
      )
      ...
(3) Page Flow Default Message Bundle: on this setting, the value of Display Name specifies the message key used to retrieve the error message from the default message bundle. (To set the message bundle file, see Validation: Set Message Bundle.)
For example, suppose that
then the following validation annotations are created:
    ...messageBundles = { @Jpf.MessageBundle(bundlePath = "validationError.properties")
    ...@Jpf.ValidatableProperty(displayNameKey = "custKey", propertyName = "customer")
and the following key is written in the bundle file:
custKey=The Customer field
The Key field shows a list of all the keys available in the default bundle (if any). Selecting a key from the list displays the associated message in the Display Name field. Any edits made to the message are saved in the bundle. Also new keys can be entered directly into the Key field.

The locale nodes in the Properties area specifies the locales to which the validation rules apply. Locale nodes are indicated by globe icons (see the image above).
To create a new locale-specific rule, right-click a property-level node, and select New Validation Locale.
The All locale is provided by default for each property. Place specific validation rules here that should be applied to every locale.

Rule nodes specify particular validation rules. Rule nodes are indicated by a key icon (see the image above).
To create a new validation rule, right-click a locale icon, and select the desired rule type. Properties and error messaging for the rule are specified on the right-hand side of the dialog.