In this section you will use the Workshop for Struts Validation Framework Wizard to add checks for the fields entered in the Workshop tour project login page.
Background
With the Validator Framework, Struts introduced a very extensible data validation system. But because several components make up the Validator Framework, such as; validators, configuration files, jsp validator form classes, and Resource Bundles, keeping track of these artifacts can be a cumbersome process. The Workshop Validation Framework Wizard allows for the creation, modification, and synchronization of all validation resources through a single interface. As new validations are added to the application through the Validation Framework Wizard, all of the changes propagate to the appropriate configuration files.
Loading the Validation Framework Wizard
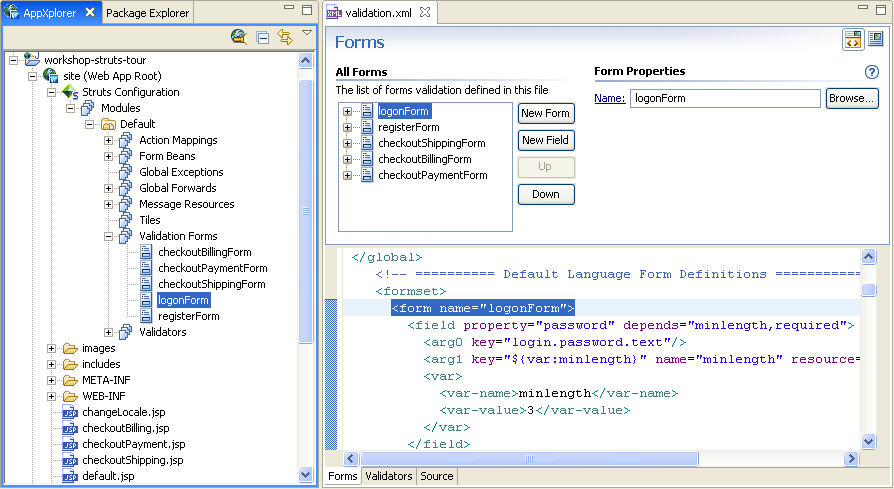
In AppXplorer, locate and expand the branches for Struts Configuration | Modules | Default to display the list of struts artifacts.
Open Validation Forms and double-click logonForm.
This will load the validation.xml located in the WEB-INF directory into the Validation Framework Editor. From within this editor, you can easily modify, delete, and add new form validations. In the next section we will be adding a new validation.
Creating a new Form Validation
In the Forms tab of the Validation Editor, right-click logonForm and
select Delete.
To recreate the logonForm validation, click the Add Form button to launch the validation wizard.
The validation wizard graphically walks through the creation of form
validations and, based on the user inputs, adds the appropriate source
code to the validation.xml.
From the Insert Form Validation window, select logonForm, and add validation for both the password and username fields.
No resource key pattern has been defined for the Workshop tour application so click Next to define the validators for the password field.
Add field validators, minlength and required. Then click Ok and Next.
In the Field Validators window for the password field, set the Min
Length to 3 and click the {0} symbol to select the output message. This
will display the list of possible resource names to display.
From the list of resource keys, choose login.password.text, select Ok, and then click Next.
To add validation for the username field add the 'required' field
validator.
Click the {0} symbol to set the output message for this validator and
then choose the login.login.text resource key. Click Ok and then Finish.
Adding Additional Validators
New Validators can also be defined and edited in the Validation Framework Wizard. To view the current list of custom Validators, select the Validators tab.
The Workshop Tour project does not contain custom validators but additional validators can be easily added by click the Add Validator button and using the Validator Wizard.