In this step, we will create and configure Managed Beans for the web application. We will create a JavaBean called UserBean that holds information like userId, password, name and contact details.
For the following steps, make sure you are in the Package Explorer view (Window > Show View > Package Explorer).
Create new packages called beans and util under the folder web/WEB-INF/src/java by right clicking on the folder and choosing New > Package.
You have been provided a ContactDetailsBean class. It is a very simple class that holds contact details information like address, city, state, country, zipcode, office and resident phone numbers. Copy the class ContactDetailsBean.java from the folder workshop-JSF-tutorial/web/Resources to beans package. Open and review the code.

| private String userId = null; private Integer password = null; private String name = null; private ContactDetailsBean contactDetails = null; |
From the workshop-JSF-tutorial/web/Resources folder, copy the class DataStoreBean.java to beans package and the class MessageFactory.java to util package.
The DataStoreBean maintains a list of registered users. Open the class DataStoreBean and review the code. The DataStoreBean constructor initializes instance of java.util.Hashtable to maintain list of registered user. It has methods to add / remove user and get user information. For each user the Hashtable maps userId as a key and UserBean instance as a value.
The MessageFactory class retrieves localized messages from the application resource bundle i.e. application.properties file. Open the class and review the code. It has method getMessage(String, Object[ ]) that returns instance of FacesMessage for localized messages. The String argument is the key that corresponds to the message in the ResourceBundle. The Object instance typically contains the substitution parameters that are embedded in the message. It uses the FacesContext to access the Application instance on which the messages are registered.
In this step you will implement the method registerUser( ) in UserBean class. The method is responsible for adding the user to the data store, retrieving FacesMessage instances for localized messages with the key thanksMsg_Registration, adding it to FacesContext and returning the logical outcome success.
If, the user with the same userId already exists then the method retrieves a FacesMessage instance for a localized message with key userIdExists, adds it to FacesContext and returns null.
Type the following lines of code for the registerUser( ) method in UserBean class. You can also copy it from the file workshop-JSF-tutorial/web/Typing_Aid/UserBean_registerUser_Method.txt
| public String registerUser( ) { FacesContext context = FacesContext.getCurrentInstance( ); ExternalContext extContext = context.getExternalContext( ); Map appMap = extContext.getApplicationMap( ); DataStoreBean dataStore = (DataStoreBean)appMap.get(DataStoreBean.DB_NAME); if(dataStore.getUser(userId) != null) { Object[ ] objArr = new Object[ ] { userId }; FacesMessage message = MessageFactory.getMessage(context, "userIdExists", objArr); context.addMessage(null, message); return null; } else { dataStore.addUser(this); Object[ ] objArr = new Object[ ] { name }; FacesMessage message = MessageFactory.getMessage(context, "thanksMsg_Registration", objArr); String msg = message.getDetail( ); extContext.getRequestMap( ).put("thanksMsg_Registration", msg); return "success"; } } |
If the user already exists, the method adds a localized message to FacesContext and returns null . This causes the JavaServer Faces implementation to re-render the JSP page with messages and without creating a new view of the page.
Import FacesContext and ExternalContext classes from the javax.faces.context package, Map class from the java.util package, FacesMessage class from the javax.faces.application and MessageFactory class from the application's util package.
Save the UserBean class.
To make the application support multiple languages, we use the internationalization feature. We define text constants, component labels / titles and messages into properties files that are used by the JSF components and Java classes.
The registerUser( ) method of UserBean gets localized messages for the keys userIdExist and thanksMsg_Registration from the application resource bundle file application.properties
Open the application.properties file in the WEB-INF/src/java/resources folder; type the following lines and save the file.
| userIdExists=The userId {0} already exists, pls. try
another userId. thanksMsg_Registration=Dear {0}, Thank you for registering with Workshop |
To enable the JSF framework for instantiating backing beans and storing them in the appropriate scope, you must configure it in the application configuration resource file faces-config.xml using the managed-bean XML element. The faces-config.xml file is processed at application startup time. When a page references a bean, the JavaServer Faces implementation initializes it according to its configuration in the application configuration resource file.
The UserBean has a property contactDetails of bean type ContactDetailsBean. Hence, we first define managed-bean configurations for ContactDetailsBean and then for the UserBean.
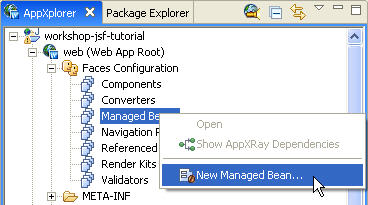

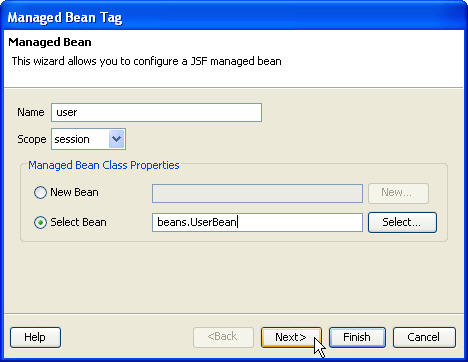


The user managed-bean declaration creates a UserBean
in Session scope. This bean has property contactDetails
that references the contactDetails managed-bean.
The contactDetails managed-bean declaration
will not create an instance of ContactDetailsBean
because it is defined with the scope none.
Click one of the following arrows to navigate through the tutorial:
|
|
|