Object-Relational Mappings: Generating JPA Entities
This document describes the following:
OEPE allows you to generate JPA entities using the entity generation tool called OEPE JPA Entity Generation Wizard.
Note that prior to using this tool, you should set up and configure the database connection, as well as add JPA support to your Eclipse project.
To generate JPA entities using the JPA Entity Generation Wizard, follow this procedure:
Upon the completion of the OEPE JPA Entity Generation Wizard, the generated JPA entity classes are automatically added to your project's
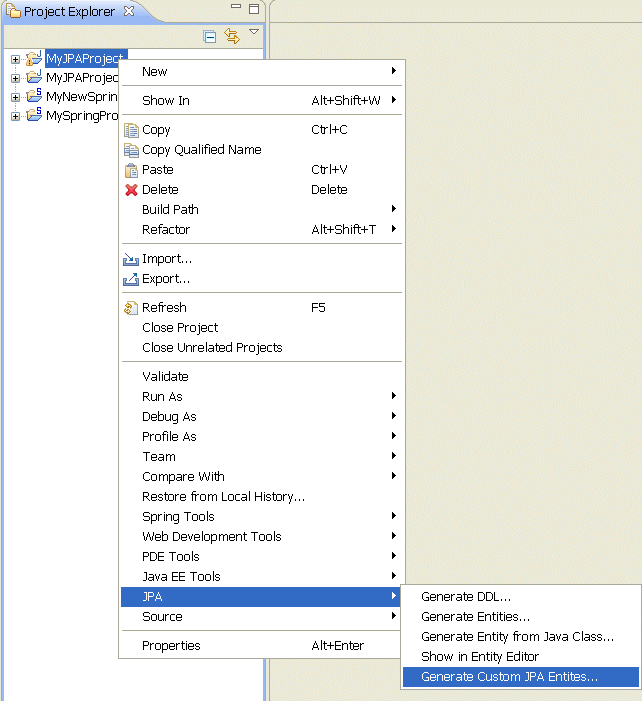
Figure 1. Generating Custom JPA Entities
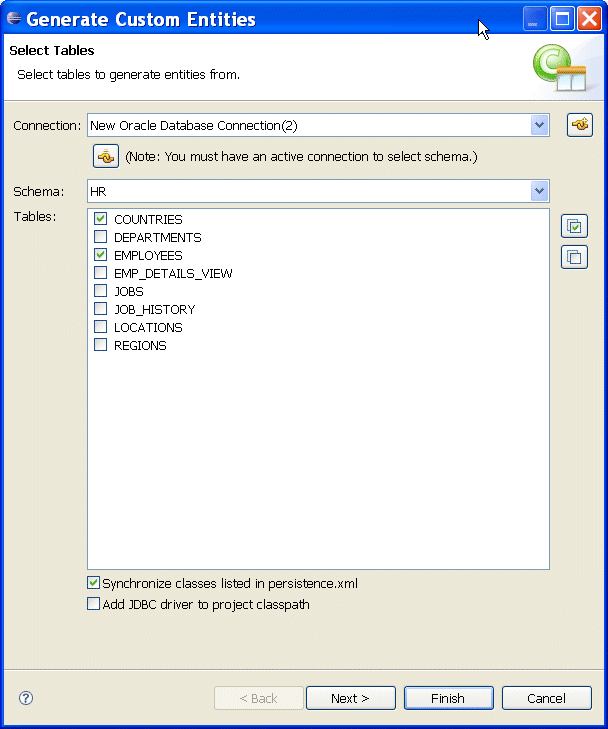
Figure 2. Generate Custom Entites Dialog
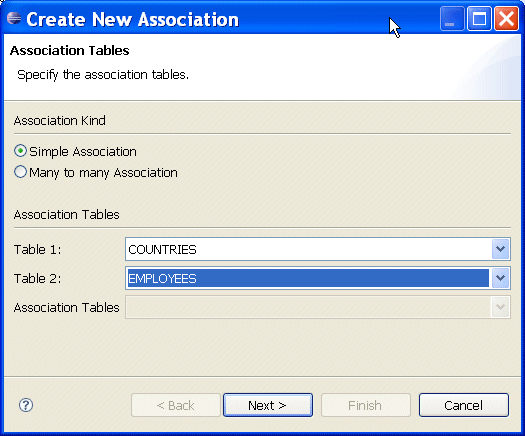
Figure 3. Create New Association Dialog
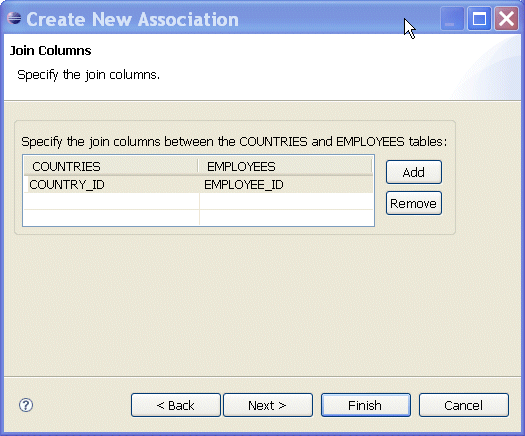
Figure 4. Create New Association Dialog - Join Columns

Figure 5. Create New Association Dialog - Association Cardinality
The Generate Custom Entities dialog will display the table association that you have created. You can edit the association by clicking on it and modifying the field values on the bottom panel, as Figure 6 shows, and then click Next.
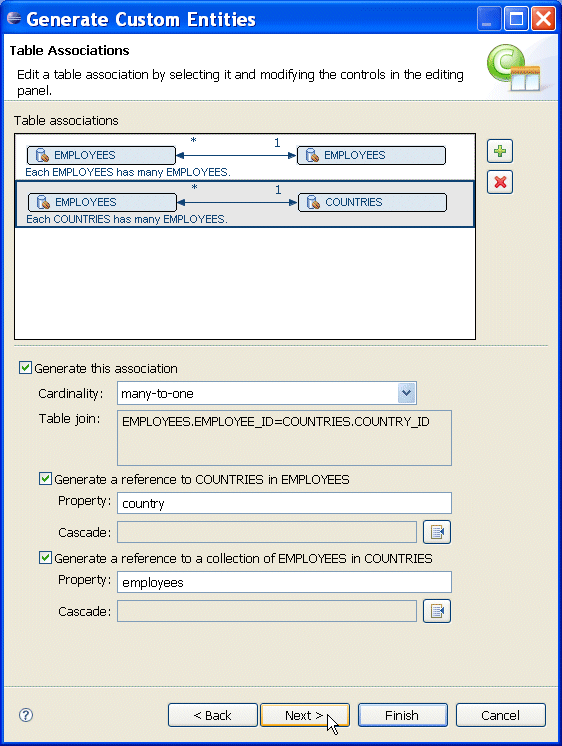
Figure 6. Table Association
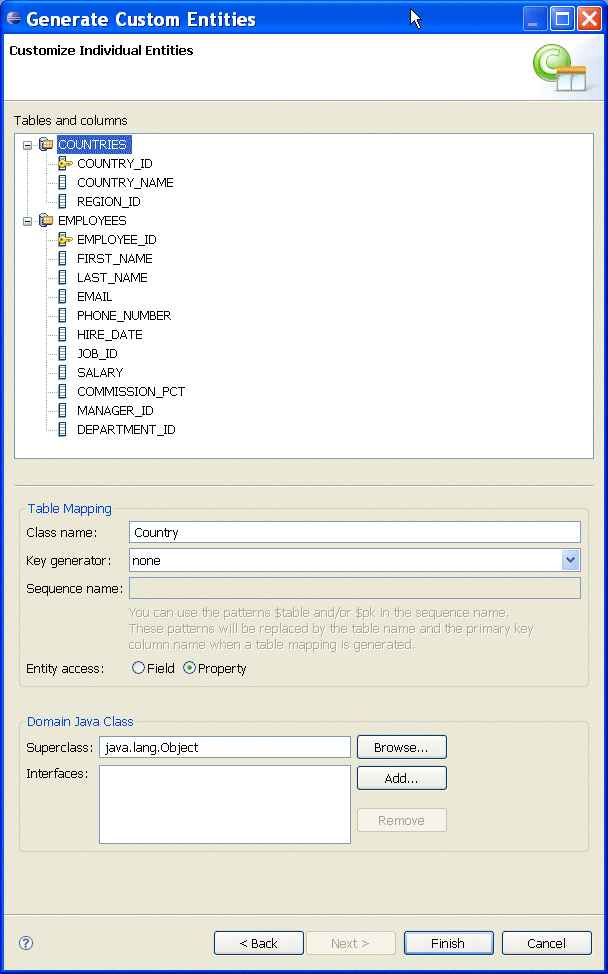
Figure 7. Table Association
persistence.xml file, as Figure 8 and Figure 9 show.
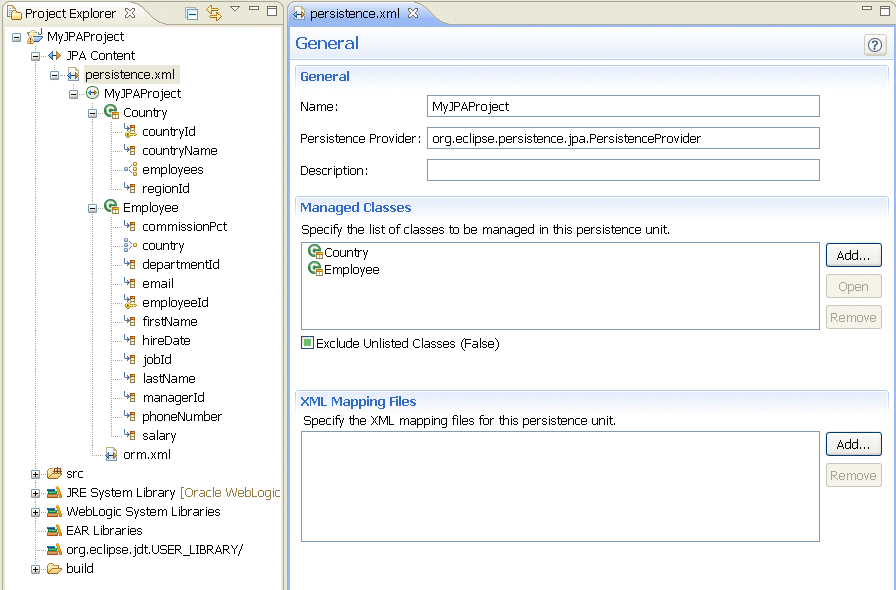
Figure 8. persistence.xml File
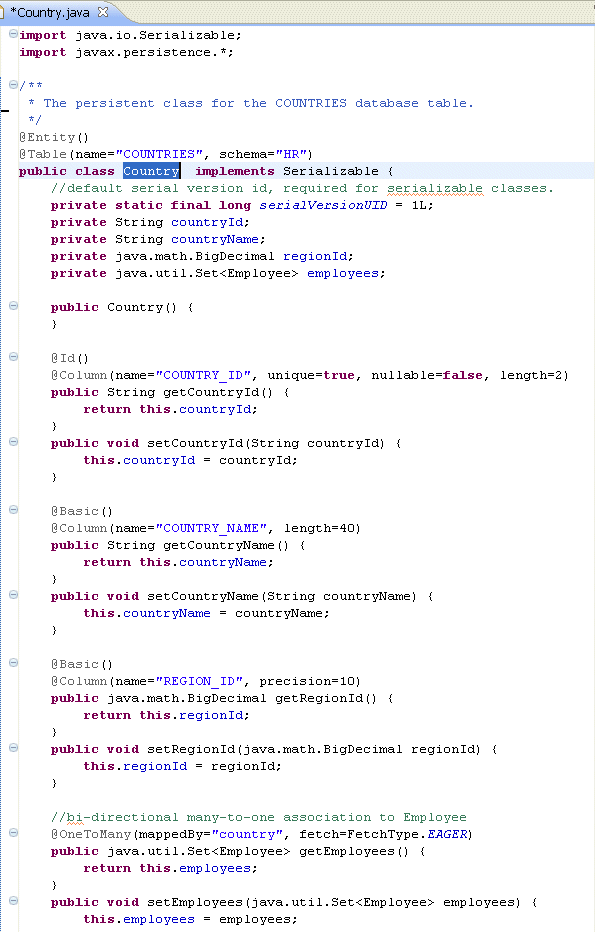
Figure 9. Generated Persistent Class
Getting Started With the Oracle Database Plugin for Eclipse
Configuring a Persistence Provider for JPA Projects
To set up a database connection using Eclipse IDE, follow this procedure:
The following example shows a DDL script that you can use to create a database schema that Figure 4 demonstrates:
DROP TABLE LINEITEM;
DROP TABLE ORDER_DATA;
DROP TABLE PRODUCT;
DROP TABLE CUSTOMERID;
DROP TABLE CUSTOMER;

CREATE TABLE CUSTOMER (
  CUSTOMERID INTEGER  NOT NULL,
  NAME CHAR(60) DEFAULT NULL NOT NULL
);
ALTER TABLE CUSTOMER ADD CONSTRAINT PK_CUSTOMERID PRIMARY KEY (CUSTOMERID);


CREATE TABLE CUSTOMERID (
  CUSTOMERID INTEGER  NOT NULL,
  DRV_LIC_NO INTEGER DEFAULT NULL NOT NULL
);
ALTER TABLE CUSTOMERID  ADD CONSTRAINT FK_CUSTOMERID FOREIGN KEY (CUSTOMERID) REFERENCES CUSTOMER (CUSTOMERID);
ALTER TABLE CUSTOMERID  ADD CONSTRAINT PK_CUSTOMER_DRV_LIC_ID PRIMARY KEY (CUSTOMERID, DRV_LIC_NO);


CREATE TABLE ORDER_DATA (
  ORDERID INTEGER  NOT NULL,
  AMOUNT DECIMAL(6 , 0) DEFAULT NULL NOT NULL,
  CUSTOMERID INTEGER DEFAULT NULL NOT NULL,
  ORDERDATE VARCHAR(64) DEFAULT NULL
);
ALTER TABLE ORDER_DATA ADD CONSTRAINT PK_ORDERID PRIMARY KEY (ORDERID);
ALTER TABLE ORDER_DATA ADD CONSTRAINT FK_ORDER_CUSTOMERID FOREIGN KEY (CUSTOMERID)
 REFERENCES CUSTOMER (CUSTOMERID);


CREATE TABLE PRODUCT (
  PRODUCTID INTEGER  NOT NULL,
  CODE VARCHAR(5) DEFAULT NULL,
  NAME VARCHAR(64) DEFAULT NULL,
  UNITPRICE DECIMAL(38 , 0) DEFAULT NULL NOT NULL
);
ALTER TABLE PRODUCT ADD CONSTRAINT PK_PRODUCTID PRIMARY KEY (PRODUCTID);


CREATE TABLE LINEITEM (
  ORDERLINE INTEGER  NOT NULL,
  ORDERID INTEGER DEFAULT NULL NOT NULL,
  PRODUCTID INTEGER DEFAULT NULL NOT NULL,
  QUANTITY DECIMAL(4 , 0) DEFAULT NULL NOT NULL
);
ALTER TABLE LINEITEM ADD CONSTRAINT PK_ORDERLINE PRIMARY KEY (ORDERLINE);
ALTER TABLE LINEITEM ADD CONSTRAINT FK_LINEITEM_PRODUCTID FOREIGN KEY (PRODUCTID)
 REFERENCES PRODUCT (PRODUCTID);
ALTER TABLE LINEITEM ADD CONSTRAINT FK_LINEITEM_ORDERID FOREIGN KEY (ORDERID)
 REFERENCES ORDER_DATA (ORDERID);
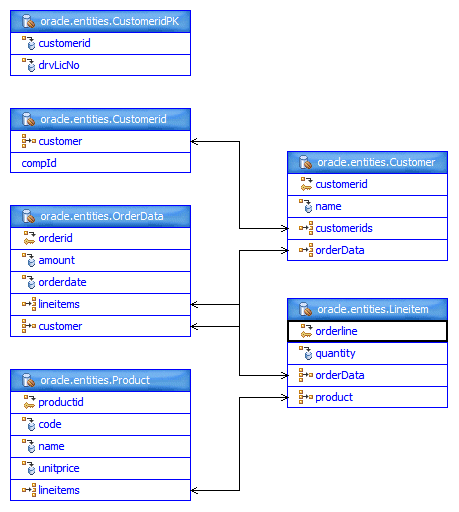
Figure 10. Sample Database Schema
In order to use JPA, you need to be working within either a Web, EJB or utility project that supports JPA facet (includes the required libraries).
To create a new Eclipse JPA project, follow this procedure:
- Right-click the Project Explorer and select New > Project from the drop-down menu. This will open the New Project dialog.
- Select JPA > JPA Project from the list, as Figure 11 shows, and then click Next.
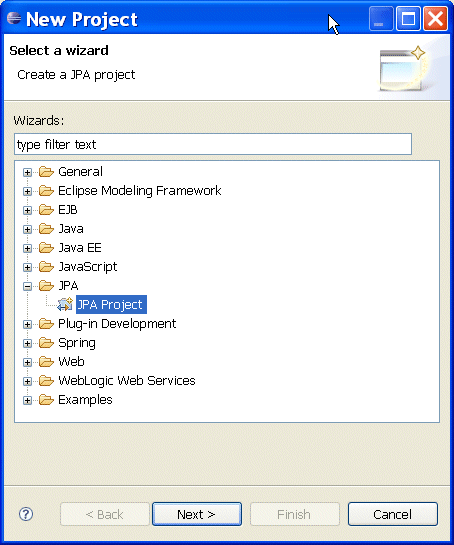
Figure 11. New Project Dialog - On the New JPA Project dialog, specify the following:
- provide a name for your project;
- select Oracle WebLogic Server v.N as your target runtime;
- enter the appropriate value in Configuration field. To specify either EclipseLink or Oracle Kodo as your persistence provider, click Modify, and select either Java Persistence Library (EclipseLink), or a combination of Java Persistence Library (Oracle Kodo) and WebLogic Utility Module Extensions on the Project Facets dialog, as Figure 13 shows. For more information, see Configuring a Persistence Provider for JPA Projects.
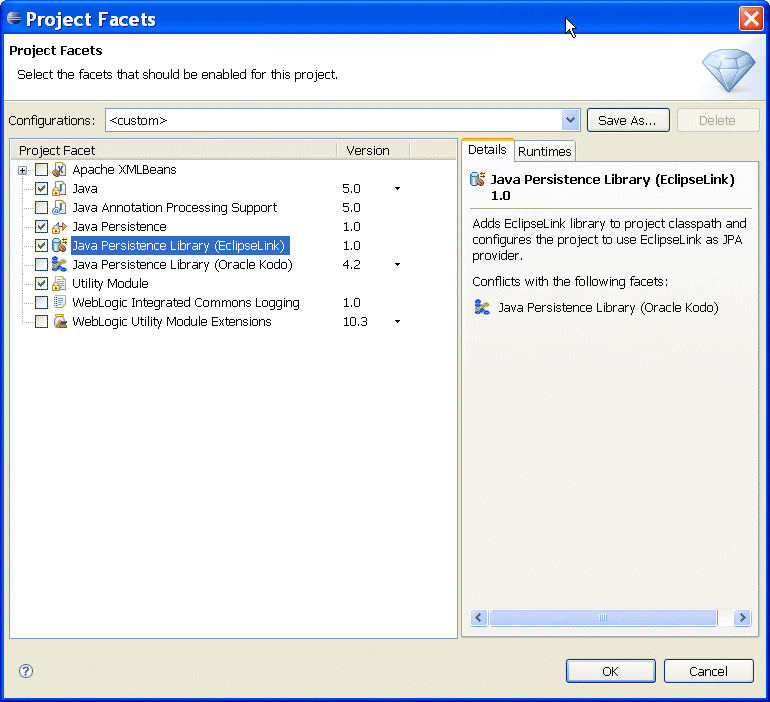
Figure 13. Project Facets Dialog - JPA Configuration - optionally, select Add project to an EAR;
- click Next.
- Optionally, make modifications on the New JPA Project > JPA Facet screen, making sure you specify the database connection in the Connection field, and then click Finish.
This will open the New JPA Project dialog, as Figure 12 shows.
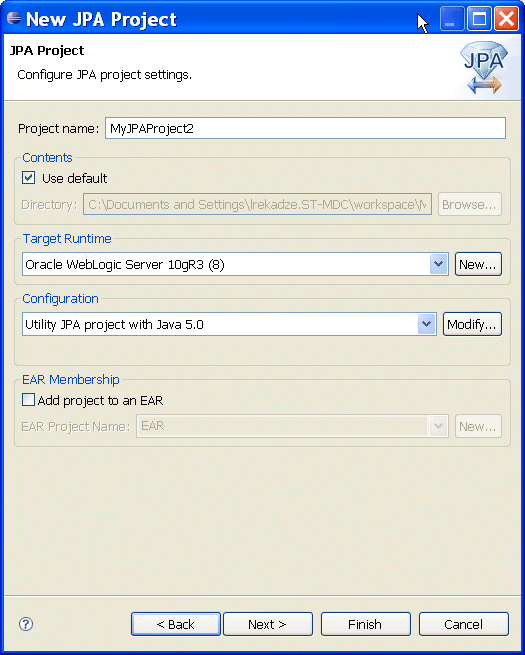
Figure 12. New JPA Project Dialog
You can also add JPA support to an existing Eclipse project as follows:
- Right-click your project in Project Explorer and select Properties from the drop-down menu. This will open the Properties dialog.
- Select Project Facets from the tree control on the left, and then select Java Persistence, as well as one of Java Persitence Library (EclipseLink) or Java Persitence Library (Oracle Kodo) from the Project Facet list. For more information, see Configuring a Persistence Provider for JPA Projects
- Click Further configuration available.... This will open the Modify Faceted Project dialog.
- On the Modify Faceted Project dialog, make appropriate modifications, ensuring that you specify the database connection in the Connection field, and then click Next.
- On the next screen, configure the JPA persistence provider libraries, and then click Finish.
- Click Apply, and then OK on the Properties dialog.