Web Services Development: Starting Points for JAX-WS
This document describes the following starting points of developing JAX-WS-enabled Web services:
- Generating a Web Service from a WSDL File
- Generating a Web Service from Java
- Generating a WSDL File by Starting from a Java Class
- Related Information
1. Generating a Web Service From a WSDL File
Using OEPE, you can generate a Web service from a WSDL file. The resulting Web service class will contain the public endpoint interface described by the WSDL without the implementation. After the Web service has been generated, you have to fill in the Web service implementation details.To generate a Web service from a WSDL, follow this procedure:
- Create a new WSDL file or import an existing WSDL file into your project.
- In the Project Explorer, right-click the WSDL file and select WebLogic Web Services > Generate Web Service....
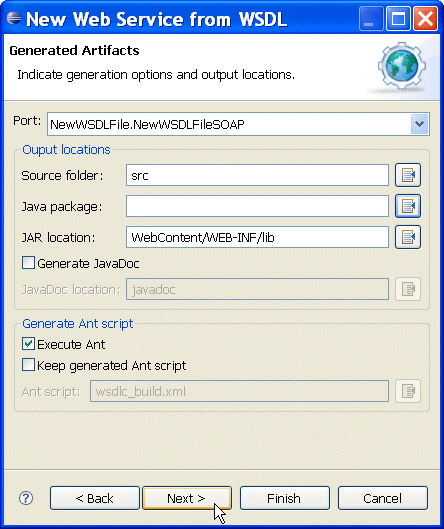
This opens the New Web Service from WSDL dialog that lets you specify many parameters for the generated Web service, including the port, Java package, and so on, as Figure 1 shows.

Figure 1. New Web Service from WSDL Dialog
Selecting Keep generated Ant Script saves an Ant file for modification and reuse of the generation process.
In addition to the Web service implementation class, this will create a JAR file that contains a Web service interface class, as well as types referenced in the original WSDL file. The default location for the JAR file is the project's WEB-INF/lib directory. If you select a different location that is not on the class path, your Web service is unlikely to function properly.
You can test your Web service using the Test Client. For more information, see Testing Web Services.
2. Generating a Web Service From Java
OEPE lets you generate Web services from Java using the following starting points:You can develop a JAX-WS-enabled Web service as a Java class, with methods becoming Web service operations, and method parameters and return types being Java beans. To indicate what methods should be exposed and to set other properties for the service, you use annotations.
To create a Web service from a Java class, do the following:
- Create a new Web service project.
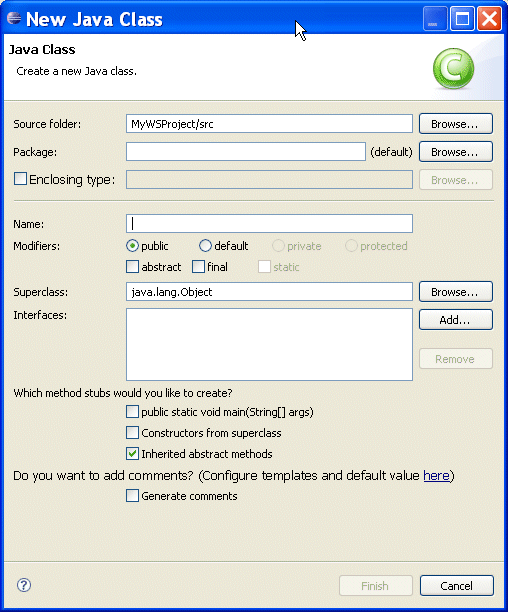
- Expand your new project tree and select Java Resources > src. Right-click the src node and select New > Class from the drop-down menu. This will open the New Java Class dialog, as Figure 2 shows.
- Enter the package name in the Package field, and a class name in the Name field, and then click Finish.
- When your new class definition opens in the source editor pane, add the following to the code:
- import
javax.jws.* - annotate your class with the
@WebServiceannotation - annotate your method with the
@WebMethodannotation
The source code will look similar to the following:package pkg; import javax.jws.*; @WebService public class MyClass { @WebMethod public void myMethod() { } } - import
Having followed the preceding procedure, you created a Web service from a Java class. You can run it by right-clicking the new class, and then selecting Run As > Run on Server from the drop-down menu.
You can test your Web service using the Test Client. For more information, see Testing Web Services.
Using OEPE, you can create a JAX-WS-enabled Web service for your Java project without taking any prior steps.
To create a Web service from scratch using Java, do the following:
- Create a new Web service project.
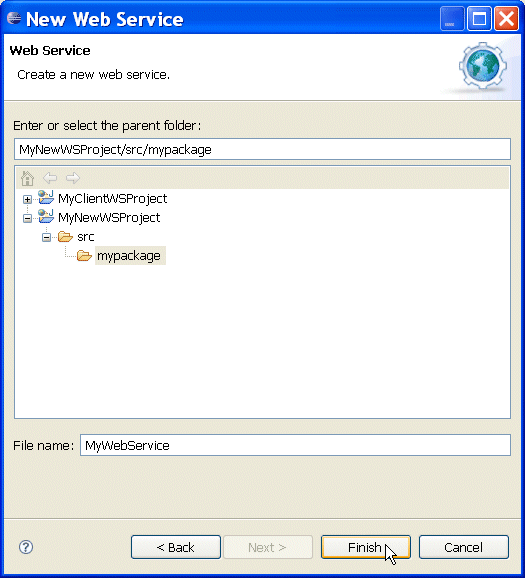
- Right-click the project name in the Project Explorer and select New > Other from the drop-down menu. This will open the New > Select wizard dialog. Select WebLogic Web Service > WebLogic Web Service, and then click Next to open the New Web Service dialog, as Figure 4 shows.
- On the New Web Service dialog, select the package and enter the file name for your new Web service, and then click Finish. This will generate a new Web service Java class template that you can use to develop your Web service.

Figure 4. New Web Service Dialog
Figure 5 shows and example of a newly generated
MyWebService.java.3. Starting From a Java Class and Generating a WSDL File
Using OEPE, you can generate a WSDL file from a Java class for your project by following this procedure:- Create new or use an existing Web service project.
- Right-click a Java class in your Web service project in the Project Explorer, and select WebLogic Web Service > Generate WSDL from the drop-down menu.
W3C WSDL Specification Ant Task Reference in the Oracle WebLogic Server documentation JAX-WS Documenation
Files with the WSDL extension contain Web service interfaces expressed in the Web Service Description Language (WSDL). WSDL is a standard XML document type specified by the World Wide Web Consortium (W3C). For more information, see www.w3.org
WSDL files communicate interface information between Web service producers and consumers. A WSDL description allows a client to utilize a Web service's capabilities without knowledge of the implementation details of the Web service.
A WSDL file contains the following information necessary for a client to invoke the methods of a Web service:
- The data types used as method parameters or return values.
- The individual methods names and signatures (WSDL refers to methods as operations).
- The protocols and message formats allowed for each method.
- The URLs used to access the Web service.
When you want to use an external Web service from within Eclipse, you should first obtain the WSDL file for the service you want to use, as follows:
- For public Web services, the WSDL file will typically be available on the Web site of the organization that publishes the Web service.
- For private Web services, contact the organization that supports the Web service to obtain the WSDL file.
WSDL files can also be found through both public and private UDDI registries. For more information about UDDI, see www.uddi.org
Once you have the WSDL file, you may use Eclipse to create a Web service.
Some Web service tools produce WSDL files that do not contain an XML declaration. The XML declaration is just the first line of an XML file of the following form:
<?xml version="1.0" encoding="utf-8"
    ?>
If you receive a WSDL file that does not contain an XML declaration, you must add a declaration to the file using a text editor before you can use the WSDL file in Eclipse.
Note that the encoding attribute is not required. If an encoding attribute is not present, the default encoding is utf-8.
To create a WSDL file to use in your project, follow this procedure:
- Right-click the project in the Project Explorer and select New > Other from the drop-down menu. This will open the New dialog.
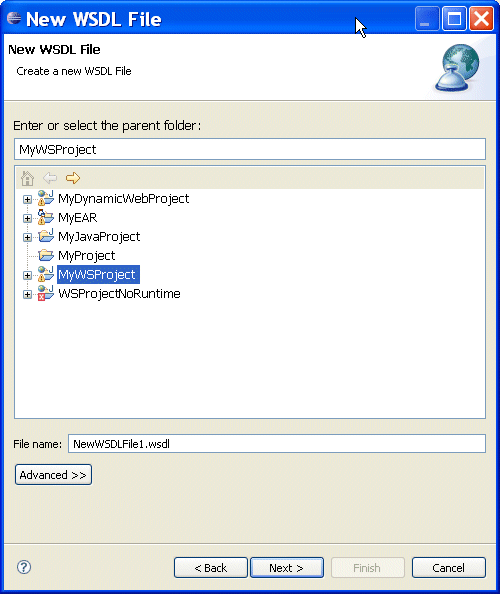
- In the New dialog, select Web Services > WSDL, and then click Next. The New WSDL File dialog opens, as Figure 5 shows.
- On the New WSDL File dialog, provide a name for the WSDL file, click Next, and then click Finish. This creates a WSDL file for your project.
As you develop a Web service, you can test it directly by using the test client. The test client provides a user interface through which you can test Web service operations with parameter values you choose.
Using the test client, you can do the following:
- Test a Web service from the project tree: When you test Web services with Eclipse, consider the following steps that launch the test client with a visual interface for invoking the Web service's operations:
- Expand the project tree to display the Web service source file.
- Right-click the source file, then click Run > Run on Server.
- When the test client is displayed, choose the operation you want to test by clicking the button labeled with the operation's name. If the operation has parameters, the test client provides boxes for you to enter the values to test with. If an operation includes complex types as parameters, the test client will display an XML template with placeholders for your test values.
- Examine the result of the test by looking at generated messages. When you execute an operation, the test client refreshes to display information about the message exchanged by the operation. The user interface provides a summary of message values, as well as the message XML itself. When an exception occurs, a fault message is displayed.
- Use the Message Log list to view the results of multiple tests.
- Click Show Operations to begin another test.
- View the WSDL file for the Web service you are currently testing by clicking the WSDL URL provided at the top of the test client window.
- Choose another Web service to test: You can test another Web service without closing the test client by clicking the Choose Another WSDL link at the top of the test client window. The test client will display a page with a box where you enter the WSDL URL, then click Test to display the test form for that Web service.
Alternatively, you can launch the test client without using Eclipse IDE by launching the client through a Web browser, as follows:
- With the Oracle WebLogic Server running, open a browser window and navigate to the http://localhost:7001/wls_utc URL to start the test client.
- In the Enter WSDL URL box, enter the URL for the WSDL of the Web service you want to test, and then click Test.


