4.4 Accounts
Accounts are defined and managed on Content Server. Accounts permissions are assigned to user logins on Oracle WebLogic Server.
This section covers the following topics:
4.4.1 Introduction to Accounts
Accounts give you greater flexibility and granularity in your security structure than security groups alone provide. Accounts and account permissions are assigned to users with the Oracle WebLogic Server Administration Console, and the server maps groups to Content Server roles and permissions. An account can also be assigned to each content item. To access a content item that has an account assigned to it, the user must have the appropriate permission to the account.
Oracle WebLogic Server user groups that start with a @ ("at") symbol are mapped to Content Server accounts.
Note:
If you enable accounts and use them, then later choose to disable accounts, you can have the perception of losing data. The repository remains intact. However, if you make certain changes to the security model, then you also must update the users' access rights so they can continue to access the secure content.To avoid this situation, examine your requirements and the Oracle UCM security model of groups and accounts to determine what would best match your needs. Unless you are certain that you want to use accounts, do not enable them.
There are several ways accounts can be created:
-
The system administrator creates predefined accounts using the User Admin tool. See "Creating Predefined Accounts on Content Server".
-
A user administrator creates an account while checking in content. See "Creating Accounts When Checking In Content on Content Server".
You must enable accounts to be able to use them. See "Enabling Accounts on Content Server" for more information.
4.4.1.1 Accounts and Security Groups
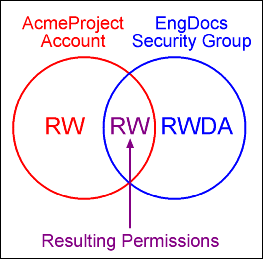
When accounts are used, the account becomes the primary permission to satisfy before security group permissions are applied. You can also think of a user's access to a particular document as the intersection between their account permissions and security group permissions.
For example, the EngAdmin role has Read, Write, Delete, and Admin permission to all content in the EngDocs security group. A user is assigned the EngAdmin role, and is also assigned Read and Write permission to the AcmeProject account. Therefore, the user has only Read and Write permission to a content item that is in the EngDocs security group and the AcmeProject account.
Figure 4-6 shows the intersection of the AcmeProject account and EngDocs security group permissions.
Figure 4-6 Example of Security Group Permissions

Description of "Figure 4-6 Example of Security Group Permissions"
Security group permissions are ignored if the account does not permit access to any content. Remember that the account acts as a filter that supersedes the permissions defined by the user's roles.
4.4.1.2 Hierarchical Accounts
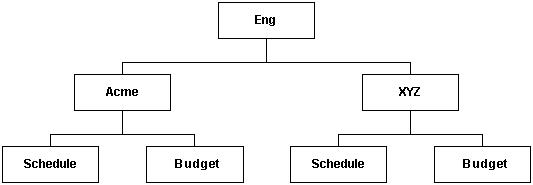
Accounts can be set up in a hierarchical structure, which enables you to give some users access to entire branches of the structure, while limiting permissions for other users by assigning them accounts at a lower level in the structure. Figure 4-7 shows a typical hierarchical account structure.
Figure 4-7 Example of Hierarchical Account Structure

Description of "Figure 4-7 Example of Hierarchical Account Structure"
Important:
Because account names form part of the directory path for the URL of a content item, account names cannot exceed 30 characters.-
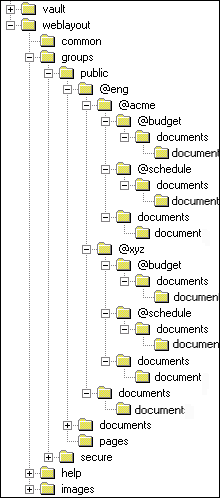
If you use slashes to separate the levels in account names (for example, Eng/Acme/Budget), Content Server creates a weblayout directory structure according to your account structure. (However, each actual directory will not be created until a content item is assigned to the account during the check-in process.) Each lower level in the account name becomes a subdirectory of the upper level, with an @ symbol prefix to indicate that the directory is an account level.
-
If a user has permission to a particular account prefix, they have access to all accounts with that prefix. For example, if you are assigned the Eng/XYZ account, you have access to the Eng/XYZ account and any accounts that begin with the Eng/XYZ prefix (such as Eng/XYZ/Schedule and Eng/XYZ/Budget).
Important:
The account prefix does not have to include slashes. For example, if you have accounts called abc, abc_docs, and abcdefg, all users who have access to the abc account will have access to the other two accounts as well.
To handle the security structure depicted above, you would create the following accounts:
-
Eng
-
Eng/Acme
-
Eng/XYZ
-
Eng/Acme/Schedule
-
Eng/Acme/Budget
-
Eng/XYZ/Schedule
-
Eng/XYZ/Budget
Figure 4-8 Example of a Security File Structure

Description of "Figure 4-8 Example of a Security File Structure"
4.4.1.3 Performance Considerations
Consider the following performance issues when using accounts in your security model:
-
Theoretically, you can create an unlimited number of accounts without affecting Content Server performance. A system with over 100,000 pieces of content has only limited administration performance problems at 200 accounts per person; however, there is significant impact on search performance with over 100 accounts per person. (Note that these are explicit accounts, not accounts that are implicitly associated with a user through a hierarchical account prefix. A user can have permission to thousands of implicit accounts through a single prefix.)
-
For performance reasons, do not use more than approximately 50 security groups if you enable accounts.
-
Ensure that your security groups and accounts have relatively short names.
4.4.1.4 External Directory Server Considerations
Accounts are available whether or not your Content Server is integrated with an external directory server (such as JPS User provider for Oracle WebLogic Server) . When you use accounts with an external directory, ensure that you follow these guidelines:
-
Set up a global group with the appropriate users in it to match the account.
-
Associate group names to either a role or an account by configuring mapping prefixes.
4.4.2 Managing Accounts
The following tasks are involved in managing accounts.
4.4.2.1 Enabling Accounts on Content Server
To enable accounts:
Important:
If you enable accounts and use them, then choose to disable accounts, you can have the perception of losing data. The repository remains intact. However, if you make certain changes to the security model, then you also must update the security settings for users so they can continue to access the content.-
On the Content Server portal, select Administration, then click Admin Server.
-
On the Admin Server page, click General Configuration.
-
On the General Configuration page, select the Enable Accounts check box to enable accounts.
-
Save the changes.
-
Restart the Content Server.
Alternately, you can access the General Configuration page from the Admin Server, then add the following line to the Additional Configuration Variables field, which shows the contents of the IntradocDir/config/config.cfg file:
UseAccounts=true
Save the changes, and restart the Content Server.
4.4.2.2 Creating Predefined Accounts on Content Server
To create a predefined account:
-
From the User Admin screen, select Security, and then select Predefined Accounts.
The Predefined Accounts Screen is displayed.
-
Click Add.
The Add New Predefined Account Screen is displayed.
-
Add the name of the new account. Keep the names short and consistent. For example, set up all of your accounts with a three-letter abbreviation by location or department (MSP, NYC, etc.). Account names can be no longer than 30 characters, and the following are not acceptable: spaces, tabs, line feeds, carriage returns, and the symbols : ; ^ ? : & + " # % < > * ~.
-
Click OK.
-
If you already have content checked into the Content Server and you are using a database with full text indexing, rebuild your search index.
If you are using only the metadata database search indexer engine, you do not need to rebuild your search index.
4.4.2.3 Creating Accounts When Checking In Content on Content Server
Generally, you should create predefined accounts rather than creating an account during content checkin. See "Creating Predefined Accounts on Content Server".
To create an account at the time you check in a content item, you must have User Admin rights, and perform these tasks:
-
Display the Content Check In Form page.
-
Enter all required and optional information.
-
Type an account name in the Account field.
-
Click Check In.
The new account is assigned to the content item.
4.4.2.4 Deleting Predefined Accounts on Content Server
To delete a predefined account:
-
Select Security and then select Predefined Accounts.
The Predefined Accounts Screen is displayed.
-
Select the account to delete.
-
Click Delete.
The account is deleted immediately.
You can delete an account even if content with that account still exists. The account value will remain assigned to the content item, but will be considered a user-defined account.
4.4.2.5 Assigning Accounts to a User on Oracle WebLogic Server
To assign an account to a user, use the Oracle WebLogic Server Administration Console to create a group and then assign it to one or more users. The group name must start with the @ sign and end with permissions enclosed in parentheses. The following example creates a group named testaccount and assigns it Read, Write, and Delete permissions: @testaccount(RWD).
Accounts assigned to a user on Oracle WebLogic Server are mapped to the content server. For more information, see Oracle Fusion Middleware Oracle WebLogic Server Administration Console Online Help.
4.4.3 An Accounts Case Study
In this example, Xalco is a worldwide software company with offices in London, New York, and Paris. They have a content server hosted in the London office, with access from the other offices through the corporate WAN. At the same time, Xalco is replicating some files out to an area of their public Web site. Initially, the Sales and Finance departments at each location want to use their instance to publish files. The New York office is small and has no Sales department.
The following sections provide sample information for the Xalco case study:
4.4.3.1 Xalco Security
-
Xalco staff and security levels:
-
London: David Smith, Worldwide CFO, and Jim McGuire, UK Sales Manager
-
New York: Catherine Godfrey, Regional Finance Manager
-
Paris: Helene Chirac, Finance Clerk (Europe)
-
-
Xalco levels of security clearance (security groups) for Xalco content:
-
Public: Files suitable for consumption by members of the public (public content is replicated to the Xalco Web site)
-
Internal: Files which have unrestricted access internally, but are not suitable for public consumption
-
Sensitive: Files which are commercially sensitive, and restricted to middle managers and above
-
Classified: Highly-sensitive files, suitable only for board members
-
-
Xalco staff access:
-
David Smith: As Worldwide CFO, he requires full access to all files held in the instance.
-
Jim McGuire: As UK Sales Manager, he must have full control of Sales files in London, and have visibility of sales activities in Paris. As a manager, he has clearance to the Sensitive level.
-
Helene Chirac: Based in the Paris office, she must view only files relating to Finance in Europe, and she has clearance only to the Internal level.
-
Catherine Godfrey: As a Regional Finance Manager based in New York, she must contribute Finance files for New York and view all other Finance documents. As a manager, she has clearance to Sensitive level.
-
4.4.3.2 Xalco Accounts
Access varies by location and job function, so this is reflected in the account structure:
-
London has Finance and Sales departments, so it needs two accounts:
-
London/Finance
-
London/Sales
-
-
New York has only a Finance department:
-
NewYork/Finance
-
-
Paris has both Finance and Sales departments:
-
Paris/Finance
-
Paris/Sales
-
This results in three top-level accounts (London, NewYork, Paris) and five lower-level accounts.
4.4.3.3 Xalco Roles
We need to create two roles for each security group (one for Consumers and one for Contributors)
-
PublicConsumer
-
PublicContributor
-
InternalConsumer
-
InternalContributor
-
SensitiveConsumer
-
SensitiveContributor
-
ClassifiedConsumer
-
ClassifiedContributor
4.4.3.4 Roles and Permissions Table
To give specific users the ability to start workflows, you would need to add Admin permission and Workflow rights to the Contributor role.
| Role | Public | Internal | Sensitive | Classified |
|---|---|---|---|---|
| PublicConsumer | R | |||
| PublicContributor | RWD | |||
| InternalConsumer | R | |||
| InternalContributor | RWD | |||
| SensitiveConsumer | R | |||
| SensitiveContributor | RWD | |||
| ClassifiedConsumer | R | |||
| ClassifiedContributor | RWD |
4.4.3.5 Roles and Users Table
| Role | David Smith | Helene Chirac | Jim McGuire | Catherine Godfrey |
|---|---|---|---|---|
| PublicConsumer | X | |||
| PublicContributor | X | X | X | |
| InternalConsumer | X | |||
| InternalContributor | X | X | X | |
| SensitiveConsumer | ||||
| SensitiveContributor | X | X | X | |
| ClassifiedConsumer | ||||
| ClassifiedContributor | X | X | X |
4.4.3.6 Accounts and Users Table
It would be sufficient to give David Smith RWDA permission on London, New York, and Paris accounts.
| Account | David Smith | Helene Chirac | Jim McGuire | Catherine Godfrey |
|---|---|---|---|---|
| London/Finance | RWDA | R | R | |
| London/Sales | RWDA | RWDA | ||
| NewYork/Finance | RWDA | RW | ||
| Paris/Finance | RWDA | R | ||
| Paris/Sales | RWDA | R |