7.9 Archive and Migration Strategies
This section provides information about several typical archiving and migration strategies.
Note:
All of the scenarios described in this section can be run manually or automatically (through replication).This section covers these topics:
7.9.1 Export
This section provides information about exporting.
A simple export is typically used to:
-
Store and later remove outdated content on a file system.
-
Store content on a file system for later retrieval.
-
Retain a 'snapshot' of a content server at a certain date and time.
The following are possible export-only configurations, shown in order from most to least typical:
-
Export to a collection on an external file system.

Description of the illustration exp_config1.gif
-
Export to one of the content server's own collections.
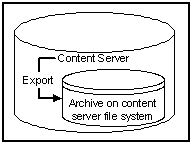
Description of the illustration exp_config2.gif
7.9.2 Import
This section provides information about importing.
A simple import is typically used to:
-
Retrieve content from storage after an unintended deletion.
-
Restore content from an archived 'snapshot' of a content server.
The following are possible import-only configurations, shown in order from most to least typical:
-
Import from a collection on an external file system.

Description of the illustration exp_config3.gif
-
Import from one of the content server's own collections.
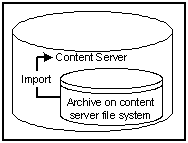
Description of the illustration exp_config4.gif
7.9.3 Self Export/Import
This section provides information about self export.
Self export/import is typically used to change content metadata to new values.
The following are possible self export/import configurations, shown in order from most to least typical:
-
Export to and import from one of the content server's own collections.
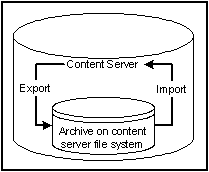
Description of the illustration exp_imp1.gif
-
Export to and import from a collection on an external file system.

Description of the illustration exp_imp2.gif
7.9.4 One-to-One Archiving
This section provides information about one-to-one archiving.
One-to-one archiving is used to copy or move content from one content server to another.
The following are possible one-to-one archiving configurations, shown in order from most to least typical:
-
Export, transfer, and import over sockets.
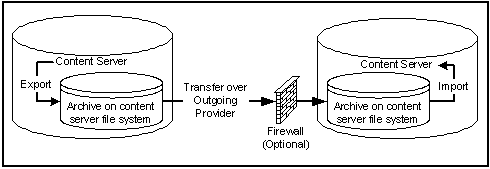
Description of the illustration exp_imp3.gif
-
Export, transfer, and import on a shared file system.
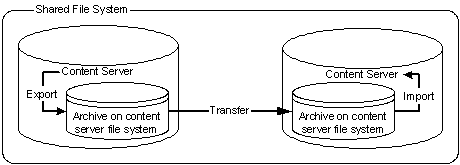
Description of the illustration exp_imp4.gif
-
Export to and import from a collection on a shared external file system.

Description of the illustration exp_imp5.gif
-
Export to the source content server's collection and import directly from that collection on a shared file system.
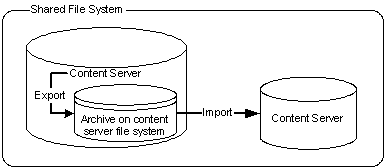
Description of the illustration exp_imp6.gif
-
Export from the source content server directly to a collection on the target content server and import from that collection on a shared file system.
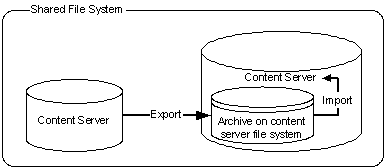
Description of the illustration exp_imp7.gif
7.9.5 One-to-Many Archiving
This section provides information about one-to-many archiving.
One-to-many archiving is typically used to copy or move content from a contribution server to consumption servers.
The following are possible one-to-many archiving configurations, shown in order from most to least typical:
-
Export, transfer, and import over sockets.
When this configuration is automated using replication, a separate export archive is required for each target server because the source files are deleted upon transfer. However, for manual transfer, you could transfer a single archive to multiple targets.
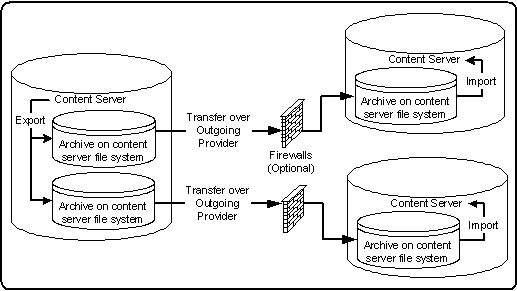
Description of the illustration exp_imp8.gif
-
Export, transfer, and import on a shared file system.
When this configuration is automated using replication, a separate export archive is required for each target server because the source files are deleted upon transfer. However, for manual transfer, you could transfer a single archive to multiple targets.
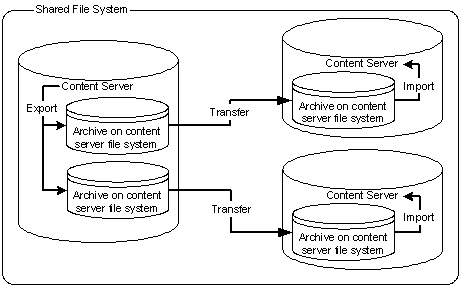
Description of the illustration exp_imp9.gif
-
Export to and import from a collection on a shared external file system.
When this configuration is automated using replication, a separate export archive is required for each target server because the source files are deleted upon import. However, for manual import, you could import a single archive from multiple targets.
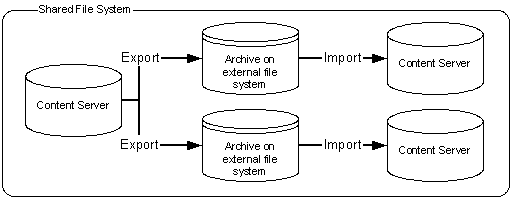
Description of the illustration exp_imp10.gif
-
Export to the source content server's collection and import directly from that collection on a shared file system.
When this configuration is automated using replication, a separate export archive is required for each target server because the source files are deleted upon import. However, for manual import, you could import a single archive from multiple targets.
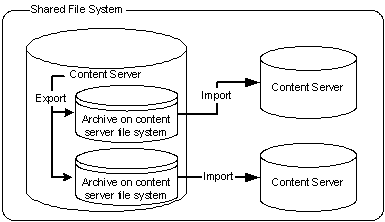
Description of the illustration exp_imp11.gif
-
Export from the source content server directly to collections on the target content servers and import from those collections on a shared file system.
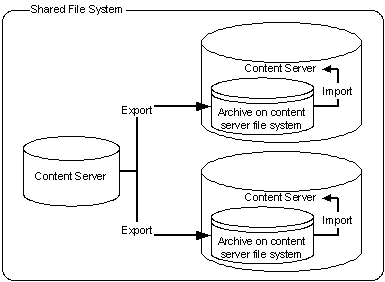
Description of the illustration exp_imp12.gif
7.9.6 Many-to-One Archiving
This section provides information about many-to-one archiving.
Many-to-one archiving is typically used to:
-
Copy or move content from several contribution servers to one consumption server.
-
Move sensitive content from several contribution servers to a more secure contribution server.
The following are possible many-to-one archiving configurations, shown in order from most to least typical:
-
Export, transfer, and import over sockets.
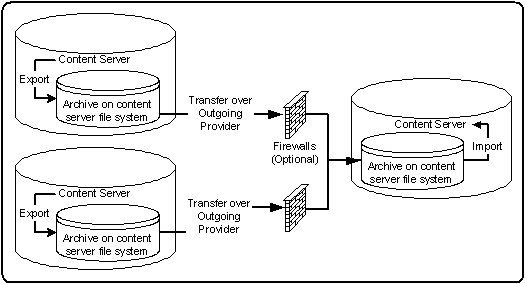
Description of the illustration exp_imp13.gif
-
Export, transfer, and import on a shared file system.
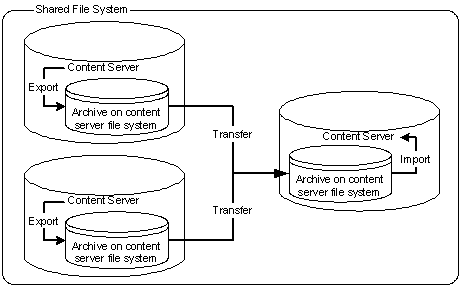
Description of the illustration exp_imp14.gif
-
Export to and import from a collection on a shared external file system.
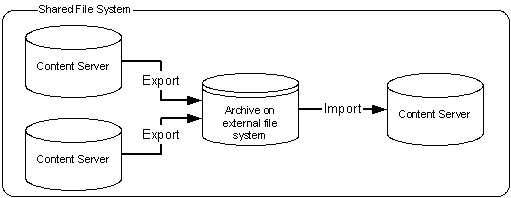
Description of the illustration exp_imp15.gif
-
Export to the source content servers' collections and import directly from those collections on a shared file system.
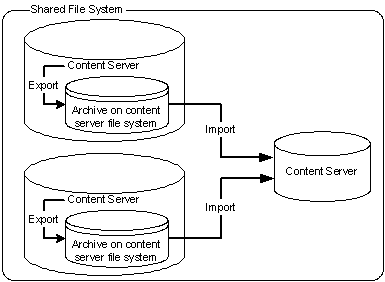
Description of the illustration exp_imp16.gif
-
Export from the source content servers directly to a collection on the target content server and import from that collection on a shared file system.
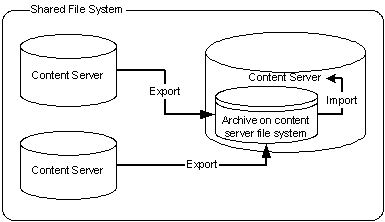
Description of the illustration exp_imp17.gif
7.9.7 Archiver Examples
This section provides examples that illustrate how to use Archiver to solve common business problems.
7.9.7.1 Copying a Content Server Instance to a Laptop
In this example, you need to set up a laptop computer with a copy of a content server instance for a colleague who will be traveling.
This procedure assumes that the source content server and the laptop computer have access to the same file system, and that the laptop computer has Content Server installed.
-
Open Archiver on the source content server.
-
Create a new archive.
-
Because you want to export all content, you do not need to create an export query.
-
To limit the file size of the archive, select the Latest Revisions option on the Edit Export Query screen.
-
If content types and user attributes need to be copied to the laptop system, select Content Configuration and User Configuration on the Export Data tab.
-
Set export options from the General tab:
-
To save space on the local system, select Replace Existing Export Files.
-
If your colleague needs web-viewable files, select Copy Web Content.
-
-
Initiate the export manually.
-
Open Archiver on the laptop content server.
-
Open the source collection and select the archive to import.
-
If content type and user attributes were exported, select these options on the Import Archive screen.
-
Initiate the import manually.
7.9.7.2 Transferring by Content Type and Author
In this example, you have a contribution content server where users submit content. You want to automatically archive HR content that is contributed by JChang to a content server in another building that serves as a Human Resources portal.
This procedure assumes that the two content servers do not have access to a shared file system, and that the Human Resources portal server should contain only the latest revision of each content item.
Set up an automated export on the Contribution content server:
-
Create an archive.
-
Set these export queries for the archive:
Field Operator Value Content Type Is HR Author Is JChang -
On the Edit Export Query screen:
-
Select the Export Revisions with Release Date later than most recent Export Date check box.
-
Select the Latest Revisions option.
-
-
Set export options from the General tab:
-
To save space on the local system, select Replace Existing Export Files.
-
To include web-viewable files in the archive, select Copy Web Content.
-
-
Export the archive manually.
-
On the Replication tab, register the archive as an automated exporter.
Set up an automated import on the HR Portal content server:
-
Create a target archive.
-
Select the target archive and ensure that the Update Override Action is set on the General tab.
-
Import the target archive manually.
-
On the Replication tab, register the archive as an automated importer.
Set up an automated pull transfer from the Contribution server to the HR Portal server:
-
On the Contribution content server, create an outgoing provider to the HR portal content server.
-
Open Archiver on the HR portal content server.
-
Open the target collection and make the target archive 'targetable.'
-
Open the source collection and select the source archive.
-
On the Transfer To tab, select the target archive as the target destination.
-
Run a manual transfer.
-
Set the transfer to be automated.
7.9.7.3 Changing Metadata Fields
In this example, you have a custom metadata field, ApprovedBy, which was used in one content server instance, but the field name must be changed to Sponsor for consistency with other content servers.
-
Create the new Sponsor metadata field.
-
Create an archive.
-
Manually export all content to the archive. (You do not need to create an export query.)
-
Set up the following import field map for the archive:
Export Field Target Field xApprovedBy Sponsor -
From the General tab, select Update as the Override Action.
-
Initiate the import manually.
-
Delete the ApprovedBy field from the content server.
7.9.7.4 Adding Content ID Prefixes
In this example, you have two content servers that are used as contribution servers, but you want to have all content available for consumption from both servers. You can set up an automatic transfer in both directions. However, both content servers use automatic Content ID generation with similar numbering schemes, which could result in errors or overwritten revisions if you import files with Content IDs that already exist on the target content server.
-
One way to avoid conflicts is to add a unique prefix in the Auto Number Prefix system property on both content servers.
-
Another way to accomplish this is to add a unique prefix during the import process:
To add content ID prefixes:
-
Set up the following value map on the first content server's import archive:
Input Value Field Output Value All check box Content ID server2_<$dDocName$> -
Set up the following value map on the second content server's import archive:
Input Value Field Output Value All check box Content ID server1_<$dDocName$>
7.9.7.5 Changing Release Dates
In this example, you are copying archives to other content servers using replication or transfer, but you want the release date on the target content server to be the date the content item was copied.
-
Set up an export and import for replication or transfer.
-
Select the archive to import in the target content server.
-
Set up the following import value map for the archive:
Input Value Field Output Value All check box Release Date <$dateCurrent()$>
The release dates will reflect the local date and time of the target content server.
7.9.8 Configuration Migration Tips
There are several points to keep in mind when using the Configuration Migration Utility.
-
If you use directory locations on the target system that differ from the standard content server installation directories, you cannot use Configuration Migration but must do a manual copy of the pertinent directories.
For example, if you use partitioned file systems and want to split content server storage on the partitions, you must add configuration variables to the DomainHome/ucm/cs/bin/intradoc.cfg file to point to the correct locations for the directories that are stored elsewhere.
-
If you are using different web servers for the source and the target systems, make sure to exclude the web server information when using Configuration Migration to prepare an export.
-
Not all components can be exported using the Configuration Migration Utility. For example, components that require an interactive installation cannot be exported. They must be installed separately on the target system.
-
Dynamic Converter rules are not transferred with the Configuration Migration Utility. They must be manually added to the target system by copying the data/conversion/cvtemplates.hda file from the source system to the target system. In addition, you should create an archive for dynamic converter templates and transfer them to the target system before transferring other content. Otherwise an error occurs when a document that is eligible for dynamic conversion is imported.
-
The Configuration Migration Utility is particularly useful for propagating a part of an instance to another. For example, some customization, such as workflows or content profiles, may best be designed and tested on a development instance. After they are tested they can be migrated to your production system. Other development work, such as component development, is probably best done using the Component Wizard and Component Manager for testing and deployment.
-
Problems can occur when importing archives if required fields and validated option lists are not considered. If metadata fields have been changed to be required or if option lists have been altered between one migration and another, it will be difficult to import content into another system with those same metadata field definitions. To avoid this problem, temporarily change required fields to be non-required and change option lists to be non-validated before importing data on a target system.
-
You can use the Configuration Migration Utility with the archiver to create a regular 'snapshot' of your instance.You should also make sure to make appropriate backups of your databases at the same time, to ensure that the entire system stays synchronized.
-
You should create a configuration migration package before creating an archive package to ensure that the appropriate metadata information is available on the importing content server.
-
Remember that migration is an additive process. The exporting configuration bundle of metadata information is added to the metadata that currently exists in the importing content server. If metadata information currently exists that matches the metadata being imported, and if the Force Overwrite rule has been selected during import, then the metadata on the importing content server is overwritten by the metadata from the exported bundle.