7 Checking Out Files
This section covers the following topics:
7.1 About Manual File Check-Out
Check-out is the process of locking a content item so that no other users can revise it. You must have write permission to the content item to check out a file or undo a check-out. Only one user at a time can check out a file; however, multiple users can continue to view the released file.
There are two approaches to checking out files manually:
-
For content items that could be revised by other users, it is a good idea to check out the file as soon as you know that you need to edit it. This prevents other users from checking in a new revision with potentially conflicting changes.
-
For content items that are unlikely to be revised by other users, you can make revisions to a copy of the file, check out the content item, and immediately check it back in with the edited file.
Once you have checked out a content item, you can either check in a revision or undo the check-out.
You can check out files automatically through your desktop application by using Desktop Integration Suite. For more information, see "Checking Out Content Files" in Oracle Fusion Middleware User's Guide for Desktop Integration Suite.
7.2 Checking Out Single Files
Use either of the following procedures to check out a single file:
To check out single files from a Content Information page:
-
Display the Content Information Page of the content item you want to check out.
-
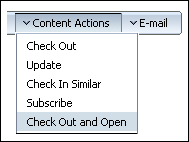
Select Check Out from the Content Actions menu. The Check-Out Confirmation Page is displayed.
-
If applicable, click Native File Link to get a copy of the native file.
-
If a dialog window appears before the Save As window, choose to save the file to disk.
-
On the Save As window, navigate to the location where you want to save the file and click Save.
-
Start the native application (for example, Word or PowerPoint) and locate the file where you saved it in step 5.
-
Edit the file in its native application and then save the file.
To check out single files from a Search Results page:
-
Search for content to view a search results list.
-
Select Headline View or Thumbnail View from the Content Actions menu.
-
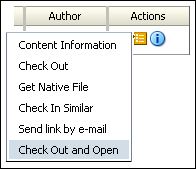
Click the Action icon and select Check Out from the contextual menu. The Check-Out Confirmation Page is displayed.
-
If applicable, click Native File Link to get a copy of the native file.
-
If a dialog window appears before the Save As window, choose to save the file to disk.
-
On the Save As window, navigate to the location where you want to save the file and click Save.
-
Start the native application (for example, Word or PowerPoint) and locate the file where you saved it in step 6.
-
Edit the file in its native application and then save the file.
7.3 Using Check Out and Open
When the Check Out and Open component is enabled, which it is by default, you may open content items using the added Check Out and Open option in the item action menu on a search results page, or from the Content Actions menu on a content information page. This opens the item directly in a WebDAV-compliant native application from Content Server. Before using Check Out and Open, verify with your system administrator what WebDAV-compliant applications are in use, and make sure that the content item you are checking out is associated with one of the compliant applications.
This section covers the following topics:
7.3.1 About Checking Out and Opening Content
When you check out and open a content item, the content item opens in its native application if the application is WebDAV-compliant (for example, Microsoft Word). You can edit the content item and check it back into the content server using that application. Each time you save the content item in the native application, a new revision of the item is checked into the content server.
Important:
Pay close attention to the status of a content item you attempt to check out using Check Out and Open, both in Content Server and in the native application you are using to edit the file. If you open the file and notice that the title bar designates the file to be Read Only, then it is not available for editing. Any changes you make to the file will not be checked in as a new revision.Instead, the application prompts you to save the file as a new item on a local file system. A file is designated as Read Only if it is in a workflow process. This does not prevent you from opening the file for viewing or editing as a new item. This is identical to the behavior of opening a file whose properties are set to Read Only on a file system. A content item will not open if it is checked out by another user.
7.3.2 Opening Content from Content Server
Use either of the following procedures to check out a single file.
To open content from a Content Information page:
-
Display the Content Information Page of the content item you want to check out.
-
Select Check Out and Open from the Content Actions menu. The content item is checked out from Content Server transparently and opened in a WebDAV compliant native application, such as Microsoft Word.
-
Edit the content item, save the changes and close the file. The content is checked back into Content Server transparently as a new revision.
To open content from a Search Results page:
-
Search for content to view a search results list.
-
Select Headline View or Thumbnail View from the Content Actions menu.
-
Click the Action icon and select Check Out and Open from the contextual menu. The content item is checked out from Content Server transparently and opened in a WebDAV compliant native application, such as Microsoft Word.
-
Edit the content item, save the changes and close the file. The content is checked back into Content Server transparently as a new revision.
Note:
The Check Out and Open options are available in the Content Actions menu of a content item's current revision only.
7.4 Checking Out Multiple Files
This section covers the following topics:
7.4.1 About Multiple File Check-Out
You can get a copy of multiple content items at one time using the download applet. When you download files, you also have the option to check out the content items and/or uncompress any compressed zip files.
7.4.2 Download Applet Requirements
You can use the download applet to check out multiple files only if the following conditions are all true:
The system administrator has enabled the download applet on the content server.
-
The Enable download applet check box is selected in your User Profile Page.
-
You are using a Java-enabled web browser.
The download applet requires permission to access the local drive. When you run a search for the first time after enabling this applet, you may see a Java security warning:
-
If your system is using the Sun Java plug-in, when you encounter this message box, click Run. If you do not want to be prompted again with this message box, select Always trust content from this publisher then click Run.
-
If your system is using the Microsoft plug-in for Internet Explorer, click Yes to give full permissions. If you do not want to be prompted again with this message box, select Always trust software from Oracle Incorporated, and click Yes.
7.4.3 Download Options on Search Results Pages
When the download applet is enabled, the following features are added to search results pages.
| Element | Description |
|---|---|
| Download | This link downloads the selected content items. |
| Select All check box | Selects all items in the search result list. |
| Select check boxes | Selects content items to be downloaded when the Download Selected button is clicked. |
7.4.4 Downloading Multiple Files
Use the following procedure to download and check out multiple content items using the download applet:
-
Locate the files to download by drilling down the hierarchical link structure (the "Library") or by performing a search. For details see Chapter 4, "Finding Content Items".
The Download Files Screen is displayed.
-
To download all content items on the Search Results page, click Download All.
-
To download selected content items, select the corresponding Select check boxes and click Download Selected.
The Download Files Screen is displayed.
-
Select the type of file to download: Web Viewable or Native.
-
To uncompress zip files during the download process, select the Extract zip file contents check box.
-
If you selected the Native option and you want to check out the content items upon download, select the Check out file check box.
-
In the Download Location field, enter the path where you want the files to be copied. You can click Browse and navigate to the directory to select it.
-
If you want a different file name for the downloaded file, change the file name in the Download Location field. This applies only to the current file. If you click Download All, all other files will retain their default file names.
-
Click one of the following buttons:
-
Download: to download the current file only.
-
Download All: to download all selected files that have not been skipped (you will not be prompted for each file that was selected).
-
Skip: to not download the current file and go to the next selected file.
-
Cancel: to cancel the download.
-
-
If a file with the same file name already exists in the target location, you will be asked whether you want to overwrite it. Click a button to indicate whether you want to overwrite one or more files.
When downloading is complete, the Download Results Summary is displayed.
-
Click OK.

