12 Using Oracle SOA Composer with Oracle Business Rules
Oracle Business Rules lets you create rules at design-time with the Oracle Business Rules Designer (Rules Designer) extension to Oracle JDeveloper. Rules Designer is an editor that enables you to create and edit rules with Oracle JDeveloper, and store the rules in a rules dictionary. When a dictionary is deployed in an SOA composite application, Oracle Business Rules lets you use SOA Composer to view, edit, and commit changes to a dictionary. This chapter shows you how to use the SOA Composer application (SOA Composer) to work with a deployed dictionary that is part of an SOA composite application.
This chapter includes the following sections:
-
Section 12.3, "Opening and Viewing an Oracle Business Rules Dictionary at Run Time"
-
Section 12.4, "Getting Started with Editing and Saving a Dictionary at Run Time"
-
Section 12.5, "Committing Changes for an Oracle Business Rules Dictionary at Run Time"
-
Section 12.6, "Editing Rules in an Oracle Business Rules Dictionary at Run Time"
-
Section 12.8, "Editing Decision Tables in an Oracle Business Rules Dictionary at Run Time"
-
Section 12.9, "Synchronizing Rules Dictionary in Oracle JDeveloper With Run Time Dictionary Updates"
-
Section 12.10, "Validating an Oracle Business Rules Dictionary at Run Time"
-
Section 12.12, "Obtaining Composite and Dictionary Information at Run Time"
12.1 Introduction to SOA Composer
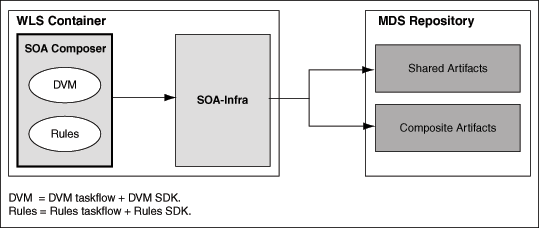
Oracle SOA Composer is a Web-based application that allows you to work with Oracle Business Rules dictionaries for deployed applications. Figure 12-1 shows how SOA Composer accesses a dictionary in an MDS repository.
12.2 Using SOA Composer User Authentication
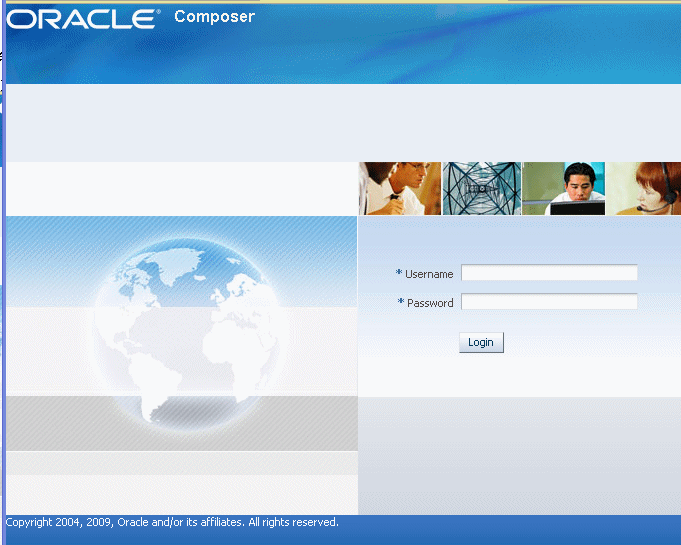
Figure 12-2 shows the SOA Composer login page. This page allows SOA Composer to authenticate the specified user.
Figure 12-2 Oracle SOA Composer Login Page
Description of "Figure 12-2 Oracle SOA Composer Login Page"
-
In the SOA Composer login page in the Username field, enter a user name.
-
In the Password field, enter a password.
-
Click Login.
For information on creating and managing users and groups, see Oracle Fusion Middleware Oracle WebLogic Server Administration Console Help.
12.2.1 What You Need to Know About SOA Composer Access Control and User Authentication
SOA Composer supports user and password access control and only authenticated users can use SOA Composer. However, SOA Composer does not provide finer grained access control. For example, SOA Composer does not support access control for individual rulesets or rules within a dictionary.
SOA Composer does support access control to metadata. Using SOA Composer, only users with the SOADesigner application role can access the metadata from SOA Composer. By default all the users with the WLS Administrator privileges have this role.
If a user without the SOADesigner role logs into SOA Composer, a message is shown indicating the user is not authorized to modify the SOA metadata, as shown in Figure 12-3.
Figure 12-3 SOA Composer Unauthorized Metadata Access Message

Description of "Figure 12-3 SOA Composer Unauthorized Metadata Access Message"
12.3 Opening and Viewing an Oracle Business Rules Dictionary at Run Time
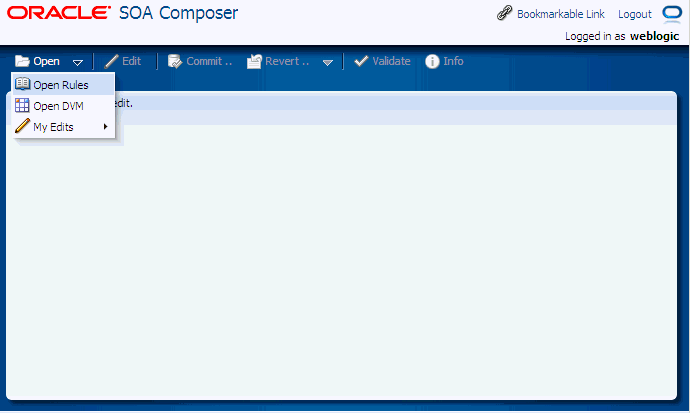
After you login to SOA Composer you can select a document to open. SOA Composer supports viewing and editing different types of metadata, including a DVM document or an Oracle Business Rules dictionary. In SOA Composer you can open either an Oracle Business Rules dictionary or a DVM file with the Open menu as shown in Figure 12-4.
Figure 12-4 Oracle SOA Composer Open Menu Options
Description of "Figure 12-4 Oracle SOA Composer Open Menu Options"
12.3.1 Opening an Oracle Business Rules Dictionary at Run Time
To open an Oracle Business Rules dictionary using the Open menu:
-
In SOA Composer, from the Open menu, select Open Rules.
-
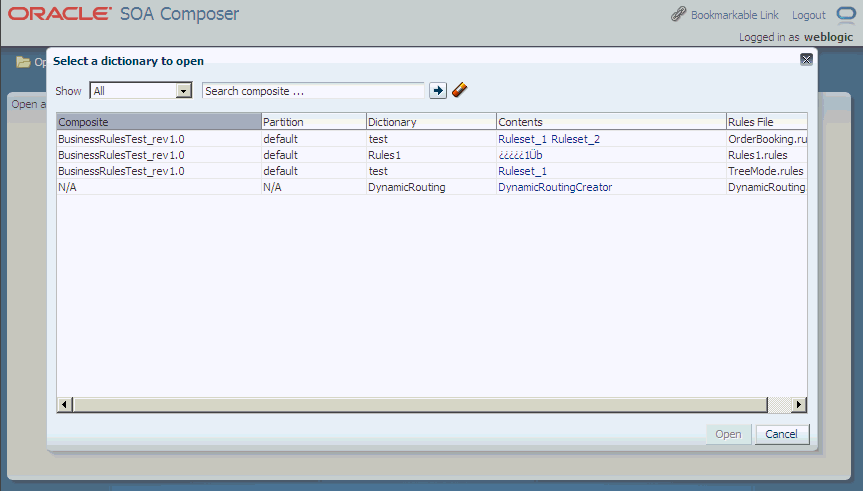
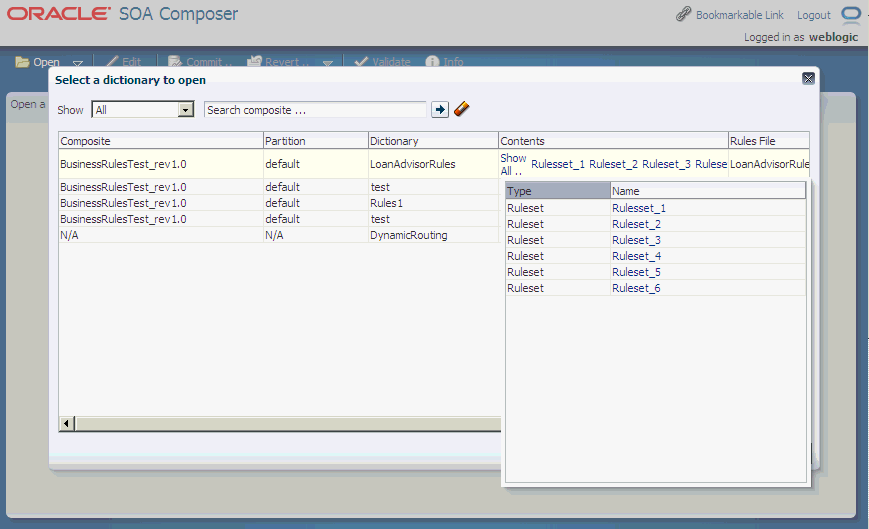
When you select Open Rules, SOA Composer connects to MDS and displays the Select a dictionary to open dialog box. This dialog box presents the available composite applications that contain dictionaries, as shown in Figure 12-5. In addition, it lists the shared dictionaries, and these shared dictionaries can also be viewed and edited.
Figure 12-5 SOA Composer with Oracle Business Rules Dictionaries
Description of "Figure 12-5 SOA Composer with Oracle Business Rules Dictionaries"
-
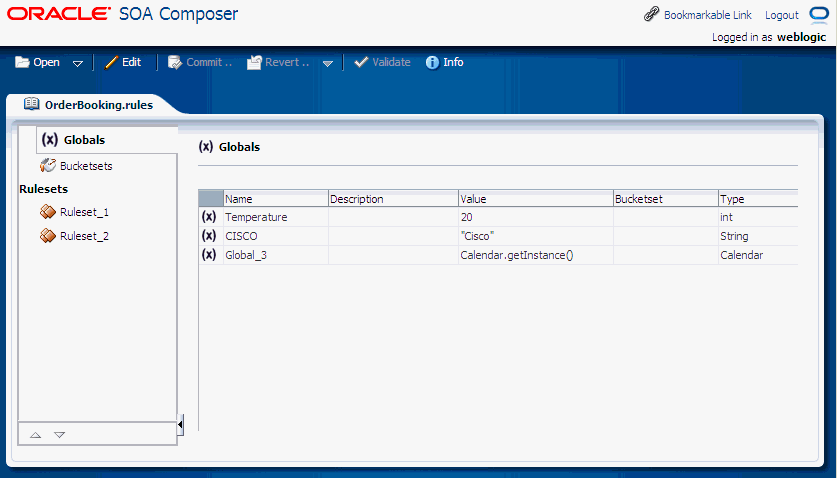
To open a dictionary select an entry in the table and click Open or double-click an item. This opens the dictionary in view mode, as shown in Figure 12-6.
Figure 12-6 Oracle Business Rules Dictionary Open in SOA Composer View Mode
Description of "Figure 12-6 Oracle Business Rules Dictionary Open in SOA Composer View Mode"
As shown in Figure 12-6, SOA Composer shows a dictionary that displays a left-side panel with a list of tabs and links. Dictionary details for the selected item are shown on the right-hand side. SOA Composer includes the following tabs:
-
Globals
-
Bucketsets
-
Rulesets
Note:
Functions, Links, and Decision Functions are not supported in SOA Composer.By default, a dictionary is opened in the view mode. If a dictionary is previously opened in the edit mode and the changes made, if any, are not reverted, the next time when you open it, SOA Composer opens the dictionary in the edit mode. For more information on Edit mode, see Section 12.4, "Getting Started with Editing and Saving a Dictionary at Run Time".
To open an Oracle Business Rules dictionary directly using a known URL:
If you know the URL for a document that stores an Oracle Business Rules dictionary, you can start SOA Composer and open the document by supplying the URL:
-
Obtain the URL for the document you want to open in SOA Composer.
-
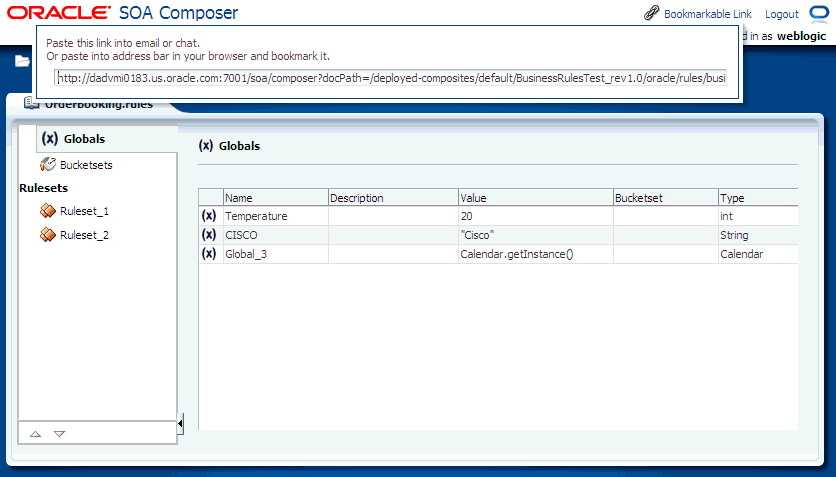
With an Open document you can obtain the URL from the SOA Composer Bookmarkable Link. Click Bookmarkable Link to obtain the URL information for an open dictionary, as shown in Figure 12-7.
Figure 12-7 Using Link Dialog to Obtain the URL for an Open Dictionary
Description of "Figure 12-7 Using Link Dialog to Obtain the URL for an Open Dictionary"
-
Enter the URL and append the document path in a browser to open SOA Composer with the specified document.
For example,
http://dadvmi0183.us.oracle.com:7001/soa/composer?docPath=/deployed-composites/default/BusinessRulesTest_rev1.0/oracle/rules/businessrulestest/OrderBooking.rules
To open and edit a recently edited dictionary using the My Edits option:
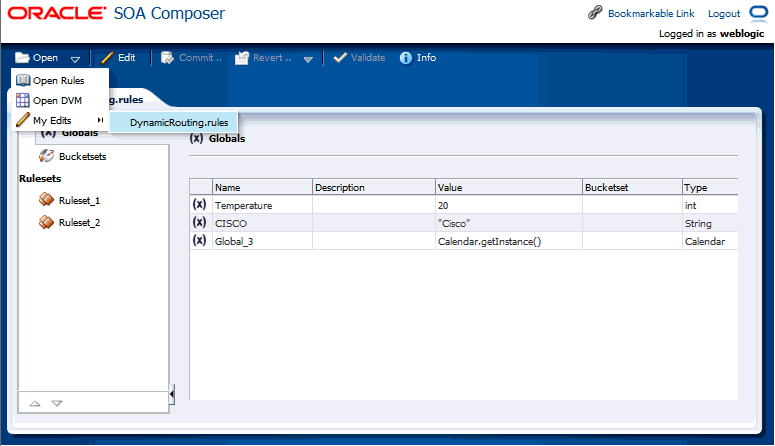
If you recently edited a dictionary, then you can use the Open menu My Edits option to open and edit a dictionary.
-
In SOA Composer, from the Open menu select My Edits and select a dictionary from the list, as shown in Figure 12-8.
Figure 12-8 Using Open My Edits Option to Open a Dictionary
Description of "Figure 12-8 Using Open My Edits Option to Open a Dictionary"
-
SOA Composer opens the specified dictionary in edit mode.
To open a ruleset in an Oracle Business Rules dictionary:
-
When you select Open Rules, SOA Composer connects to MDS and presents the available composite applications that contain dictionaries.
-
To open a ruleset, if the ruleset you want to open is shown in the Contents field, then select the ruleset. If the ruleset is not shown, then click Show All as shown in Figure 12-9.
Figure 12-9 Opening a Ruleset from the Contents Field in SOA Composer
Description of "Figure 12-9 Opening a Ruleset from the Contents Field in SOA Composer"
-
Select a ruleset from the Name field in the list. This opens the rules editor with the specified ruleset selected.
12.3.2 What You Need to Know When You Open an Oracle Business Rules Dictionary
When you use the Open menu and select Open Rules to open a dictionary, SOA Composer shows you all the metadata artifacts associated with the soa-infra that is co-located with the running SOA Composer application. From the supplied list, as shown in Figure 12-9, you select the composite, dictionary, and ruleset to open.
12.3.3 What You Need to Know to Obtain the Dictionary Path from the Open Dialog
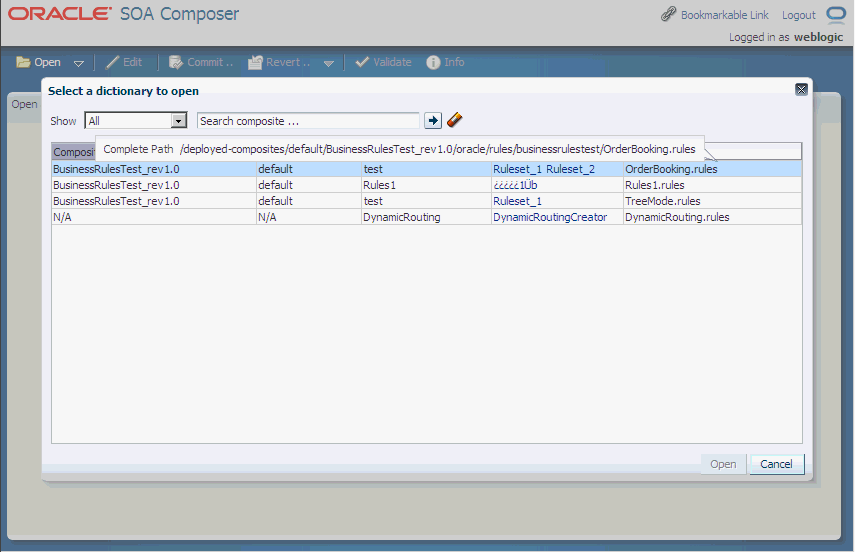
The Open Dialog includes a Rules File field. When you hold the mouse over the values in the Rules File field, SOA Composer shows a "Complete Path" popup that includes the dictionary path, as shown in Figure 12-10.
Figure 12-10 Showing the Dictionary Rules File Complete Path from the Open Dialog
Description of "Figure 12-10 Showing the Dictionary Rules File Complete Path from the Open Dialog"
12.3.4 Viewing Globals in an Oracle Business Rules Dictionary at Run Time
When you open a dictionary SOA Composer displays the Globals tab. The Globals tab only shows final global variables (global variables with Final option selected). Final global variables from linked dictionaries are also displayed in the Globals tab. However, these linked global variables are not editable even in the edit mode.
You cannot create or delete global variables. From the Globals tab, in edit mode, you can edit the Name, Description, and Value fields. For the Value field, you can use the expression builder to set the value. To check for validity, you can click Validate button on the SOA Composer menu bar. In view mode, the edit operations are not available. For information on using the SOA Composer edit mode, see Section 12.4, "Getting Started with Editing and Saving a Dictionary at Run Time".
To view globals in SOA Composer:
-
In SOA Composer, from the Open menu, select Open Rules.
-
After you open a dictionary, select the Globals tab from the left-side pane. This displays the Globals table, as shown in Figure 12-11.
Figure 12-11 Using the SOA Composer Rules Dictionary Globals Tab

Description of "Figure 12-11 Using the SOA Composer Rules Dictionary Globals Tab"
12.3.5 Viewing Bucketsets in an Oracle Business Rules Dictionary at Run Time
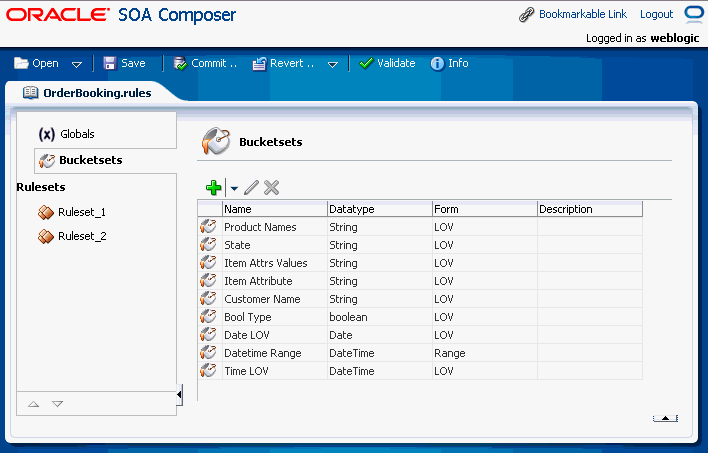
When you open a dictionary and select the Bucketsets tab, if the dictionary contains bucketsets, the table shows all the bucketsets. Bucketsets from linked dictionaries are also displayed in the Bucketsets table. You can select a linked bucketset and click the Edit button to view the buckets. However, a linked bucketset is not editable even in the edit mode.
For information on the SOA Composer edit mode, see Section 12.4, "Getting Started with Editing and Saving a Dictionary at Run Time".
To view bucketsets in SOA Composer:
-
In SOA Composer, from the Open menu select Open Rules.
-
After you open a dictionary, select the Bucketsets tab from the left-side pane. This displays the Bucketsets table, as shown in Figure 12-12.
Figure 12-12 Using the SOA Composer Rules Dictionary Bucketsets Tab
Description of "Figure 12-12 Using the SOA Composer Rules Dictionary Bucketsets Tab"
12.3.6 Viewing Rulesets in an Oracle Business Rules Dictionary at Run Time
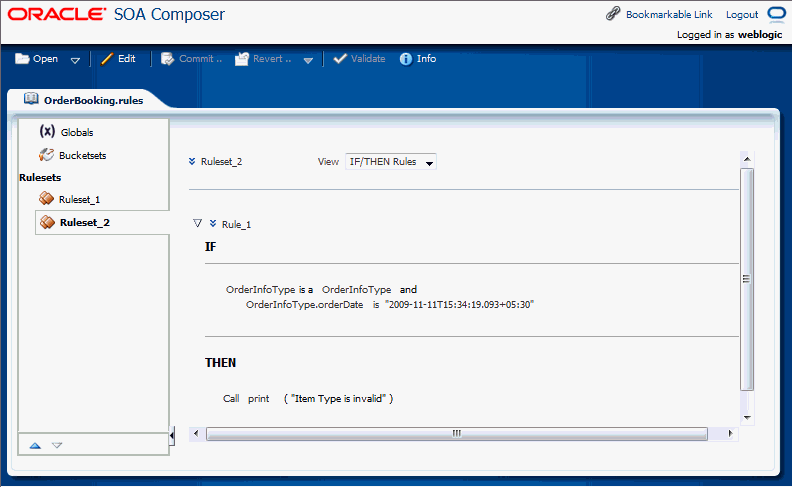
SOA Composer displays the rulesets in the dictionary on the left-side panel, as shown in Figure 12-13. You can select a ruleset to display a detailed view of the ruleset. In view mode, all the rules in the ruleset are displayed but they are not editable. For information on the SOA Composer Edit mode, see Section 12.4, "Getting Started with Editing and Saving a Dictionary at Run Time".
Note:
Using SOA Composer in edit mode, you cannot create or delete rulesets. You can view and modify rulesets.Figure 12-13 Using the SOA Composer Rules Dictionary Rulesets Tab to View Rules
Description of "Figure 12-13 Using the SOA Composer Rules Dictionary Rulesets Tab to View Rules"
To select the next ruleset or previous ruleset:
-
In SOA Composer, open a dictionary and select a ruleset.
-
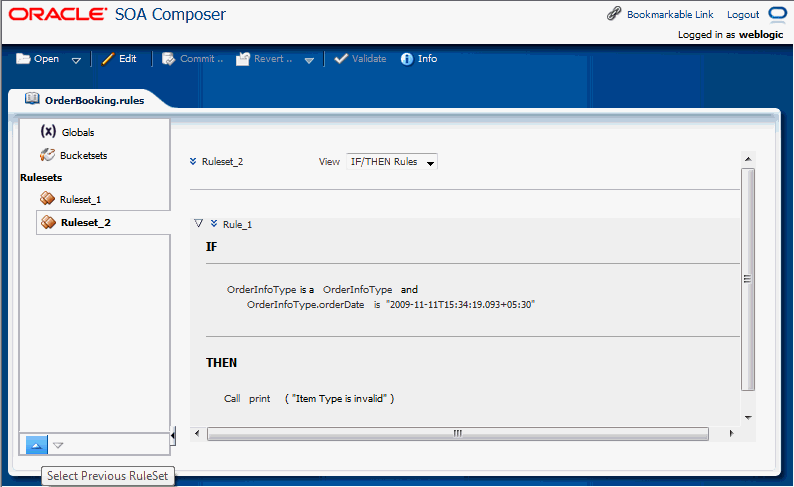
When you are viewing a ruleset, you can click Select Next Ruleset or Select Previous Ruleset to view the next or the previous ruleset, as shown in Figure 12-14.
Figure 12-14 Using the SOA Composer Rules Dictionary Rulesets Tab to Select Next Ruleset
Description of "Figure 12-14 Using the SOA Composer Rules Dictionary Rulesets Tab to Select Next Ruleset"
12.4 Getting Started with Editing and Saving a Dictionary at Run Time
When you select and open a dictionary SOA Composer shows the dictionary in read only mode. From each tab in view mode, you enter edit mode for the dictionary item by selecting the Edit menu. In edit mode, after you make changes, click Save to save your changes. Saving changes saves the dictionary to a work area. To apply the changes to the run time version of the dictionary, click Commit.
If you decide you do not want to apply the changes, you can revert the changes by selecting either of the following:
-
Click Revert on the SOA Composer menu and then select Clear all unsaved changes.
This clears only the unsaved changes.
-
Click Revert on the SOA Composer menu and then select Clear all session edits and saved changes.
This aborts all the changes done as part of the existing edit session.
12.4.1 Editing Bucketsets in an Oracle Business Rules Dictionary at Run Time
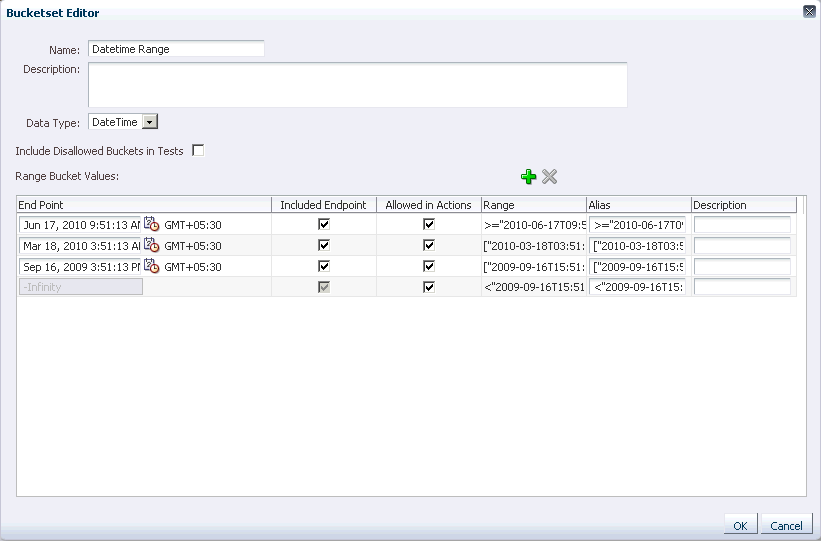
In SOA Composer, selecting the Bucketsets tab shows you a table listing the bucketsets in the dictionary. To edit a bucketset, select the appropriate row, and click the Edit Bucketset icon to display the Bucketset Editor. Depending on the type of the bucketset, Range, Enum, or LOV, this displays a corresponding Edit bucketset page. You can create a Range Bucketset by clicking Add Bucketset icon and selecting a type. This adds a new row in the Bucketsets table. For example, for Date types, such as Date, DateTime, or Time, a calendar is displayed for selecting the date, time, and timezone. Adding a bucket automatically adds an end point for a range bucket and a value for an LOV bucket based on the datatype. You can modify the newly added bucket end point or value. Note that the alias is modified when an end point or value is changed.
To delete a bucketset, select a row and click Delete.
-
To edit a Range bucketset, in SOA Composer select the Bucketsets tab. This displays a table listing the bucketsets in the dictionary.
-
To edit a Range bucketset, select the appropriate Range bucketset row and click the Edit Bucketset icon. This displays the Bucketset Editor page, as shown in Figure 12-15.
Figure 12-15 Using Bucketset Editor to Edit a Range Bucketset
Description of "Figure 12-15 Using Bucketset Editor to Edit a Range Bucketset"
-
Use the Bucketset Editor to edit the appropriate fields in the bucketset. You can click Add Bucket to add a bucket, and also select a row and click Delete Bucket to delete a bucket.
-
Click OK to confirm the changes.
-
To edit an LOV bucketset, in SOA Composer select the Bucketsets tab. This displays a table listing the bucketsets in the dictionary.
-
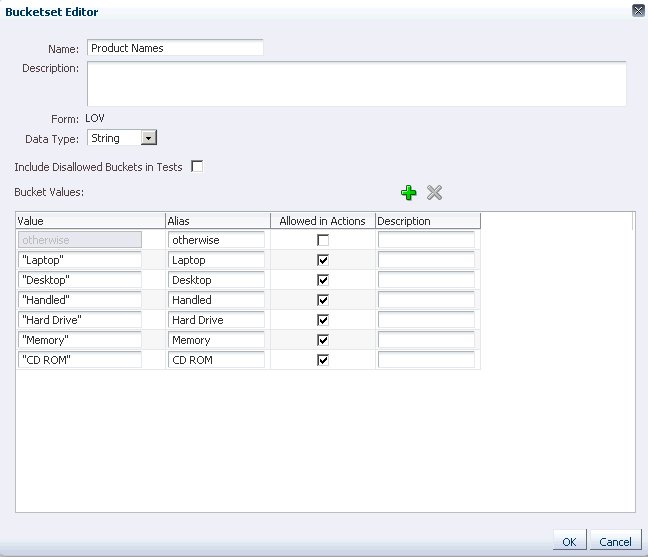
To edit an LOV bucketset, select the appropriate LOV bucketset row and click the Edit Bucketset icon. This displays the Bucketset Editor page, as shown in Figure 12-16.
Figure 12-16 Bucketset Editor Dialog to Edit an LOV Bucketset
Description of "Figure 12-16 Bucketset Editor Dialog to Edit an LOV Bucketset"
-
Use the Bucketset Editor to edit the appropriate fields in the bucketset. You can click Add Bucket to add a bucket, and also select a row and click Delete Bucket to delete a bucket.
-
Click OK to confirm the changes.
12.4.2 What You Need to Know About Editing Bucketsets
Only when a bucket has the Allowed in Actions field selected does the bucketset display in the condition cell drop-down in a Decision Table.
Click Validate in the menu bar to validate the dictionary while making changes to a bucketset.
12.4.3 Using Oracle Business Rules Dictionary Editor Declarative Component
You can use the Oracle Business Rules Dictionary Editor composite declarative component to leverage the functionality of editing Rules Dictionaries in any ADF-based Web application. It enables you to edit business rules metadata artifacts, such as Globals, Bucketsets, and Rulesets, by using the Rules SDK2 API.
For more information on Oracle Business Rules Dictionary Editor, see "Using the Oracle Business Rules Dictionary Editor Declarative Component" in Oracle Fusion Middleware Developer's Guide for Oracle SOA Suite.
12.4.4 Using Oracle Business Rules Dictionary Editor Task Flow
Rules Dictionary Editor Task Flow, which is a wrapper around the Rules Dictionary Editor declarative component is used in ADF-based Web applications that require a task flow instead of a declarative component.
For more information on Oracle Business Rules Dictionary Editor, see "Using the Oracle Business Rules Dictionary Task Flow" in Oracle Fusion Middleware Developer's Guide for Oracle SOA Suite.
12.5 Committing Changes for an Oracle Business Rules Dictionary at Run Time
After you verify dictionary modifications, you can commit those changes to the MDS repository.
To commit changes to an Oracle Business Rules dictionary:
-
Click the Commit menu item.
-
In the Confirm dialog, click No if you do not want to make the changes in the MDS repository.
-
In the Confirm dialog, click Yes if you do want to make the changes in the MDS repository.
Note:
A dictionary with validation errors can be saved, but it can be committed only after correcting the validation issues.12.5.1 What You Need to Know About Editing With Multiple Users at Run Time
When multiple users are editing the same dictionary, SOA Composer shows a message that the dictionary is being edited by another user and asks for a confirmation. When multiple users work on a single dictionary, only the last commit is persisted.
12.6 Editing Rules in an Oracle Business Rules Dictionary at Run Time
In SOA Composer with edit mode you can edit, add, and delete rules in a ruleset. For more information on how to use edit mode, see Section 12.4, "Getting Started with Editing and Saving a Dictionary at Run Time".
12.6.1 Editing Rules in an Oracle Business Rules Dictionary at Run Time
SOA Composer allows you to edit the rules in a dictionary.
To edit a rule with SOA Composer:
-
In SOA Composer, with an Oracle Business Rules dictionary open, select a ruleset.
-
Click the Edit menu item.
-
SOA Composer shows a confirm dialog if another user is currently editing the same dictionary. In the confirm dialog, click No or Yes, depending on whether you want to edit the document (if you click Yes, your changes could conflict with another user's changes). For more information, see Section 12.5.1, "What You Need to Know About Editing With Multiple Users at Run Time".
-
SOA Composer creates an area to save any modifications you make to the dictionary, and the Edit menu changes to a Save menu.
Note:
The Edit view provides an interface to the dictionary that allows you to edit most dictionary components (you can only create and edit some dictionary components at design-time using the Rules Designer extension to Oracle JDeveloper). -
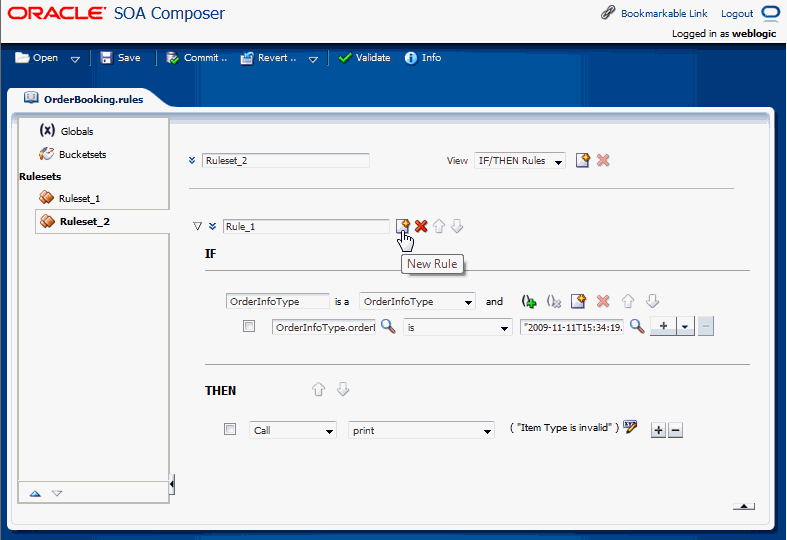
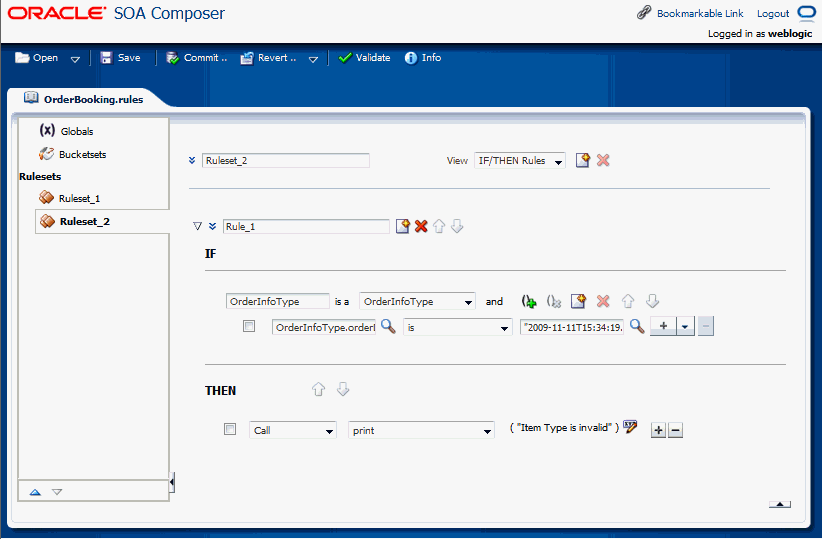
To edit an item in the dictionary, in the navigation tab, select the item of interest. For example, see Figure 12-17 with the ruleset Ruleset_2 selected.
Figure 12-17 Using SOA Composer to Edit a Ruleset in a Dictionary
Description of "Figure 12-17 Using SOA Composer to Edit a Ruleset in a Dictionary"
-
Click the Save menu item to save your changes in the work area.
12.6.2 Adding a Rule at Run Time
In SOA Composer you can add rules to a ruleset.
-
In edit mode, select a ruleset of interest.
-
In the rule area, click New Rule as shown in Figure 12-18. The rule is added immediately after the current one unlike Rules Designer, where a new rule is added at the end.
12.6.3 Deleting a Rule at Run Time
In SOA Composer you can delete rules in a ruleset.
To delete a rule in a ruleset:
-
In edit mode, select a ruleset of interest.
-
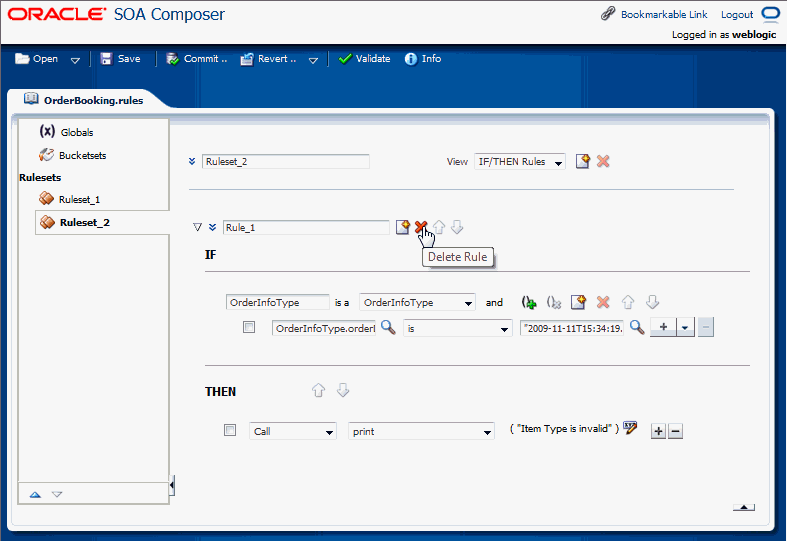
In the rule area locate the rule you want to delete and click Delete Rule, as shown in Figure 12-19.
Figure 12-19 Deleting a Rule in a Ruleset
Description of "Figure 12-19 Deleting a Rule in a Ruleset"
12.6.4 Showing and Editing Advanced Settings for Rules at Run Time
In SOA Composer you can edit advanced settings for rules in a ruleset. For more information on advanced settings, see Section 4.5, "Using Advanced Settings with Rules and Decision Tables".
To show and edit advanced settings in a rule:
-
In edit mode, select a ruleset of interest.
-
In the rule area locate the rule you want to show or change advanced settings.
-
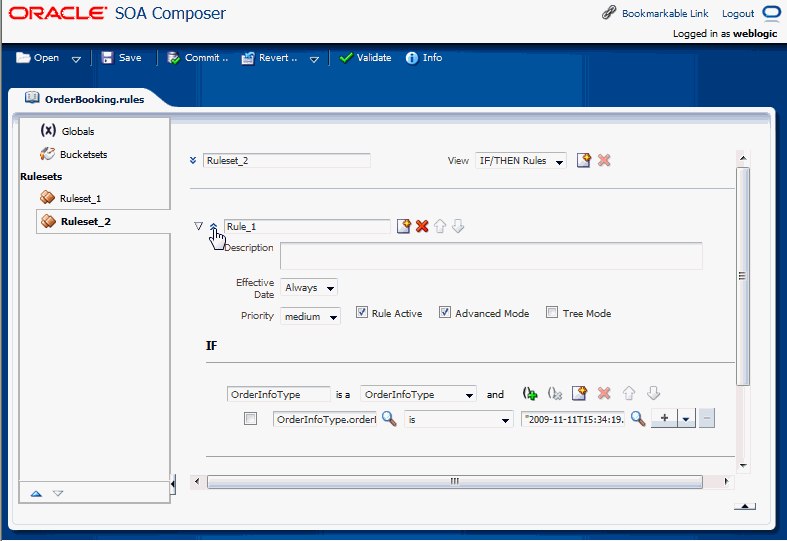
Click the Show Advanced Settings icon next to the rule name. This displays the advanced settings, as shown in Figure 12-20.
Figure 12-20 Showing and Editing Rule Advanced Settings
Description of "Figure 12-20 Showing and Editing Rule Advanced Settings"
12.6.5 Adding Rule Conditions at Run Time
In SOA Composer you can add conditions to a rule in a ruleset. For more information on working with rule conditions, see Section 4.3, "Working with Rules".
-
In edit mode, select a ruleset of interest.
-
In the rule area locate the rule where you want to add a condition.
-
Next to the rule condition, click Insert Test as shown in Figure 12-21. This adds a condition immediately after the current one.
Figure 12-21 Adding a New Rule Condition in a Ruleset
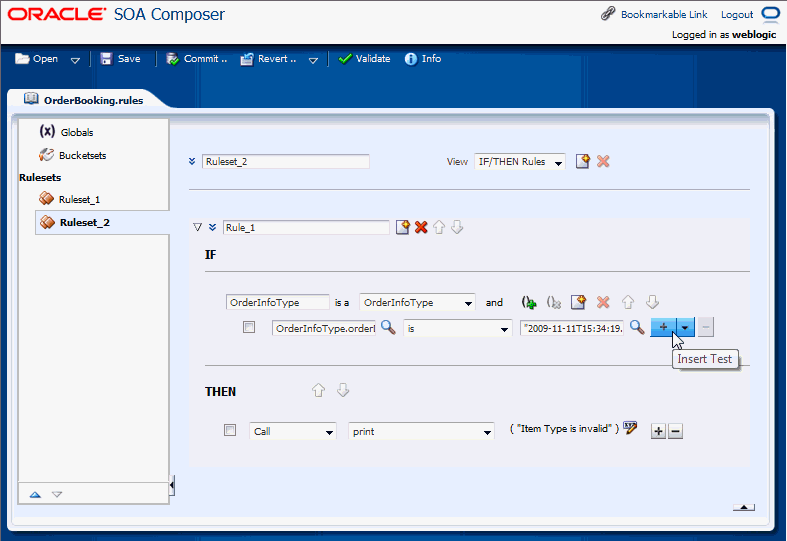
Description of "Figure 12-21 Adding a New Rule Condition in a Ruleset"
12.6.6 Deleting Rule Conditions at Run Time
In SOA Composer you can delete conditions for a rule in a ruleset. For more information on working with rule conditions, see Section 4.3, "Working with Rules".
-
In edit mode, select a ruleset of interest.
-
In the rule area, locate the rule where you want to delete a condition.
-
Click Delete Test next to the rule condition, as shown in Figure 12-22.
Figure 12-22 Deleting a Rule Condition in a Ruleset
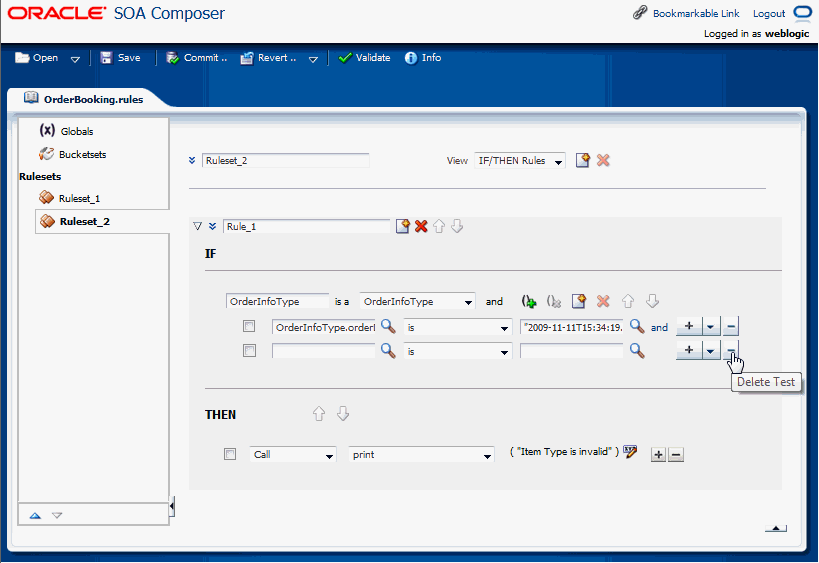
Description of "Figure 12-22 Deleting a Rule Condition in a Ruleset"
12.6.7 Modifying Rule Conditions at Run Time
Using SOA Composer, you can edit conditions in a rule. You can select a rule condition for nesting or modify expression values within the condition. For more information on working with rule conditions, see Section 4.3, "Working with Rules".
To modify a condition in a rule:
-
In edit mode, select a ruleset of interest.
-
In the rule area locate the rule where you want to modify conditions.
-
In the IF area, use the controls, icons, and selection boxes, including the Left Value expression icon, list for an operator, and Right Value expression icon to modify the condition.
You can use the Expression Builder, Condition Browser, Date Browser, and Right Operand Browser to edit the left and right-side expressions.
12.6.8 Adding Rule Actions at Run Time
In SOA Composer you can add actions to a rule. For more information on working with rule actions, see Section 4.3, "Working with Rules".
-
In edit mode, select a ruleset of interest.
-
In the rule area locate the rule where you want to add an action.
-
In the THEN area for the rule, next to the rule action click Insert Action, as shown in Figure 12-23.
Figure 12-23 Adding a Rule Action in a Ruleset
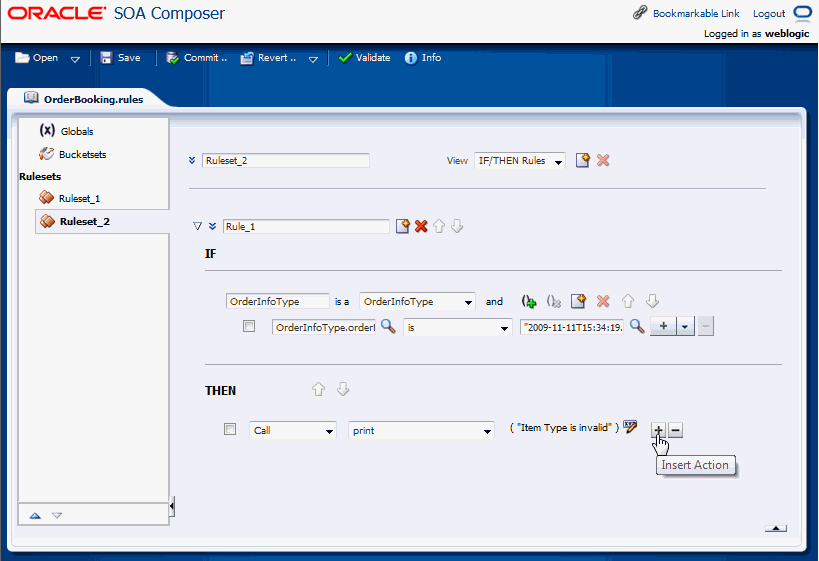
Description of "Figure 12-23 Adding a Rule Action in a Ruleset"
12.6.9 Deleting Rule Actions at Run Time
In SOA Composer you can delete actions in a rule. For more information on working with rule actions, see Section 4.3, "Working with Rules".
-
In edit mode, select a ruleset of interest.
-
In the rule area, locate the rule where you want to delete an action.
-
In the THEN area for the rule, next to the rule action, click Delete Action, as shown in Figure 12-24.
Figure 12-24 Deleting a Rule Action in a Ruleset
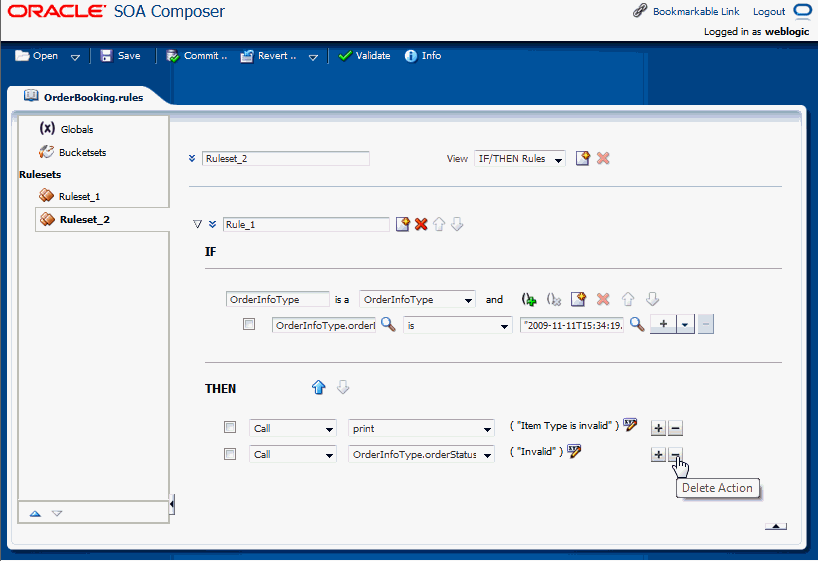
Description of "Figure 12-24 Deleting a Rule Action in a Ruleset"
12.6.10 Modifying Rule Actions at Run Time
In SOA Composer you can modify actions in a rule. For more information on working with rule actions, see Section 4.3, "Working with Rules".
-
In edit mode, select a ruleset of interest.
-
In the rule area, locate the rule where you want to modify an action.
-
In the THEN area for the rule, next to the rule action, click a list for the action type, or click Edit Properties as shown in Figure 12-25.
The Properties dialog box is displayed where you can modify the property details as shown in Figure 12-26.
12.6.11 Working with Advanced Mode Rules at Run Time
In SOA Composer, you can work with advanced mode rules in a ruleset. For more information on working with advanced mode rules, see Section 4.7, "Working with Advanced Mode Rules".
To show and modify advanced mode rules:
-
In edit mode, select a ruleset of interest.
-
In the rule area, locate the rule where you want to show or modify advanced mode rules.
-
Click Show Advanced Settings icon to show advanced settings. For more information on showing advanced settings, see Section 12.6.4, "Showing and Editing Advanced Settings for Rules at Run Time".
-
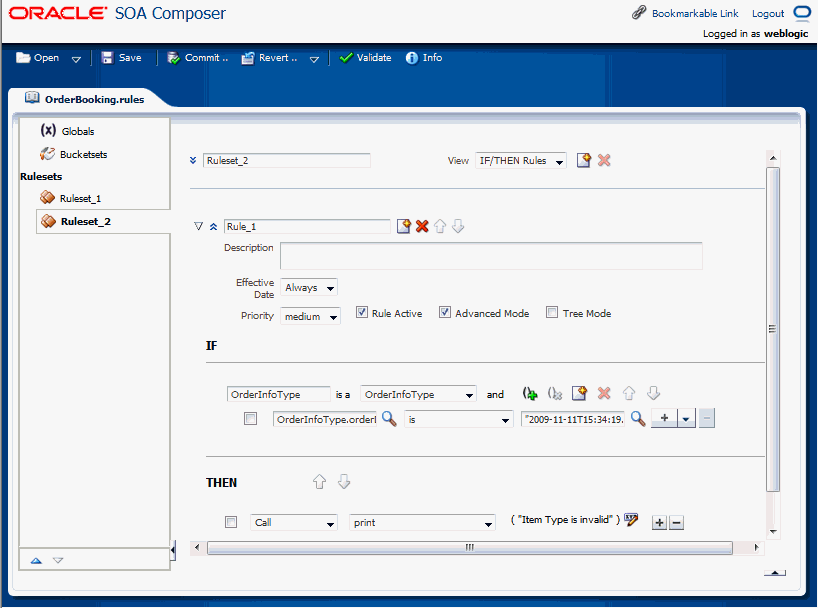
If the Advanced Mode icon is not selected, then select the Advanced Mode icon. This shows the advanced mode rule options, as shown in Figure 12-27.
Figure 12-27 Showing Advanced Mode Rule Options
Description of "Figure 12-27 Showing Advanced Mode Rule Options"
12.6.12 Working with Tree Mode Rules at Run Time
In SOA Composer you can work with tree mode rules in a ruleset. For more information on working with tree mode rules, see Section 4.8, "Working with Tree Mode Rules".
To show and modify tree mode rules:
-
In edit mode, select a ruleset of interest.
-
In the rule area locate the rule where you want to show or modify tree mode rules.
-
Select Advanced Settings icon to show advanced settings. For more information on showing advanced settings, see Section 12.6.4, "Showing and Editing Advanced Settings for Rules at Run Time".
-
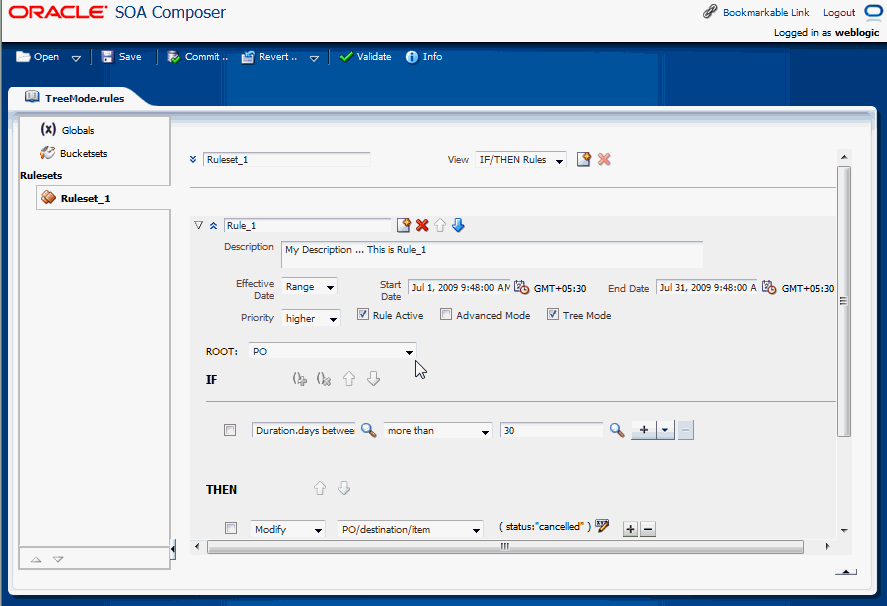
If the Tree Mode icon is not selected, then select the Tree Mode icon. This shows the tree mode rule options, as shown in Figure 12-28.
Figure 12-28 Showing the Tree Mode Rule Area in a Rule
Description of "Figure 12-28 Showing the Tree Mode Rule Area in a Rule"
12.6.13 Using Oracle Business Rules Editor Declarative Component
You can use the Oracle Business Rules Editor composite declarative component to leverage the functionality of editing business rules in any ADF-based Web application. It enables you to edit business rules available in rulesets by using the Rules SDK2 API.
For more information on Oracle Business Rules Dictionary Editor, see "Using the Oracle Business Rules Editor Declarative Component" in Oracle Fusion Middleware Developer's Guide for Oracle SOA Suite.
12.7 Using the SOA Composer Browser Windows
SOA Composer provides browser windows that helps you to work with different types of expressions such as rule expressions, XPATH expressions, date expressions, and so on.
The different types of browsers provided by SOA Composer are:
12.7.1 Expression Builder
Expression Builder is used to build different types of expressions such as XPATH expressions, rule expressions, and so on.
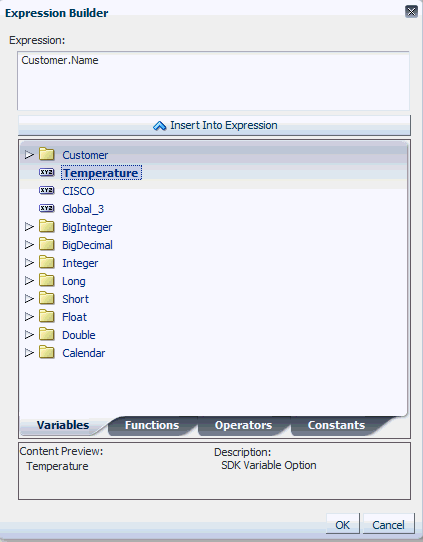
Expression Builder has a field where you can enter the expression directly. It has four tabs: Variables, Functions, Operators, and Constants. Each of these tabs display data in a tree structure. The Variables tab displays all the variables in the rules meta-data. The Functions tab displays all the functions in the rules meta-data. The Operators tab displays operators such as +, -, *, and so on. The Constants tab displays all the constants that exist in the rules meta-data.You can switch between the tabs, select an item in the tree, and click the Insert Into Expression button to insert the selected item at the cursor position in the expression field. When an item is selected in the tree, the Content Preview and the Description areas display more information about the selected item. Once you create the expression and click OK, the newly created expression appears in the field that is available to the left of the expression builder icon.
Figure 12-29 displays the Expression Builder browser.
Figure 12-29 The Expression Builder Browser
Description of "Figure 12-29 The Expression Builder Browser"
12.7.2 Condition Browser
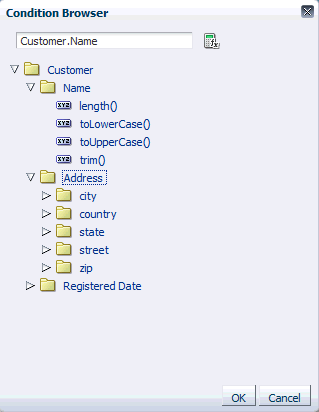
The Condition Browser has a field, a hierarchical tree, and an Expression Builder embedded inside it. You can enter the expression directly in the field, or select an item from the tree. When an item is selected in the tree, the new selection appears in the field immediately. You can also use the embedded Expression Builder to create an expression.
Once the Expression Builder is launched and an expression is created, the new expression appears in the Condition Browser field. Once you create an expression and click the OK button in the Condition Browser, the newly created expression appears in the field that is to the left of the Condition Browser icon.
Figure 12-30 displays the Condition Browser.
12.7.3 Date Browser
The Date Browser is used to select a Literal Date or a Date Expression. The Date Browser has two options to switch between a Literal Date and a Date Expression. When one option is selected, the other one is disabled.
Select:
-
Literal Date option to enter a date using a Calendar pop-up
-
Date Expression option to enter the expression directly in the Date Expression field or to launch the Condition Browser to select a date expression.
Figure 12-31 displays the Date Browser.
12.7.4 Right Operand Browser
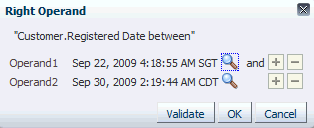
The Right Operand browser is used to select multiple right expressions. The browser displays operands in each row. You can enter an expression directly in the operand field or launch the Condition Browser to select an expression. The + icon adds a row after the current one. The - icon deletes the current row. These icons are enabled and disabled based on the selected operator. For instance the "in" operator allows multiple right expressions. So in this case, the icons are enabled.
Figure 12-32 displays a Right Operand browser.
Note:
Using Right Operand browsers, you can enter multiple values for the right-side expression. However, you can place a Date browser outside a Right Operand browser, and in which case, only one expression can be entered. For both these browsers, you cannot enter values directly in the right-side expression field. Once you have entered values using the browser and clicked OK, the values get added as comma-separated values on the Rules UI.12.8 Editing Decision Tables in an Oracle Business Rules Dictionary at Run Time
In SOA Composer, in edit mode, you can edit, add, and delete a Decision Table in a ruleset. For more information on how to use edit mode, see Section 12.4, "Getting Started with Editing and Saving a Dictionary at Run Time".
12.8.1 Adding a Decision Table at Run Time
In SOA Composer, you can add a Decision Table to a ruleset. For more information on working with Decision Tables, see Section 5.1, "Introduction to Working with Decision Tables".
To add a Decision Table in a ruleset:
-
In edit mode, select a ruleset of interest.
-
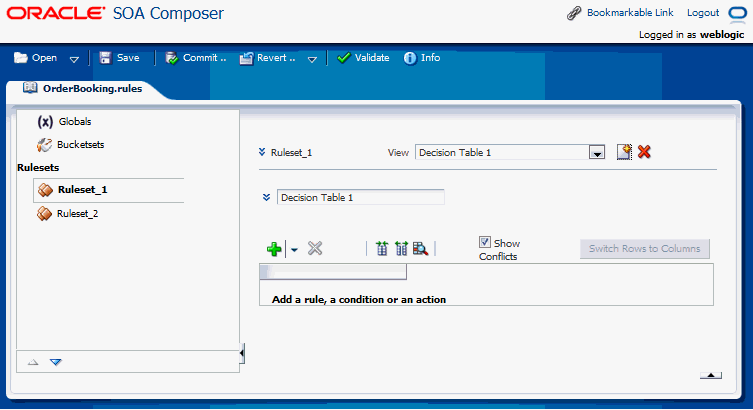
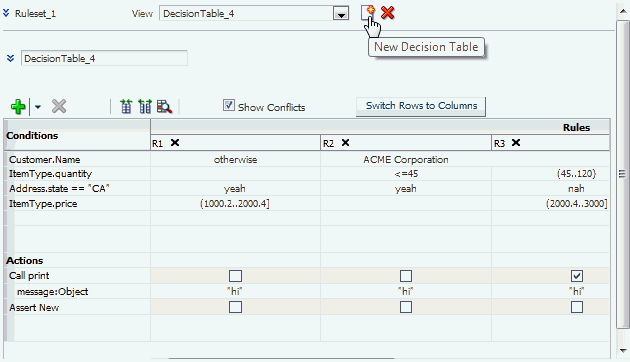
In the ruleset area, click New Decision Table, as shown in Figure 12-33.
Figure 12-33 Adding a Decision Table in a Ruleset
Description of "Figure 12-33 Adding a Decision Table in a Ruleset"
A blank Decision Table is displayed as shown in Figure 12-34.
12.8.2 Adding Condition Rows to a Decision Table
Using SOA Composer, you can add condition rows to a Decision Table.
To add condition rows to a Decision Table:
-
From SOA Composer, select a ruleset from the Rulesets navigation tab and select the Decision Table where you want to add conditions from the View box, for example Decision Table 1.
-
In the Decision Table area, from the list next to the Add icon, select Add Condition.
-
In the Conditions area, click the condition row, and then click the Edit Condition icon on the toolbar to display the Condition Browser as shown in Figure 12-35.
Figure 12-35 Adding a Condition to a Decision Table
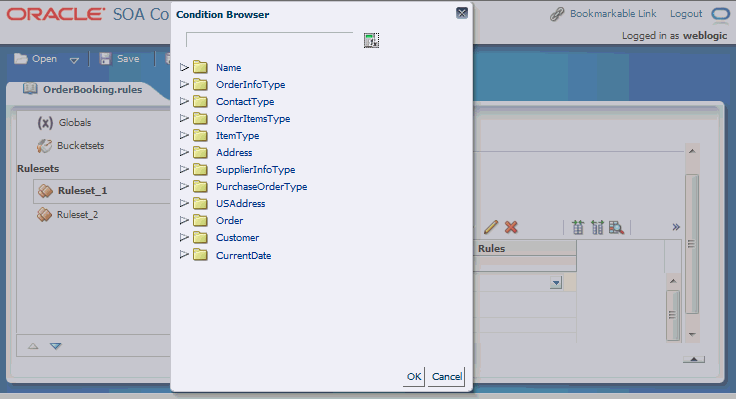
Description of "Figure 12-35 Adding a Condition to a Decision Table"
-
Enter an expression by clicking in the Conditions Browser to select a variable, or click the Expression Builder icon to display the Expression Builder as shown in Figure 12-36.
Figure 12-36 Displaying the Expression Builder Window
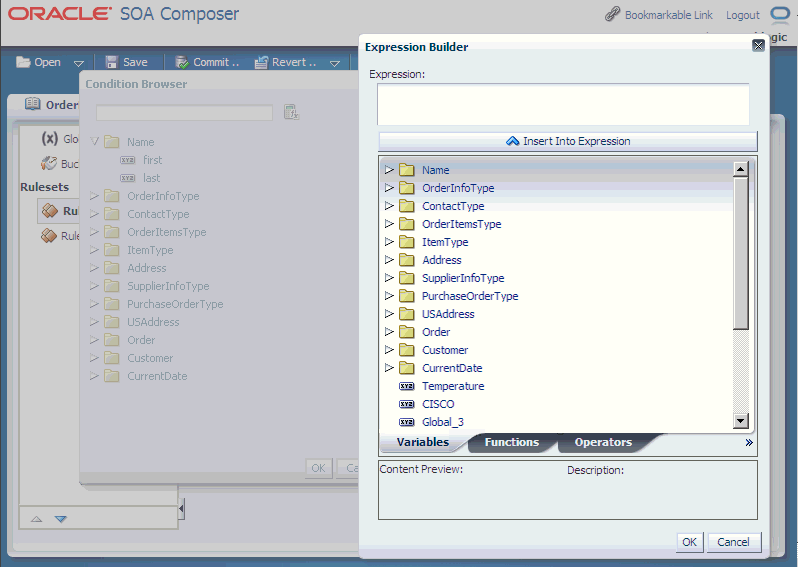
Description of "Figure 12-36 Displaying the Expression Builder Window"
Expression Builder lets you build expressions.
-
Each condition row requires a bucketset from which to draw the values for each cell. When the value you select has an associated global bucketset, then by default the bucketset is associated with the condition row.
If there is no global bucketset associated with the value, then after you add a condition row to a Decision Table, you need to either specify an existing global bucketset or create a Local List of Values or a Local List of Ranges bucketset.
To associate a bucketset for the condition, perform either of the following:
-
In the Conditions area, select the condition, and select an existing bucketset from the Select Bucketset list as shown in Figure 12-37.
Figure 12-37 Associating an Existing Bucketset With a Condition Row
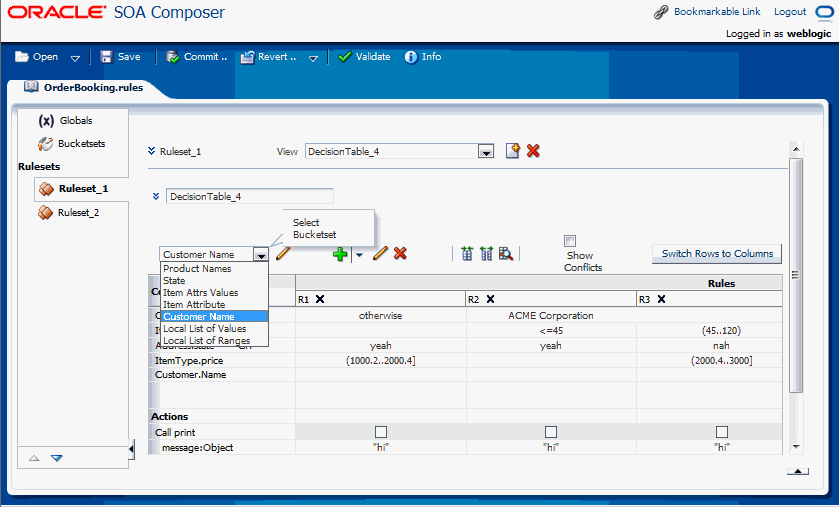
Description of "Figure 12-37 Associating an Existing Bucketset With a Condition Row"
-
In the Conditions area, select the condition, and select either Local List of Values or Local List of Ranges (as relevant) from the Select Bucketset list as shown in Figure 12-38.
Figure 12-38 Associating a Local List of Values or Local List of Ranges With a Condition Row
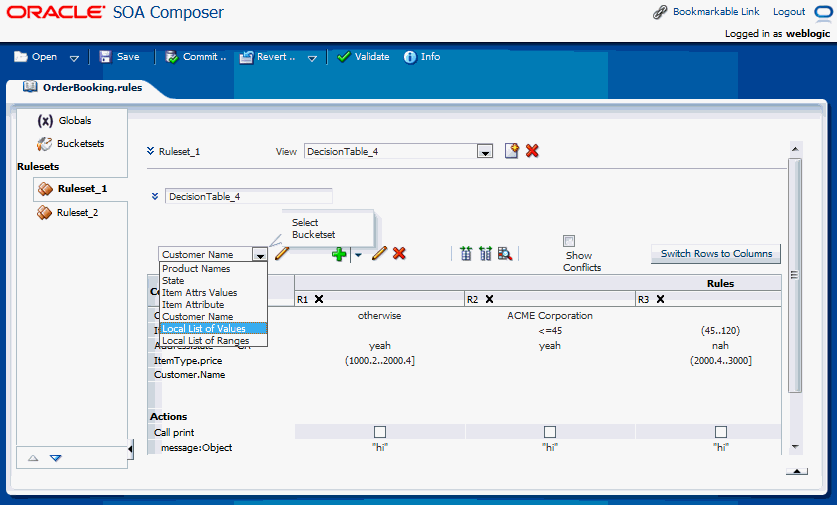
Description of "Figure 12-38 Associating a Local List of Values or Local List of Ranges With a Condition Row"
You can edit the bucketset for the selected condition by clicking the Edit Bucketset icon as shown in Figure 12-39.
Figure 12-39 Editing a Local List Bucketset
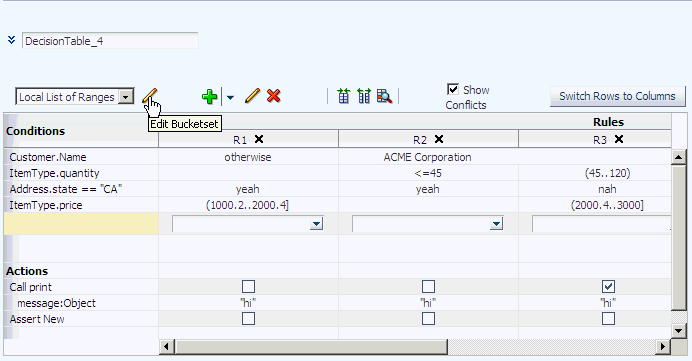
Description of "Figure 12-39 Editing a Local List Bucketset"
This displays the Bucketset Editor where you can add, edit or delete buckets.
-
-
Repeat Step 2 through Step 5, as required to add additional condition rows in the Decision Table.
For more information on adding condition rows, see Section 5.2.2, "How to Add Condition Rows to a Decision Table".
12.8.3 Adding Actions to a Decision Table
In SOA Composer, you can add actions to a Decision Table.
To add actions to Decision Table:
-
From SOA Composer, select a ruleset from the Rulesets navigation tab and select the Decision Table where you want to add actions.
-
From the list next to the Add icon, select Add Action and select an available action from the list. For example, click Modify as shown in Figure 12-40.
Figure 12-40 Adding an Action to a Decision Table
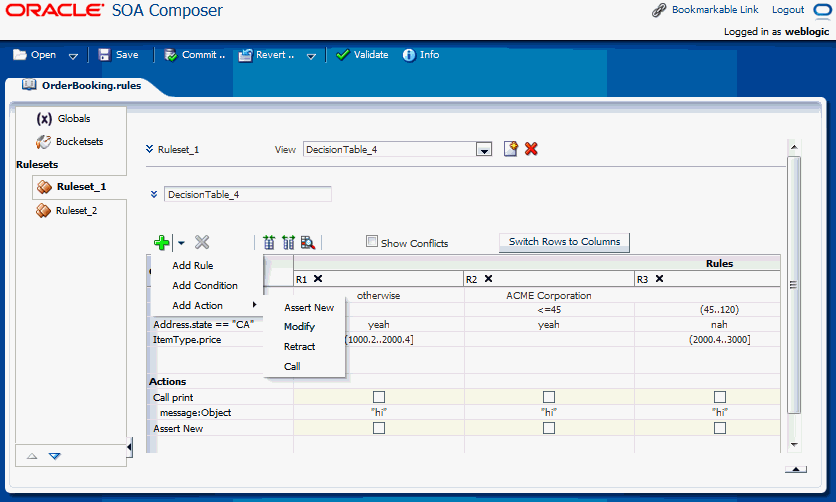
Description of "Figure 12-40 Adding an Action to a Decision Table"
A new row with for the Modify action gets added to the Decision Table as shown in Figure 12-41.
Figure 12-41 Action Row Added to the Decision Table
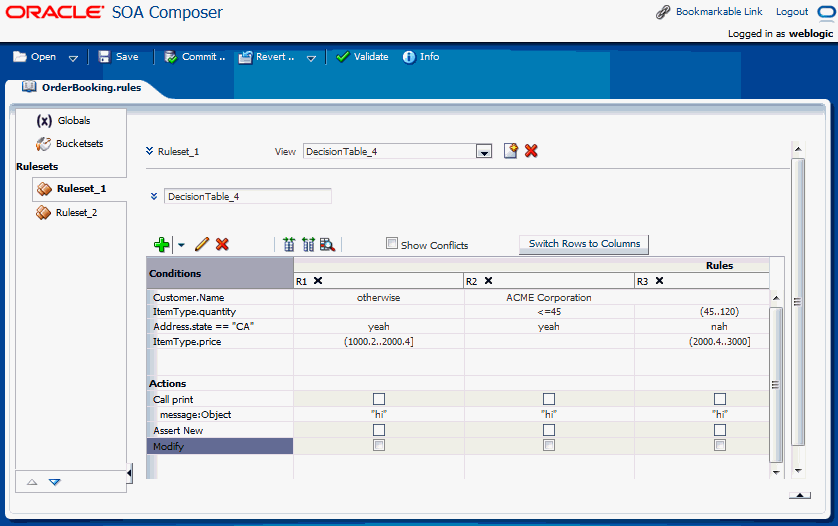
Description of "Figure 12-41 Action Row Added to the Decision Table"
Table 5-1 in Chapter 5, "Working with Decision Tables," lists the available actions.
-
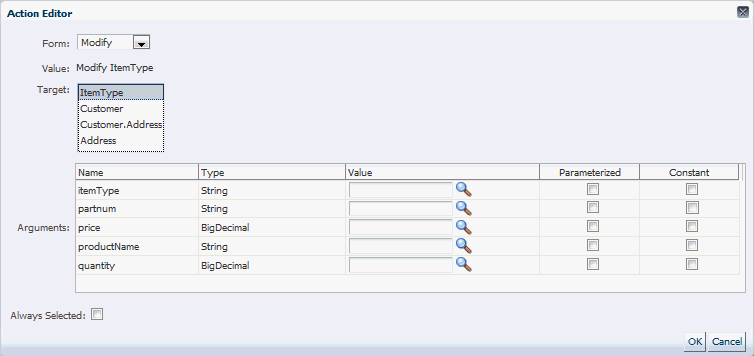
Select the new action row and then click the Edit Action icon on the toolbar to display the Action Editor window as shown in Figure 12-42.
-
In the Action Editor window, select the action target and then specify values for an action cell.
For more information on adding actions to Decision Tables, see Section 5.2.3, "How to Add Actions to a Decision Table."
12.8.4 Adding Rules to a Decision Table
Using SOA Composer, you can add a rule to a Decision Table.
To add a rule to a Decision Table:
-
From SOA Composer, select a ruleset from the Rulesets navigation tab and select the Decision Table where you want to add the rule.
-
From the list next to the Add icon, select Add Rule as shown in Figure 12-43.
Figure 12-43 Adding a Rule to a Decision Table
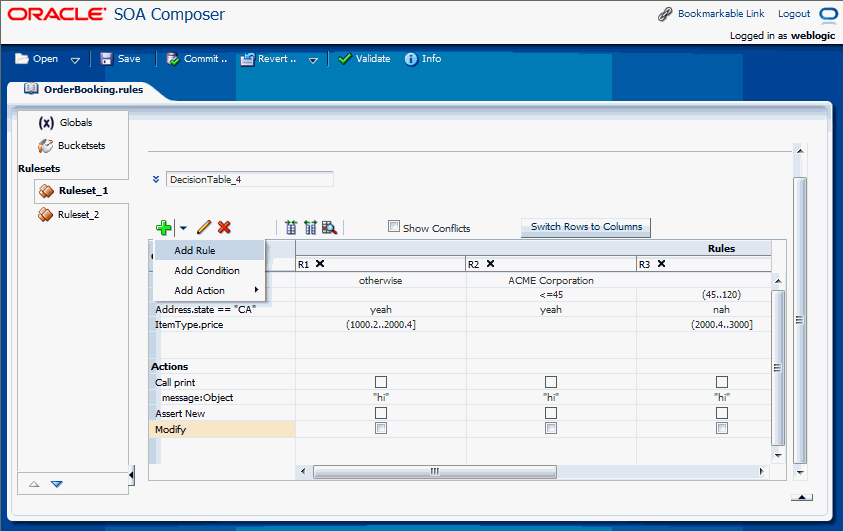
Description of "Figure 12-43 Adding a Rule to a Decision Table"
A new column for the added rule is displayed as shown in Figure 12-44.
Figure 12-44 Added Rule in the Decision Table
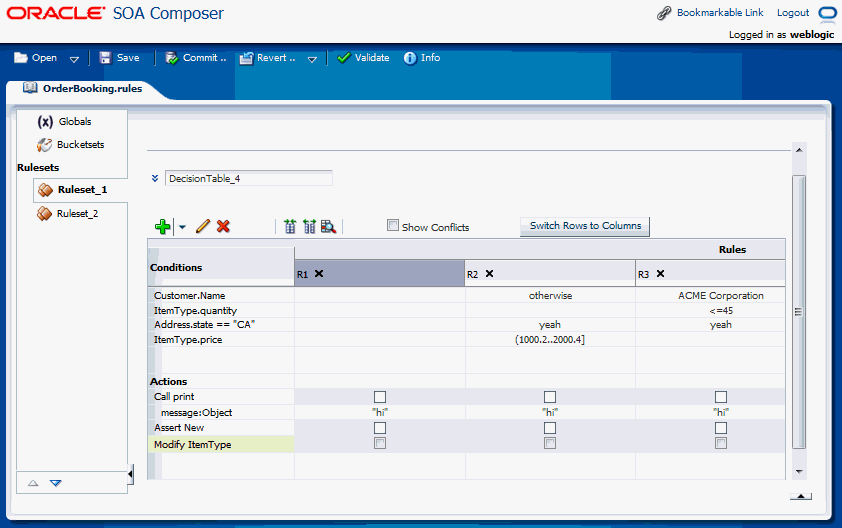
Description of "Figure 12-44 Added Rule in the Decision Table"
-
Enter values for the condition cells. Notice that the new rule is added as the first rule of the Decision Table and the other rules have moved as required to keep the bucket values in their defined order.
Note:
You can enter values for the condition cells (or any other cells) only when the row containing the cell is selected. Only when a row is selected, the condition cell lists are displayed. This is called the "Click to Edit" feature. -
Click an Action row to enter values for the action cells.
12.8.5 Splitting and Compacting a Decision Table
You can modify the contents of a Decision Table to create a table that includes a complete set of rules for all cases, or a table that provides the least number of rules for the cases. The split and compact operations enables you to manipulate the contents in a Decision Table.
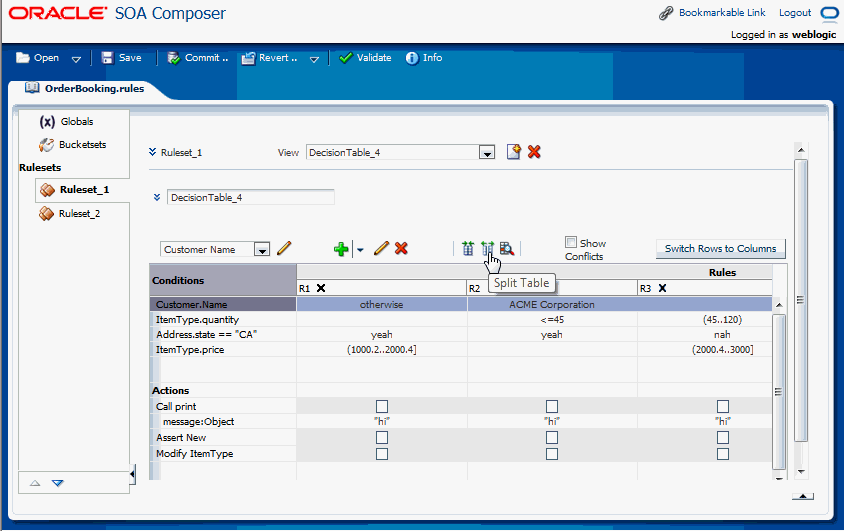
The split table operation creates a rule for every combination of buckets across the conditions. For example, in a Decision Table with 2 boolean conditions, 2 x 2 = 4 rules are created. In a Decision Table with 20 boolean conditions, 2**20 ~ 1 million rules are created. So, you only use split table when the number of rules created is small enough that filling in the action cells is feasible.
Using SOA Composer, split can be applied to an entire Decision Table. However, you cannot perform split operation on an individual condition row or cell.
-
From SOA Composer, select a ruleset from the Rulesets navigation tab and select the Decision Table that you want to split.
-
Click the Split Table icon as shown in Figure 12-45.
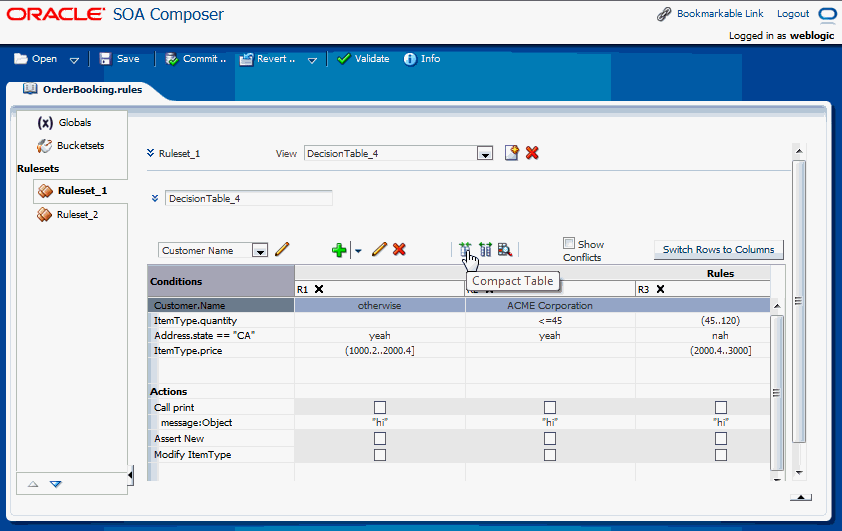
Using SOA Composer, you can compact a Decision Table by merging conditions of rules with identical actions. So, compacting a table enables you to remove conditions from a Decision Table. However, using SOA Composer, you cannot merge two or more condition cells.
-
From SOA Composer, select a ruleset from the Rulesets navigation tab and select the Decision Table that you want to compact.
-
Select the Compact Table icon as shown in Figure 12-46.
For more information on splitting and compacting Decision Tables, see Section 5.3, "Performing Operations on Decision Tables."
12.8.6 Performing Gap Analysis in a Decision Table
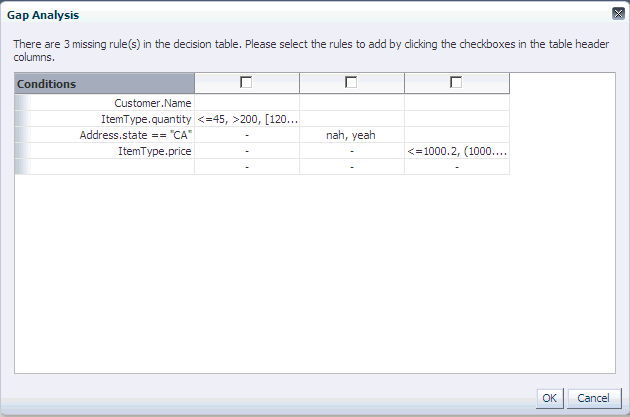
In a Decision Table, a "missing" rule is termed as a "gap." A gap in a Decision Table occurs when a rule does not to cover some combinations of buckets, one from each condition.
Using SOA Composer, you can perform Gap Analysis on Decision Tables.
-
From SOA Composer, select a ruleset from the Rulesets navigation tab and select the Decision Table on which you want to perform the Gap Analysis.
-
Click the Gap Analysis icon on the Decision Table menu as shown in Figure 12-47.
Figure 12-47 Performing Gap Analysis on a Decision Table
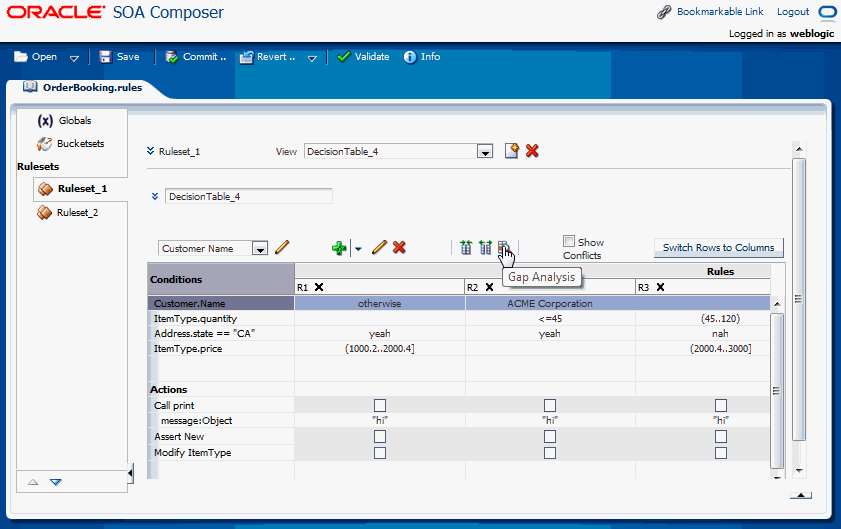
Description of "Figure 12-47 Performing Gap Analysis on a Decision Table"
The Gap Analysis window is displayed as shown in Figure 12-48. You can select the rules that need to be added to the Decision Table.
For more information about Gap Analysis, see Section 5.3.5, "How to Perform Decision Table Gap Analysis."
12.8.7 Performing Conflict Resolution in Decision Tables
Rules in a Decision Table can conflict when they overlap or have different actions. Two rules overlap when at least one of their condition cells has a bucket in common. However, overlap without conflict is common and harmless. For more information about conflicts in Decision Tables, see Section 5.3.1.4, "Understanding Decision Table Conflict Analysis."
Using SOA Composer, you can find and resolve conflicts in a Decision Table.
To perform conflict resolution in a Decision Table:
-
From SOA Composer, select a ruleset from the Rulesets navigation tab and select the Decision Table on which you want to perform the Conflict Resolution.
-
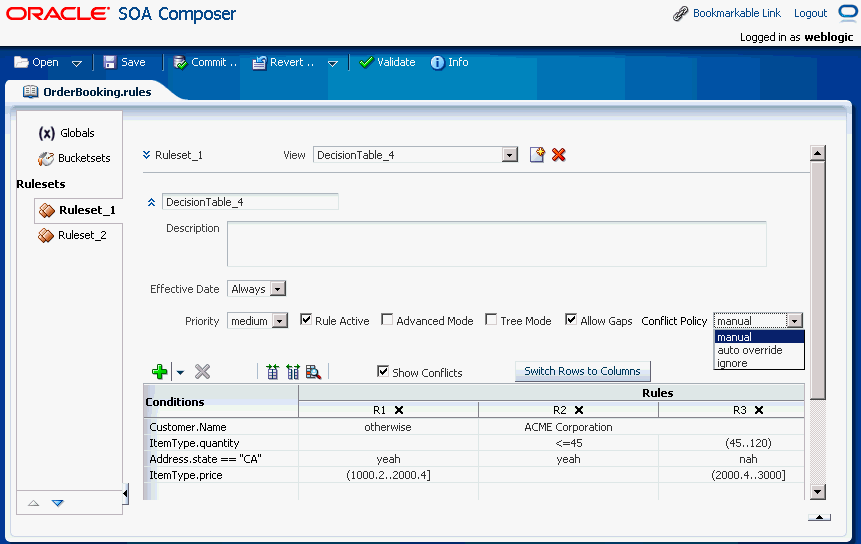
Ensure that the Show Conflicts is selected on the Decision Table menu.
-
Ensure that the conflict policy is set to manual in Advanced Settings as shown in Figure 12-49. This is the default conflict policy.
Note:
For more information on conflict policies, see Section 5.3.1.4, "Understanding Decision Table Conflict Analysis." -
Select the Conflict row under Conflict Resolution and then click the rule that has a conflict to display the Conflict Resolution window as shown in Figure 12-50.
Figure 12-50 The Conflict Resolution Window
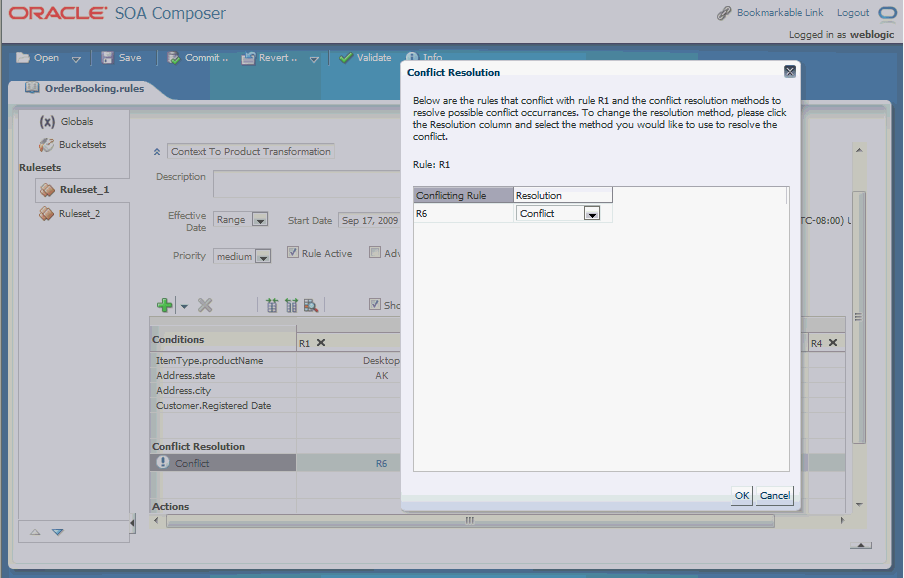
Description of "Figure 12-50 The Conflict Resolution Window"
-
In the Conflict Resolution window, for each conflicting rule, in the Resolution field select a resolution from the list and click OK as shown in Figure 12-51.
Figure 12-51 Options for Conflict Resolution
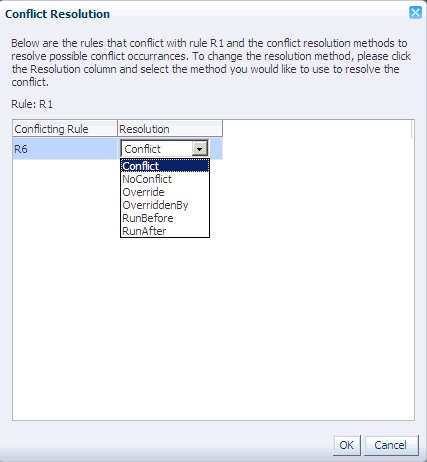
Description of "Figure 12-51 Options for Conflict Resolution"
For more information about the conflict resolution options in Decision Tables, see Section 5.3.1.4, "Understanding Decision Table Conflict Analysis."
12.8.8 Switching From Rows to Columns
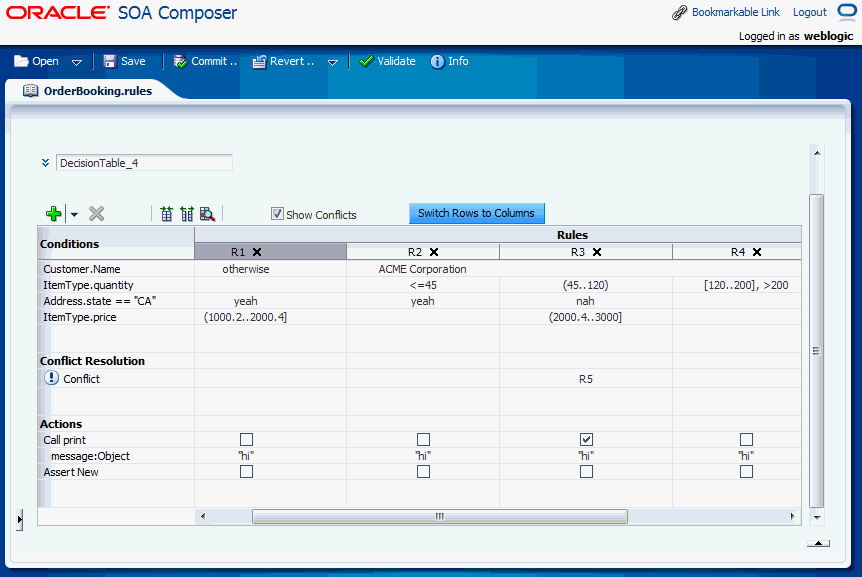
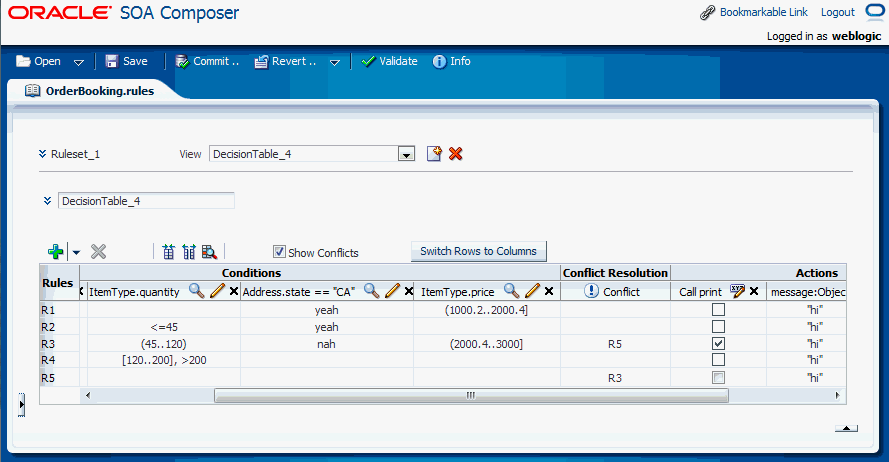
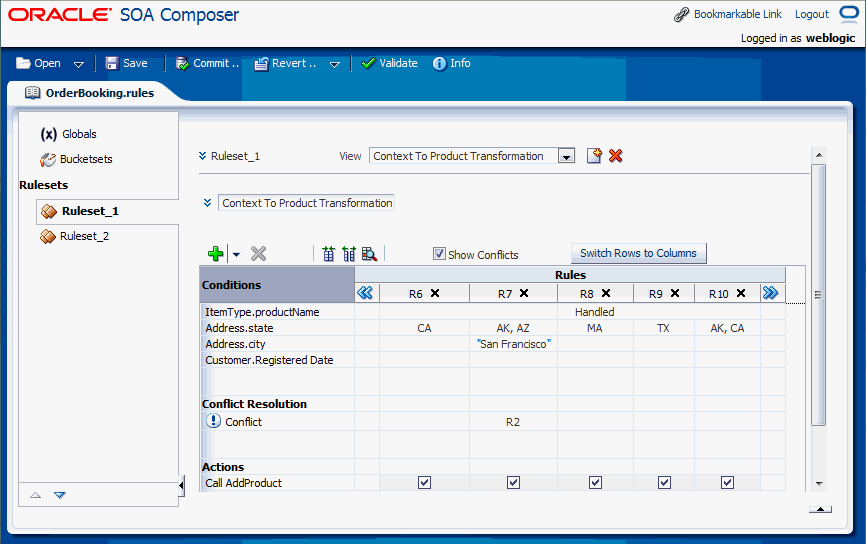
In SOA Composer, you can turn the rows in a Decision Table to columns by clicking the Switch Rows to Columns button on the Decision Table toolbar. This enables the rules to be displayed as rows, and conditions, actions, and conflicts to be displayed as the columns.
Switching rows to columns provides ease of navigation when a Decision Table has many rules because you can see all the rules together and you do not need to "page the columns" for viewing the rules.
Figure 12-52 displays a Decision Table before the switch operation.
Figure 12-53 displays the sample Decision Table after switching the rows to columns.
In a Decision Table with many rules, for the ease of navigation, the SOA Composer UI displays the rules in mutiple sets, with each set containing multiple rules. This is done to ensure that you do not need to scroll a lot for viewing all the rules.
SOA Composer provides a pair of >> and << buttons on the rules column header immediately following the last rule column heading of a particular set and immediately preceding the first rule of a particular set respectively.
You need to click the >> or the << button to move to the following or preceeding set of rules respectively. This feature is called column paging.
Figure 12-54 displays the column paging buttons in a Decision Table in a SOA Composer UI.
Figure 12-54 Column Paging in a Decision Table
Description of "Figure 12-54 Column Paging in a Decision Table"
12.8.9 Deleting a Decision Table at Run Time
In SOA Composer, you can delete Decision Tables in a ruleset. For more information on working with Decision Tables, see Section 5.1, "Introduction to Working with Decision Tables."
To delete a decision table in a ruleset:
-
In edit mode, select a ruleset of interest.
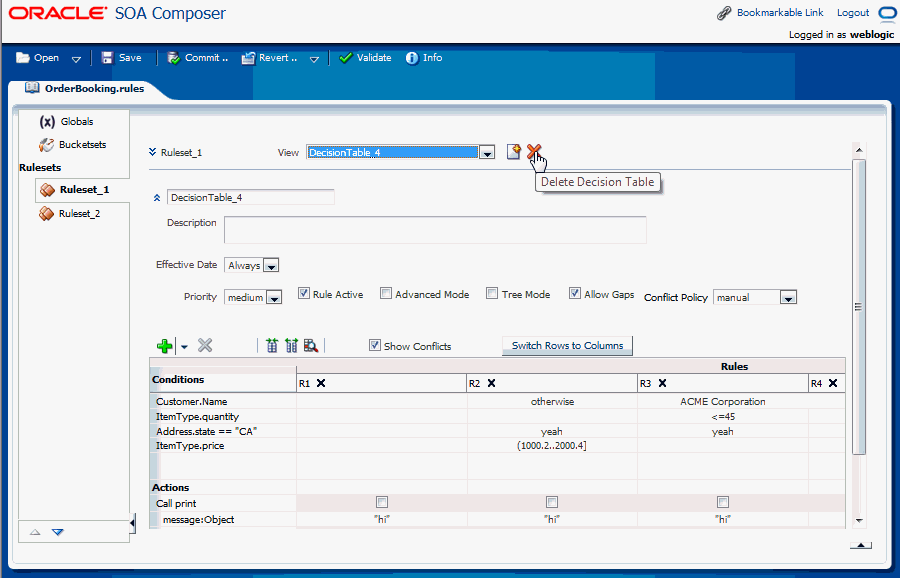
-
In the ruleset area, in the View field from the list, select the Decision Table you want to delete.
-
Click Delete Decision Table, as shown in Figure 12-55.
Figure 12-55 Select the Delete Decision Table Icon
Description of "Figure 12-55 Select the Delete Decision Table Icon"
12.9 Synchronizing Rules Dictionary in Oracle JDeveloper With Run Time Dictionary Updates
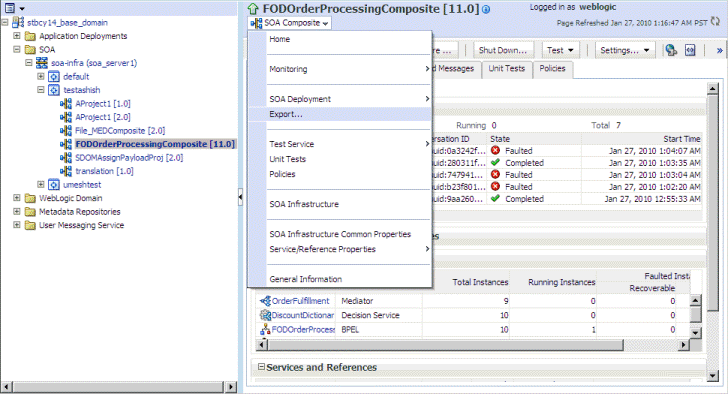
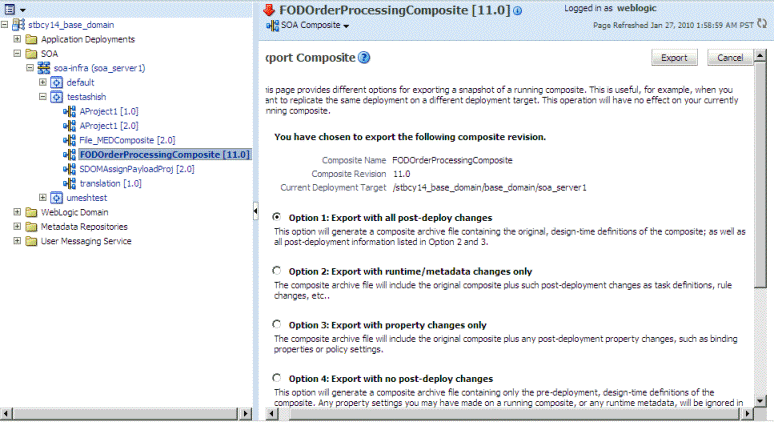
SOA Composer enables you to update rules dictionaries at run time. However, the modifications made to the dictionaries through SOA Composer are not automatically reflected in Oracle JDeveloper. To synchronize the dictionary updates made in SOA Composer with the dictionaries available in Oracle JDeveloper, you must select the Export option in Oracle Enterprise Manager Fusion Middleware Control Console. This utility allows you to export the SOA composite application along with the dictionary.
To select the Export option in Fusion Middleware Control Console:
-
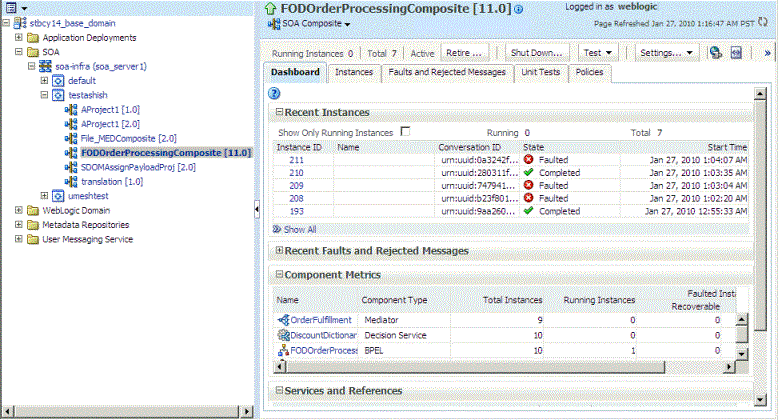
In Fusion Middleware Control Console, select the composite that contains the dictionary to be exported. Figure 12-56 displays the selected composite in Fusion Middleware Control Console.
-
Click SOA Composite drop-down list on the right panel and select Export as shown in Figure 12-57.
Figure 12-57 Selecting the Export Utility
Description of "Figure 12-57 Selecting the Export Utility"
-
Select Option 1: Export with all post-deploy changes from the Export Composite page and click Export as shown in Figure 12-58.
Figure 12-58 Exporting All Postdeployment Changes
Description of "Figure 12-58 Exporting All Postdeployment Changes"
12.10 Validating an Oracle Business Rules Dictionary at Run Time
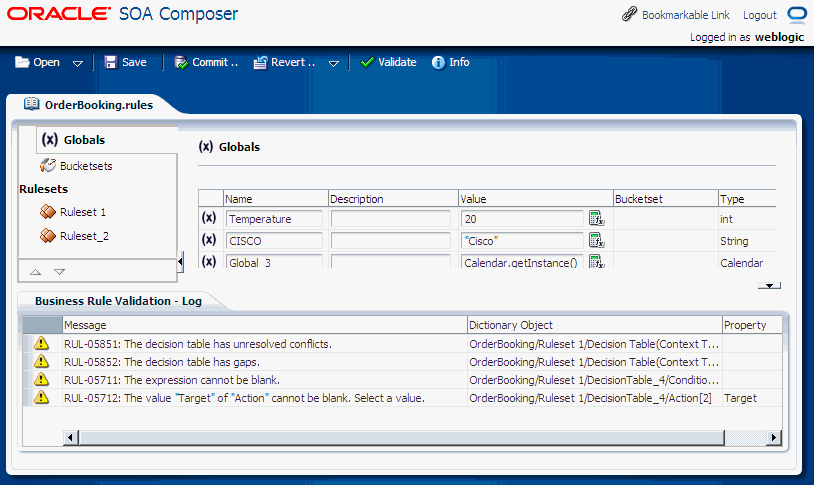
In SOA Composer, in the Edit mode, you can validate a dictionary for errors. The dictionary level validation errors are displayed in a Validation Panel in the bottom of SOA Composer window as shown in Figure 12-59.
12.10.1 Understanding the Validation Panel
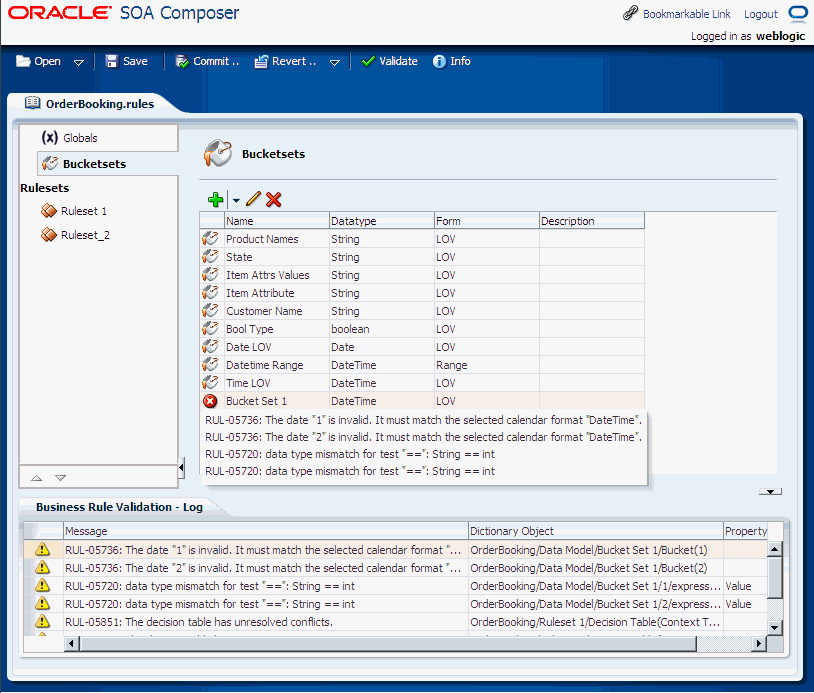
The Validation Panel lists all the dictionary-level validation errors. When you double-click a row in the Validation Panel, SOA Composer leads you to the erroneous component. For example, if a Bucket or a Bucketset error is double-clicked in the Validation Panel, SOA Composer switches to the Bucketsets tab and displays the invalid icon next to the Bucketset name. You can move the mouse cursor over the invalid icon to see the list of error messages for that Bucketset as shown in Figure 12-60.
Figure 12-60 Bucketset Validation Error Messages
Description of "Figure 12-60 Bucketset Validation Error Messages"
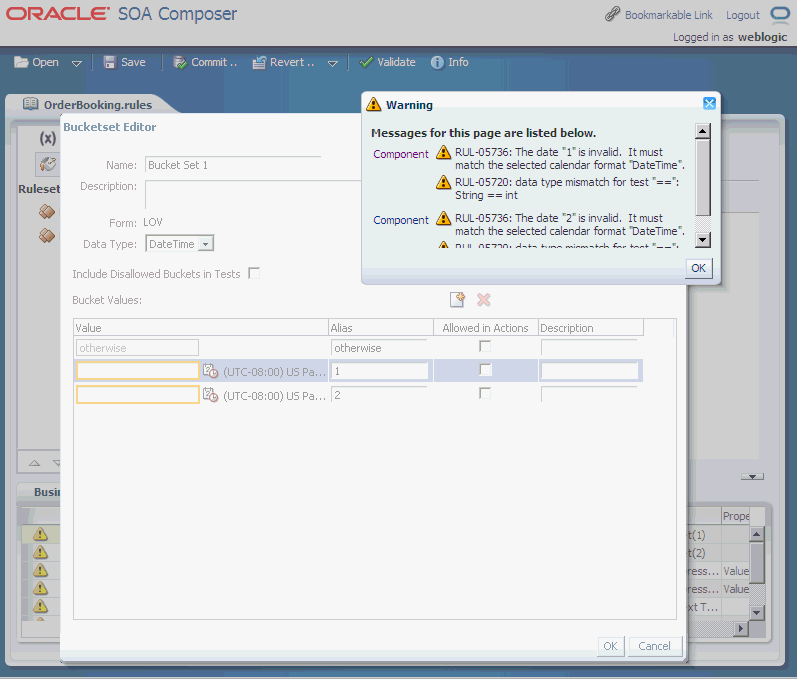
When the Bucketset Editor window is displayed, the invalid fields are highlighted in the editor, and a pop-up containing the error messages are displayed, as shown in Figure 12-61.
Figure 12-61 Highlighted Error Entries in Bucketset Editor
Description of "Figure 12-61 Highlighted Error Entries in Bucketset Editor"
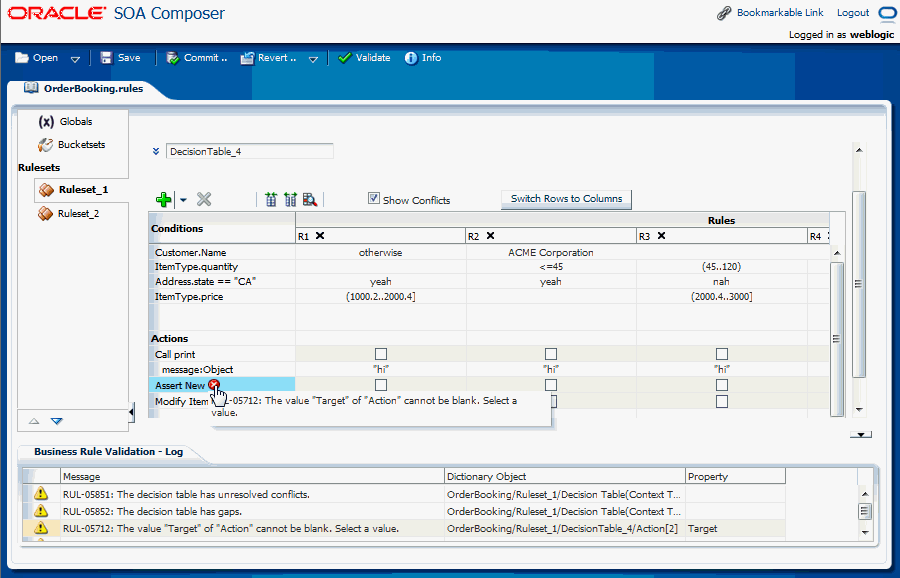
When you double-click an error pertaining to a Decision Table, the UI switches to the Decision Table UI and displays the error messages when you move the mouse cursor on the invalid icon as shown in Figure 12-62.
Figure 12-62 Accessing the Erroneous Component
Description of "Figure 12-62 Accessing the Erroneous Component"
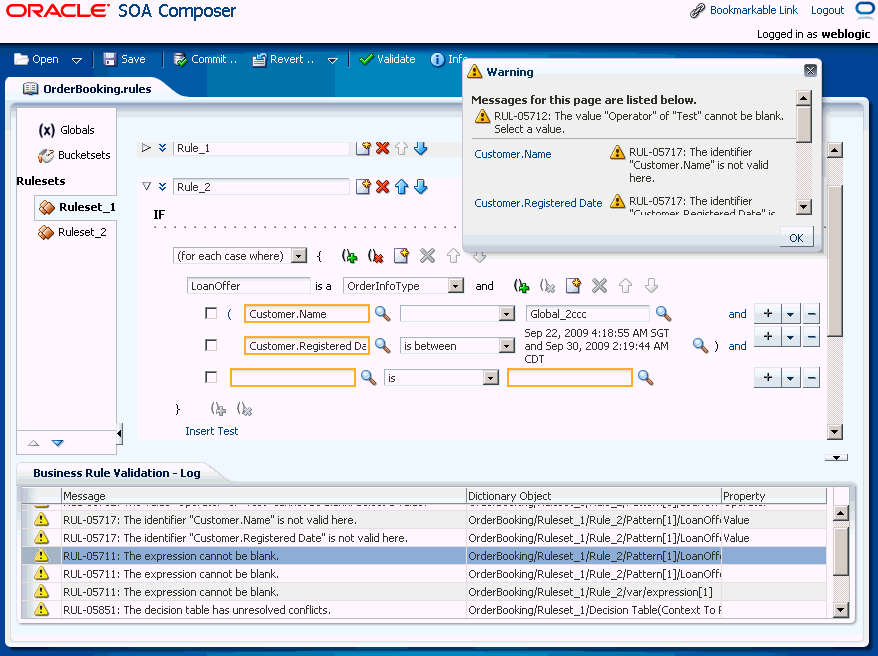
Similarly, in the Validation Panel, if you double-click an error pertaining to a rule in a ruleset, the UI switches to the ruleset to which the rule belongs and highlights the erring fields of the rule. In addition, all the errors pertaining to the rule are displayed in a pop-up as shown in Figure 12-63.
12.10.2 Updating the Validation Panel
The Validation Panel does not get updated automatically to display any new validation errors that may be generated due to any modification to the dictionary components.
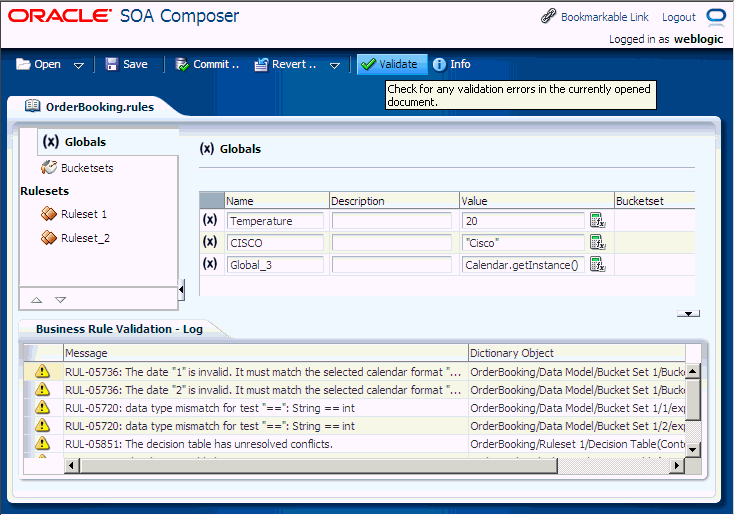
For example, when a new rule is added with some errors, the Validation Panel is not updated automatically. You need to click the Validate button on the SOA Composer menu to update the Validation Panel with the new error entry, as shown in Figure 12-64.
12.11 Working With Linked Dictionaries
An Oracle Business Rules dictionary can be linked to other dictionaries. The complete data model defined by a dictionary and its linked dictionaries is called a combined dictionary. You can create multiple links to the same dictionary. However, in this case, all but the first link is ignored.
You cannot use SOA Composer to link dictionaries. However, if a deployed composite already has linked dictionaries, using SOA Composer, you can make use of the Globals, Bucketsets, and Rulesets of the linked dictionaries across applications. For example you have an application called App1 that contains a dictionary called Dict1. Dict1 is linked to another dictionary called Dict2. Because Dict1 is linked to Dict2, the objects of Dict2 will be available for use in App1.
For more information about linked dictionaries, see Section 2.2.7, "What You Need to Know About Dictionary Linking."
12.12 Obtaining Composite and Dictionary Information at Run Time
When a dictionary is open, you can obtain dictionary and composite details from the Info dialog.
To obtain dictionary information:
-
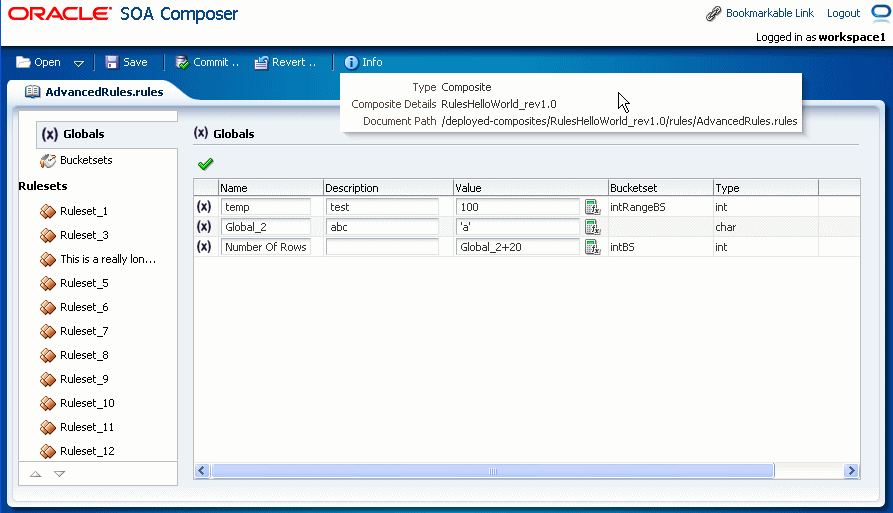
With an open document, you can obtain the document type, composite details, and document path by clicking Info. This displays the SOA Composer open file information, as shown in Figure 12-65.
Figure 12-65 Using Info Dialog to Obtain the Document Path for an Open Dictionary
Description of "Figure 12-65 Using Info Dialog to Obtain the Document Path for an Open Dictionary"
