18 Integrating the Instant Messaging and Presence Service
This chapter explains how to integrate the Instant Messaging and Presence (IMP) service in a WebCenter application at design time.
For more information about managing and including instant messaging and presence, see:
-
"Managing the Instant Messaging and Presence Service" in the Oracle Fusion Middleware Administrator's Guide for Oracle WebCenter
-
"Working with the Instant Messaging and Presence Service" in the Oracle Fusion Middleware User's Guide for Oracle WebCenter
This chapter includes the following sections:
18.1 Introduction to the IMP Service
The IMP service enables you to observe the presence status (online, offline, busy, or away) of other authenticated application users. Additionally, it provides instant access to interaction options, such as instant messages, emails, and phone calls.
WebCenter services that have user names with the same identity can integrate with the IMP service; for example, Discussions, Documents, or Mail.
This section provides an overview of IMP features and requirements. It contains the following subsections:
18.1.1 Understanding the IMP Service
Figure 18-1 shows the Presence icon indicating a user who is online.
Wherever a user is indicated, for example as the author of a document in the document library, you can click the icon to invoke a context menu (Figure 18-2).
The context menu can include the following actions:
-
Send Mail (This opens a compose window for the mail client set, either WebCenter Mail service or a local mail client.)
-
View Profile (This opens the selected user's profile page, with information such as email ID and contact numbers.)
-
Send Instant Message (This opens the instant message client running on the computer, either Oracle Instant Messenger or Microsoft Communicator.)
-
Change Credentials (This works as an alternative to using an external application. This option is available with Microsoft Office Live Communications Server (LCS) and Microsoft Office Communications Server (OCS).
-
Start Phone Conference (For presence servers that support the phone facility, this initiates a call between you and the selected user.)
You can enable your users to pull in existing instant messaging contacts (or buddies) and communicate with those contacts within the context of your application. Next to a contact name is an icon that indicates the presence state of each contact. Users can sort contacts can by name or online status. For more information, see Section 18.2.2.3, "Adding the Buddies Task Flow."
For detailed information about the IMP service at runtime, including screen shots and descriptions of the presence status options, see Oracle Fusion Middleware User's Guide for Oracle WebCenter.
18.1.2 Requirements for IMP
The IMP service requires a back-end presence server. WebCenter is certified with Microsoft Office Live Communications Server (LCS) 2005 and Microsoft Office Communications Server (OCS) 2007, and it can integrate with other presence servers. Oracle WebLogic Communications Services (OWLCS) 11g is available for download on Oracle Technology Network (OTN) at http://www.oracle.com/technology/index.html.
18.2 Basic Configuration for the IMP Service
This section describes the steps required for adding the IMP service to your application. It contains the following subsections:
18.2.1 Setting up Connections for the IMP Service
After the presence server is properly installed and running, you must add a connection to it. This section describes how. It contains the following subsections:
-
Section 18.2.1.2, "How to Set Up Microsoft LCS Connections for the IMP Service"
-
Section 18.2.1.3, "How to Set Up Microsoft OCS Connections for the IMP Service"
-
Section 18.2.1.4, "How to Set Up OWLCS Connections for the IMP Service"
18.2.1.1 IMP Service Connections
The IMP service requires an Instant Messaging and Presence connection to the presence server (Microsoft LCS, Microsoft OCS, or OWLCS).
When a WebCenter service interacts with an application that handles its own authentication, you can associate that application with an external application definition to allow for credential provisioning. For Microsoft LCS and OCS connections, an external application is mandatory. For OWLCS connections, use identity propagation (instead of an external application). This set up enables you to configure additional security with Web Services Security (WS-Security).
The connection appends the domain provided with in the connection to the user name to create the Session Initiation Protocol (SIP) address. If the domain is oracle.com and presence is requested for user with name john, then the IM address resolved is john@oracle.com.
Note:
While you can set up the connections to back-end servers at design time in Oracle JDeveloper, you can later add, delete, or modify connections in your deployed environment using Enterprise Manager Fusion Middleware Control. For more information, see Oracle Fusion Middleware Administrator's Guide for Oracle WebCenter.18.2.1.2 How to Set Up Microsoft LCS Connections for the IMP Service
To set up the connection to the LCS presence server:
-
In Oracle JDeveloper, open the application in which to consume the Instant Messaging and Presence service.
-
Ensure that security is enabled in your application according to the steps in Chapter 3, "Implementing Security in Your Application."
-
In the Application Navigator, under Application Resources, right-click Connections, then select Instant Messaging and Presence from the list.
-
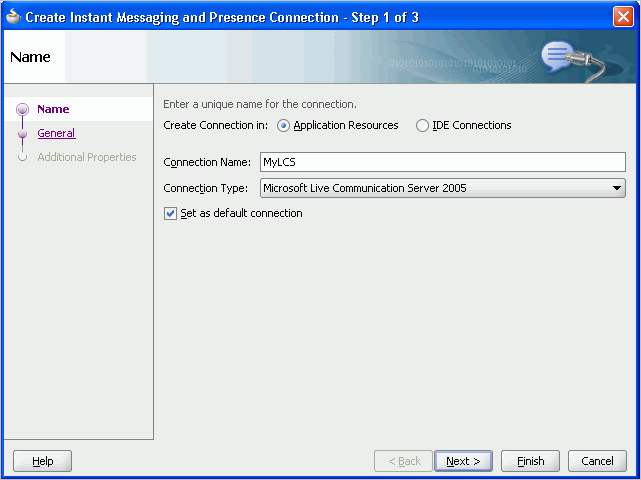
In the Create Instant Messaging and Presence Connection dialog box, select to create the connection in Application Resources.
A connection in Application Resources is available only for that application, while a connection in IDE Connections is available for all applications you create. If you plan to use the connection in other applications, then select IDE Connections to avoid having to re-create it.
-
On the Name page, for Connection Name, enter a unique name for your connection.
No other connection should have the same name.
-
From the Connection Type list, select Microsoft Live Communication Server 2005.
-
Select the Set as default connection checkbox to use this as the default connection, as shown in Figure 18-9.
Figure 18-3 Create LCS Instant Messaging and Presence Connection, Step 1
Description of "Figure 18-3 Create LCS Instant Messaging and Presence Connection, Step 1"
-
Click Next
-
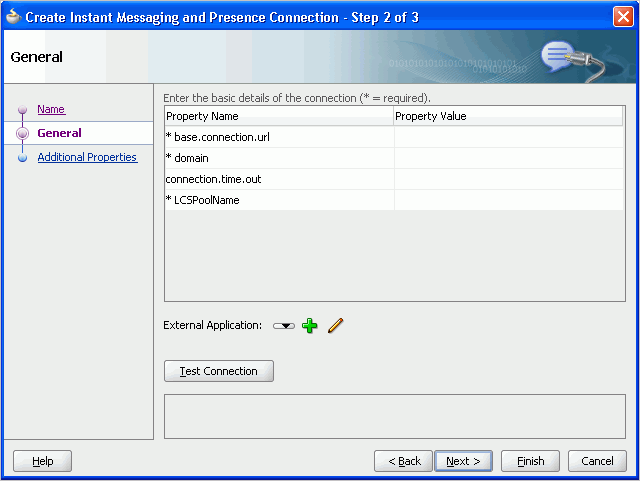
On the General page (Figure 18-4), for
base.connection.urlanddomain, enter the location of your LCS instance.Figure 18-4 Create LCS Instant Messaging and Presence Connection, Step 2
Description of "Figure 18-4 Create LCS Instant Messaging and Presence Connection, Step 2"
For example:
-
The
base.connection.urlcould behttp://host:port/RTCwhere RTC is the virtual directory name under which the server side module is deployed. (See the Microsoft Live Communications Server 2005 documentation for more information.) -
The
domaincould beexample.com. The domain specified is used to construct each user's instant messaging ID. For example, if the domain is oracle.com and presence is requested for user with name john then the IM address resolved is john@oracle.com. -
The
connection.time.outproperty is optional. It represents the time (in seconds) the service should wait for the server to respond while making the connection. If the presence server does not respond in the given time, then it aborts the connection and reports an error. -
For
LCSPoolName, enter the name of the pool under which Microsoft Communications Server components are deployed. (See the Microsoft Live Communications Server documentation for more information.)
-
-
On the same page, select an External Application to leverage the authentication mechanism (user names and passwords) on the presence server.
For LCS connections, an external application is mandatory. The application maps the presence server user to the application user such that end users do not have to enter their user names and passwords each time they need information. For detailed information about configuring an external application for the IMP service, see Section 18.2.3, "Setting Security for the IMP Service."
-
Click Test Connection to confirm that the connection is good.
-
Click Next to create the connection.
-
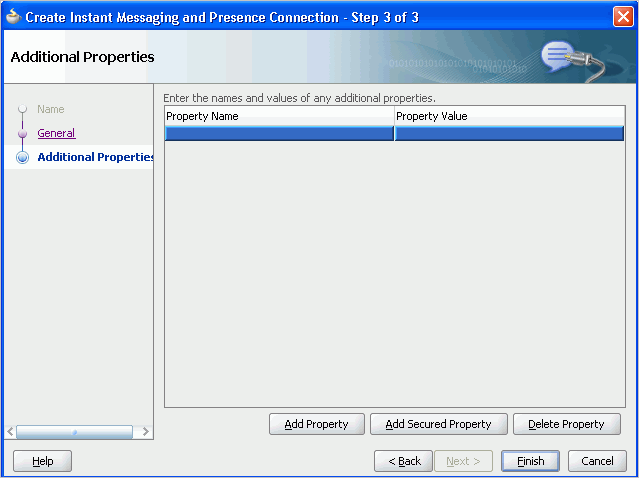
On the Additional Properties page (Figure 18-5), you can optionally add the
primary.domainparameter.Figure 18-5 Create LCS Instant Messaging and Presence Connection, Step 3
Description of "Figure 18-5 Create LCS Instant Messaging and Presence Connection, Step 3"
If the WebCenter user identity is qualified with a domain (for example,
john.deo@oracle.com), and if the presence server domain is different (for example,john.deo@example.com) then specify the primary domainoracle.comhere. If the user identity is qualified with a domain and the presence server uses the sameoracle.comdomain, then it is not necessary that you specify theprimary.domain. -
Click Finish.
You can see the new IM and presence connection under Application Resources - Connections.
18.2.1.3 How to Set Up Microsoft OCS Connections for the IMP Service
To set up the connection to the Microsoft OCS presence server:
-
In Oracle JDeveloper, open the application in which you plan to consume the Instant Messaging and Presence service.
-
Ensure that security is enabled in your application according to the steps in Chapter 3, "Implementing Security in Your Application."
-
In the Application Navigator, under Application Resources, right-click Connections, then select Instant Messaging and Presence from the list.
-
In the Create Instant Messaging and Presence Connection dialog box, select to create the connection in Application Resources.
A connection in Application Resources is available only for that application, while a connection in IDE Connections is available for all applications you create. If you plan to use the connection in other applications, then select IDE Connections to avoid having to re-create it.
-
On the Name page, for Connection Name, enter a unique name for your connection.
No other connection should have the same name.
-
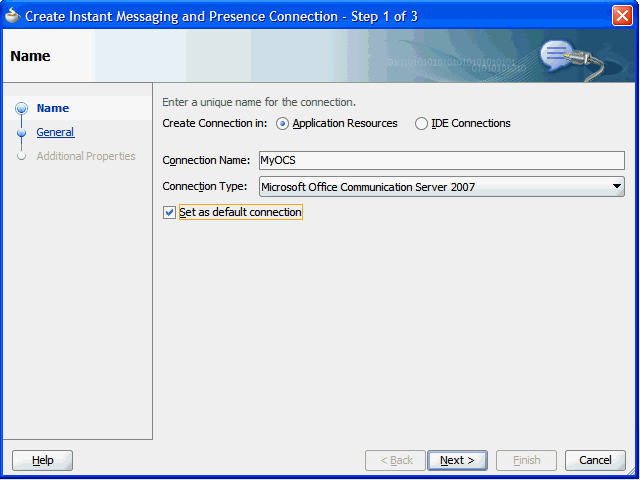
From the Connection Type list, select Microsoft Office Communications Server 2007.
-
Select the Set as default connection checkbox.
The service requires that one connection be marked as the default connection, as shown in Figure 18-6.
Figure 18-6 Create Microsoft OCS Instant Messaging and Presence Connection, Step 1
Description of "Figure 18-6 Create Microsoft OCS Instant Messaging and Presence Connection, Step 1"
-
Click Next ().
-
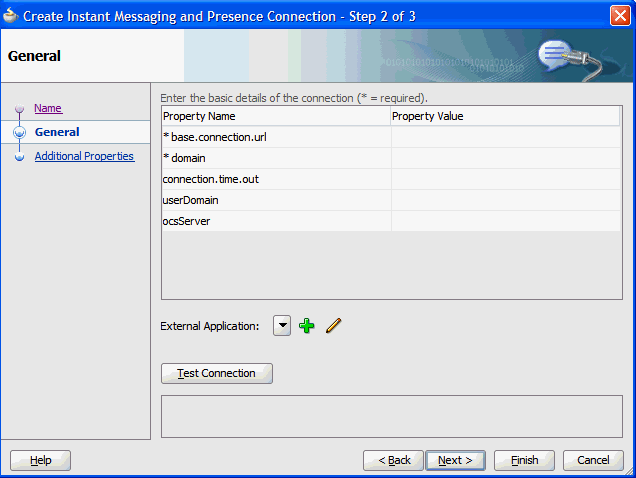
On the General page (), enter the parameters for your Microsoft OCS instance.
Figure 18-7 Create Microsoft OCS Instant Messaging and Presence Connection, Step 2
Description of "Figure 18-7 Create Microsoft OCS Instant Messaging and Presence Connection, Step 2"
For example:
-
The
base.connection.urlis the location of your Microsoft OCS instance. This could behttp://host:port/RTCwhere RTC is the virtual directory name under which the server side module is deployed. (See the Microsoft Office Communications Server 2007 documentation for more information.) -
The
domaincould beexample.com. The domain specified is used to construct each user's instant messaging ID. For example, if the domain is oracle.com and presence is requested for user with name john then the IM address resolved is john@oracle.com. -
The
connection.time.outproperty is optional. It represents the time (in seconds) the service should wait for the server to respond while making the connection. If the presence server does not respond in the given time, then it aborts the connection and reports an error. -
The
userDomainis the Active Directory domain on Microsoft OCS. This parameter is mandatory for Microsoft OCS connections. -
For
OcsServer, enter the name of the pool under which Microsoft Communications Server components are deployed. This parameter is mandatory for Microsoft OCS connections. (See the Microsoft Office Communications Server 2007 documentation for more information.)
-
-
On the same page, select an External Application to leverage the authentication mechanism (user names and passwords) on the presence server.
For Microsoft OCS connections, an external application is mandatory. The application maps the presence server user to the application user such that end users do not have to enter their user names and passwords each time they need information. For detailed information about configuring an external application for the IMP service, see Section 18.2.3, "Setting Security for the IMP Service."
-
Click Test Connection to confirm that the connection is good.
-
Click Next to create the connection.
-
On the Additional Properties page (Figure 18-5), you can optionally add the
primary.domainparameter.Figure 18-8 Create Microsoft OCS Instant Messaging and Presence Connection, Step 3

Description of "Figure 18-8 Create Microsoft OCS Instant Messaging and Presence Connection, Step 3"
If the WebCenter user identity is qualified with a domain (for example,
john.deo@oracle.com), and if the presence server domain is different (for example,john.deo@example.com) then specify the primary domainoracle.comhere. If the user identity is qualified with a domain and the presence server uses the sameoracle.comdomain, then it is not necessary that you specify theprimary.domain. -
Click Finish.
You can see the new IM and presence connection under Application Resources - Connections.
18.2.1.4 How to Set Up OWLCS Connections for the IMP Service
To set up the connection to the OWLCS presence server:
-
In Oracle JDeveloper, open the application in which you plan to consume the Instant Messaging and Presence service.
-
Ensure that security is enabled in your application according to the steps in Chapter 3, "Implementing Security in Your Application."
-
In the Application Navigator, under Application Resources, right-click Connections, then select Instant Messaging and Presence from the list.
-
In the Create Instant Messaging and Presence Connection dialog box, select to create the connection in Application Resources.
A connection in Application Resources is available only for that application, while a connection in IDE Connections is available for all applications you create. If you plan to use the connection in other applications, then select IDE Connections to avoid having to re-create it.
-
On the Name page, for Connection Name, enter a unique name for your connection.
No other connection should have the same name.
-
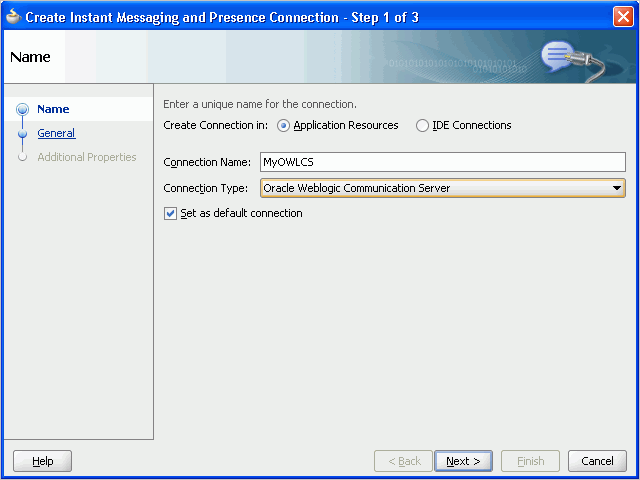
From the Connection Type list, select Oracle WebLogic Communication Server.
-
Select the Set as default connection checkbox.
The service requires that one connection be marked as the default connection.
-
Click Next (Figure 18-9).
Figure 18-9 Create OWLCS Instant Messaging and Presence Connection, Step 1
Description of "Figure 18-9 Create OWLCS Instant Messaging and Presence Connection, Step 1"
-
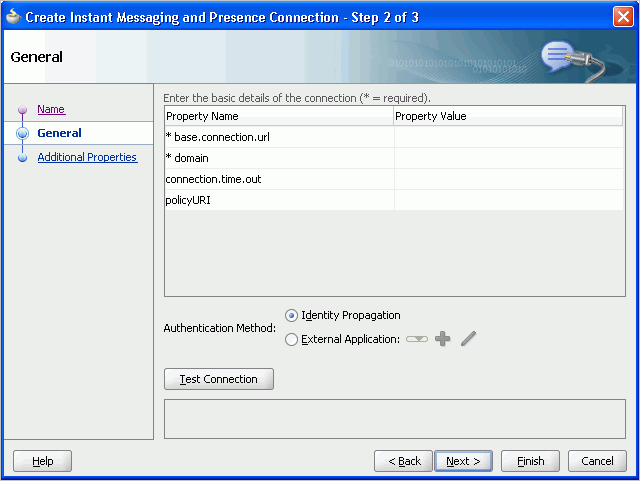
On the General page (Figure 18-10), for
base.connection.urlanddomain, enter the location of your OWLCS instance.Figure 18-10 Create OWLCS Instant Messaging and Presence Connection, Step 2
Description of "Figure 18-10 Create OWLCS Instant Messaging and Presence Connection, Step 2"
For example, the
base.connection.urlcould behttp://host:port, and thedomaincould beexample.com. The domain specified is used to construct each user's instant messaging ID. For example, if the domain is oracle.com and presence is requested for user with name john then the IM address resolved is john@oracle.com.The following properties are optional:
-
connection.time.out: The time (in seconds) the service should wait for the server to respond while making the connection. If the presence server does not respond in the given time, then it cancels the connection and reports an error. -
policyURI: URI to the security policy that is required for authentication on the OWLCS.
For Authentication Method:
-
Select Identity Propagation to provide secure identity propagation with WS-Security.
Note:
Identity propagation is the recommended authentication method for the IMP service. For more information about identity propagation, see Section 37.11, "Identity Propagation Mechanisms." -
Select External Application to leverage the authentication mechanism (user names and passwords) on the presence server. The application maps the presence server user to the application user such that end users do not have to enter their user names and passwords each time they need information. For more information on configuring an external application for the IMP service, see Section 18.2.3, "Setting Security for the IMP Service."
-
-
Click Test Connection to confirm that the connection is good, then click Next to create the connection.
-
On the Additional Properties page, add any additional, optional parameters (Figure 18-11).
Figure 18-11 Create OWLCS Instant Messaging and Presence Connection, Step 3

Description of "Figure 18-11 Create OWLCS Instant Messaging and Presence Connection, Step 3"
Additional properties are necessary only for changing the default configuration of the Click2Dial call service.
Note:
If values should be secured, then add them with the Add Secured Property button.You can add the following parameters:
-
presence.url: URL to the presence service. This must be supplied if the presence service is deployed on a separate server. -
contacts.url: URL to the contact management service. This must be supplied if the contact management service is deployed on a separate server. -
call.url: URL for the third-party call server. If no value is supplied, then this uses the same value asbase.connection.url. -
call.method: Supports valuessipandpstn:-
When set to
sip, the IMP service forwards the user's SIP address to the third-party call service. The third-party call service must decide on the routing of the call. -
When set to
pstn, the user's phone number is based on the user's profile attribute (BUSINESS_PHONE). You can use the connection propertycall.number.attributeto change this default profile attribute (BUSINESS_PHONE) to any other attribute.
-
-
call.domain: The domain name of thepstngateway. If no domain name is supplied, then this uses the domain value specified when the connection was created. Supply a domain name only whencall.methodis set topstn. -
contact.number.attribute: The attribute used to read users' phone numbers from the user profile. The default isBUSINESS_PHONE. Supply this attribute value only whencall.methodis set topstn. -
primary.domain: If the WebCenter user identity is qualified with a domain (for example,john.doe@oracle.com), and if the presence server domain is different (for example,john.doe@example.com) then specify the primary domainoracle.comhere. If the user identity is qualified with a domain and the presence server uses the sameoracle.comdomain, then it is not necessary that you specify theprimary.domain.
-
-
Click Finish.
You can see the new IM and presence connection under Application Resources - Connections.
18.2.2 Adding the IMP Service at Design Time
This section explains a basic incorporation of the IMP service into your application. It contains the following subsections:
18.2.2.1 IMP Service Task Flows
The IMP service includes the Buddies task flow.
18.2.2.2 How to Add the IMP Service to your Application
To add the IMP service to your WebCenter application:
-
Follow the steps described in Chapter 3, "Preparing Your Development Environment" to implement security and create a new customizable page in your application.
-
Open the page on which you want to add the IMP service.
-
Ensure that you have configured your application to connect to the presence server. See Section 18.2.1, "Setting up Connections for the IMP Service."
-
In the Component Palette, drag and drop Presence to the page to add the Presence icon.
Use the Presence icon anywhere you want to display a user, for example, as the author of a discussion topic, the sender/recipient of an email, or the owner of a document.
-
In the resulting dialog box, enter the user name of a user that exists in the back-end server that is linked to in the IM and Presence connection.
You can add numerous presence components to the application page.
For information about optional Presence component parameters, see Section 18.3.1, "Customizing IMP Views."
-
Click Finish.
-
From the Component Palette, drag and drop Presence Data to the end of the page (that is, before the
<af:document>tag).This component does not have any attributes.
The Presence Data component provides the status information for all Presence components on the page, such as online, offline, or busy. It verifies that all presence information corresponding to the user on the whole page shows consistent status information. Without this component, all users appear offline.
Because the Presence Data component makes a call to the back-end server, for best performance, ensure that this is the last tag on the page. To avoid adding this tag to every page in your application, consider using a page template with Presence Data as the last component; that is, before the end of the
</af:form>tag.Note:
The Page service enables you to create new pages at runtime on which you can add components, such as forums, mail, or documents. Many components have Presence tags, but users do not have a handle to add the Presence Data tag to the page. To see presence on custom pages, you must manually add the Presence Data tag to the underlying template. -
If External Application in IDE Connections was selected when you created the connection, then drag and drop the External Application - Change Password task flow into your application from the Resource Palette or Component Palette.
This task flow enables the end user to set the appropriate user name and password for the external application.
-
Save your project, and then run your page to a browser.
18.2.2.3 Adding the Buddies Task Flow
Optionally, you can add the Buddies task flow to an application page. For the Buddies task flow to work, you must have the IMP service configured in your application. Additionally, ensure that you have a Presence Data component tag at the end of the page to see the presence status of buddies.
Note:
To add or remove buddies from your account, you must use the Microsoft LCS, Microsoft OCS, or OWLCS client. In WebCenter applications, you can see buddies but you cannot add or remove buddies.With OWLCS, it is possible to see someone's online presence even if they are not your buddy. To get this functionality, you must provision the IMP service in group spaces. For more information about OWLCS, see the Oracle WebLogic Communication Services Administrator's Guide.
18.2.3 Setting Security for the IMP Service
The IMP service requires user identity. You should make the WebCenter application secure using the ADF Security wizard and make pages secure in their page definition files. The user name you use to log on to the application is also used to log in to the presence server.
If you have an external application configured, then credentials can be read from the external application (public credentials) and used to log on to the presence server.
If you do not apply ADF security or if you do not have an external application configured, then users cannot authenticate and do not see any content at runtime.
Note:
The presence server and the WebCenter application should point to the same identity store. The identity store must be LDAP-based; that is, not file-based withjazn-data.xml.To access the presence server, the IMP service can use an external application with dedicated user accounts:
-
Microsoft LCS and OCS support external application connections. With a secured application, users get buddies and presence status. Microsoft LCS and OCS provide an option for changing external credentials, which works as an alternative to using an external application. A logged-in user can click any Presence context menu and select Change Credentials.
With Microsoft LCS and OCS, if security is required, then they should be on a private trusted network.
-
OWLCS supports both identity propagation and external application-based connections. With OWLCS, user creation and deletion is manual. Any time a new user is added to (or removed from) the application's identity store, the same user must be created in (or removed from) the OWLCS user store.
To use an external application for authentication:
-
On the General page of the Create Instant Messaging and Presence Connection wizard, click the + icon next to External Application.
This brings up the Register External Application wizard. The application maps the presence server user to the application user such that end users do not have to enter their user names and passwords each time.
Note:
External application credential provisioning is built into the IMP connection. You do not need to drop External Application - Change Password task flow on a page. -
On the Name page:
-
For Application Name, enter a unique name to identify the application. This name must be unique within the WebCenter application, and among other connections as well. Note that you cannot edit this field afterward.
-
For Display Name, enter a name for the application that end users see in the credential provisioning screens.
-
-
Click Next.
-
On the General page:
-
For Login URL, enter the URL to which the HTML login page is submitted. View the HTML source of the application's login form to retrieve this URL.
-
For User Name/ID Field Name, enter the label that the application uses for the user name field, for example, User Name.
-
For Password Field Name field, enter the label that the application uses for the password field, for example Password.
-
-
From the Authentication Method list, select POST. This submits login credentials within the body of a form. The external application for the IMP service requires this authentication method.
-
Click Next.
-
On the Additional Fields page:
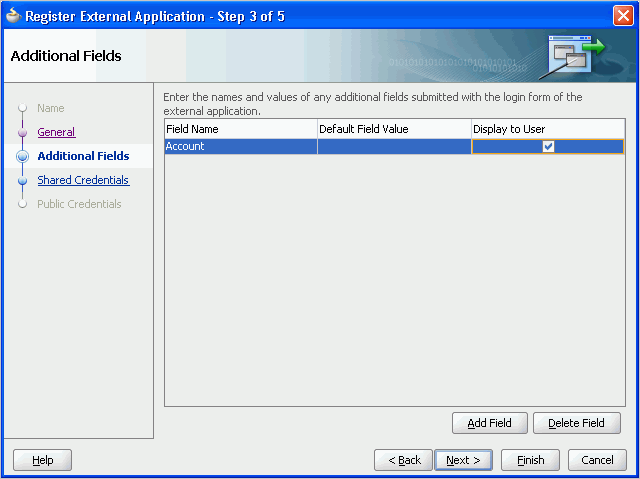
Click Add Field, and add an extra field with the name "Account." Make sure to select the Display to User checkbox, as shown in Figure 18-12.
Note:
The external application for the IMP service requires this additional field. It must be displayed to users. -
The External Application service allows different types of credentials to be associated with a connection:
-
When shared credentials are specified, every authenticated user uses the same credentials to access the external application; that is, the user name and password you can define here. A single presence session is created for all logged-in users. This is not accessible to public users.
-
With public credentials, without authenticating your WebCenter application, you can view presence from a certain presence ID for all unauthenticated (public) users. Public credentials are used whenever an application is not secured or the user has not yet logged in. A single presence session is created for all public users.
-
With private credentials, each user must authenticate to an individual ID (that is, each application user must specify his own credentials). One presence session is created for each user.
-
-
Click Finish to have the external application use private credentials, or click Next to set up shared or public credentials.
-
For Shared Credentials Only: On the Shared Credentials page, ensure that Specify Shared Credentials is selected, then enter the shared user credentials and ID.
-
For Public Credentials Only: On the Public Credentials page, ensure that Specify Public Credentials is selected, then enter the user credentials and ID for public use.
-
Click Finish to register the external application.
-
In the IMP connection wizard, ensure that this newly-created external application connection for IMP is selected.
For information about using external applications, see Section 37.2, "Working with External Applications."
For information about configuring ADF security, see Section 3.5, "Implementing Security in Your Application."
18.3 Advanced Information for the IMP Service
This section describes optional features available with the IMP service. It contains the following subsections:
18.3.1 Customizing IMP Views
Table 18-1 lists the attributes supported by the Presence component. Only the username attribute is required; all other attributes are optional. You can update these attributes in the Property Inspector.
Table 18-1 Presence Component Description
| Attribute | Description |
|---|---|
|
|
The user whose presence information you want to add to the application page. This attribute is required. |
|
|
How the component should display. Takes one of the following values:
|
|
|
By default, the Presence component displays the user name. If the flag |
|
|
The position for the icon. Possible values are |
|
|
A Boolean value that defines whether the component should provide rich interactions to the end user. If this attribute is set to |
|
|
A unique identifier for the component on the page. The identifier must follow a subset of the syntax allowed in HTML:
|
|
|
A Boolean value that defines whether to use the small 12x12 icon set ( |
|
|
A Boolean value that defines whether to render this component. The default value is |
|
|
An EL reference to store the component instance on a bean. Use this to give programmatic access to a component from a backing bean or to move creation of the component to a backing bean. |
|
|
The CSS styles to use for this component. Manually enter any style in compliance with CSS version 2.0 or later, or expand this node to specify style elements. This is intended for basic style changes. |
|
|
A CSS style class to use for this component. |
|
|
A Boolean value that defines whether to resolve the supplied However, if the supplied For example, with With |
18.3.2 Troubleshooting the IMP Service
This section describes common problems and solutions for the IMP service.
The Presence icon is not visible in your custom WebCenter application.
Ensure that an IMP connection exists in your application and has been set as active.
Buddies are not visible from within your custom WebCenter application. Further, the presence status of users is not available.
This problem may arise due to various reasons. Ensure the following:
-
Ensure that the IMP connections are configured properly and the base URL and domain values are correct.
-
Ensure that your back-end presence server (Microsoft LCS, Microsoft OCS, or OWLCS) is up and running. A quick way to verify this is to ensure that you can connect to the presence server using a supported SIP client (Microsoft Communicator or Oracle Communicator).
-
Ensure that you have logged-on with valid user credentials and the user exists on the presence server. For Microsoft LCS and OCS, verify that you have provided correct credentials in the external application.
-
Ensure that you have buddies on the presence server.
-
If all these settings are working fine, then check with your administrator to ensure that Web Services for the presence server is installed properly and is running.
In addition to verifying these settings, ensure the following if the presence status of a user is not visible:
-
Ensure that the user, whose presence you cannot view, has been added as your buddy in the application. You cannot view presence of a user who is not your buddy.
-
Ensure that the user is online on the presence server.
-
Ensure that the application page contains the Presence Data component. The Presence Data component must be added as the last tag on the page.
Changes in the presence status of users are not visible in your custom WebCenter application.
For each logged-in user's session, the IMP service fetches the presence information from the presence server and stores it in the presence cache. For any presence or buddy requests, the service returns the data from the cache until the cache expires. The default cache expiry period is 60 seconds.
To view the updated presence status, you can wait for the cache to expire and retrieve the latest presence status.
You can also change the cache expiry time by setting the rtc.cache.time service configuration property to the desired value (in seconds). Update adf-config.xml to include the highlighted entry, which shows the sample value as 30 seconds. Example 18-1 shows an example.
Example 18-1 Setting the rtc.cache.time Expiration Value in adf-config.xml
<adf-collaboration-config xmlns="http://xmlns.oracle.com/webcenter/collab/config">
<service-config serviceId="oracle.webcenter.collab.rtc">
<property name="rtc.cache.time" value="30"/></service-config>
</adf-collaboration-config>
A number of options, such as Start Phone Conference and Send Instant Message, are not available in the context menu of the IMP service in your custom WebCenter application.
Ensure that IMP service is configured in your custom WebCenter application. Also, ensure the following settings for the various context menu options:
-
Start Phone Conference option unavailable: Ensure that you are using the OWLCS connection type. For Microsoft LCS and Microsoft OCS, this option is not supported.
-
View Profile option unavailable: Ensure that your application is secured.
-
Send Instant Message option unavailable: Ensure that the IMP service is configured in the application.
You are unable to send a message from your custom WebCenter application. Clicking the Send Instant Message option returns an error.
Ensure that your SIP client is supported by the presence server and you have logged on as an authenticated user. For Microsoft LCS and Microsoft OCS, the supported SIP client is Microsoft Communicator. For OWLCS, the supported SIP client is Oracle Communicator.
You are not able to start a phone conference. Clicking the Start Phone Conference option does not initiate any action.
Ensure the following:
-
Ensure that you are starting the phone conference with a user other than the logged-in user. The caller and the user being called up should be different users, with different phone numbers.
-
Ensure that you have provided correct telephone numbers, in the supported format, in the user profile.
-
If you specified the
contact.number.attributeattribute in the IMP connection, then ensure that the contact numbers are indeed provided under this attribute for users. Otherwise, ensure that contact numbers are provided under theBUSINESS_PHONEattribute.
After migrating a WebCenter application from 10.1.3.2 to 11g, the Presence icon in the Buddies task flow is not seen.
Change the skin in trinidad-config.xml to ADF rich skin:
<skin-family>blafplus-rich</skin-family>
For more information on the trinidad-config.xml file, see Section 3.2.2.2.4, "The WebCenter Application Template Default trinidad-config.xml File."

