3 Setting Your Personal Preferences
WebCenter Spaces Preferences provide easy configuration settings for tailoring your application environment to your particular working style. These include settings for your preferred application display language; your preferred application look and feel; your WebCenter Spaces password; the passwords you use to access additional applications, such as your mail or useful enterprise software; and your preferred order for search results. Additionally, WebCenter Spaces Preferences provide an accessibility setting to optimize the application user interface for use with a screen reader, such as JAWS.
Preferences settings affect your view of the entire WebCenter Spaces application. For example, the preferences you set for search results affect all searches, and not just the searches you run from a particular group space. The preferences you set for language affect all translated strings in the application user interface.
This section describes how to specify your personal WebCenter Spaces Preferences. It contains the following subsections:
-
Section 3.3, "Enabling or Disabling Screen Reader Optimization"
-
Section 3.6, "Providing Login Information for External Applications"
-
Section 3.9, "Setting Preferences for WebCenter Spaces Search Results"
This chapter is intended for users who want to optimize their WebCenter Spaces environment for their personal use. This includes selecting a display language, providing application login information, and arranging content on the page. This chapter is also intended for users who want a better understanding of the Sidebar.
The WebCenter Spaces application administrator has the authority to expose or hide a particular service's task flows. Tasks discussed in this chapter are not available to you if the relevant service is hidden.
3.1 Choosing Your Preferred Display Language
The display language controls the language in which user interface (UI) elements are rendered in your browser. UI elements include button and field labels, application links, screen text, and so on.
On the Internet, your browser settings normally control the display language used for the various web sites you visit. Browser settings additionally control the display language used the first time you visit your WebCenter Spaces application. Even as a public user—that is, a user who is not logged in to WebCenter Spaces—you have a choice between staying with your browser display language or using a session language that you specify.
In addition to a session-specific language, WebCenter Spaces provides controls for setting an application-level default display language, a personal preference-based default display language, and a group space display language. The order of precedence for WebCenter Spaces display language settings from weakest to strongest is as follows:
-
Browser setting - your browser documentation describes how to change the browser's language.
-
Application setting - see "Choosing the Default Display Language" in Oracle Fusion Middleware Administrator's Guide for Oracle WebCenter.
-
User preference setting - see Section 3.1.3, "Setting a User Preference Display Language."
-
Session setting - see Section 3.1.2, "Setting a Session Display Language."
Note:
If the server on which WebCenter Spaces is running does not support the character set of the language preference set in WebCenter Spaces, the output information related to group spaces becomes garbled or displays as question marks.To work around this issue, users can change the session language or the Language preference to English. This creates new log file information. The log file is typically located at
$WC_DOMAIN/servers/WLS_Spaces/logs. -
Group space setting - see Section 13.7, "Setting a Group Space Display Language."
This section contains the following subsections:
3.1.1 What You Should Know About Display Languages in WebCenter Spaces
WebCenter Spaces users can set their preferred display language in two ways:
-
A user preference language selection lasts until you select a different language. It can be overridden by a session language, but returns as the default when the session cookie is purged or expires. Set your user preference language on the General panel in the Preferences dialog.
-
A session language is retained for the life of the session cookie that is generated after you make a selection. If you clear browser cookies, the session language is also cleared and the user preference language takes over or, if a user preference language is not specified, the application display language selected by your WebCenter Spaces administrator. Set a session language using the Choose A Language popup on the application Welcome page (viewed when you first access WebCenter Spaces, before you log on).
When you set a language and your preferred locale in WebCenter Spaces, you are specifying the language and the locale to use for all elements of the WebCenter Spaces native user interface (UI). This includes application links, field labels, display text, message text, and dialogs.
WebCenter Spaces provides runtime translations for 27 languages and 100 different locales.
Table 3-1 Languages Available for Oracle WebCenter Spaces
| A to Fi | Fr to No | P to T |
|---|---|---|
|
Arabic |
French |
Polish |
|
Brazilian Portuguese |
German |
Portuguese |
|
Chinese (Simplified) |
Greek |
Romanian |
|
Chinese (Traditional) |
Hebrew |
Russian |
|
Czech |
Hungarian |
Slovak |
|
Danish |
Italian |
Spanish |
|
Dutch |
Japanese |
Swedish |
|
English |
Korean |
Thai |
|
Finnish |
Norwegian |
Turkish |
The list in Table 3-1 includes all the languages available to WebCenter Spaces out-of-the-box. Your WebCenter Spaces administrator can reduce the number of available languages exposed in WebCenter Spaces by modifying the supported-languages.xml file, as described in the white paper "Extending WebCenter Spaces (11.1.1.2.0)" available on the Oracle Technology Network (http://www.oracle.com/technology/products/webcenter/white_papers.html).
Your locale selection applies special formatting considerations applicable to your selected locale. For example, whether information is typically viewed from left to right or right to left, how numbers are depicted (such as monetary information), and the like. You can change your language to Arabic and, within that language group, select from 20 different locales, including Algeria, Bahrain, Djibouti, and so on.
Note:
The administrative tier that offers services to WebCenter Spaces, including such tools as Oracle Enterprise Manager, provides a subset of the languages available to WebCenter Spaces. These include:-
English
-
Brazilian Portuguese
-
Chinese (Simplified)
-
Chinese (Traditional)
-
French
-
German
-
Italian
-
Japanese
-
Korean
-
Spanish
The Discussions service uses the Jive application. Out-of-the-box, the Jive application bundled with WebCenter supports English and Spanish. It does not support other languages listed in Table 3-1. However, Jive is open to your own translation files. For more information, see http://www.jivesoftware.com/builds/docs/latest/documentation/developer-guide.html#i18n. This information is explicit to the Jive application user interface.
Information that users add to the WebCenter Spaces application—that is, information that is not a part of the native UI—appears in the language used by its author. Such information includes announcements, documents, discussion forum content, and the like.
3.1.2 Setting a Session Display Language
Opening your web browser initiates a user session. When you select an application display language for your current user session, a session cookie is generated that keeps track of your selection.
The session language is retained for the life of the session cookie. If you clear browser cookies, the session language is also cleared and your default display language takes over or, absent a default, the application display language selected by your WebCenter Spaces administrator.
See Also:
For more information about default and session display languages, see Section 3.1.1, "What You Should Know About Display Languages in WebCenter Spaces."To set a session display language for your WebCenter Spaces application:
-
Open your WebCenter Spaces application.
-
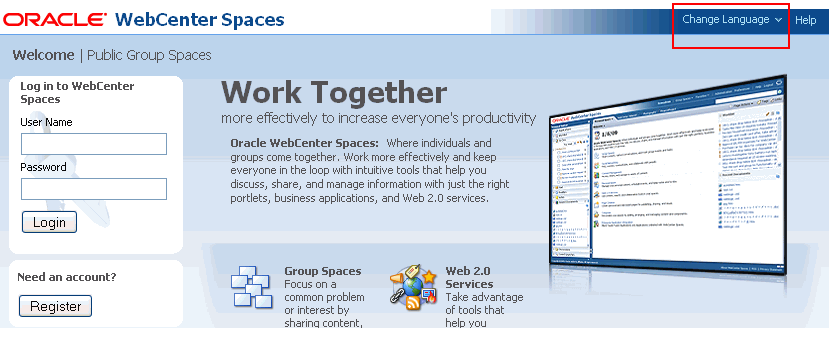
On the application Welcome page, click the Change Language link (Figure 3-1).
-
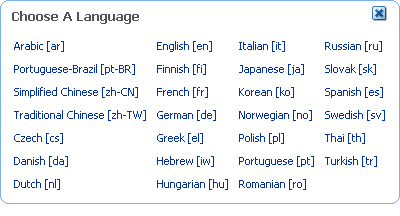
Select a language from the Choose A Language pop-up (Figure 3-2).
The application UI displays in the selected language for the life of the session cookie.
3.1.3 Setting a User Preference Display Language
Use WebCenter Spaces Preferences to select your preferred display language. A display language specified through WebCenter Spaces Preferences is retained across browser sessions. This display language setting can be temporarily overridden by a Change Language selection, but a Change Language selection remains in effect only for the life of its associated session cookie (for more information, see Section 3.1.2, "Setting a Session Display Language").
To set a user preference display language:
-
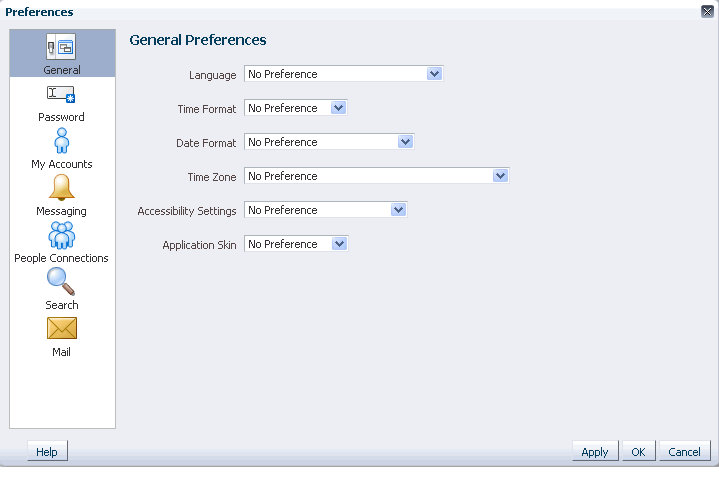
Log in, and click the Preferences link at the top of the application (Figure 3-3) to open the Preferences dialog (Figure 3-4).
-
Click General to access general preferences.
-
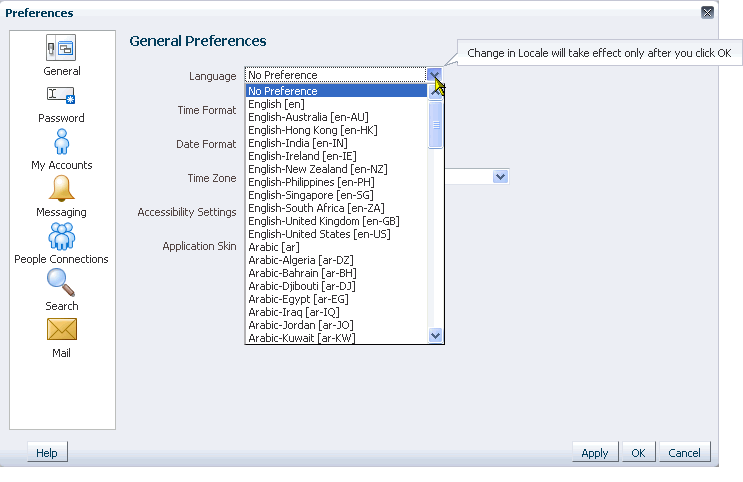
From the Language dropdown list (Figure 3-5), select your preferred display language-locale.
Alternatively, select No Preference to accept the application-level default set by your WebCenter Spaces Administrator.
See Also:
For information about setting the application-level default display language, see "Choosing the Default Display Language" in Oracle Fusion Middleware Administrator's Guide for Oracle WebCenter. -
Click OK to save your change and exit the Preferences dialog, or click Apply to save your change without exiting.
Your change takes effect when you click OK.
3.2 Setting Date and Time Preferences
One way to make the WebCenter Spaces application your own is to set it up to reflect your local time zone and your preferred date and time formats:
-
Use the time format setting to specify how you want time rendered in your view of WebCenter Spaces. Time is rendered with documents, events, and in many other services.
-
Wherever dates appear in the WebCenter Spaces user interface, the date format you select under Preferences is the format that is used. Dates appear in many task flows, for example Notes, Worklist assignments, Events, and the like.
-
Use the time zone preference to tell WebCenter Spaces where in the world you are and the time associated with that place.
Note:
Some services may be developed with an intrinsic time display format. In such cases, these services are not influenced by your Preference selection.To set your preferred time format, date format, and time zone:
-
Log in, and click the Preferences link at the top of the application to open the Preferences dialog.
-
Click General to access general preferences.
-
Set your date and time preferences.
Table 3-2 lists and describes selections on the Preferences General panel.
Table 3-2 Date and Time Preference Settings
Preference Setting Options Time Format
The following list shows time formats; the formats in the UI reflect the current time:
-
No Preference—To display the default Time Format established by the WebCenter Spaces administrator
-
H:M AM/PM—To display hour, minutes, and AM or PM
-
H:M:S AM/PM—To display hour, minutes, seconds, and AM or PM
-
H:M:S AM/PM Time Zone—To display hour, minutes, seconds, AM or PM, and the abbreviation of the specified time zone
Date Format
The following list shows date formats; the formats in the UI reflect the current date:
-
No Preference—To use the default date format set by the WebCenter Spaces administrator
-
M/D/YY—To use a number format
-
MON D, YYYY—To use an abbreviation format and the full year
-
Month D, YYYY—To display the full month name and the full year
-
DAY, MONTH D, YYYY—To display the full month name, the full year, and include the day of the week,
Time Zone
From the Time Zone pick list, select your preferred time zone. Alternatively select No Preference to accept the application-level default set by your WebCenter Spaces Administrator.
-
-
Click OK to save your change and exit the Preferences dialog, or click Apply to save your change without exiting.
Alternatively, click Cancel to cancel your change and exit the Preferences dialog.
3.3 Enabling or Disabling Screen Reader Optimization
The General panel in the Preferences dialog contains a list of options related to accessibility. You can use these options to optimize the application user interface (UI) for use with a screen-reader, such as JAWS. This section describes how to access accessibility options and explains the meaning of each option.
To optimize the application UI for use with a screen-reader:
-
Log in, and click the Preferences link at the top of the application to open the Preferences dialog.
-
Click General to access general preferences.
-
From the Accessibility Settings pick list, select your preferred accessibility setting.
Choose from the following options:
-
No Preference—The UI is not optimized for a screen reader. Screen readers can still process the WebCenter Spaces UI, but the UI is not optimized for screen readers.
-
Enable Screen Reader Mode—The UI is optimized for screen readers.
-
Disable Screen Reader Mode—The UI is not optimized for screen readers. Screen readers can still process the WebCenter Spaces UI, but the UI is not optimized for screen readers.
-
-
Click OK to save your change and exit the Preferences dialog, or click Apply to save your change without exiting.
Alternatively, click Cancel to cancel your change and exit the Preferences dialog.
3.4 Changing Your Application Look and Feel
The General panel in the Preferences dialog provides a pick-list of application skins for your WebCenter Spaces application. Application skins specify the application background color, screen fonts, and, with some skins, the shapes and images used for application buttons and icons.
To change your application skin:
-
Log in, and click the Preferences link at the top of the application to open the Preferences dialog.
-
Click General to access general preferences.
-
From the Application Skin pick list, select your preferred application skin.
Choose from the following options:
-
No Preference—To defer to the application's configured skin setting
-
Skin_Name—To select a predefined application skin from the list of skins available to you
-
-
Click OK to save your change and exit the Preferences dialog, or click Apply to save your change without exiting.
The application refreshes, using the skin you selected.
See Also:
Advanced users can create custom application templates and deploy them to WebCenter Spaces. For more information, see the white papers, "Customizing Site Templates in WebCenter Spaces (11.1.1.2.0)," and, "Extending WebCenter Spaces (11.1.1.2.0)," on the Oracle Technology network:http://www.oracle.com/technology/products/webcenter/white_papers.html.3.5 Changing Your WebCenter Password
Once you self-register or receive login credentials from the WebCenter administrator, you can change your password. Changing your password on a regular basis is one way you can participate directly in securing your application software. This section describes how.
To change your WebCenter Spaces password:
-
Log in, and click the Preferences link at the top of the application.
-
Click Password to open the Password panel (Figure 3-6).
Figure 3-6 The Preferences Password Panel
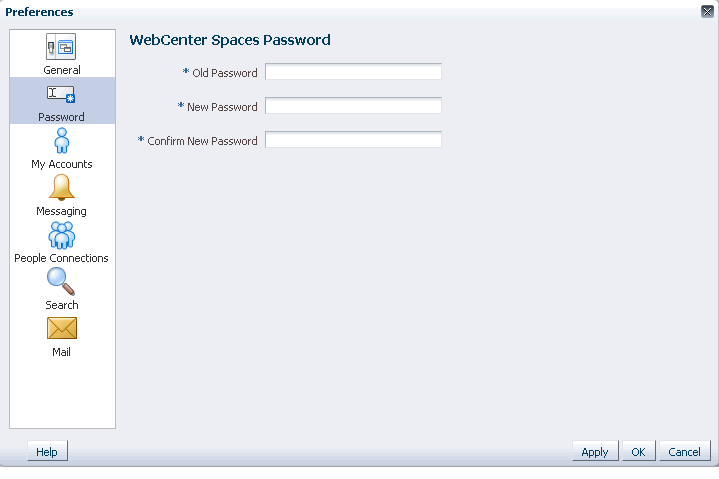
Description of "Figure 3-6 The Preferences Password Panel"
-
In the Old Password field, enter your current password.
-
In the New Password field, enter your new password.
Note:
The requirements for this password are driven by the identity store that manages WebCenter Spaces application users. For password requirements and restrictions, contact your application administrator. -
In the Confirm New Password field, enter your new password again.
-
Click OK to save your change and exit the Preferences dialog, or click Apply to save your change without exiting.
Alternatively, click Cancel to cancel your change and exit the Preferences dialog.
3.6 Providing Login Information for External Applications
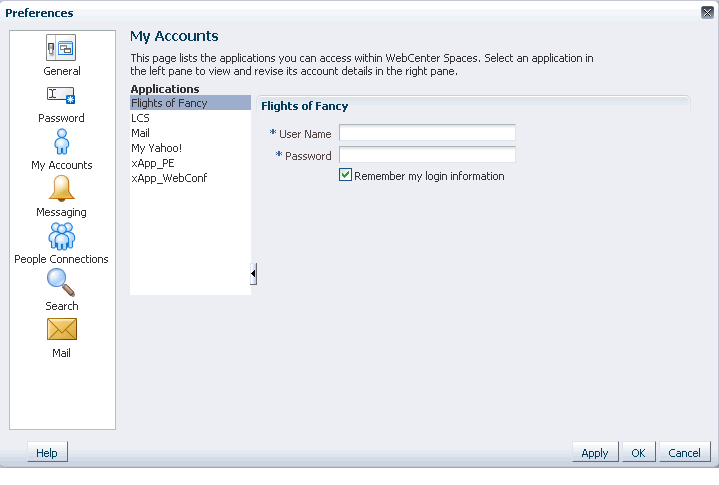
The My Accounts panel in the Preferences dialog provides one-stop access to supply or revise credentials for all external applications that are exposed in WebCenter Spaces. My Accounts provides a way to store application login credentials so that you provide them only once for the life of the credential. Once credentials are entered and stored, every time you access an external application within WebCenter Spaces the login credentials are provided automatically. This gives you a single-sign-on type of experience where one login (to WebCenter Spaces) provides access to multiple applications.
Note:
If you change the login credentials for an application, you must enter them again into WebCenter Spaces Preferences as described in this section.To provide login credentials for external applications:
-
Log in, and click the Preferences link at the top of the application.
-
Click My Accounts to open the My Accounts panel (Figure 3-7).
-
In the left pane of the My Accounts panel, select an application.
Log-in credential fields and check boxes are shown in the right pane.
-
Enter log-in credentials as required for the selected application.
Login credentials vary from one application to another. For example, some applications may require user name and password, while others may require those values along with additional values, such as your mail address.
Fields requiring values are marked with an asterisk (*).
-
Select Remember my login information to enable automatic authentication to the selected application every time you log in to WebCenter Spaces.
When you do not select this option, the login information that you enter is used only for the current user session. The next time you log in to WebCenter Spaces, you must also log in to this application.
-
Click Apply to save your changes and remain in the Preferences dialog.
Click OK to save your changes and exit the Preferences dialog.
3.7 Setting Messaging Preferences
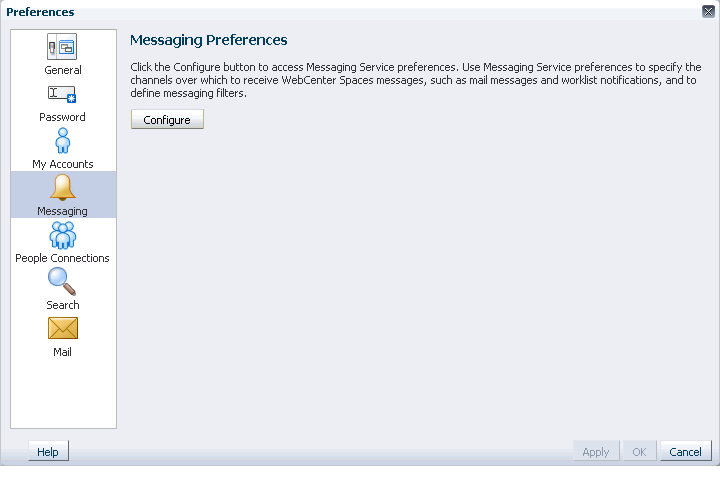
The Messaging panel in the Preferences dialog provides a means of configuring messaging channels and defining messaging filters.
Messaging channels are the channels over which messages, notifications, and alerts are received. Channel types include mail, voice over internet (VoIP), and the like. Messages, notifications, and alerts come from services registered with the Oracle User Messaging Service.
Messaging filters define sorting conditions for messages and specify the channels through which to send the messages that meet the conditions.
Messages, alerts, and notifications are sent to the Oracle User Messaging Service, which applies messaging filters, which in turn specify how messages, alerts, and notifications that meet different sets of conditions should be routed.
The Messaging panel in WebCenter Spaces Preferences (Figure 3-8) provides a Configure button for navigating to a messaging configuration page.
Note:
The Configure button is active only when a BPEL server is configured with WebCenter Spaces.Click the Configure button to view the messaging tabs:
-
Messaging Channels—Configure the messaging channels (such as mail, voice, and so on) over which to deliver your notifications and alerts.
-
Messaging Filters—Define rules for filtering your notifications and alerts.
The online help available with the Oracle User Messaging Service provides configuration guidance. Additionally, see Oracle Fusion Middleware Developer's Guide for Oracle SOA Suite.
Note:
In environments where multiple BPEL connections are registered against the WebCenter Worklist component, the messaging preferences repository is shared by all. When you set messaging preferences for one connection, you set them for all.3.8 Setting People Connections Preferences
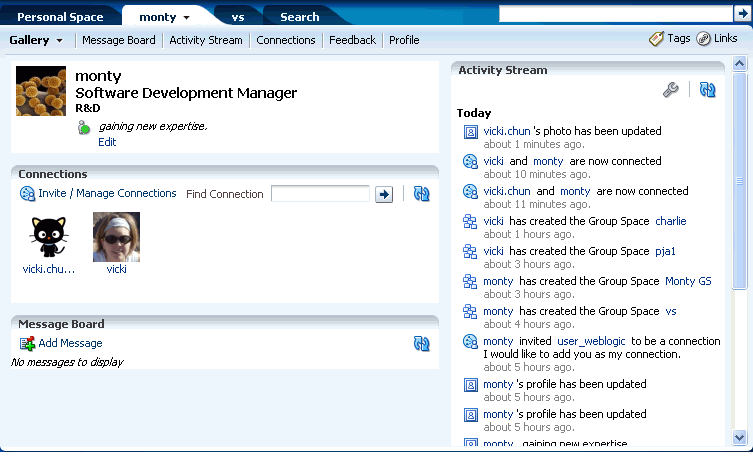
The People Connections service includes features for accessing personal profiles, connecting with other users, viewing user activity, posting messages, and offering feedback. Once you log on to your WebCenter application, a top-level tab becomes available with a selection of People Connections task flows. The tab label is your user name (Figure 3-9).
If you close this page, you can access it again by clicking your user name at the top of the application (Figure 3-10).
See Also:
Features of the People Connections service are discussed in detail in Chapter 25, "Working with the People Connections Service."Before you begin using People Connections task flows, you can prepare your social networking environment by specifying your People Connections preferences. The preferences you can specify are influenced by the preferences made available to you by your application administrator. The administrator can choose to hide or show some controls; consequently, you may not have access to some controls described in this section.
See Also:
For more information about People Connections and the application administrator, see, "Managing the People Connections Service," in the Oracle Fusion Middleware Administrator's Guide for Oracle WebCenter.This section contains the following subsections:
3.8.1 Setting Activity Stream Preferences
The Activity Stream monitors and logs your application and social-networking activities and the activities of fellow application users. For example, whenever you connect with another user, post a message on a Message Board, leave feedback, and other like activities, these are noted in your Activity Stream task flow.
See Also:
For information about the services that Activity Stream tracks, see Table 25-2, in Chapter 25, "Working with the People Connections Service."Use Activity Stream preferences to specify who can view your Activity Stream, the services for which to track activities, and the activities to show in an Activity Stream task flow.
To set Activity Stream preferences:
-
Log in, and click the Preferences link at the top of the application to open the Preferences dialog.
-
Click People Connections to display People Connections preferences.
-
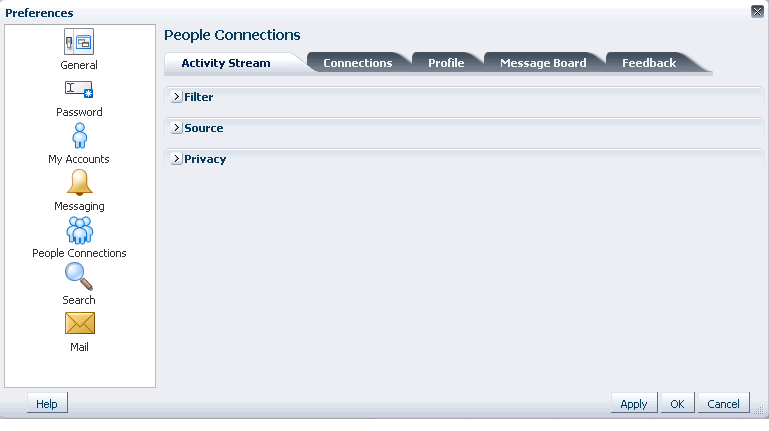
Click the Activity Stream tab to bring it forward (Figure 3-11).
-
Click the Expand icon to the left of Filter to select the services for which to track activities.
Select a checkbox to track the activity of a particular service; clear a checkbox to ignore the activity of a particular service.
-
Click the Expand icon to the left of Source to control the default activities to show in Activity Stream task flows.
Table 3-3 lists and describes each option.
Table 3-3 Activity Stream Source Options
Option Description Connections
Specify the source of the personal activities to show. Choose from:
-
Don't include personal space activities—Select to omit all personal space activities.
-
Include personal space activities from all connections—Select to include all the personal space activities of you and your connections.
-
Include personal space activities from people in specified connection lists—Select to include the activities of users on the connection lists you specify. When you select this option, a Selected Connection Lists section opens with an Add/Choose link. Click the link to open a dialog from which you can select the connection lists to use.
Group Spaces
Specify the source of group space activities to show. Choose from:
-
Don't include group space activities—Select to omit all group space activities.
-
Include all group space activities—Select to include all group space activities. Activity Stream task flows display activities from only the group spaces to which you have access.
-
Include activities from specified group spaces—Select to specify the group spaces from which to show activities. Selecting this option results in the display of a Selected Group Spaces section with an Add/Choose link. Click this link to open a dialog from which to select group spaces.
-
-
Click the Expand icon to the left of Privacy to specify who can view your activities in Activity Stream task flows:
Note:
Your application administrator can set this value at the application level and prevent users from changing it.From the dropdown list next to Allow all my activities to be viewed by, choose from:
-
Everyone—Any user, whether logged in or not, can view your activities.
-
Authenticated Users—Users who have logged in can view your activities.
-
My Connections—Only you and your connections can view your activities.
-
Myself—Only you can view your activities.
-
-
Click OK.
Instead, you can also click Apply to save your changes but remain in the Preferences dialog.
3.8.2 Setting Connections Preferences
Use Connections to set up your internal social network of friends and business contacts. The users that you identify as your connections can enjoy special privileges on information relating to your application and social networking activity. For example, as a connection, you may have a greater level of access to your connections' Message Board and Feedback task flows. You may be able to view a greater level of detail in your connections' personal profiles. This all depends on the permissions you and your connections set for yourselves in People Connections Preferences.
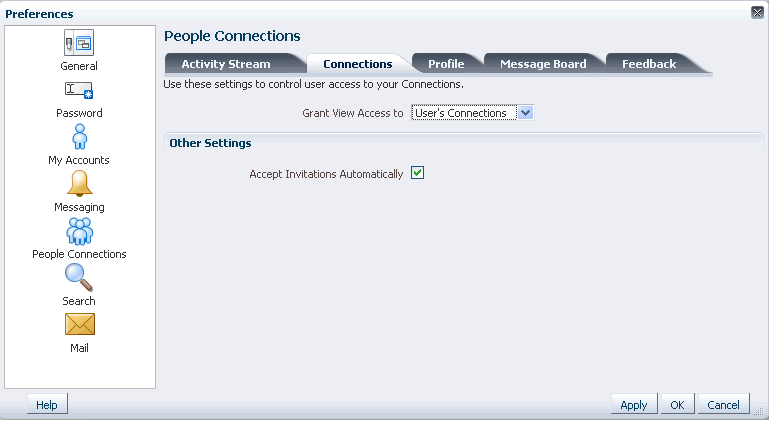
Use Connections Preferences to specify who can view information about the people you have connected with and whether to accept invitations to be others' connections automatically.
To set Connections preferences:
-
Log in, and click the Preferences link at the top of the application to open the Preferences dialog.
-
Click People Connections to display People Connections preferences.
-
On the People Connections panel, click the Connections tab to bring it forward (Figure 3-12).
-
From the Grant View Access to dropdown list, select the users who can view your list of connections.
Choose from:
-
Everyone—All users, including users who are not logged in, can see information about your connections.
-
Authenticated Users—Only users who are logged in can view your connections.
-
User's Connections—Only you and the users you have accepted as your Connections can view your connections.
-
User Only—Only you can view your connections.
-
-
Select Accept Invitations Automatically to automatically accept any invitation to connect with another user.
Clear this checkbox to leave yourself the option of accepting, refusing, or ignoring an invitation to connect with another user.
-
Click Apply to save your settings and remain in the Preferences dialog.
Click OK to save your settings and exit the Preferences dialog.
3.8.3 Setting Profile Preferences
Your People Connections personal profile is populated from the back-end identity store that provides WebCenter Spaces with users. Use Profile-related preferences to specify who can access different types of information associated with your personal profile.
To set Profile preferences:
-
Log in, and click the Preferences link at the top of the application to open the Preferences dialog.
-
Click People Connections to display People Connections preferences.
-
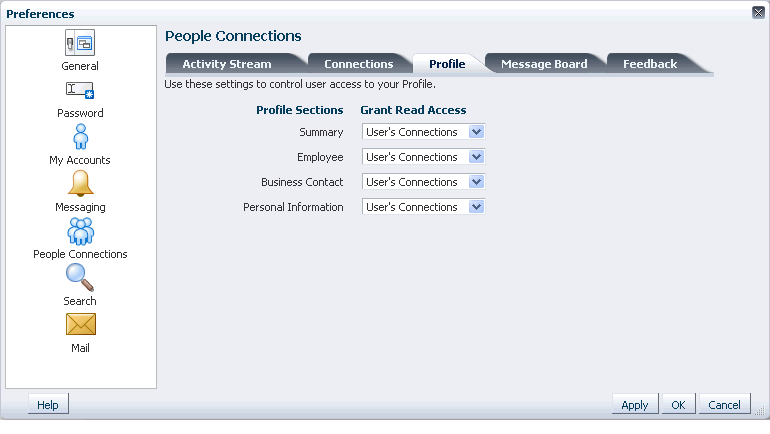
Click the Profile tab to bring it forward (Figure 3-13).
Your personal profile is presented in four sections: Summary, Employee, Business Contact, Personal Information. Each section provides information about you that is related to the section heading. For example, Summary includes a collection of basic details, such as your user name, mail address, and office location.
Using the settings on the Profile tab, you can specify different levels of access for different groups of users on each section of your personal profile.
Choose from:
-
Everyone—All users, including users who are not logged in, can see the associated profile section in your profile.
-
Authenticated Users—Only users who are logged in can view the information in the specified section of your personal profile.
-
User's Connections—Only you and the users you have accepted as your Connections can view the information in the specified section of your personal profile.
-
User Only—Only you can view the information in the specified section of your personal profile.
-
-
Click Apply to save your settings and remain in the Preferences dialog.
Click OK to save your settings and exit the Preferences dialog.
3.8.4 Setting Message Board Preferences
The Message Board is like a select community bulletin board. Use it to post your own messages and view the messages of others. Use Message Board preferences to specify who can view and post to your Message Board.
To set Message Board preferences:
-
Log in, and click the Preferences link at the top of the application to open the Preferences dialog.
-
Click People Connections to display People Connections preferences.
-
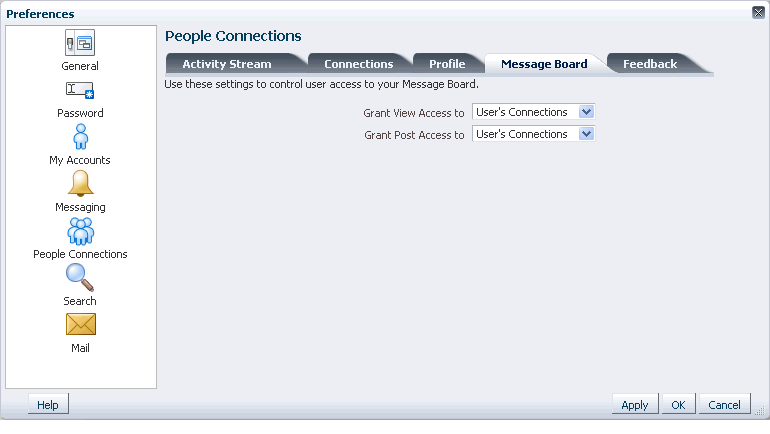
Click the Message Board tab to bring it forward (Figure 3-14).
-
Set your Preferences for the Message Board.
Table 3-4 lists and describes each option.
Table 3-4 Message Board Preference Options
Option Description Grant View Access to
Select who can view your Message Board. Choose from:
-
Everyone—All users, including users who are not logged in, can view your Message Board messages.
-
Authenticated Users—Only users who are logged in can view your Message Board messages.
-
User's Connections—Only you and the users you have accepted as your Connections can view your Message Board messages.
-
User Only—Only you can view your Message Board messages.
Grant Post Access to
Select who can post messages to your Message Board. Choose from:
-
Everyone—All users, including users who are not logged in, can post messages to your Message Board.
-
Authenticated Users—Only users who are logged in can post messages to your Message Board.
-
User's Connections—Only you and the users you have accepted as your Connections can post messages to your Message Board.
-
User Only—Only you can post messages to your Message Board.
-
-
Click Apply to save your settings and remain in the Preferences dialog.
Click OK to save your settings and exit the Preferences dialog.
3.8.5 Setting Feedback Preferences
Feedback provides a means of viewing and posting observations about the efforts of other users and viewing observations from other users about your own efforts. Use Feedback preferences to specify who can view and post feedback about your efforts.
To set Feedback preferences:
-
Log in, and click the Preferences link at the top of the application to open the Preferences dialog.
-
Click People Connections to display People Connections preferences.
-
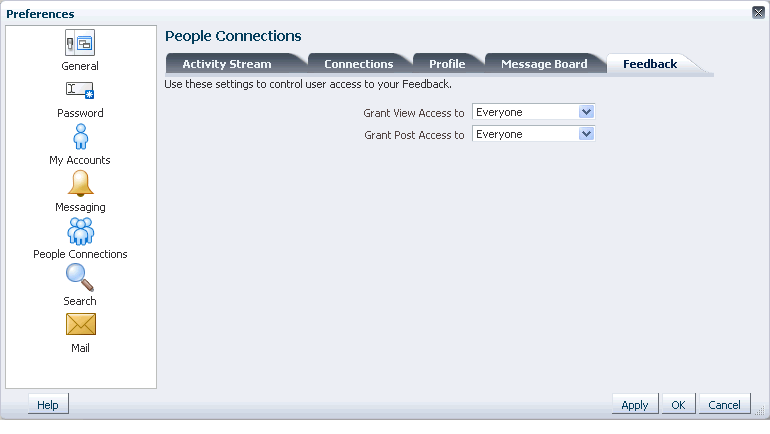
Click the Feedback tab to bring it forward (Figure 3-15).
-
Set your Preferences for Feedback.
Table 3-5 lists and describes each option.
Table 3-5 Feedback Preference Options
Option Description Grant View Access to
Select who can view Feedback given to you. Choose from:
-
Everyone—All users, including users who are not logged in, can view your Feedback messages.
-
Authenticated Users—Only users who are logged in can view your Feedback messages.
-
User's Connections—Only you and the users you have accepted as your Connections can view your Feedback messages.
-
User Only—Only you can view your Feedback messages.
Grant Post Access to
Select who can provide Feedback to you. Choose from:
-
Everyone—All users, including users who are not logged in, can post Feedback messages to you.
-
Authenticated Users—Only users who are logged in can post Feedback messages to you.
-
User's Connections—Only you and the users you have accepted as your Connections can post Feedback messages to you.
-
User Only—No one can post Feedback messages to you.
-
-
Click Apply to save your settings and remain in the Preferences dialog.
Click OK to save your settings and exit the Preferences dialog.
3.9 Setting Preferences for WebCenter Spaces Search Results
When you search content, you may find that the results from one service are more relevant to you than results from other services. You may find it useful to be able to exclude some services from a search and specify the order in which the results from selected services are listed.
WebCenter Spaces search preferences provide this capability. Use search preferences to select the services to search, specify the display order for search results, and choose the information you want to display with search results. This section describes how. It contains the following subsections:
-
Section 3.9.2, "Specifying a Display Order for Search Results"
-
Section 3.9.3, "Specifying the Type and Order of Information to Show with Search Results"
See Also:
For detailed information about searching in WebCenter Spaces, see Chapter 28, "Working with the Search Service." For information about a Document Library search, see Section 18.4.8, "Running Document Searches in the Document Manager Task Flow."3.9.1 Selecting the Services to Search
Your WebCenter Spaces administrator makes services available to the WebCenter Spaces application. Some of these services, while quite useful, may not often provide particularly useful search results. For example, if you frequently search for mention of a particular type of technology, including your personal contacts in the search is probably not useful.
By configuring the WebCenter Spaces search engine to search only those services you select, you can exclude those services most likely to return irrelevant search results. This section describes how.
To select the services to be searched:
-
Log in, and click the Preferences link at the top of the application.
-
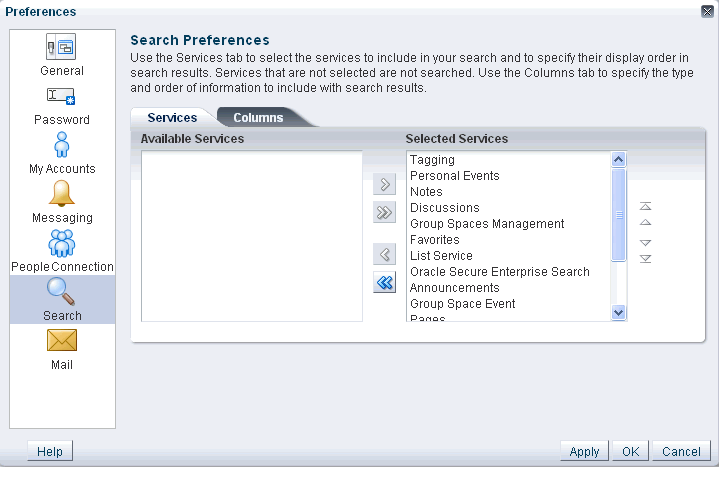
Click Search to open the Search Preferences panel (Figure 3-16).
-
To add a service to a search, select one or more services on the Available Services list by checking their checkboxes, and then click the Move selected items to list icon to move them to the Selected Services list.
To remove services from search, select one or more services on the Selected Services list and click the Remove selected items from list icon to move them to the Available Services list.
-
Click OK to save your changes and exit the Preferences dialog.
Alternatively, click Apply to save your changes without exiting.
The services you add to the Selected Services list are included in future WebCenter Spaces searches. The services on the Available Services list are not searched.
3.9.2 Specifying a Display Order for Search Results
Of all the services you include in a WebCenter Spaces search, you may find that some services provide more relevant results than others. If this proves true, you can ensure that the results from those services display first. WebCenter Spaces Preferences provide controls for specifying the order in which services are listed in search results. This section describes how to use them.
To specify a display order for search results:
-
Log in, and click the Preferences link at the top of the application.
-
Click Search to open the Search Preferences panel (Figure 3-17).
-
Select one or more services on the Selected Services list by checking their checkboxes, and click the Move icons to the right of the list to move your selections higher or lower on the list.
The order you specify here determines the order each service is listed in search results.
-
Click OK to save your changes and exit the Preferences dialog.
Alternatively, click Apply to save your changes without exiting.
3.9.3 Specifying the Type and Order of Information to Show with Search Results
You can use Search Preferences to specify the type of information to show with search results and the order in which that information is presented. Information types include Icon, Title, Person, Size, Date, and Type.
To specify the type and display order of information to show with search results:
-
Log in, and click the Preferences link at the top of the application.
-
Click Search to open the Search Preferences panel.
-
Click the Columns tab to bring it forward (Figure 3-18).
Figure 3-18 The Columns Tab in Search Preferences
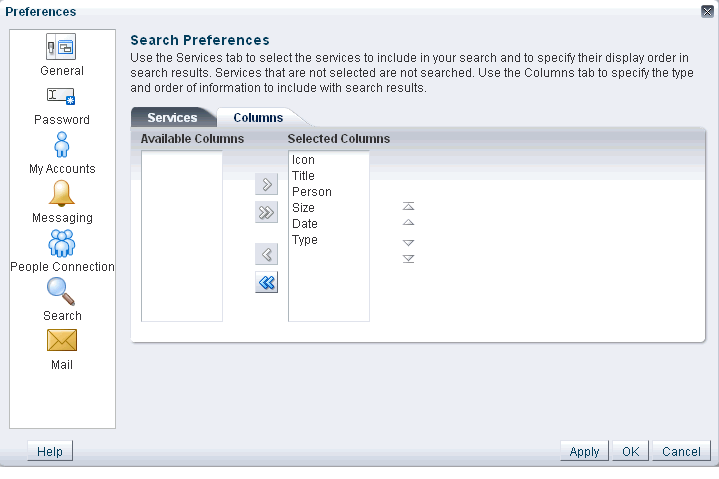
Description of "Figure 3-18 The Columns Tab in Search Preferences"
-
To set the types of columns to show in search results, select one or more column titles on the Available Columns list and then click the Move selected items to other list icon to move your selections to the Selected Columns list.
Choose from:
-
Icon—An icon representing a result's item type.
-
Title—The linked title of the search result. For a file, this is the file name. Click this link to navigate to the result.
-
Person—The person who owns the result. For a file, this is the user who uploaded or last modified the file. Right-click the person listed to access a context menu with options for contacting the person (for more information, see Chapter 20, "Working with the Instant Messaging and Presence Service (IMP)").
-
Size—The size of the result, for example, the file size.
-
Date—The date the result was added to WebCenter Spaces. For a file, this is the date it was uploaded or last modified.
-
Type—The object type of the result. For example, for a graphic this is the type image.
To remove an information column from search results, select one or more column titles on the Selected Columns list and then click the Remove selected items from list icon to move your selections to Available Columns.
-
-
To set the order in which search result information is shown, select the checkbox of one or more column names in the Selected Columns list and then click the Move icons to the right of the list to rearrange column titles into the display order you prefer.
-
Click OK to save your changes and exit the Preferences dialog.
Alternatively, click Apply to save your changes without exiting.
Search results present all of the information you specify here, in your preferred order.
3.10 Selecting Your Preferred Mail Connection
When your WebCenter Spaces application provides access to multiple mail connections, it also provides a way for you to select which connection to use. This section describes how.
To select your preferred mail connection:
-
Log in, and click the Preferences link at the top of the application.
-
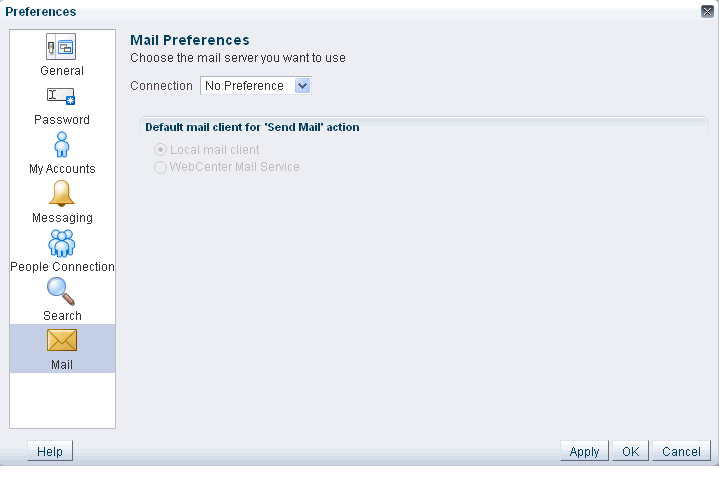
Click Mail to open the Mail Preferences panel (Figure 3-19).
-
From the Connection dropdown list, select the mail connection you want to use for accessing your mail through WebCenter Spaces.
The options available on this list depend on the connections your system administrator makes available to your WebCenter Spaces application. The No Preference option uses your system-level active mail connection.
-
Under Default mail client for 'Send Mail' action, select an option to identify the mail application to open when the
SendMailcommand is invoked.Choose from:
-
Local mail client—Select to specify that the local mail client you normally use, such as Microsoft Outlook or Mozilla Thunderbird, should open a compose message window when the
SendMailcommand is invoked. -
WebCenter Mail Service—Select to specify to open a WebCenter Mail service compose message window when the
SendMailcommand is invoked.
-
-
Click OK to save your change and exit the Preferences dialog.
-
Log out of WebCenter Spaces.
For information about logging out, see Section 2.2.2, "Logging Out of WebCenter Spaces."
-
Log in to WebCenter Spaces.
-
If you previously saved your credentials for this mail connection to the WebCenter Spaces credential store, you are logged in to the new mail connection automatically.
If you have not previously saved your credentials, log in to this mail connection using Preferences (see Section 3.6, "Providing Login Information for External Applications") or using the login link in a Mail task flow (see Section 23.3.2, "Logging in to Mail").
