5 Adding Oracle WebCenter Services to Your Application
Oracle WebCenter Framework includes Oracle WebCenter Services, which enable you to enhance your application with Web 2.0 features, such as secure information sharing and online collaboration. In this chapter, we will explore a few of the features you can use to add these capabilities to your application.
In this lesson, you will add a search toolbar and a document library to your application. With the document library, or the Documents service, you can enable your users to share and manage content like Word documents or PDFs in an easy-to-navigate environment, right in the application. Additionally, you will take advantage of the People Connections service to examine how users can create a social network and keep up to date with each other by viewing recent activities and messages posted by the users.
You will also add the Tags service, which enables you and your users to add keywords to documents, files, and other items in your application to make it easier to search and organize content. This service also includes a "tag cloud" task flow where you can visualize the mapping of the keywords to your application contents right on your page. Then, you will add the Links service, which enables you to create relationships between items in your application, as well as relationships between items in your application and other items, like external URLs.
Optionally, if you have access to an email server, you can add the Mail service to the sample application to see how users can email each other within the application at runtime.
These services are just a few examples of the myriad services Oracle WebCenter Suite offers. You will see how easy it is to use services to make your application dynamic and provide frequently-used communication options to your users. To learn more about WebCenter Services, refer to the Oracle Fusion Middleware Developer's Guide for Oracle WebCenter.
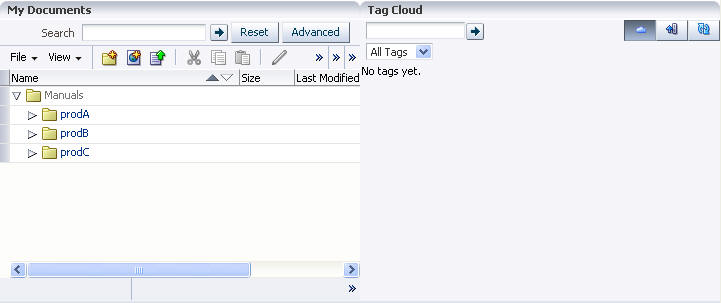
Figure 5-1 shows the Search toolbar, document library, and Tag Cloud that you will create in this lesson. Figure 5-2 shows the People Connections service on MyPage in the application.
Figure 5-1 Top Portion of MyPage.jspx at the End of this Lesson
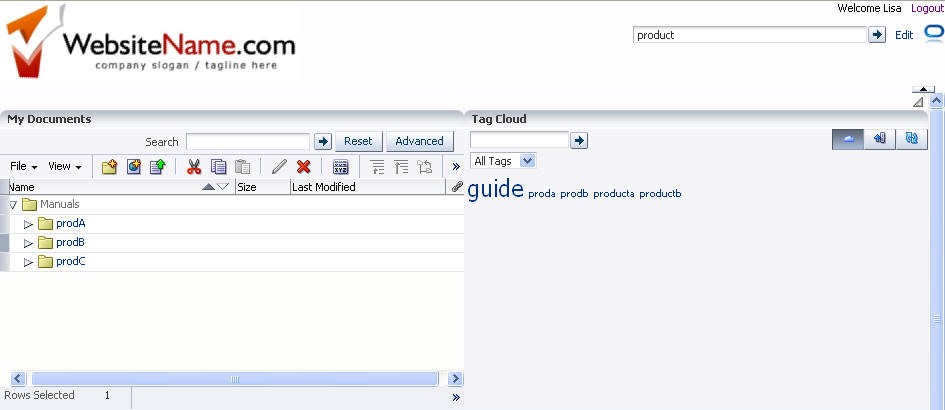
Description of "Figure 5-1 Top Portion of MyPage.jspx at the End of this Lesson"
Figure 5-2 People Connections Section of MyPage at the End of this Lesson (Logged in as Alex)
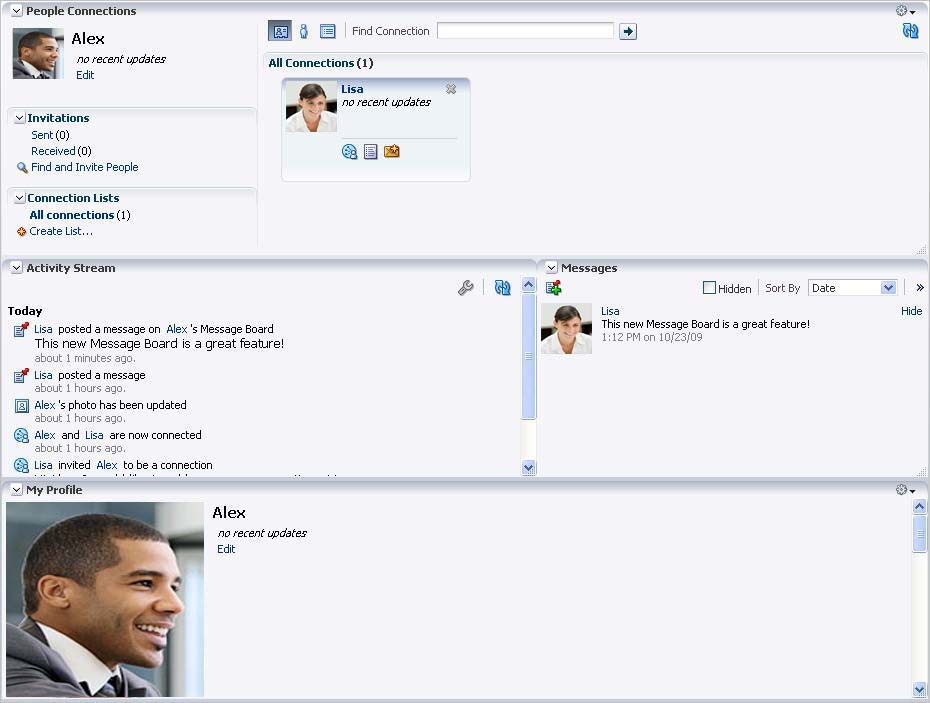
Description of "Figure 5-2 People Connections Section of MyPage at the End of this Lesson (Logged in as Alex)"
Introduction
This lesson contains the following steps:
-
Step 3: Add the Documents - Document Manager Task Flow to Your Application
-
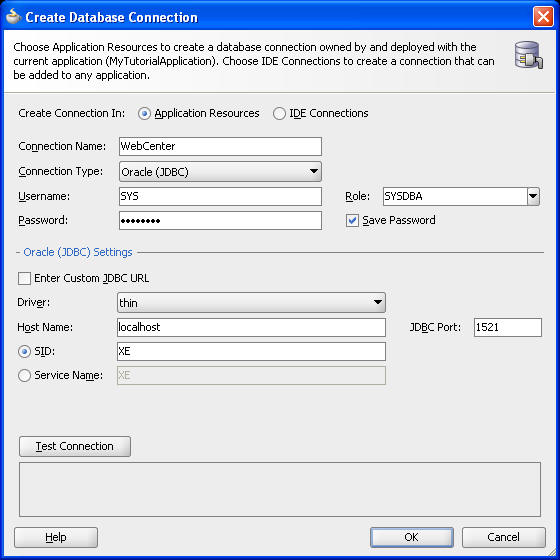
Step 5: Create a Database Connection to the WebCenter Schema
-
Step 8: Add the People Connections Service to Your Application
-
Step 9: Use the People Connections Service in Your Application at Runtime
-
Step 7: Use, Add, and Search Tags in Your Application at Runtime
-
Step 10: Use the Links Service in Your Application at Runtime
-
Step 11: Use the Mail Service with Your Application (Optional)
Before you begin the steps in this lesson, ensure you have followed the steps up to this point in the Tutorial.
Step 1: Add the Search Toolbar Task Flow to the Application
With Oracle WebCenter Framework, you can allow your users to search through information within the services. For example, you may want to add a Search field so that users can search for a particular file in your document library. Figure 5-3 shows a sample of the search results you can retrieve in your application.
To add the Search service to your application:
-
In Oracle JDeveloper, ensure MyTutorialApplication is open and that your page,
MyPage.jspx, is open and visible. -
In the Structure window, locate the second horizontal Panel Group Layout (in the
endfacet) that you added in Chapter 4, "Adding Security to Your Application." Figure 5-4 shows the Panel Group Layout selected. You will add the Search Toolbar task flow here.Figure 5-4 Panel Group Layout in the end Facet
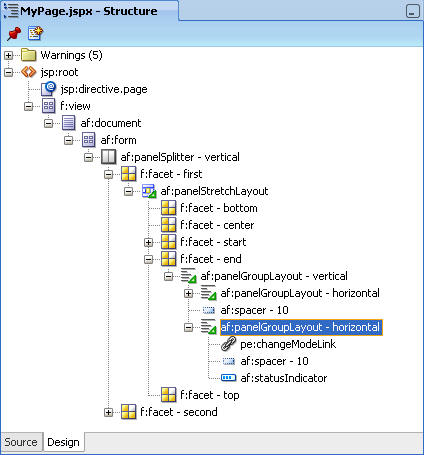
Description of "Figure 5-4 Panel Group Layout in the end Facet"
-
As we mentioned in Chapter 3, "Creating a WebCenter Application with a Customizable Page," you can use the pushpin in the Structure window to freeze the current view. For this step, you click MyPage in the Design view, then ensure the pushpin is in the "freeze" position (pressed). This way, when you click the Search Toolbar task flow in the ensuing steps, the Structure window does not contextually refresh.
-
Before you add the Search Toolbar task flow, add a Spacer component to create the layout. From the Component Palette, under ADF Faces, under Layout, drag and drop a Spacer component onto the Structure window just above the Change Mode Link (Figure 5-5).
Figure 5-5 Spacer Component above the Change Mode Link

Description of "Figure 5-5 Spacer Component above the Change Mode Link"
-
In the Resource Palette, in the WebCenter Services Catalog, open the Task Flows node. If you do not see the Resource Palette in Oracle JDeveloper (it usually displays as a tab next to the Component Palette), choose Resource Palette from the View menu.
-
Under My Catalogs, open the WebCenter Services Catalog, then expand Task Flows.
-
Locate the Search Toolbar task flow (Figure 5-6).
Figure 5-6 Search Toolbar Task Flow in the WebCenter Services Catalog
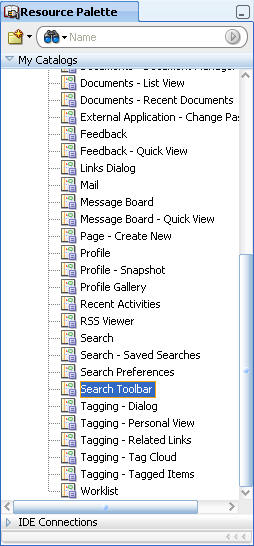
Description of "Figure 5-6 Search Toolbar Task Flow in the WebCenter Services Catalog"
Drag and drop this task flow onto the Panel Group Layout then choose Region from the context menu. If you are prompted to add the appropriate libraries, choose Add Libraries.
-
In the Structure window, move the Search Toolbar task flow (
af:region - #{bindings.sarchtoolbar1.regionModel}) above the Spacer component you just added (Figure 5-7).Note:
As previously mentioned, you can use the pushpin in the Structure window to freeze the current view. For this step, you should click MyPage in the Design view, then ensure the pushpin is in the "freeze" position (pressed).Figure 5-7 Search Toolbar in the Structure Window
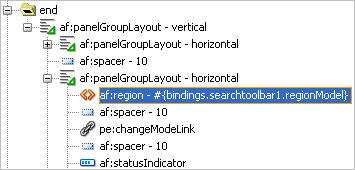
Description of "Figure 5-7 Search Toolbar in the Structure Window"
-
Run the page to your browser and log in as user
Lisa/welcome1to see how it looks at runtime. Figure 5-8 shows the Search toolbar next to the Edit (Change Mode) link. You can test the Search toolbar later in the chapter, after you add content on which you can perform a search.Figure 5-8 Search Toolbar on MyPage at Runtime

Description of "Figure 5-8 Search Toolbar on MyPage at Runtime"
-
Return to JDeveloper.
For more information about the Search service, including other Search task flows you can use, see Chapter 24, "Integrating the Search Service" in Oracle Fusion Middleware Developer's Guide for Oracle WebCenter.
Now that you have added a Search toolbar to our application, continue to the next step to add the Documents service.
Step 2: Create a Connection for the Documents Service
With most services in the WebCenter Framework, you perform a few basic steps: configure the service with our application, add the service task flow to our page, then run the page and customize or use the service at runtime.
Before we can take advantage of the Documents service, which enables us to browse, manage, and create documents at runtime, we must first create a connection to our content repository. In this Tutorial, our content repository will be the directory we created in Chapter 2, "Preparing for the Tutorial."
To create a connection to our content repository:
-
In Oracle JDeveloper, in the Application Navigator, locate the Application Resources node for MyTutorialApplication and expand it. Notice the Connections folder here (Figure 5-9).
Figure 5-9 Connections Folder in the Application Resources Panel
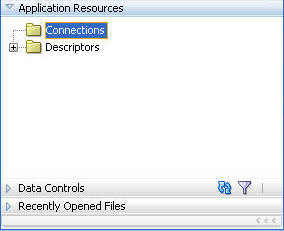
Description of "Figure 5-9 Connections Folder in the Application Resources Panel"
-
Ensure the ViewController project is highlighted.
-
Under Application Resources, right-click the Connections folder, then choose New Connection, then choose Content Repository... (Figure 5-10).
Figure 5-10 Choosing the New Content Repository Connection Menu Option
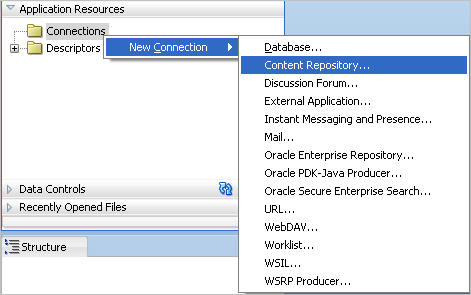
Description of "Figure 5-10 Choosing the New Content Repository Connection Menu Option"
-
In the Create Content Repository Connection dialog that displays, notice the first option: you can choose to either limit the usage of this connection to the current application by choosing Application Resources, or enable all applications created using your instance of Oracle JDeveloper to use this connection by choosing IDE Connections.
Select Application Resources.
Note:
Creating a connection here enables you to reuse the same connection throughout your application. If you chose IDE Connections, you could reuse the connection in any application you create using your instance of Oracle WebCenter Framework. The connection name would display in the Resource Palette under IDE Connections. -
In the Connection Name field, enter
MyTutorialContent. -
From the Repository Type list, choose File System.
-
Select Set as primary connection for Documents service to set this connection as the active connection any time you add the Documents service to your application.
If you did not choose this option and created a connection to another content repository, Oracle WebCenter Framework would automatically set the first connection you created as the active connection.
-
Under Configuration Parameters, let's set the Base Path to the location where you downloaded the Tutorial sample files on your C drive (in Chapter 2, "Preparing for the Tutorial"), by entering
c:\TutorialContent. -
Click Test Connection. You should see a Success! message in the Status field, as shown in Figure 5-11.
Figure 5-11 Create Content Repository Connection
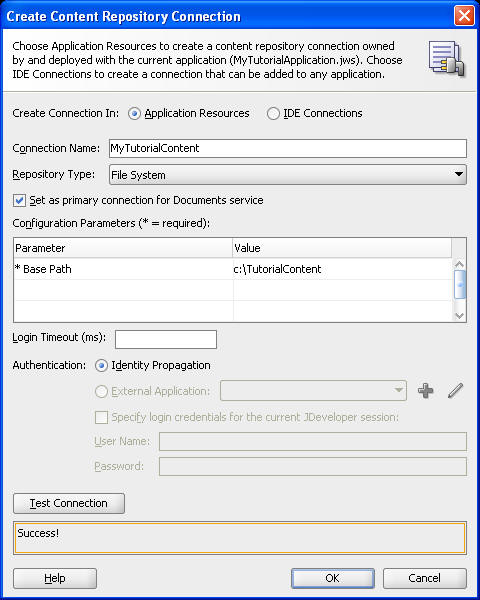
Description of "Figure 5-11 Create Content Repository Connection"
-
Click OK.
-
In the Application Navigator, in the Application Resources panel, you will see your new connection, as shown in Figure 5-12.
Figure 5-12 New Connection in the Application Resources Panel
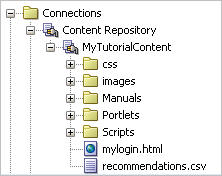
Description of "Figure 5-12 New Connection in the Application Resources Panel"
For more information about creating a connection for the Documents service, see Chapter 14, "Integrating the Documents Service" in Oracle Fusion Middleware Developer's Guide for Oracle WebCenter.
Step 3: Add the Documents - Document Manager Task Flow to Your Application
Oracle WebCenter Framework enables content integration by:
-
Content Repository data controls: enable read-only access to a content repository, and maintain tight control over the way the content displays in the application.
-
Documents service: enable users to view and manage documents in your organization's content repositories.
Both methods of integration use content repository connections, which you created in the previous step. In this Tutorial, we will use the Documents service to integrate content (the sample content on our file system that we downloaded in Chapter 2, "Preparing for the Tutorial") into our application.
Using the Documents service, users can view, upload, and collaborate around documents. In this Tutorial, you will use a file system connection that will let you view documents and enable your application users to share them, but not upload them. Using a content repository such as Oracle Content Server or Oracle Content Database, you can take advantage of all the features of this service. To learn more about using different content repositories and more details about the various Documents service task flows, refer to Chapter 14, "Integrating the Documents Service" in the Oracle Fusion Middleware Developer's Guide for Oracle WebCenter.
In this step, you will add the task flow provided by the service to your application. The Documents service provides several task flows, one of which is the Documents - Document Manager task flow. This task flow, when used with a file system content repository, enables your users to view folders and files within the application much as they would on their own file system in a read- and write-only format (Figure 5-13).
Figure 5-13 Document Manager View of Sample Folders at Runtime
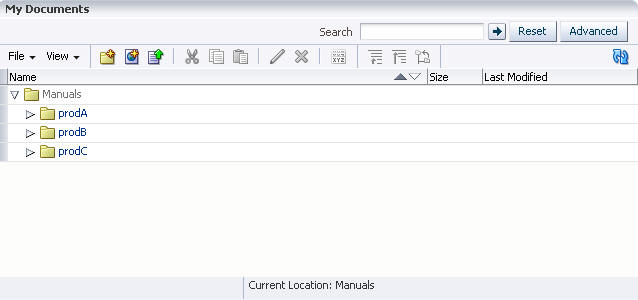
Description of "Figure 5-13 Document Manager View of Sample Folders at Runtime"
To add the Documents - Document Manager task flow to your application at design time in Oracle JDeveloper:
-
In Oracle JDeveloper, ensure MyTutorialApplication is open and that you have configured your application for services and set up a connection to the content repository, as described in "Step 2: Create a Connection for the Documents Service".
-
Let's add the Documents - Document Manager task flow to the page. Ensure that
MyPage.jspxis open. -
In the Structure window, locate where we are going to add the task flow (Figure 5-14). Under the second facet navigate to pe:pageCustomizable then af:panelGroupLayout - scroll, Layout Customizable facets, then contentA. Here, you will see the Panel Customizable where we will add the task flow.
Note:
As previously mentioned, you can use the pushpin in the Structure window to freeze the current view. For this step, you should click MyPage in the Design view, then ensure the pushpin is in the "freeze" position (pressed).Figure 5-14 Location Where We Will Add the Documents - Document Manager Task Flow
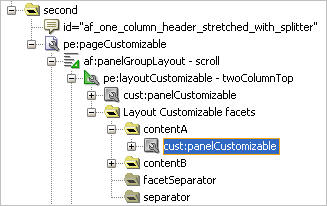
Description of "Figure 5-14 Location Where We Will Add the Documents - Document Manager Task Flow"
-
While the Panel Customizable is selected, set the Layout property to stretch.
-
Add a chrome, so that at runtime, the layout shows a frame around the list of documents.
In the Component Palette, choose Oracle Composer from the list.
-
Under Layout, drag and drop Show Detail Frame onto the cust:panelCustomizable that you selected (as shown in Figure 5-14).
-
While the Show Detail Frame is selected, in the Property Inspector, under Common, change the Text property to
My Documents, as shown in Figure 5-15. Notice also that the frame is also selected in the Design view of your page.Figure 5-15 Changing the Title of the Show Detail Frame
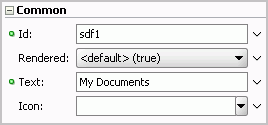
Description of "Figure 5-15 Changing the Title of the Show Detail Frame"
-
You can add the Documents - Document Manager task flow to your application in one of two ways: either by dragging and dropping the connection you created in "Step 2: Create a Connection for the Documents Service", called
MyTutorialContent, onto the Show Detail Frame, then choosing Document - Document Manager from the context menu, or by using the Resource Palette. For the purposes of this Tutorial, you can use the Resource Palette.In the Resource Palette, under WebCenter Services Catalog, open the Task Flows folder and locate Documents - Document Manager. Figure 5-16 shows the task flow in the WebCenter Services Catalog.
Figure 5-16 Documents - Document Manager Task Flow in the Resource Palette
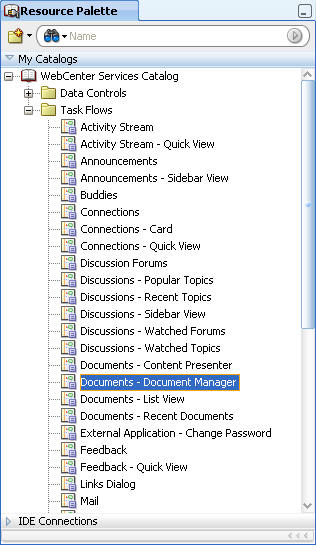
Description of "Figure 5-16 Documents - Document Manager Task Flow in the Resource Palette"
-
Drag and drop the Documents - Document Manager task flow onto the Show Detail Frame. You can do this either by dragging it onto the Show Detail Frame in the Structure window or in the Design view of the page.
-
In the context menu that displays, click Create Region, as shown in Figure 5-17.
Figure 5-17 Dropping the Documents - Document Manager Task Flow onto the Page in the Design View
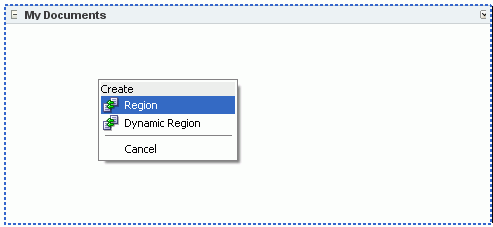
Description of "Figure 5-17 Dropping the Documents - Document Manager Task Flow onto the Page in the Design View"
-
If the Confirm Add ADF Library dialog displays, click Add Library.
-
The Edit Task Flow Binding dialog displays. In this dialog, you can set up the connection parameter for the task flow.
Click the connectionName parameter and enter
${'MyTutorialContent'}to tell the Document Library task flow to use this connection.Note:
If you do not enter a connection name here, the content repository connection where you selected Set as primary connection for Documents service is the active connection. -
Since the connection points to the root folder of our Tutorial sample files, let's update the startFolderPath parameter to the folder containing the product manuals.
Click the startFolderPath parameter and enter
${'/Manuals'}next to it, then click OK. Figure 5-18 displays the Edit Task Flow Binding dialog with the appropriate values.Figure 5-18 Edit Task Flow Binding Dialog
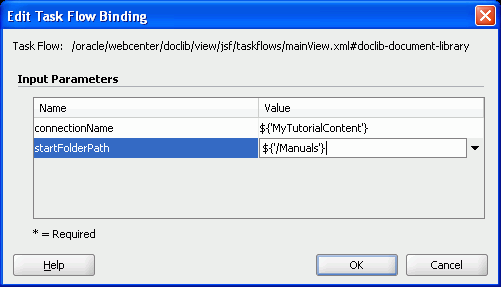
Description of "Figure 5-18 Edit Task Flow Binding Dialog"
The Structure window shows the new task flow with the
af:regiontag, as shown in Figure 5-19.Figure 5-19 Documents - Document Manager Task Flow in the Structure Window
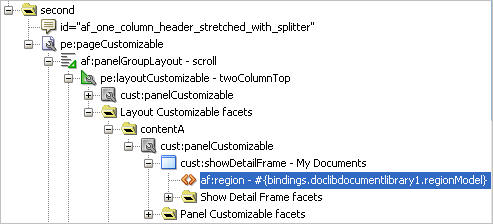
Description of "Figure 5-19 Documents - Document Manager Task Flow in the Structure Window"
-
In the Application Navigator, right-click MyPage.jspx and choose Run.
-
Log in as user
Lisawith the passwordwelcome1. Because the content repository used with the Documents - Document Manager task flow is local, this user has access to the content. However, if you used a secure content repository, such as Oracle Content Database or Oracle Content Server, you would need to ensure that the user credentials for your WebCenter application match those of a user on the secure content repository.
For more information about the Documents - Document Manager task flow, as well as other Documents service task flows, see Chapter 14, "Integrating the Documents Service" in the Oracle Fusion Middleware Developer's Guide for Oracle WebCenter.
In the next step, we will examine the Documents - Document Manager task flow at runtime.
Step 4: Browse Documents at Runtime
Now that you've added the task flow to your application, you can see the documents in your content repository, or "document library."
This step covers just a few of the basic tasks you can perform with the Documents service at runtime. For more information on using the Documents service, see Chapter 15, "Working with the Documents Service" in Oracle Fusion Middleware User's Guide for Oracle WebCenter.
To browse your documents at runtime:
-
After you run your application to your browser and log into the application, a list of your files display (Figure 5-20). The Documents service's Document Manager view shows a document library based on the file system content repository you created on your local drive. The difference between this view and other views (such as the Content Presenter or List views) provided by the Documents service is that you can delete, modify, and edit your files (that is, manage files) in the document library as you would on your file system.
Figure 5-20 Documents - Document Manager View at Runtime

Description of "Figure 5-20 Documents - Document Manager View at Runtime"
Let's examine this view. As you can see, the service shows by default the names of the folders:
prodA,prodB,prodC. This information all comes from your file system and let's you quickly show your content without much coding.Also notice the Search field within the My Documents frame. This search feature is limited to just the files in the document library. The search toolbar you added in "Step 1: Add the Search Toolbar Task Flow to the Application" searches across any page and service you add to your application.
-
Click the folder prodA. Notice how the folder opens within the context of the view. You can use the breadcrumbs to navigate throughout your document library. You can also view the various attributes about the documents (for example, Size, Last Modified).
Figure 5-21 Documents - Document Manager Task Flow Showing the Contents of a Folder
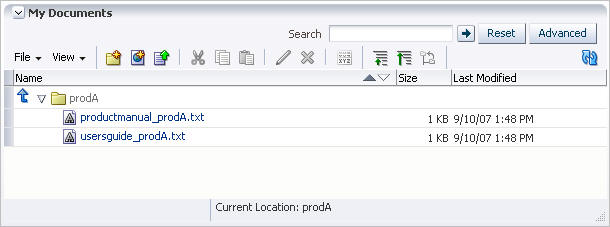
Description of "Figure 5-21 Documents - Document Manager Task Flow Showing the Contents of a Folder"
-
Click the Create New Folder icon in the toolbar (Figure 5-22).
Figure 5-22 Create New Folder Icon in the Toolbar

Description of "Figure 5-22 Create New Folder Icon in the Toolbar"
-
In the Create Folder dialog, enter a folder name, such as
prodA_details(Figure 5-23).Figure 5-23 Documents - Document Manager Task Flow with the Create Folder Dialog
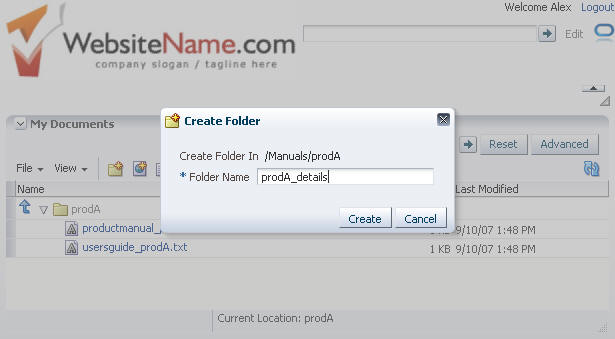
Description of "Figure 5-23 Documents - Document Manager Task Flow with the Create Folder Dialog"
-
Click Create. Figure 5-24 shows the new folder in your browser.
Figure 5-24 prodA_details Folder in the Documents - Document Manager View at Runtime
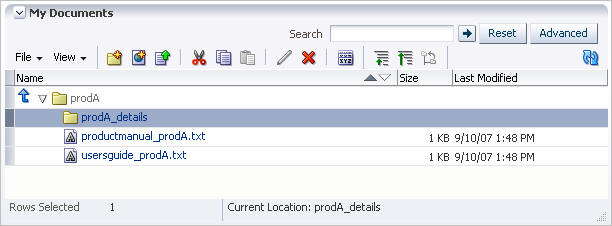
Description of "Figure 5-24 prodA_details Folder in the Documents - Document Manager View at Runtime"
-
Since you are using your own file system as your content repository, any actions you perform at runtime also affect the content repository itself. Take a look at the content repository, in this case on your file system.
Notice the
prodA_detailsfolder also exists in yourC:\TutorialContent\Manuals\prodAdirectory (Figure 5-25).Figure 5-25 New Folder in the File System
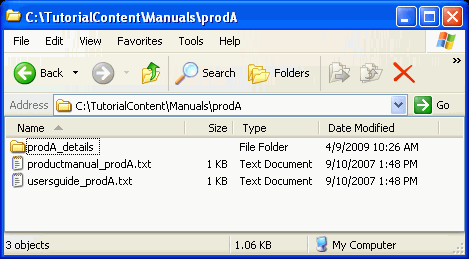
Description of "Figure 5-25 New Folder in the File System"
-
Return to your browser to view the Document Library at runtime.
-
Click the file productmanual_prodA.txt. Notice that a new browser tab or window displays with the contents of the text file (Figure 5-26).
Figure 5-26 Text File in a Browser Window
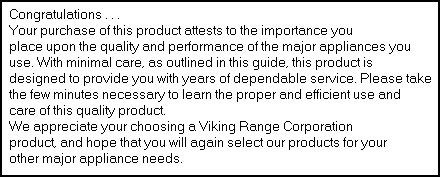
Description of "Figure 5-26 Text File in a Browser Window"
You can easily navigate from the parent folder to the text file by switching your browser window. Document Library displays the content of text and image files in the browser.
-
Return to Oracle JDeveloper.
As you can see, the Documents service provides a quick and easy way for you to display content in a meaningful way and with functionality. You can learn more about the Documents service task flows in Chapter 14, "Integrating the Documents Service" in Oracle Fusion Middleware Developer's Guide for Oracle WebCenter.
To exercise more direct control over the behavior, look, and feel of your content, you can use the JCR data control, which you can learn about in Chapter 13 "Integrating Content" in Oracle Fusion Middleware Developer's Guide for Oracle WebCenter.
Step 5: Create a Database Connection to the WebCenter Schema
Next, we will add the Tags, People Connections, and Links services. To use these three services, you must have access to the WebCenter schema. You installed this schema in Chapter 2, "Preparing for the Tutorial." In this section, you will create a connection to the database containing this schema, so that these three services can use this schema within the application. The schema will be used to store information about the services.
To learn more about setting up your application for consuming services, see Chapter 4, "Preparing Your Application for Oracle WebCenter Services" in the Oracle Fusion Middleware Developer's Guide for Oracle WebCenter.
To create the database connection to the WebCenter schema:
-
In the Application Navigator, expand the Application Resources panel.
-
Right-click Connections, choose New Connection, then choose Database.
-
Enter the following information for your database connection (Figure 5-27). Note that the Connection Name must be
WebCenter.-
Connection Name:
WebCenter -
Connection Type:
Oracle (JDBC) -
User name:
username(for example,webcenter) -
Password:
password(for example,welcome1) -
Host:
<host where you installed the WebCenter schema>(for example,localhost) -
JDBC Port:
<port>(for example,1521) -
SID:
<system identifier for the database with the same JDBC port>(for example,ORCL)
-
-
Click Test Connection to test your database connection. If you do not see a Success! message, check to make sure you entered the correct information for the WebCenter schema (see Chapter 2, "Preparing for the Tutorial" if you are not sure what you entered when you installed it).
-
Click OK.
Now that you have created the database connection, you can add the Tags, People Connections, and Links services to the application.
Step 6: Add the Tags Service to Your Application
Tags enable you and your application users to apply your own meaningful terms to items in your application, making those items more easily discoverable in search results. Because your application users can create tags for their own content or content they've searched for, the tags are much more powerful and usable than search keywords created by application developers who may not be as familiar with the user-created content. This user-powered keyword creation makes the content in your application highly searchable and discoverable.
A "tag cloud" is a visual illustration of all the tags for the application, making it easy for you and your users to identify the tags used in the application. You can then search for a tag in your application to locate any item that has been associated with that tag.
In this section, you will add the Tags service to our application and display it on your page. You will add a Tag Cloud so that you can visualize the tags and enable you and your users to add new tags to the application.
To add the Tags service:
-
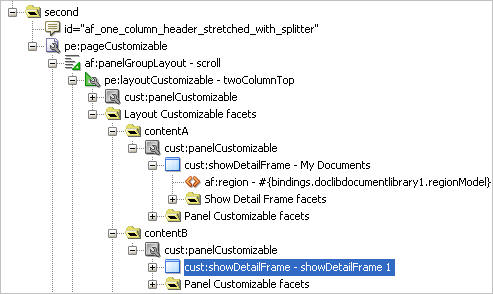
In the Structure window for MyPage, navigate to the Panel Customizable within the facet
contentBof the Layout Customizable (Figure 5-28).Figure 5-28 Panel Customizable in contentB
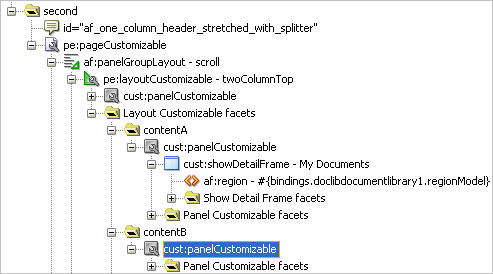
Description of "Figure 5-28 Panel Customizable in contentB"
Note:
As previously mentioned, you can use the pushpin in the Structure window to freeze the current view. For this step, you should click MyPage in the Design view, then ensure the pushpin is in the "freeze" position (pressed). -
Set the Layout property for the Panel Customizable to stretch.
-
In the Component Palette, choose Oracle Composer from the list.
-
Under Layout, drag and drop a Show Detail Frame onto the Panel Customizable, as shown in Figure 5-29.
-
While the Show Detail Frame is selected, in the Property Inspector, under Common, change the Text property to
Tag Cloud. -
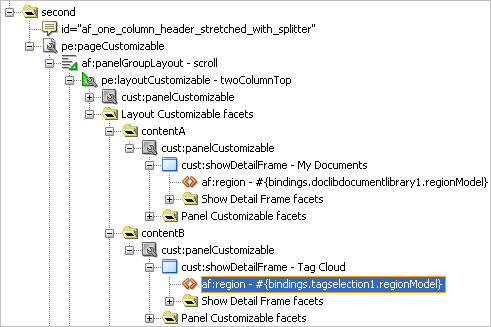
In the Resource Palette, under WebCenter Service Catalog, open the Task Flows folder and locate the Tagging - Tag Cloud task flow, then drag and drop it onto the Tag Cloud Show Detail Frame.
-
In the Create Region context menu, choose Create Region. The Tagging - Tag Cloud task flow displays in the Structure window, as shown in Figure 5-30.
Figure 5-30 Tagging - Tag Cloud Task Flow in the Tag Cloud Show Detail Frame
Description of "Figure 5-30 Tagging - Tag Cloud Task Flow in the Tag Cloud Show Detail Frame"
-
Right click MyPage in the Design view and choose Run, then log into the application with the username
Lisaand passwordwelcome1.
For more information about the Tag Cloud and the Tags Service, refer to Chapter 23, "Integrating the Tags Service" in the Oracle Fusion Middleware Developer's Guide for Oracle WebCenter.
We will examine the Tags service at runtime in the next step.
Step 7: Use, Add, and Search Tags in Your Application at Runtime
After you add the Tagging - Tag Cloud task flow to your page, the Tag Cloud automatically populates with the tags in the WebCenter schema. If you installed the WebCenter schema for the purposes of this Tutorial, you will not see any tags in the Tag Cloud. This step shows you the Tag Cloud at runtime, as well as a few basic steps you can perform with the Tags Service. You can learn more about using the Tags Service at runtime in Chapter 26, "Working with the Tags Service" in Oracle Fusion Middleware User's Guide for Oracle WebCenter.
To use the Tags service at runtime:
-
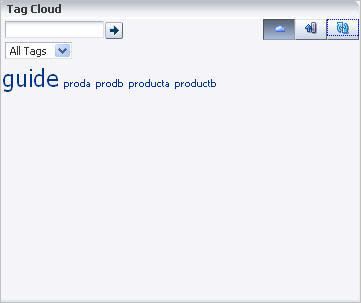
In your browser, you should now see the Tag Cloud displaying below the Connections view. In our example, we have a few sample tags that exist in our WebCenter schema. If a tag cloud exists in your WebCenter schema, the contents of your tag cloud may appear slightly different. If you do not have any tags, you will not see any tags in the Tag Cloud.
Figure 5-31 shows how MyPage looks at runtime.
-
Once you add the Tags service to your application, you can use it with the Document Library service. Let's see how we can add tags to a document in our document library.
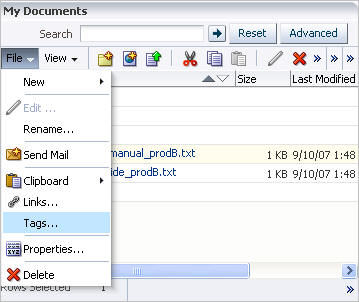
In the Document Library, open a folder, such as prodB, and select the row containing a document name, such as productmanual_prodB.txt. Be sure to click the row and not the link for the filename, otherwise you will just display the text file in a new browser window as you did in "Step 4: Browse Documents at Runtime".
-
In the Documents menu, choose Tags... from the File menu. (Figure 5-32).
Figure 5-32 Choosing the Tags Menu Option in the Documents - Document Manager View
Description of "Figure 5-32 Choosing the Tags Menu Option in the Documents - Document Manager View "
-
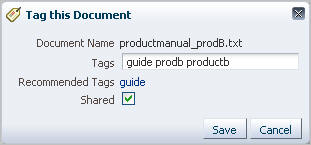
The Tag this Document dialog displays. Add a few tags, such as (Figure 5-33):
productb guide prodb
Figure 5-33 Adding New Tags to a Document
Description of "Figure 5-33 Adding New Tags to a Document"
-
Click Save, then create another tag on another document. For example, open the prodA folder, then add a few tags to productmanual_prodA.txt.
-
In the Tag this Document dialog, enter a few tags, then save your changes:
producta guide proda
-
Click the Refresh icon to the right of the Tag Cloud title bar (Figure 5-34).
Notice that the Tag Cloud now displays your new tags, for example producta, productb, guide, and prodb as shown in Figure 5-35.
-
Check out how tags help you locate items in your application. In the Search toolbar at the top of the page, enter
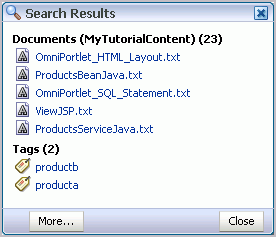
productb, then click the arrow icon. You will see the Search Results return the tag forproductb(Figure 5-36).Figure 5-36 productb Tag in the Search Results
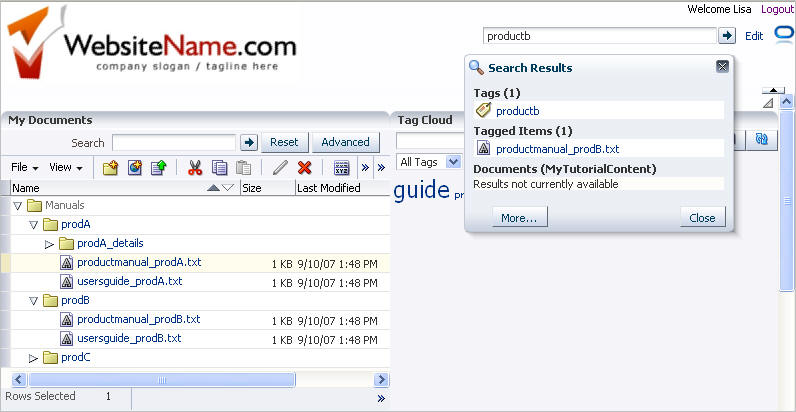
Description of "Figure 5-36 productb Tag in the Search Results "
-
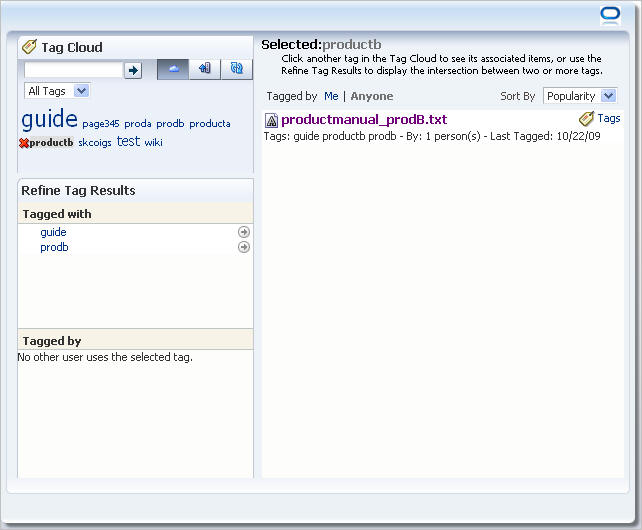
In the Search Results window, click the productb tag. The Tag Center displays in a pop-up window (Figure 5-37).
The Tag Center displays the Tag Cloud, all the results from your search that are associated with the tag
productb, including other advanced search options. You can close this window after you are done viewing the different options and return to your application. -
If you are interested, add a few more tags to see how the Tag Cloud changes. Otherwise, you can move on to the next step, "Step 8: Add the People Connections Service to Your Application".
-
Let's examine the Search toolbar again. You can also search for any keyword to view items that contain the keyword. The keyword does not necessarily have to be a tag.
For example, in the Search toolbar, enter the keyword
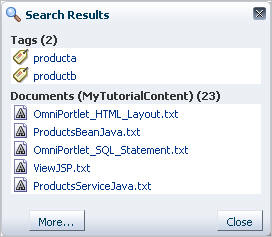
product, then click the arrow. The search returns all documents and tags that contain the word "product," as shown in Figure 5-38.Note that the search results in our example may not exactly reflect what you see in your application, as the results depend on the items you tagged.
-
When you search for a tag, the search returns a partial match -- that is, because we searched for
product, we saw in our Search Results tags and documents that contain the wordproduct. But, because no item was specifically tagged with "product," the search did not return any tagged items.Search for a specific tag and see what happens. In the Search toolbar, enter
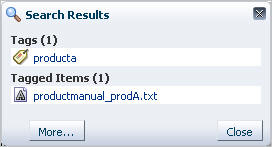
producta, then click the arrow icon.Figure 5-39 shows the search results. Notice that the tagged item,
productmanual_prodA.txtdisplays. Because the item was tagged with "producta," our search returned the specific item.
Now that you have added the Search toolbar, Documents - Document Manager view, and the Tag Cloud to your application, you can see how tagging and search work together to enable you to easily locate files in a content repository or document library.
Next, let's see how we can add a social networking feature to the application.
Step 8: Add the People Connections Service to Your Application
The People Connections service provides social networking tools for creating, interacting with, and tracking the activities of one's enterprise connections. Its features enable users to manage their personal profiles, access the profiles of other users, provide ad hoc feedback, post messages, track activities, and connect with others. This step introduces you to using the task flows associated with the People Connections service.
In this Tutorial, you will take advantage of four People Connections task flows:
-
the Connections task flow, which enables you to invite and accept invitations from other application users to become part of your social network
-
the Activity Stream task flow, which displays recent activities within services across your application -- in this case, Documents and People Connections
-
the Message Board task flow, which displays messages from the integrated message board
-
the Profile task flow, which provides users with a variety of views into their own and other users' personal profile information, such as their email address, phone number, and so on.
After you add these task flows, you can see how they work at runtime in the next step.
To add the People Connections service:
-
Ensure that you have created the database connection to the WebCenter schema per "Step 5: Create a Database Connection to the WebCenter Schema".
-
In the Structure window for MyPage, navigate to the second facet, where you added the Documents and Tags task flows, then find the Layout Customizable, and the first Panel Customizable, as shown in Figure 5-40.
Note:
As previously mentioned, you can use the pushpin in the Structure window to freeze the current view. For this step, you should click MyPage in the Design view, then ensure the pushpin is in the "freeze" position (pressed).Figure 5-40 First Panel Customizable in the Layout Customizable
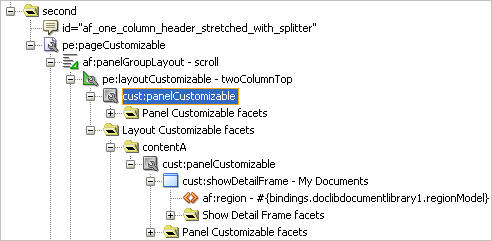
Description of "Figure 5-40 First Panel Customizable in the Layout Customizable"
-
In the Component Palette, choose Oracle Composer from the list.
-
Under Layout, drag and drop a Show Detail Frame onto the Panel Customizable, as shown in Figure 5-41.
Figure 5-41 Panel Customizable Containing the Show Detail Frame

Description of "Figure 5-41 Panel Customizable Containing the Show Detail Frame"
-
While the Show Detail Frame is selected, in the Property Inspector, under Common, change the Text property to
People Connections. -
In the Resource Palette, under WebCenter Services Catalog, open the Task Flows folder and locate the Connections task flow, then drag and drop it onto the Show Detail Frame you just added.
-
In the Create Region context menu, choose Create Region.
-
In the Edit Task Flow Binding dialog, set the resourceId parameter to the following value (Figure 5-42):
#{securityContext.userName}Figure 5-42 Edit Task Flow Binding Dialog - Connections
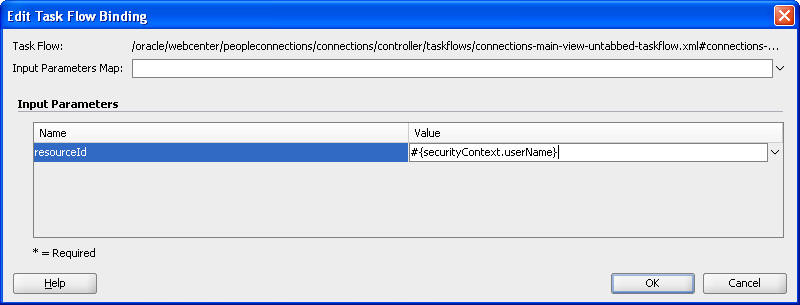
Description of "Figure 5-42 Edit Task Flow Binding Dialog - Connections"
This expression tells the Connections task flow to display all the connections of the currently logged in user. You can alternatively use the Expression Builder to set this value. To do so, click the down arrow next to the field, then choose Expression Builder. In the Expression Builder dialog, expand ADF Bindings and securityContext. select userName, then click OK.
-
Click OK. The Connections task flow displays in the Structure window, as shown in Figure 5-43.
Figure 5-43 Connections Task Flow in the Structure Window

Description of "Figure 5-43 Connections Task Flow in the Structure Window"
-
From the Component Palette, drag and drop a Panel Group Layout ADF Faces component onto the Panel Customizable containing the People Connections Show Detail Frame, as shown in Figure 5-44.
-
In the Property Inspector for the Panel Group Layout, under Common, set the Layout property to horizontal.
-
Under Style and Theme, set the Style Class property to
AFStretchWidth. Figure 5-45 shows the Property Inspector with the two properties updated.Figure 5-45 Properties for the Panel Group Layout
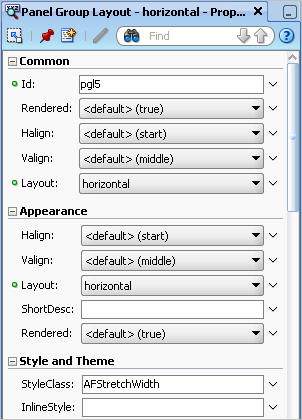
Description of "Figure 5-45 Properties for the Panel Group Layout"
-
Drag and drop a Show Detail Frame (Oracle Composer component) onto the Panel Group Layout.
-
While the Show Detail Frame is selected, in the Property Inspector, under Common, change the Text property to
Activity Stream. Figure 5-46 shows the new Show Detail Frame in the Structure window.Figure 5-46 Activity Stream Show Detail Frame

Description of "Figure 5-46 Activity Stream Show Detail Frame"
-
In the Resource Palette, under WebCenter Services Catalog, open the Task Flows folder and locate the Activity Stream task flow, then drag and drop it onto the Show Detail Frame you just added.
-
In the Edit Task Flow Binding dialog, set the resourceId parameter to the following value (Figure 5-42):
#{securityContext.userName}Figure 5-47 Edit Task Flow Binding Dialog - Activity Stream
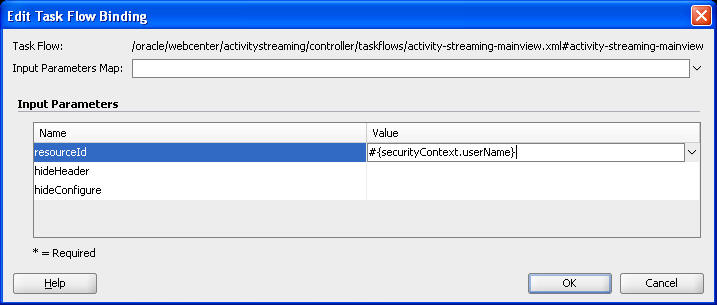
Description of "Figure 5-47 Edit Task Flow Binding Dialog - Activity Stream"
This expression tells the Activity Stream task flow to display all the recent activities of the currently logged in user. You can alternatively use the Expression Builder to set this value. To do so, click the down arrow next to the field, then choose Expression Builder. In the Expression Builder dialog, expand ADF Bindings and securityContext. select userName, then click OK.
-
Add another Show Detail Frame directly below the one containing the Activity Stream task flow. You can do this by dropping the Show Detail Frame onto the
af:panelGroupLayout - horizontalcontaining the Activity Stream Show Detail Frame. -
While the Show Detail Frame is selected, in the Property Inspector, under Common, change the Text property to
Messages. -
From the Resource Palette, drag and drop the Message Board task flow onto the page. This task flow provides users with the main view of Message Board messages and a means of adding, viewing, and managing Message Board messages.
-
In the Create Region context menu, choose Create Region.
-
In the Edit Task Flow Binding dialog, set the resourceId parameter to the following (Figure 5-48):
#{securityContext.userName}Figure 5-48 Edit Task Flow Binding Dialog - Message Board
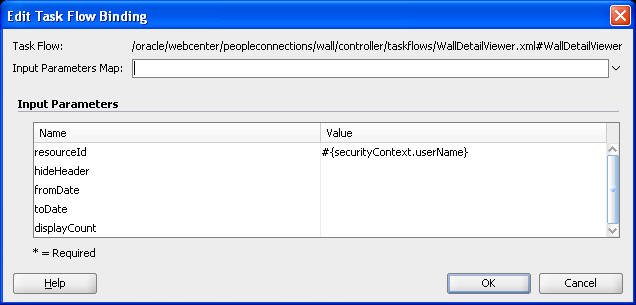
Description of "Figure 5-48 Edit Task Flow Binding Dialog - Message Board "
-
Click OK.
-
Drop a Show Detail Frame onto the Panel Customizable containing the People Connections Show Detail Frame and set the Text property to
My Profile. This Show Detail Frame should be at the same level in the structure as the horizontal Panel Group Layout containing the Activity Stream and Message Board Show Detail Frame components. -
From the Resource Palette, drag and drop the Profile task flow onto the My Profile Show Detail Frame.
-
In the Edit Task Flow Binding dialog, set the resourceId parameter to the following (Figure 5-49):
#{securityContext.userName}Figure 5-49 Edit Task Flow Binding Dialog - Profile
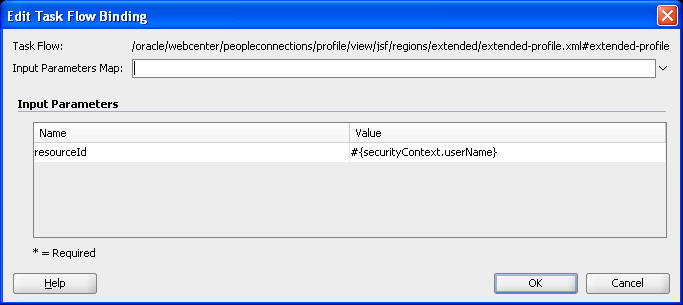
Description of "Figure 5-49 Edit Task Flow Binding Dialog - Profile"
-
Click OK. The structure should now look like Figure 5-50.
Figure 5-50 People Connections, Activity Stream, Message Board, and Profile Task Flows in the Structure Window
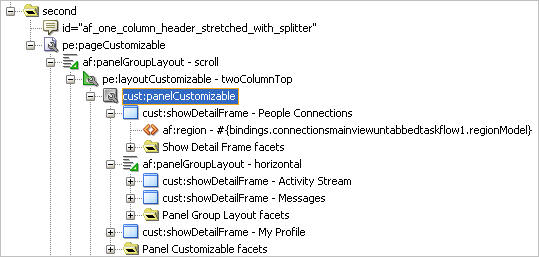
Description of "Figure 5-50 People Connections, Activity Stream, Message Board, and Profile Task Flows in the Structure Window"
-
Since you already have security configured, the task flows you just added by default have security enabled on them for the
authenticated-role.Right click MyPage in the Design view and choose Run, then log in as user
Lisawith the passwordwelcome1.
For more information about the People Connections service, see Chapter 20, "Integrating the People Connections Service" in the Oracle Fusion Middleware Developer's Guide for Oracle WebCenter.
We will examine the People Connections service at runtime in the next step.
Step 9: Use the People Connections Service in Your Application at Runtime
In this step, you will use the three users you created in Chapter 4, "Adding Security to Your Application" to test how the service would work in a production environment. Instead of three different people adding each other to one another's networks, you will log in as the three different test users (Alex, Dan, and Lisa) to see how the People Connections service works at runtime.
While this step shows you a few of the basic tasks you can perform using these task flows, you can learn more about using the service at runtime in Chapter 22, "Working with the People Connections Service" in the Oracle Fusion Middleware User's Guide for Oracle WebCenter.
To use the People Connections service in your application:
-
After you run the page and log into the application as user
Lisa, you should now see the Activity Stream view, the Connections view and the Message Board view in your application.Figure 5-51 People Connections Service on MyPage
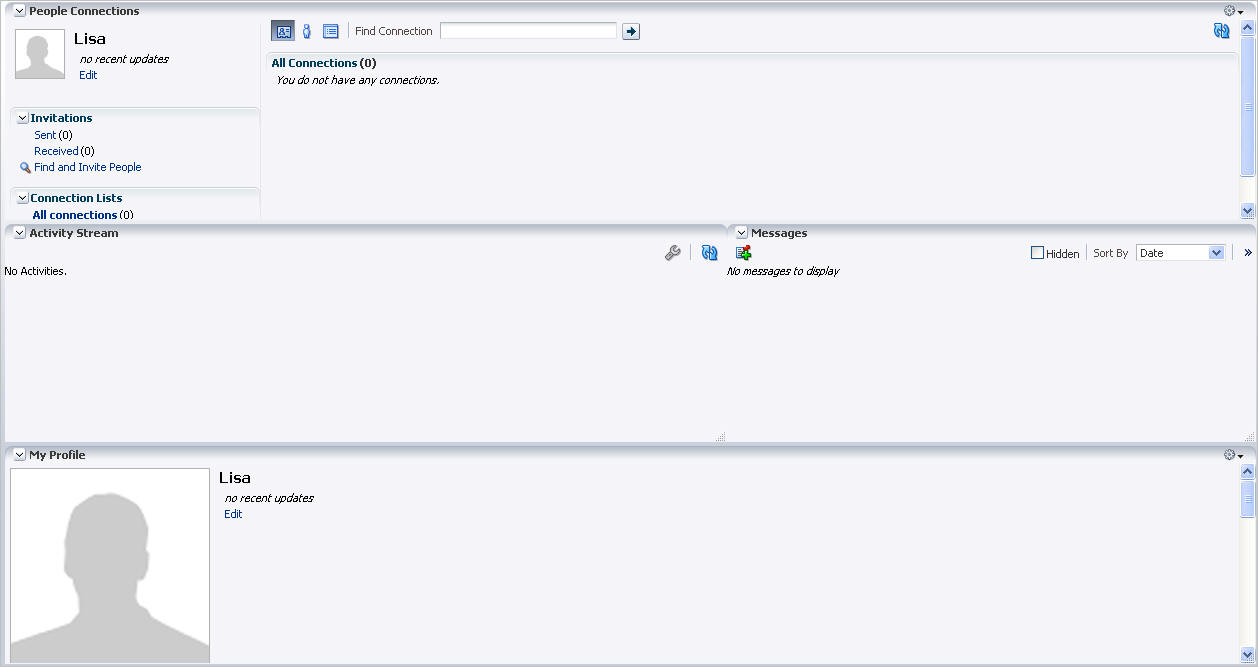
Description of "Figure 5-51 People Connections Service on MyPage"
-
Notice that the Activity Stream and Message Board task flows currently display no updates. As you update the application either by adding a connection or updating a document in the Documents - Document Manager view, notice how the information in these two views update.
-
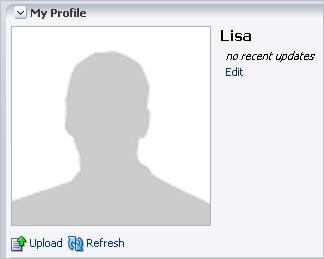
Let's update Lisa's profile by uploading an image. In the My Profile Show Detail Frame, scroll down below the blank profile image to find the Upload link, as shown in Figure 5-52.
-
Click Upload.
-
In the Upload Photo dialog, click Browse, then navigate to the directory containing your application images (for example,
JDEV_USER_HOME/mywork/MyTutorialApplication/ViewController/public_html/images). -
Locate the image lisa.PNG, then select it and click Open. The image path should display in the Upload Photo dialog, as shown in Figure 5-53.
Figure 5-53 Lisa.PNG in the Upload Photo Dialog
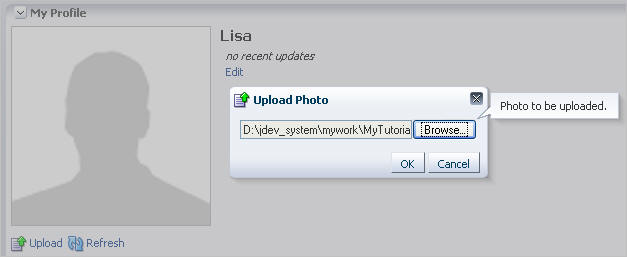
Description of "Figure 5-53 Lisa.PNG in the Upload Photo Dialog"
-
Click OK. Lisa's profile image displays in the Profile view (Figure 5-54). Notice that the image also updates in the Connections view.
Figure 5-54 Lisa's Profile Image in the Profile View
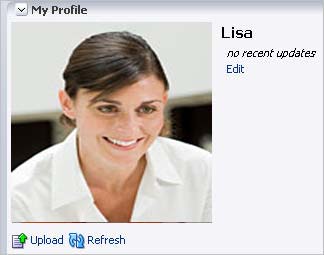
Description of "Figure 5-54 Lisa's Profile Image in the Profile View"
-
Try adding another user to your online network using the People Connections service. In the Connections view, under Invitations, click Find and Invite People (Figure 5-55).
Figure 5-55 Invitations Section of the Connections View

Description of "Figure 5-55 Invitations Section of the Connections View"
-
In the Find User field, enter the username
Alex, then click the arrow icon next to the field. The user Alex displays, as shown in Figure 5-56.Figure 5-56 User Alex in Lisa's Connections View
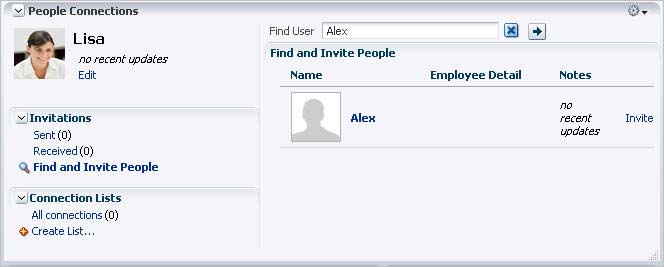
Description of "Figure 5-56 User Alex in Lisa's Connections View"
-
Next to Alex's profile, click Invite.
-
In the Invitation Message dialog, personalize your invitation, as shown in Figure 5-57.
-
Click Invite. Notice that next to Alex's profile, an invitation is now pending (Figure 5-58).
Figure 5-58 Invitation Pending in the Connections View
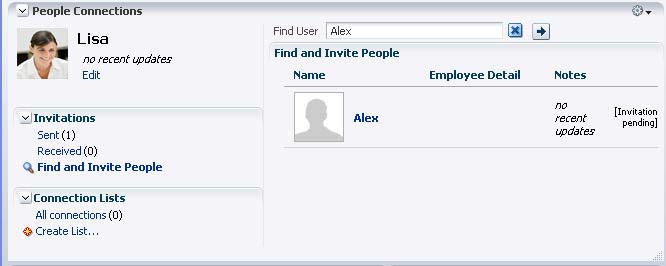
Description of "Figure 5-58 Invitation Pending in the Connections View"
Also, the Sent folder under Invitations is updated. If you click Sent(1), you can view and remove your invitation to Alex (Figure 5-59). Let's leave this alone for now.
Figure 5-59 Viewing an Invitation in the Connections View
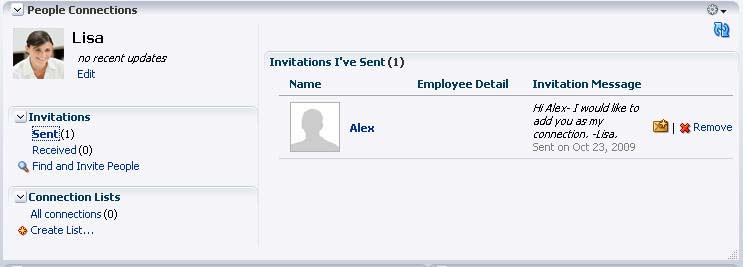
Description of "Figure 5-59 Viewing an Invitation in the Connections View"
-
Now, log out of the application as Lisa, then log in as Alex so that you can accept Lisa's invitation. Click Logout in the upper right corner of the page, then log in as the user
Alex, using the passwordwelcome1. -
In the Connections Main View, under Invitations, notice that Alex's Received messages are updated. Click Received(1), as shown in Figure 5-60.
Figure 5-60 Alex's Connection View - Received(1) Link

Description of "Figure 5-60 Alex's Connection View - Received(1) Link"
You should see the invitation from Lisa.
Figure 5-61 Alex's Connection View Showing Lisa's Invitation to Join Her Network

Description of "Figure 5-61 Alex's Connection View Showing Lisa's Invitation to Join Her Network"
-
Click Accept.
-
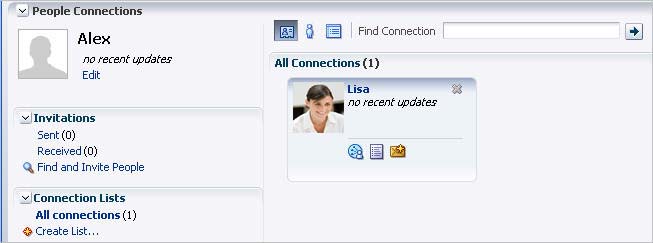
Under Connection Lists, click All Connections to display your new connection with Lisa (Figure 5-62).
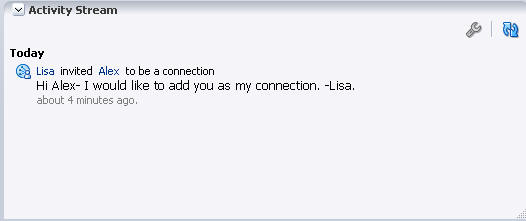
Notice now that the Activity Stream (Figure 5-63) shows Lisa's invitation to Alex.
-
Optionally, you can upload Alex's image (
alex.png) to his profile so that everyone can see it. -
Let's log out as Alex and log back in as Lisa. Click Logout, then log in as
Lisa/welcome1. -
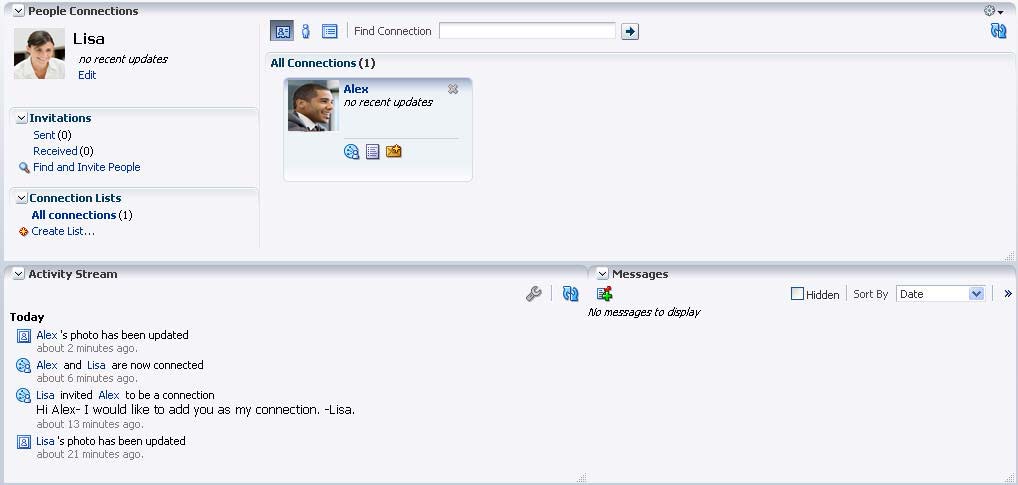
On Lisa's page, you should now see Alex as a connection in the Connection view, and a few updates to the Activity Stream showing the invitation, the connection, and Alex's photo update (if you performed this last step), as shown in Figure 5-64.
-
Next, check out the Message Board. The Message Board enables people connected to you (in this case, Lisa) to share information with each other. For example, as the application administrator, Lisa may want to let the Alex know about the new Message Board feature.
In the Connections view, click Alex (Figure 5-65).
Figure 5-65 Messages View with the Add Message Icon

Description of "Figure 5-65 Messages View with the Add Message Icon"
-
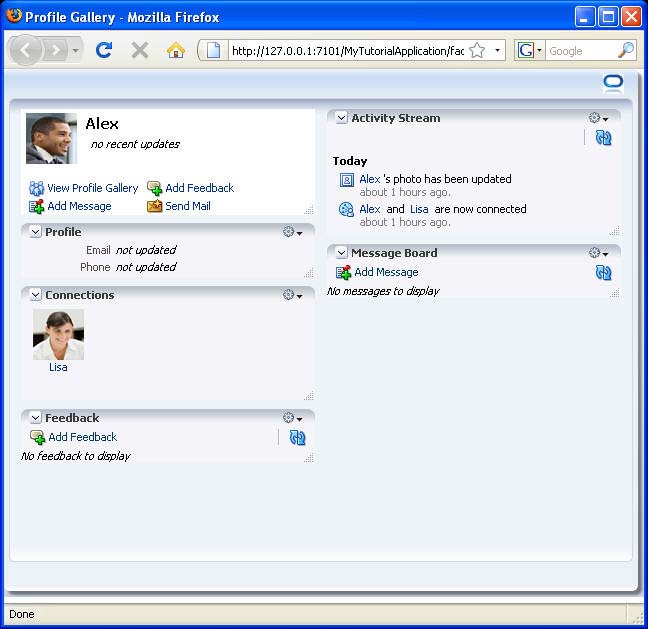
A new pop-up window displays called the Profile Gallery (Figure 5-66). Here, you can see information about Alex, such as his Activity Stream and Profile. You will also notice the Message Board. This is Alex's Message Board, where you (as Lisa) can leave messages for him.
-
Under Message Board, click Add Message.
-
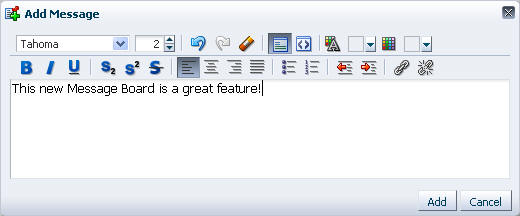
In the Add Message dialog, enter a message, such as
This new Message Board is a great feature!Figure 5-67 shows the updated dialog. -
Click Add. The message displays on Alex's Message Board (Figure 5-68) in the Profile Gallery from Lisa's perspective.
Figure 5-68 New Message on Alex's Message Board
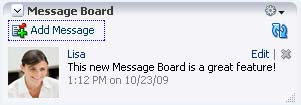
Description of "Figure 5-68 New Message on Alex's Message Board"
-
Now, let's see whether Alex can view the new message. Close the Profile Gallery window, then log out as Lisa and log back into the application as
Alex/welcome1. You will see Lisa's message on Alex's message board.Figure 5-69 Lisa's Message on Alex's Message Board from Alex's Perspective
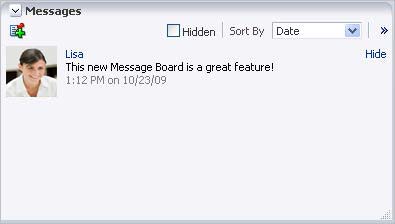
Description of "Figure 5-69 Lisa's Message on Alex's Message Board from Alex's Perspective"
These are just a few features that the People Connections service provides. For more information on using the service, see Chapter 22, "Working with the People Connections Service" in Oracle Fusion Middleware User's Guide for Oracle WebCenter.
Now, let's check out how to use the Links service with the application.
Step 10: Use the Links Service in Your Application at Runtime
The Links service provides a way to view, access, and associate related information. For example, in a list of project assignments, you can link to the specifications relevant to each assignment. In a discussion thread about a problem with a particular task, you can link to a document that provides a detailed description of how to perform that task.
Once you connected to a database containing the WebCenter schema (in "Step 5: Create a Database Connection to the WebCenter Schema"), Oracle WebCenter Framework automatically enabled the Links service in your application. You can see the icon in the Documents - Document Manager view, for example, in Figure 5-70, to the right of a listed document.
Figure 5-70 Links Service Icon in the Documents - Document Manager View

Description of "Figure 5-70 Links Service Icon in the Documents - Document Manager View"
In this section, you will use the Links service to create a relationship between two documents currently listed in the Documents - Document Manager view. By following these steps, you will see how you can create relationships between objects within your application and from within your application to an external resource or URL.
To use the Links service at runtime:
-
Ensure that MyPage.jspx is still running in your browser.
-
In the Documents - Document Manager view, navigate to the Manuals folder, then open the prodA folder so that you see the two files:
productmanual_prodA.txt andusersguide_prodA.txtlisted (Figure 5-71).Figure 5-71 Links Service Icon in the Documents - Document Manager View

Description of "Figure 5-71 Links Service Icon in the Documents - Document Manager View"
-
Let's create a relationship between the first file,
productmanual_prodA.txt, and an external URL. To the right of the file,productmanual_prodA.txt, click the Find or create Links: productmanual_prodA.txt icon to display the Links dialog, as shown in Figure 5-72. The Links dialog displays options for linking the current document to a new document or URL or to an existing document. If links exist for the object already, they would also display in this dialog. -
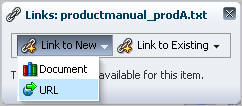
Since the file we want to link to already exists, click Link to New, then click URL (Figure 5-73). If you choose to link to a new document, a dialog displays where you can upload a new document to the content repository and link to it.
Notice that you can also choose Link to Existing and select a document that already exists within the application.
-
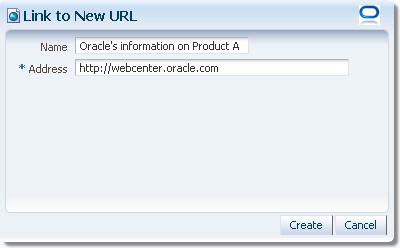
In the Link to New URL dialog, in the Name field, enter
Oracle's information on Product A, then enterhttp://webcenter.oracle.comfor the address (Figure 5-74). -
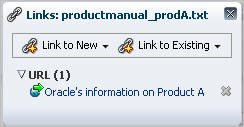
Click Create. The new link displays in the Links dialog, as shown in Figure 5-75.
-
Click the new link to view the related URL Now, if you or other users wants to find related information on Product A, you can click the icon to view the associated links.
For more information about the Links service, see Chapter 22, "Integrating the Links Service" in Oracle Fusion Middleware Developer's Guide for Oracle WebCenter and Chapter 18, "Working with the Links Service" in Oracle Fusion Middleware User's Guide for Oracle WebCenter.
Step 11: Use the Mail Service with Your Application (Optional)
If you have access to an email server (such as the one you use with your own personal email), you can easily configure your application to use the Mail service. The Mail service enables you to read, send, and organize your email directly within a custom WebCenter application. You can find detailed instructions for using the Mail service in the Oracle Fusion Middleware Developer's Guide for Oracle WebCenter.
To add the Mail service to your application:
-
Follow the steps in "Step 2: Create Users and Roles for the Application" to create a user that exists on your mail server (for example, your own user name and password). The application must have a user associated with it that also exists on the mail server.
-
Follow the instructions in Chapter 17, "Integrating the Mail Service" in the Oracle Fusion Middleware Developer's Guide for Oracle WebCenter to create a connection to your mail server and add the Mail task flow to your application.
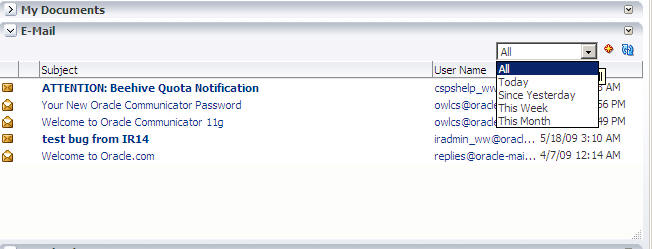
-
Run
MyPageto your browser and log in with your user name and password.You can click the dropdown list in the upper right corner to sort the view of your inbox by time range, as shown in Figure 5-76.
You can also click the plus sign to display the New Message dialog, as shown in Figure 5-77.
Figure 5-77 Mail Task Flow with New Message Dialog at Runtime
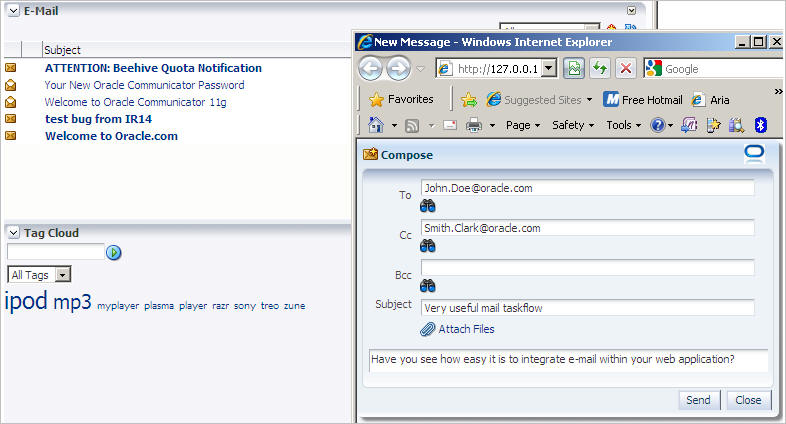
Description of "Figure 5-77 Mail Task Flow with New Message Dialog at Runtime"
For more information on using the Mail service, see Chapter 20, "Working with the Mail Service" in Oracle Fusion Middleware User's Guide for Oracle WebCenter.
You can learn more about adding the Search, Documents, Tags, Links, People Connections, and Mail services to a custom WebCenter application in the Oracle Fusion Middleware Developer's Guide for Oracle WebCenter. You can learn more about using these services at runtime (in your browser) in the Oracle Fusion Middleware User's Guide for Oracle WebCenter.
Now that you have added a few services to our application, you can learn how to build and add portlets to your application in Chapter 6, "Building Portlets and Wiring Them in Your Application."
