4 Organizing a Team Project
At this morning's staff meeting, one of the top salespeople reported that sales of Tony Notebooks, historically one of Storefront's best performers, have slipped dramatically over the last quarter. As Vice President of Sales, you need to quickly assemble a team to examine this problem, find the source, and correct it, before next quarter's sales figures are adversely impacted. This situation is perfectly suited to the benefits provided by a group project. Let's review what a group project is and how it might be of value to you in this situation.
Within any company, large groups or departments frequently need to break into smaller groups to focus on a particular goal, project, or topic. To help these groups organize themselves, WebCenter Spaces provides the notion of group spaces, which brings together the appropriate tools and services to support the ultimate purpose of the group. In 11g Release 1 (11.1.1), WebCenter Spaces provides two templates that support two very different types of endeavors:
-
Group Project, which helps people share documents, communicate with one another, keep up to date on status, and just generally function better as a team than as individuals working side by side. You'll become familiar with what the Group Project template provides in the next few chapters.
-
Community of Interest, which supports the needs of people who want to share information on a given topic, as opposed to collaborating to achieve a goal or complete a project. For example, all the Java programmers responsible for supporting your customer-facing Web site might want a place to keep up with what's happening in the Java world using discussion forums, links to articles about upcoming patches, and so on. You'll build your own Community of Interest when you get to Chapter 9, "Creating a Community of Interest".
If the pages and content supplied by these templates don't suit your needs, you can use the Blank template to create your own group space from scratch. The Blank template creates a group space with a just single page, the Home page. After you customize the group space, you can save it as a template and apply it to other group spaces later on. You might want to create a Customer Escalation template, say, or one devoted to the activities attendant to the end of the fiscal year. Blank templates help you to support projects that are unique to your company or department. (Any group space can be saved as a template and applied later on, not just those based on the Blank template.)
In this case, a group project is definitely what you need, so let's see what's involved in creating one. You're already logged in as Monica, so you can dive right in.
4.1 Step 1: Create a Group Project
-
In the Banner, click Group Spaces.
In the drop-down, all the group spaces you can access are listed below the line. When you select one, it opens at the same level as your personal space. Now, however, we want to create a new group space.
-
Click Create Group Space...
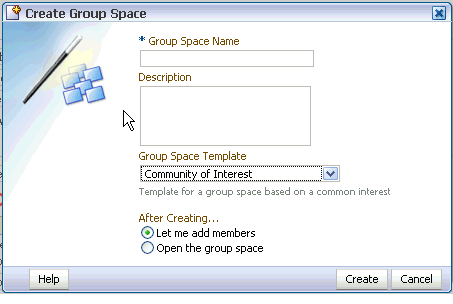
Create Group Space opens, which looks like this:
-
In the Group Space Name field, type
Tony Notebook Sales_abc, whereabcare your initials. This helps differentiate your group space from other users who may also be working through this tutorial. -
In the Description field, type
Determine the cause of the sales dip for Tony Notebooks over the last quarter. -
From the Group Space Template field, select Group Project.
The Group Project template provides you with all the collaborative tools and services you need to operate within a group space effectively, scattered among the pages Home, Documents, Discussions, and so on. We'll see demonstrations of these tools, and the pages on which they live, in subsequent steps.
-
You'll want to add members to your group space after you create it, so click Let me add members.
-
Click Create.
The group space opens to the Members tab, which is right where you need to be.
Let's go ahead and add some key members of your Sales organization so they can begin tackling this problem.
4.2 Step 2: Add Members to the Group Space
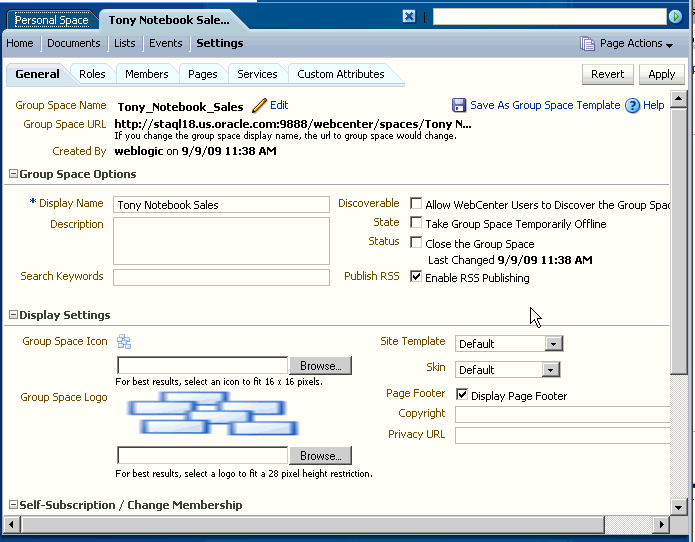
Since you created the group space, you are automatically considered a group space moderator and thus have access to the group space's Settings page. Settings is where you control things like membership for the group, what services the group space will have access to, whether people can request membership to the group, and so on. Before you begin adding members, let's see what other options are available to you as a group space moderator.
-
Click General.
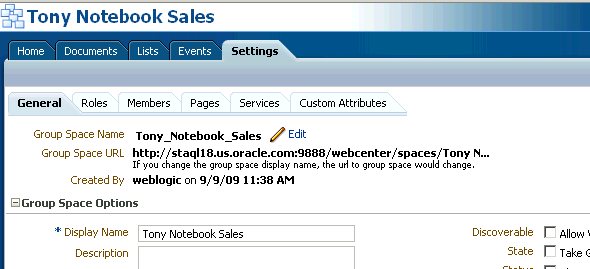
Take a moment to examine all the options you have for controlling the appearance (logo, copyright information, and so on), status (online or offline), and other aspects of your group space.
Although we won't experiment with any of these options now, it's important to know that they're available. Let's return to the task of adding members to this group space.
-
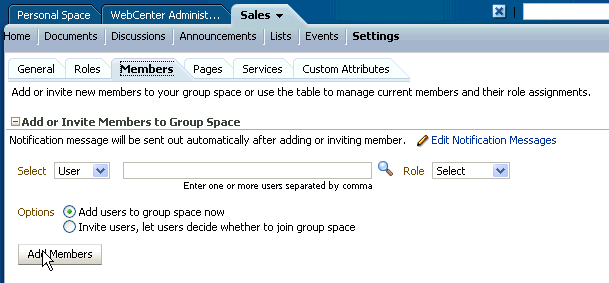
Click Members.
As one of your most knowledgable and experienced salespeople, Zeba will no doubt be instrumental in solving this problem. Asok, a member of the Customer Service organization, knows a great deal about Storefront's offerings and customers' satisfaction with them. He also has a good handle on what your competitors offer in the way of service contracts, warranties, and so on. Let's add both Zeba and Asok to the group space now.
-
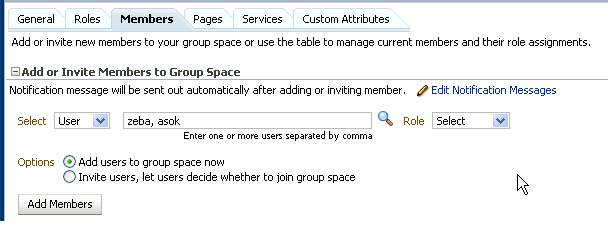
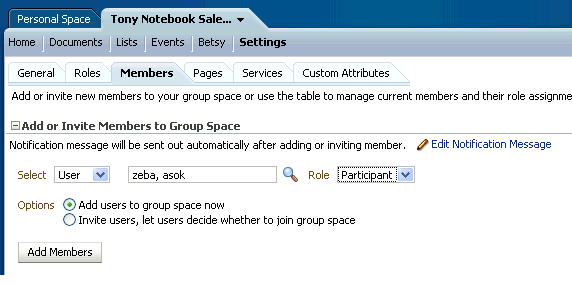
Under Add or Invite Members to Group Space, enter
zeba,asok: -
Click the arrow in the Role drop down and look at the different options: Moderator, Participant, and Viewer.
Participants can upload and share documents, initiate chats with other group space members, and so on, while viewers can look at the data relevant to the group space, but cannot contribute any of their own. Moderators have full control over the membership and behavior of the group space, and can access the Settings pages, such as the one shown in Figure 4-3, "Group Space General Page". Moderator status should be granted with care.
-
Highlight Participant in the drop-down list:
-
Click Add Members to commit your changes.
A notification is automatically sent to Zeba and Asok's Worklist pane (which appears in their Sidebars, as well as on their personal space Welcome pages) to indicate that that they have been added as members of the Tony Notebook Sales group space. You can also see their "cards" (or their icons, depending on whether you are in List View or Icon View) added to the list under Manage Group Space Members on the Members tab.
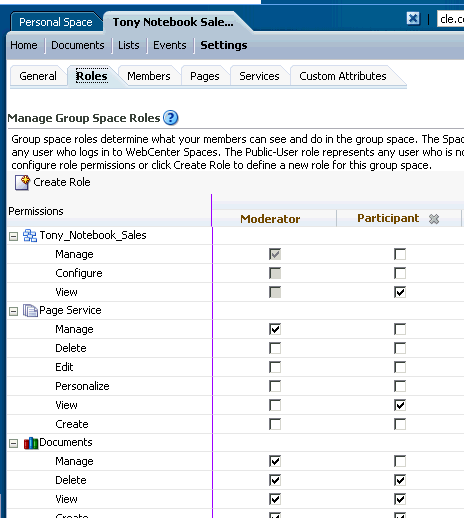
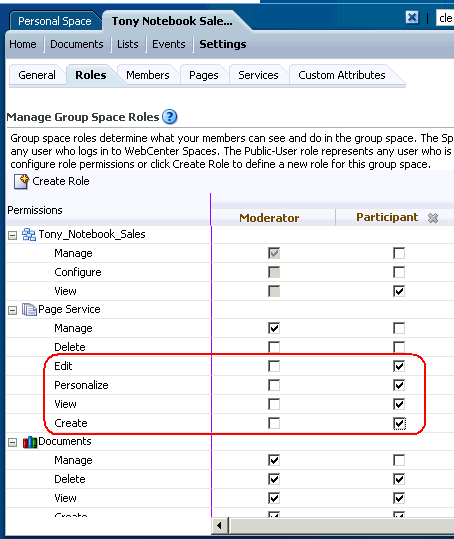
One more thing—by default, the Participant role does not have the ability to add or edit pages. You know that Zeba, at least, will need this privilege, so you'd better change the permissions for the Participant role.
-
Under Settings, click the Roles tab:
By default, participants have View privileges on pages, but in most cases the group space moderator will want to extend those privileges to make the role truly that of a participant.
-
In the Participant column, check the rows Edit, Personalize, and Create under Page Service:
-
Click Apply.
Zeba and Asok, both members of your Sales team, are certain to be key participants in this effort, but you realize that you may also need to draw from the wisdom of someone who does not report to you—Carl, a member of the Finance organization who is an expert on the terms of your competitors' cost structures. Because he's not in your organization, you don't feel comfortable just assigning Carl to this group space as you did with Zeba and Asok. Instead, you'd like to observe the formality of inviting him to participate in this group space.
4.3 Step 3: Invite a New Member
You want to be sure you've covered all bases, so you've decided to invite Carl to become a member of this group space so he can share what he knows.
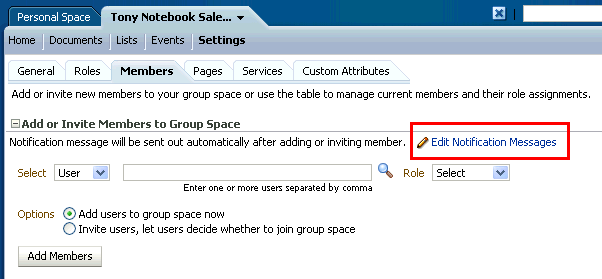
First, you want to tailor the message that Carl will see when he views your invitation.
-
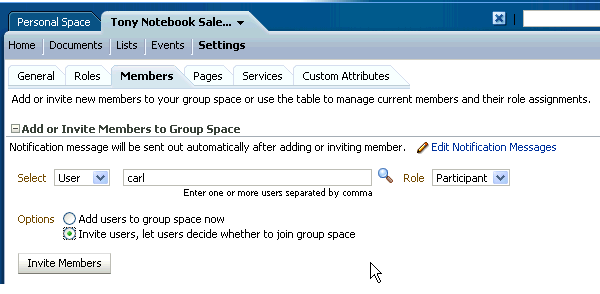
Click Edit Notification Messages:
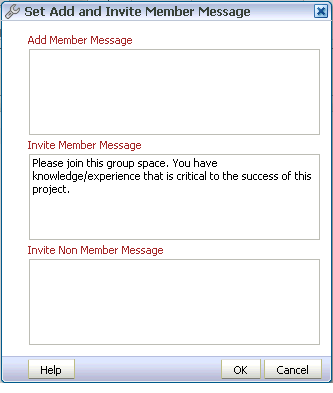
This is where you create the messages that members will see when you add them directly to the group space (like Asok and Zeba), or when you invite someone but let them decide whether to join (like we're about to do with Carl).
-
In the Invite Member Message field, type
Please join this group space. You have knowledge/experience that is critical to the success of this project. -
Click OK.
-
Back on the Members tab, type
Carlin the field and select Participant as the role. -
Click Invite users, let users decide whether to join group space:
-
Click Invite Members to extend your invitation to Carl.
Under Manage Group Space Members, notice that Carl's membership status says Invited. Only after Carl accepts his membership will this status change to Member.
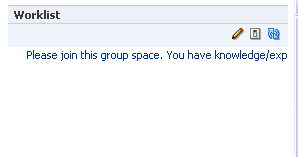
Although we won't see it in this tutorial, when Carl logs on to his personal space he'll receive an invitation to this group space in his Worklist pane, as shown here:
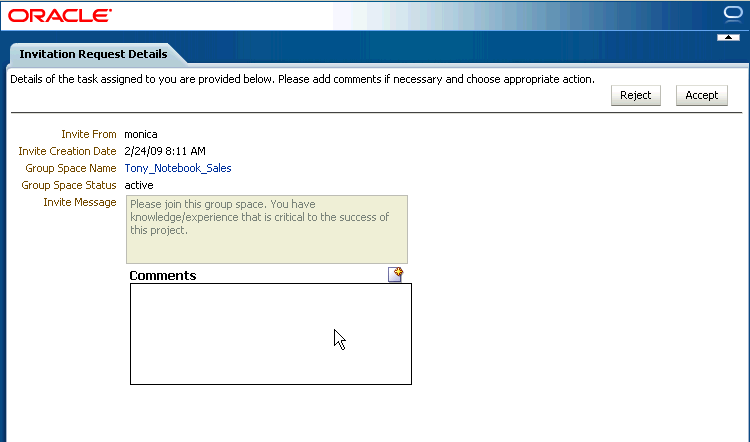
When he clicks on the invitation, he'll be asked to sign in to the Oracle BPEL Process Manager, which provides the Worklist service. Once he does so, he'll have the opportunity to approve or reject the invitation, as shown in Figure 4-12:
Assuming Carl clicks Accept, Tony Notebook Sales will then appear in the list of group spaces that he can access.
4.4 Step 4: Examine the Home Page
Before we go too much further, let's take a moment to examine the default home page for Tony Notebook Sales.
-
Click Home.
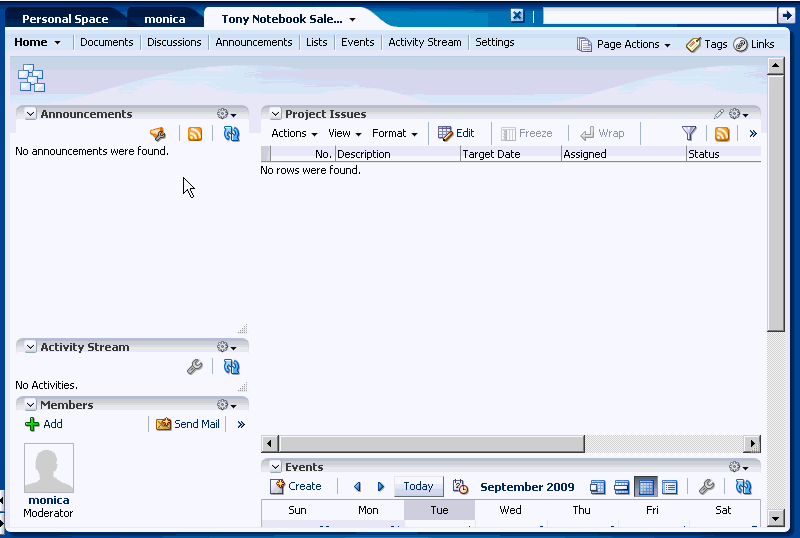
Your screen should look something like this:
The Home page contains several services that facilitate collaboration between group space members. On the right you see Project Issues, which allows you to track open items facing the group, and Events, which allows you to schedule meetings for everyone in the group space. On the left, Announcements publishes important messages for group distribution; Activity Stream reflects the transactions that have occurred within the group space; and Members displays presence information for all group space members.
Each of the areas on the page—Project Issues, Events, and so on—are referred to as task flows. Task flows provide reusable functionality that may expose all or a subset of the features available from a particular service. For example, Project Issues is just one example of the List Viewer task flow, which is provided by the Lists service. The List Viewer task flow helps you add and manage list data. As a WebCenter Spaces user you don't have to worry about the relationship between services and their task flows, but you should be familiar with the term, as it appears throughout the WebCenter documentation set.
Although the page shown in Figure 4-13 depicts the default Home page for a group project, your WebCenter administrator may have altered the template to better suit the needs of your group or company. Once you've configured it, any page may be saved as a template for subsequent use.
Let's get back to our scenario.
4.5 Step 5: Schedule a Team Event
Now you want to schedule a meeting for the group space members so you can officially kick off this project. You could go to the Events page in Tony Notebook Sales, but you don't have to—the Events task flow is already exposed right on the Home page.
-
In the Events task flow, Create in the upper left corner.
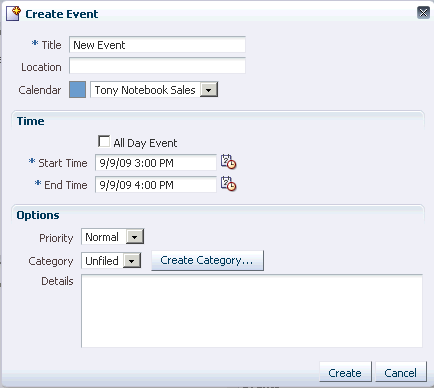
The Create Event dialog displays:
-
In the Title field, type
Tony Notebook Sales Kickoff. -
In the Location field, enter a room number, such as
888. -
Leave the Calendar field defaulted to Tony Notebook Sales. You may have other calendars available to you (your personal calendar, for example, or one for all Vice Presidents), but this one is scoped specifically to the Tony Notebook Sales group space.
-
In the Start Time field type in tomorrow's date, specifying that the meeting should start at 1:00 p.m. (You could also use the icon to display a calendar for the current month.)
-
In the End Time field, type in 2:30 p.m.
-
Click Create.
You should get a confirmation, as well as a question asking if you want to send an email. Since your team members will no doubt look at the Home page carefully when they're becoming acquainted with this new group space, there's no need to send an email.
-
Click No to close the Send Mail pop-up.
-
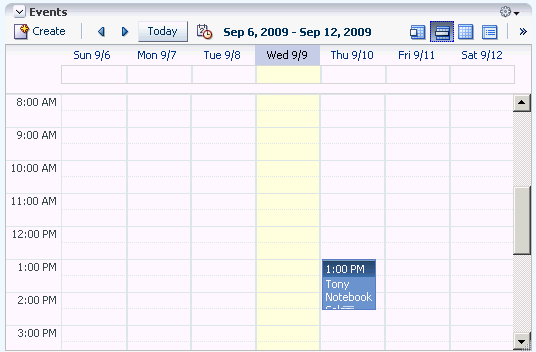
Back on the Home page, make sure that Week is selected in the Events task flow to ensure that you are looking at a weekly view:
You should see your meeting scheduled for tomorrow:
Let's continue on and make use of some of WebCenter Spaces's other productivity features.
4.6 Step 6: Create a Discussion Forum
You've got Asok and Zeba focusing on this issue, but it's certainly worthwhile to solicit the opinions of others outside as Sales as well to see if they have any insight into what could be causing the problem with Tony Notebook sales. Rather than starting individual chats or email threads with many different people, the most efficient method of communicating in this circumstance is to use a discussion forum.
Although the Tony Notebook Sales group space has its own Discussions page (which may be hidden by default), that page is for group space members only. People outside your membership won't be able to participate, which kind of defeats your goal. Perhaps the best solution is to create a new group space that is open to all Storefront Inc users, so you can draw opinions from the Sales team, Customer Support, Technical Services, and so on.
-
Click Group Space->Create Group Space.
-
In the Name field, type
Tony Notebooks Discussion, since that is the primary focus of this group space. -
From the Template drop-down, select Blank.
-
Leave Let me add members selected.
-
Click Create.
The Members tab opens. Before addressing membership, we need to enable the Discussion service for this group space. If we don't do that, we won't be able to create a discussions forum.
-
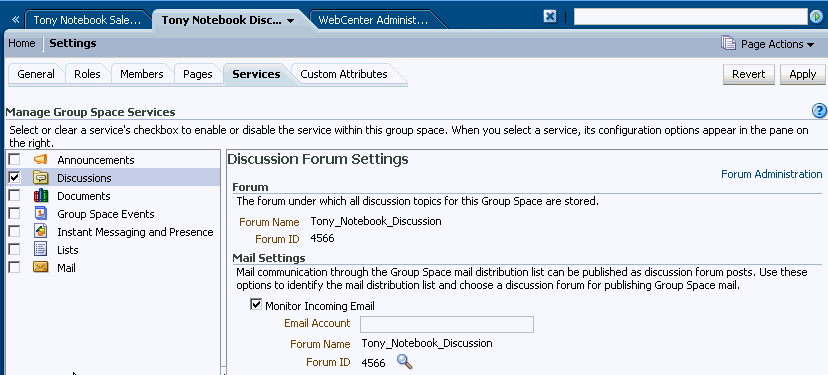
Under Settings, click the Services tab.
-
Check the box next to Discussions to enable that service for the Tony Notebooks Discussion group space, then click Apply:
Now it's time to establish membership for the group space. For Tony Notebook Discussion, you want to open membership to everyone at your company, even those who do not have a WebCenter Spaces user account. You can do this using the Public-User role.
-
Click the Roles tab.
-
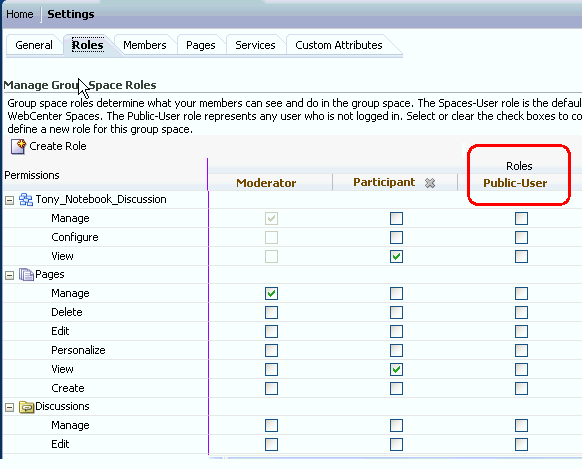
Locate the Public-User role:
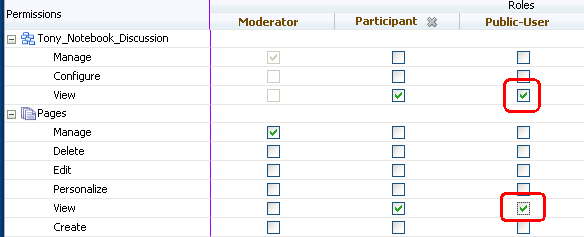
To make a group space publicly available, you must give the Public-User View privileges for both the group space and the pages within it.
-
In the Public-User column, click the box that corresponds to View under Tony_Notebook_Discussion, as well as Pages:
-
Click Apply.
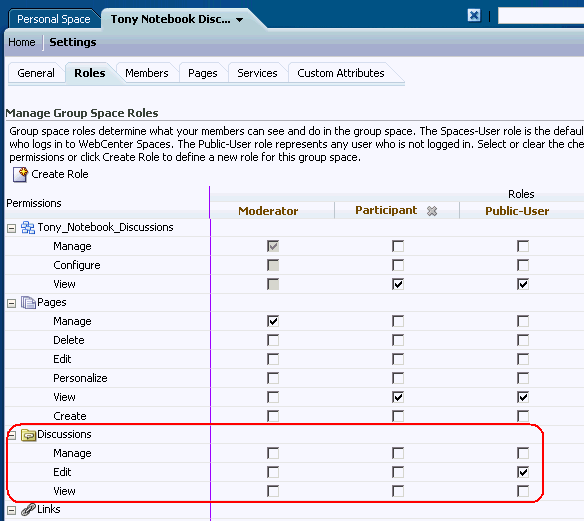
This allows public users to see the group space, but you still have to give them permission to interact with the Discussions service specifically.
-
Scroll down until you see Discussions, then grant Edit permissions to the Public-Users role:
-
Click Apply.
Now let's go back to the Home page and create a discussions forum for the Tony Notebook sales issue.
-
Click the Home tab.
Because we selected the Blank template for this group space, it contains only one page—the Home page—with nothing on it.
-
Click Page Actions->Edit Page.
-
Click Add Content.
-
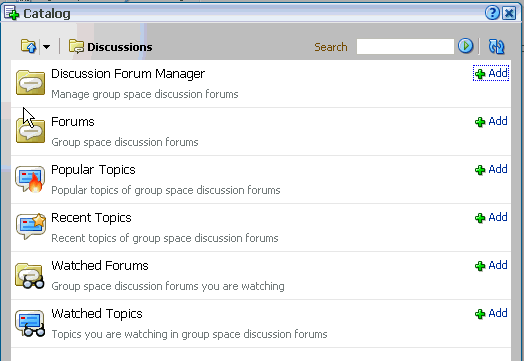
In the Catalog, click Discussions to display the Discussions service task flows:
You can use these task flows to keep track of the topics or forums that are of interest to you. (For a full description of what each task flow provides, see the Oracle Fusion Middleware User's Guide for Oracle WebCenter). The Discussion Forum Manager is the task flow you use to create a discussions forum.
-
Click Add next to Discussions Forum Manager, then close the Catalog.
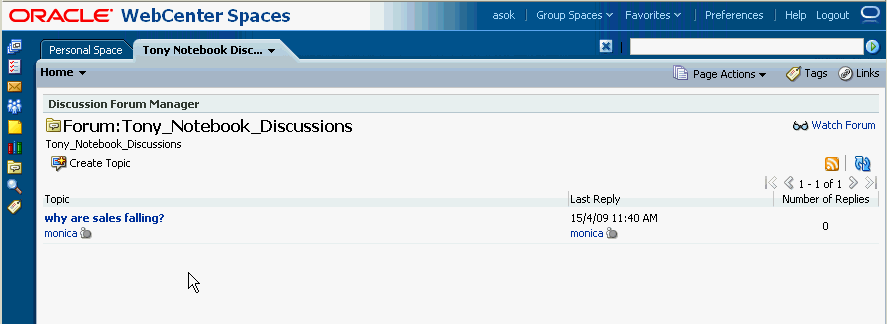
The forum name automatically takes the name of the group space it belongs to, which in this case is Tony_Notebook_Discussions. That's fine for our purposes, but if you wanted to change the name, you could use the Edit icon (the little pencil) to do so.
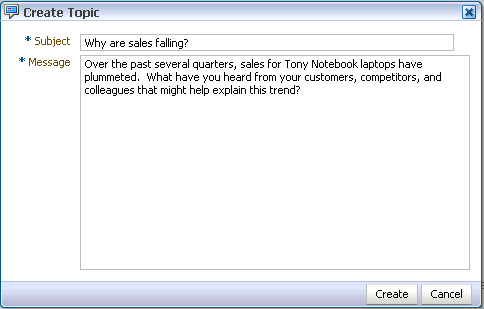
Let's add a sample topic to get the discussion rolling.
-
In the Subject field, type:
Why are sales falling? -
In the Message field, type:
Over the past several quarters, sales for Tony Notebook laptops have plummeted. What have you heard from your customers, competitors, and colleagues that might help explain this trend? -
Click Create:
When unauthenticated users (those who do not have log in accounts for WebCenter Spaces) visit this instance of WebCenter Spaces, they'll see the Tony Notebook Discussions group space and have the ability to respond to this topic, as well as contribute topics of their own. Authenticated users will see the group space open alongside their personal space, as shown here for the user Asok:
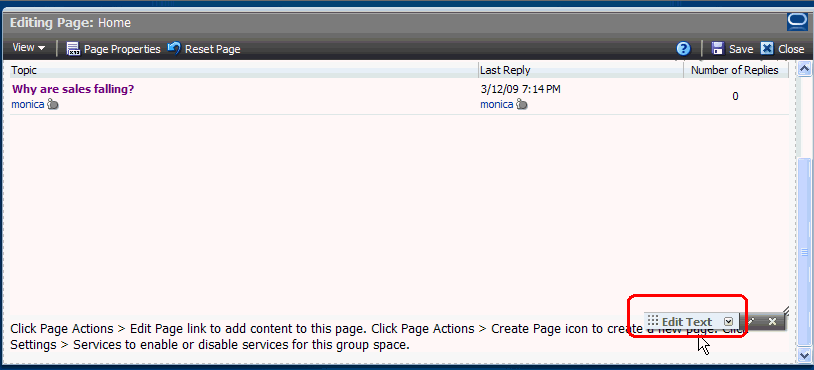
Before we leave this page, let's clean it up a bit and remove the standard text that was there before you added the discussions forum.
-
Place your cursor over the standard text until the action bar appears:
When you hover over the X, it becomes red.
-
Click the red X to remove the text, clicking Delete to confirm the removal.
-
Click Close to close this page, taking care to save your changes first.
So far you've created a group space, added members to it, set up a kick-off meeting, and made use of several key communications tools to ensure that group space members can share information freely. You've even created a discussions forum and opened it up to the entire company so that anyone with information pertaining to Tony Notebook sales can lend their perspective. Going back to Tony Notebook Sales, let's add one more thing to ensure that everyone is on the same page—an announcement.
4.7 Step 7: Create an Announcement
You want to make sure everyone knows what's going on with the group space and the problem it was created to address by broadcasting the news to all members. Announcements are designed expressly for this purpose.
Although you can see the Announcements task flow on the Home page, you can't create announcements there—it's display only. The Announcements task flow on the Home page automatically displays all announcements created on the Announcements page. Only group space moderators can create announcements, to help you ensure that only truly important information is prominently advertised.
-
Click the Tony Notebook Sales tab.
If the Announcemets page isn't visible, you must b
-
Click Page Actions->Manage Pages.
-
Click Create.
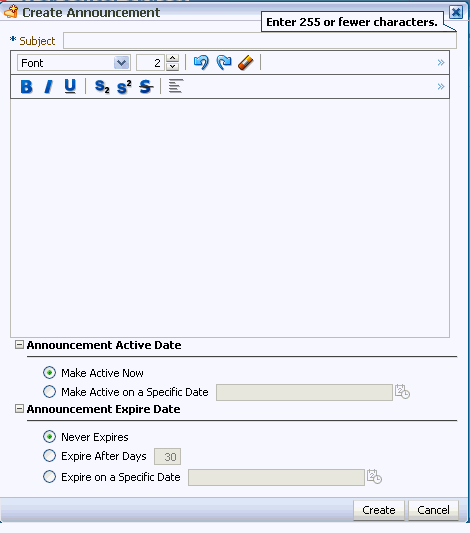
Your screen should look like this:
-
In the Subject field, type
Tony Notebook Sales: What Happened? -
In the composition area, type:
Over the next few weeks, we need to figure out why Tony Notebook sales have taken a dive.Be sure to check the Tony Notebook Discussions group space to see what people inside and outside of Sales have to say.Although you could specify a particular date on which you want to publish this announcement, in this case you want the announcement to be available immediately.
-
Leave the Make Active Now radio button selected.
You're not worried about the expiration date for this announcement, so you don't have to specify anything there.
-
Click Create.
Let's check the Home page to verify that the announcement has been added there.
-
Click Home.
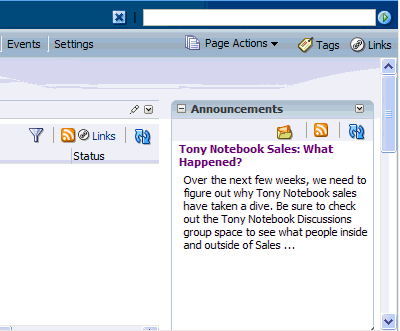
And there's the announcement, published right on the Home page:
Remember, the Home page is a convenient one-stop stop that reflects the content published through many services available within the group space.
4.8 Step 8: Changing the Appearance of the Group Space
The default appearance of the Tony Notebook Sales group space isn't really working for you. You'd like to put a bit more focus on your group space when people are using it, and you don't care for the default color scheme. You can change both of these display aspects through the use of site templates and application skins.
A site template determines how your group space pages display on the screen. You can set things up so that tabs or the toolbar are suppressed, for example, or have each page open in full-screen mode. By default, your group spaces use the site template selected by your WebCenter Spaces administrator, but you can override this setting just for the Tony Notebook Sales group space. Let's see how this is done.
-
In Tony Notebook Sales, click Settings.
-
Click General.
-
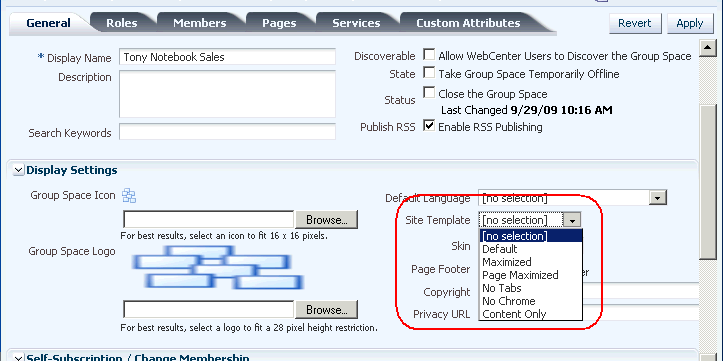
Under Display Settings, click the drop-down beside Site Template:
WebCenter Spaces provides you with five site templates to choose among (use the help icon if you're curious about what each one does). Alternatively, your IT department can create custom site templates if you have a request that isn't satisfied by the templates provided.
For the purposes of this tutorial, we're going to use Maximized, which opens the entire group space in full-screen mode to occupy the entire screen. This option enables users to focus entirely on the group space by maximizing the display area.
-
In the Site Template field, select Maximized.
Now let's take a look at how you can change the default color scheme through the next field, Skin. A skin changes the way the user interface appears. A selection of built-in skins is provided with WebCenter Spaces, but again, your developers can create custom skins to brand the application according to your corporate image.
Like site templates, the skin used for a group space defaults to whatever your WebCenter Spaces administrator selected for the entire WebCenter Spaces instance. Let's select a different color scheme for Tony Notebook Sales, called Dew.
-
In the Skin field, select Dew.
-
Click Apply.
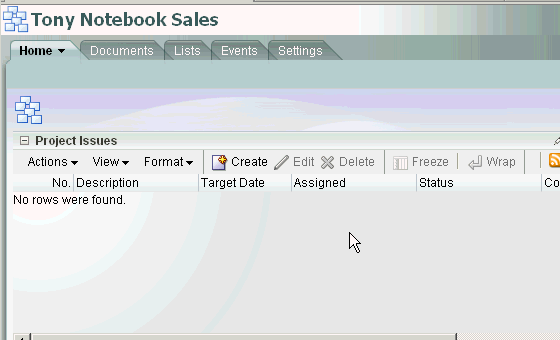
First, notice how Tony Notebook Sales now occupies the entire screen as a result of the Space Maximized site template:
-
Click Home to see the new skin applied:
If you click the Personal Space link in the banner, you'll see that it continues to use the default site template and skin as defined by your WebCenter Spaces administrator. Only Tony Notebook Sales is affected by the changes we just made.
You're finished setting up the group space, but now you'd like to set up some connections to the group space from your personal space so you can keep tabs on the progress more readily. Let's move on to the next chapter.
Note: The rest of this tutorial shows images that reflect the Midnight Blue skin and original site template.
