Coherence Tooling: Configuring Projects for Coherence
This document describes the following:
- Configuring Coherence Facet
- Editing Coherence Launch Configuration
- Editing Coherence Operational Configuration
- Editing Coherence Cache Configuration
1. Configuring Coherence Facet
Oracle Coherence provides replicated and distributed data management and caching services on top of a peer-to-peer clustering protocol. OEPE provides a project facet that allows you to configure your dynamic Web projects to use Coherence.To configure your project for Coherence, follow this procedure:
- Either add the Coherence facet when you create a project, or add the facet to an existing project by right-clicking your project in the Project Explorer and selecting Properties from the drop-down menu. This opens the Properties dialog, as Figure 1 shows.

Figure 1. Project Properties Dialog
- In the Properties dialog, select Project Facets on the left panel, and then select Oracle Coherence from the Project Facet list, as Figure 2 shows.

Figure 2. Selecting Coherence in the Project Properties Dialog
Click Further configuration required... link to open the Modify Faceted Project > Coherence dialog, as Figure 3 shows.
Figure 3. Modify Faceted Project - Coherence Dialog
If the Coherence library is listed as a user library, proceed as follows:- Select the Coherence library from the list.
- Accept default settings.
- Click OK.
If you are using Oracle WebLogic Server 11gR1 (10.3.5) runtime in your project, Coherence might already be installed on your machine if you chose this option at the server install time . In this case, the Coherence Library in Fusion Middleware Install option is available in the Library > Type list.
If the Coherence library is not listed, you need to either point to an existing installation, or download the library.
To point to an already downloaded Oracle Coherence library, click the Manage User Library icon to open the Preferences > User Libraries dialog, and then select a Java user library in the form of thecoherence.jar, which represents the entire library. Note that the Coherence JAR files reside in the\coherence\libdirectory of the Oracle Coherence installation. Also note that the same dialog allows you to fine-tune your Coherence library configuration.
To obtain the Coherence library, click Download Library icon. This will open the Download Library dialog, as Figure 3 shows. To use this dialog to download the Coherence library, make appropriate selections, and then click Next to accept the terms of the library license, after which click Finish to trigger the download.
Figure 4. Download Library Dialog - Click OK on the Modify Faceted Project > Coherence dialog.
- By clicking Apply > OK on the Properties dialog, you will complete the configuration of the Coherence library for your project, as Figure 5 shows.
Figure 5. Coherence JAR in Project View
2. Editing Coherence Launch Configuration
You use the Coherence launch configuration editor to to set the most commonly used Coherence command line arguments.You modify the Coherence launch configuration for your project configured with the Coherence facet as follows:
The Coherence launch configuration is populated with default settings from the
3. Editing Coherence Operational Configuration To modify operational configuration elements defined in the
4. Editing Coherence Cache Configuration OEPE provides an editor that you can use to modify the generated
Figure 6. Run Configurations Dialog
Figure 7. Run Configurations Dialog - Main Tab
Figure 8. Run Configurations Dialog - Coherence Tab - General Subtab
Figure 9. Run Configurations Dialog - Coherence Tab - XML Subtab
Figure 10. Run Configurations Dialog - Coherence Tab - Other Subtabtangosol-coherence.xml file in the coherence.jar file (see Figure 12) merged with the tangosol-coherence-override.xml file currently in the classpath, and, finally, with the VM arguments.
Figure 11. Console View
Figure 12. Files Included in coherence.jar
The created Coherence XML files, such as coherence-cache-config.xml, pof-config.xml, and tangosol-coherence-override.xml, reside in your project's src directory.
tangosol-coherence-override.xml Oracle Coherence deployment descriptor.
tangosol-coherence-override.xml file, follow this procedure:
src/tangosol-coherence-override.xml, and select Open With > Coherence Override (see Figure 13) to open the Coherence Override editor.
Figure 13. Opening the Operational Configuration Editor
Figure 14. Operational Configuration Editor
For information on Oracle Coherence operational configuration deployment descriptors and their elements, see Operational Configuration Elements.
coherence-cache-config.xml Oracle Coherence deployment descriptor.
To modify cache configuration elements defined in the coherence-cache-config.xml file, follow this procedure:
coherence-cache-config.xml, and select Open With > Coherence Cache Configuration (see Figure 15) to open the Coherence Cache Configuration editor.
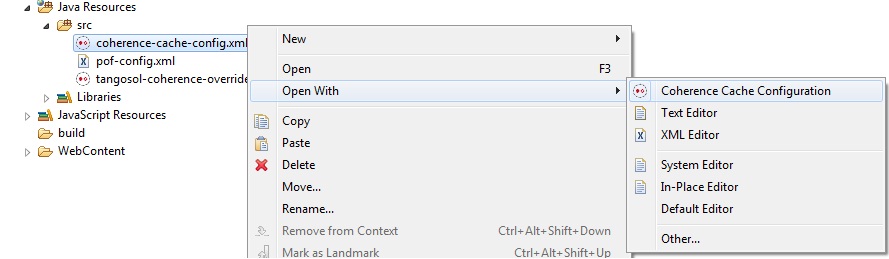
Figure 15
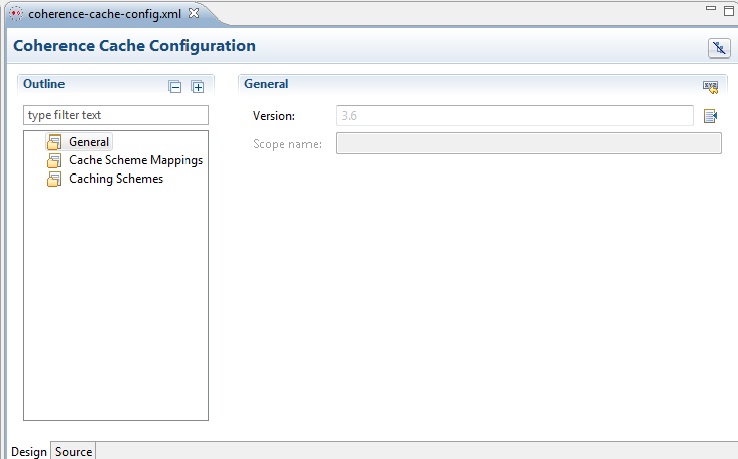
Figure 16
Fore more information on Oracle Coherence cache configuration elements, see Oracle Coherence: Cache Configuration Elements.
