45 Using Two-Layer Business Process Management (BPM)
Two-Layer BPM enables you to create dynamic business processes whose execution, rather than being predetermined at design time, depends on elements of the context in which the process executes. Such elements could include, for example, the type of customer, the geographical location, or the channel.
To illustrate further, suppose that you have an application that performs multichannel banking using various processes. In this scenario, the execution of each process would depend on the channel for each particular process instance.
This chapter includes the following sections:
45.1 Introduction to Two-Layer Business Process Management
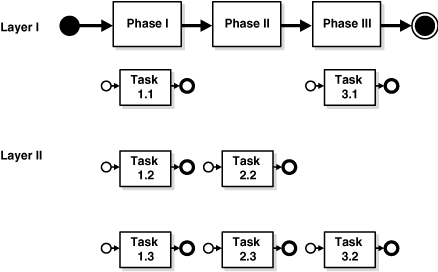
Two-Layer BPM enables you to model business processes using a layered approach. In that model, a first level is a very abstract specification of the business process. Activities of a first-level process delegate the work to processes or services in a second level. Figure 45-1 illustrates this behavior.
In Figure 45-1, the Phase I activity of the business process can delegate its work to one of the corresponding Layer II processes: Task 1.1, Task 1.2 or Task 1.3.
The two-layer BPM functionality enables you to create the key element—namely, the phase activity—declaratively.
By using the DT@RT functionality of Oracle Business Rules, you can add more channels dynamically without having to re-deploy the business process. DT@RT enables you to add rules (columns) to the dynamic routing decision table at runtime. Then, during runtime, business process instances consider those new rules and eventually route the requests to a different channel.
The DT@RT functionality of Oracle Business Rules also enables you to modify the end-point reference of a service that is invoked from a phase activity, pointing that reference to a different service.
Note:
In Oracle Fusion Middleware 11g Release 1 (11.1.1), you can use the DT@RT functionality of Oracle Business Rules only by way of the Oracle Business Rules SDK.For information about using the Oracle Business Rules SDK, see:
To enable Two-Layer BPM, you follow these steps:
Table 45-1 Steps for Enabling Two-Layer BPM
| Step | Information |
|---|---|
|
Install the Oracle WebLogic Server |
|
|
Design the SOA composite application |
|
|
Create Element-type variables named |
|
|
Create a Phase Activity |
|
|
Create and Edit the Dynamic Routing Decision Table |
|
|
Add Assign activities to the BPEL process model |
|
|
Create the Application Deployment Profile |
|
|
Create an Application Server Connection |
Section 38.7.1.1.1, "Creating an Application Server Connection" |
|
Deploy the Application |
45.2 Phase Activities
In Two-Layer BPM, a Phase is a level-1 activity in the BPEL process model. It complements the existing higher-level BPEL activities Business Rule and Human Task.
45.2.1 Creating a Phase Activity
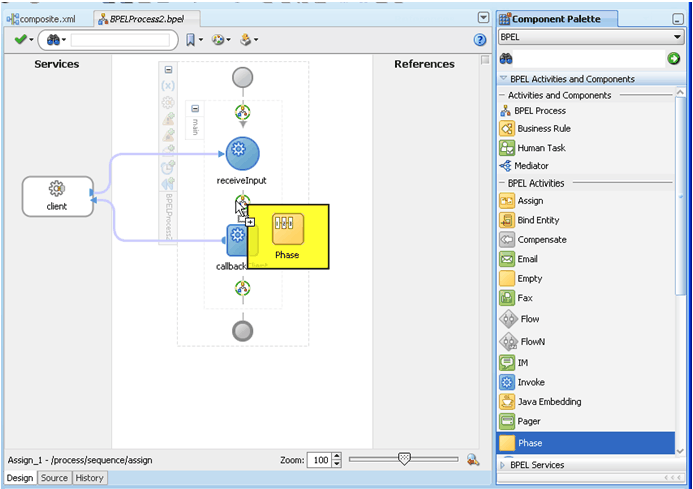
You add a Phase to a process declaratively by using the BPEL Designer in Oracle JDeveloper by dragging and dropping it from the BPEL Activities and Components palette to the process model.
Figure 45-2 Phase Activity in BPEL Designer
Description of "Figure 45-2 Phase Activity in BPEL Designer"
Note:
The reference WSDL (Layer 2 or Called References) must have the same abstract WSDL as that for the Phase reference that gets auto-created.45.2.2 How to Create a Phase Activity
You create the Phase activity for your composite application after you have created the necessary variables as described in "Creating Variables".
Once the Phase is dropped into the level-1 BPEL process, a wizard guides you through the various configuration steps. It first displays the Create Phase Activity dialog, in which you specify the input and the output of the Phase.
In the Create Phase Activity dialog:
-
Enter a value in the Name field.
-
Select the Inputs and Outputs icon, which is a green plus sign (+). The Variable Chooser dialog appears.
-
Select Process, Variables, and phaseIn, and then click OK. The Phase dialog is displayed with the phaseIn variable populated.
-
From the Inputs and Outputs icon, select Select Output. The Variable Chooser dialog appears.Select Process, Variables, and phaseOut.
-
Click OK. The Phase dialog is displayed with the input and output variable names populatedClick OK. The BPEL Designer displays the
.bpelpage for your process. -
Click Save All from the File menu. Close the
.bpelpage. -
Click the
composite.xmlpage. The SCA composite diagram appears.
45.2.3 What Happens When You Create a Phase Activity
When you create a Phase activity, the artifacts described in Table 45-2 are created.
Table 45-2 Artifacts Created with a Phase Activity
45.2.4 What Happens at Runtime When You Create a Phase Activity
At runtime, the input of the Phase activity is used to evaluate the dynamic routing decision table. This is performed by a specific decision component of the Phase activity. The result of this evaluation is an instruction for the Mediator. The Mediator routes the request to a service based on instructions from the decision component.
Note:
In the current release, asynchronous Phase activity is supported. Synchronous or one-way Phase activity is not supported.45.2.5 What You May Need to Know About Creating a Phase Activity
When creating a Phase activity, you need to know the following:
-
Rules that you need to either configure or create in the decision service. This is based on data from the payload that you use to evaluate a rule.
-
For each rule created in the decision service, you need to know the corresponding endpoint URL that must be invoked when a rule evaluates to true. This endpoint URL is used by Mediator to invoke the service in layer 2.
For information on specifying endpoints, see "Creating and Editing the Dynamic Routing Decision Table".
Note:
No Transform, Assign or Validation can be performed on a payload.
45.3 The Dynamic Routing Decision Table
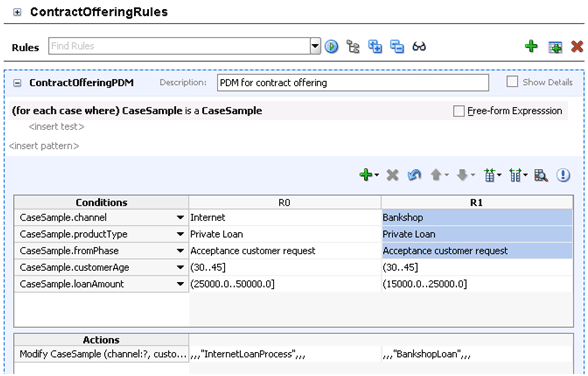
A Dynamic Routing Decision Table is a decision table evaluated by Business Rules. Conditions are evaluated on the input data of a Phase activity. The result of the evaluation is routing instruction for the Mediator.
45.3.1 How to Create the Routing Decision Table
After you have created the Phase activity, the wizard launches the Rule Designer in Oracle JDeveloper for you edit the Routing Decision Table. Figure 45-3 shows a sample decision table within rule designer.
You can leave the decision table empty while modeling the level-2 process phases, and complete it after the level-1 process is being deployed using the Business Analyst tool.
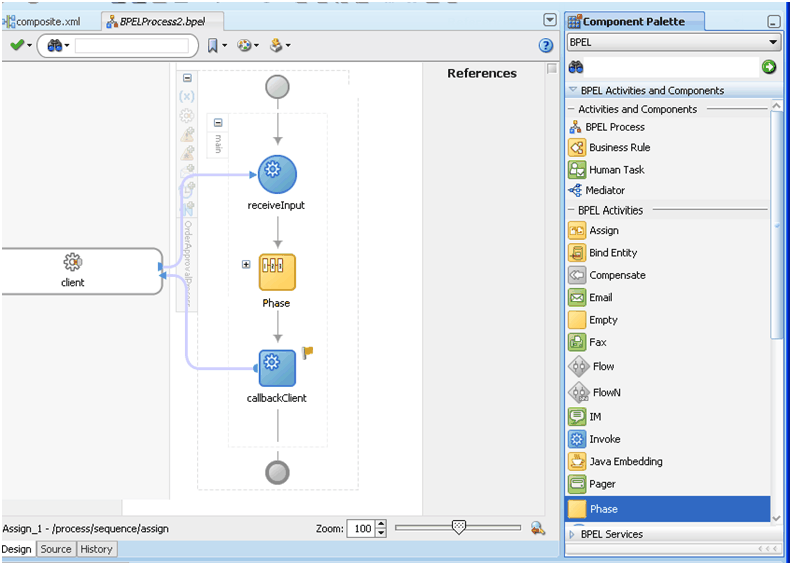
Once you have created and edited the Routing Decision Table, the new level-1 phase activity appears in the BPEL process in Oracle JDeveloper as illustrated in Figure 45-4.
Figure 45-4 Completed Level-1 Phase in Oracle JDeveloper
Description of "Figure 45-4 Completed Level-1 Phase in Oracle JDeveloper"
45.3.2 What Happens When You Create the Routing Decision Table
By creating the Routing Decision Table, you are configuring the decision service to dynamically evaluate the conditions applied to the incoming payload and give the corresponding routing rules to the Mediator. The Mediator then executes these rules when invoking the service in layer 2.
More specifically, here is what happens at design time when you create the Routing Decision Table:
-
A new decision component is created in the composite of the project.
-
A new rule dictionary is created in the composite project directory.
-
The rule dictionary is populated with a data model that reflects the data model of the phase input—that is, the XML schema of the Phase input is imported into the rule dictionary.
45.4 Use Case: Two-Layer BPM
This section tells you how to build a sample application for routing a customer order. Before you build this application, you need to download the BPELPhaseActivity sample from http://www.oracle.com/technology/sample_code/products/bpel/index.html.
-
Install the server as described in Oracle WebLogic Server Installation Guide.
-
Model the sample by performing these tasks:
-
Design the SOA composite as described in Section 45.4.1, "Designing the SOA Composite"
-
Create the Phase Activity as described in Section 45.4.2, "Creating a Phase Activity"
-
Create and Edit the Dynamic Routing Table as described in Section 45.4.3, "Creating and Editing the Dynamic Routing Decision Table"
-
Add assign activities to the BPEL process model as described in Section 45.4.4, "Adding Assign Activities to the BPEL Process Model"
-
-
Deploy the sample with JDeveloper as described in Section 45.4.5, "Deploying and Testing the Sample".
45.4.1 Designing the SOA Composite
You design the SOA composite application in JDeveloper.
-
In JDeveloper, from the File menu, select New. The New Gallery dialog appears. By default, Generic Application is selected.
-
Click OK. The Create Generic Application wizard displays the first screen.
-
In the Application Name field, enter
BPELPhaseActivityand then click Next. The second screen of the Create Generic Application wizard appears. -
In the Project Name field, enter BPELPhaseCustomerRouter.
In the Project Technologies tab page, from the Available window, select SOA and move it to the Selected window.
Click Next. The third screen of the Create Generic Application wizard appears.
-
From the Composite Template list, select Composite With BPEL, and click Finish.
The Create BPEL Process dialog appears.
-
In the Name field of the Create BPEL Process dialog, enter
CustomerRouterBPELProcess. -
From the Template list, select Synchronous BPEL Process.
-
Import the
CustomerData.xsdschema into the project xsd folder. An XML Schema Definition (XSD) specifies the kinds of elements and attributes that may appear in an XML document, their relationship to each other, the types of data may be in them, and other things.To import the
CustomerData.xsdfile:-
In the Input field, click the Browse Input Elements icon.
The Type Chooser dialog displays.
-
Click the Import Schema File icon.

Description of the illustration importxsd.gif
The Import Schema File dialog displays.
-
Click the Browse Resources icon to the right of the URL field.
The SOA Resource Browser appears.
-
Select File System and, in the Location section, search for
CustomerData.xsdin theartifacts/schemafolder, then click OK. -
In the Import Schema dialog, ensure the
CustomerData.xsdnow appears in the URL field and the Copy to Project option is selected, and then click OK.The Localize Files dialog prompts you to import the
CustomerData.xsdschema file and any dependent files. -
Deselect the option Maintain original directory structure for imported files and click OK to import the files.
The Type Chooser dialog appears.
-
Expand Project Schema Files > CustomerData.xsd > Customer and then click OK.
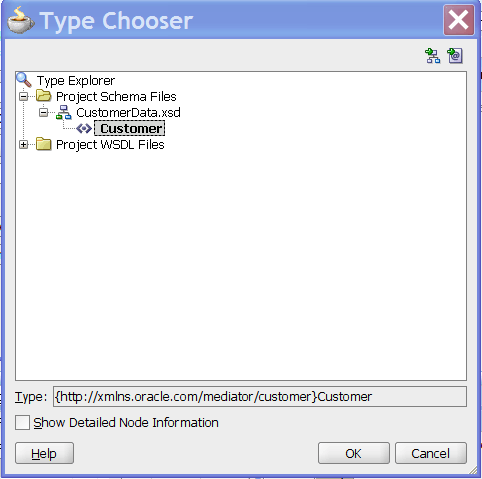
Description of the illustration importxsd2.gif
-
-
After importing the
CustomerData.xsdschema, open theCustomerRouterBPELProcess.bpelpage.
Note:
Phase variables can be of the Element type only.-
Click the Variables... icon. The Variables dialog appears.
-
Click the Create... icon. The Create Variable dialog appears.
-
Enter
InputPhaseVariablein the Name field. Click the Element option. -
Click the Browse Elements icon. The Type Chooser dialog appears.
-
Select Project Schema Files >CustomerData.xsd > Customer, and then click OK. The Create Variable dialog appears with the element name populated.
-
Click OK. The Variables dialog is displayed with the variable name populated.
-
Click the Create... icon in the Variables dialog. The Create Variable dialog appears.
-
In the Name field, enter
OutputPhaseVariable. In the Type section, select the Element option. Click the Browse Elements icon. The Type Chooser dialog appears. -
Select Project Schema Files >CustomerData.xsd > Customer, and then click OK. The Create Variable dialog appears with the element name populated.
-
Click OK. The Variables dialog appears with the input and output variable names populated.
-
Click OK. The variables have been created and the
CustomerRouterBPELProcess.bpelpage appears.
45.4.2 Creating a Phase Activity
-
With the
CustomerRouterBPELProcess.bpelpage selected, drag and drop a Phase activity from the BPEL component palette into the process model, between receiveInput and replyOutput. The Phase dialog appears. -
In the Name field, enter
CustomerRoutingPhase_1. -
From the Inputs and Outputs Variables plus icon, select Add Input Variable. The Add Input Variable dialog appears.
-
Select Process, Variables, and phaseIn, and then click OK. The Phase dialog is displayed with the InputPhaseVar variable populated.
-
From the Inputs and Outputs Variables plus icon, select Add Output Variable. The Add Output Variable dialog appears.
-
Select Process, Variables, and OutputPhaseVar.
-
Click OK. The Phase dialog displays the input and output variable names.
-
Click OK. The
CustomerRouterBPELProcess.bpelpage appears. -
Click Save All from the File menu. Close the
CustomerRouterBPELProcess.bpelpage. -
Click the
composite.xmlpage. The SCA composite diagram is displayed.
Note:
-
As part of the Phase activity wizard, three components are created: Rules, Mediator, and Dynamic Reference.
-
The Rules component returns an executable case for the Mediator component, because of the rules defined.
-
The Mediator component routes because of the routing rules received from the Rules component.
-
The Dynamic Reference component is the dummy reference for the second-level processes.
-
The Rule dictionary is populated with the fact type model of the Mediator and the fact type corresponding to the input of the Phase activity, which in this case is
CustomerData. -
An empty decision table called the RoutingTable is created that must be edited providing dynamic routing rules.
45.4.3 Creating and Editing the Dynamic Routing Decision Table
To create and edit the Dynamic Routing Decision Table:
-
Open the
CustomerRouterBPELProcess.bpelpage, and double-click the Phase activity in the process diagram. The Phase dialog appears. -
Click the Edit Dynamic Rules button. The Rule Designer page appears.
-
Under Rulesets, click Ruleset_1. The Ruleset_1 page with an empty RoutingTable appears.
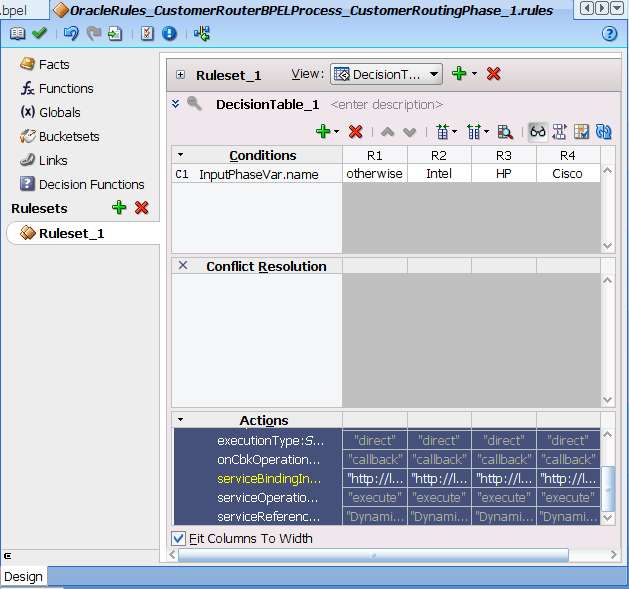
Description of the illustration bp_ruleset.gif
-
In DecitionTable_1, click the Add icon, then Action, then Assert New. The Actions section of the table appears.
-
In the serviceBindingInfo, specify the SOAP endpoint, replacing the hostname and host port with SOA Server details. The sample has
localhostas host server and8001as host port.-
In the "otherwise" column, provide
http://hostname:host_port/soa-infra/services/default/CustomerRouter!1.0/DefaultCustomerRouterService. -
In the Intel column, enter
http://hostname:host_port/soa-infra/services/default/CustomerRouter!1.0/SilverCustomerRouterService -
In the Cisco column, it is
http://hostname:host_port/soa-infra/services/default/CustomerRouter!1.0/GoldCustomerRouterService -
In the HP column, it is
http://hostname:host_port/soa-infra/services/default/CustomerRouter!1.0/PlatinumCustomerRouterService
-
45.4.4 Adding Assign Activities to the BPEL Process Model
Before deploying the Phase activity, you must initialize the Phase variables. You do this by adding Assign activities in the phase in the BPEL process.
To add Assign activities to the BPEL Process Model:
-
Click the
CustomerRouterBPELProcess.bpelpage. Drag and drop an Assign activity from the BPEL component palette into the process model between the receiveInput activity and the Phase activity. The Assign activity is added to the process model. -
Double-click the Assign activity. The Assign dialog is displayed.
-
Select the General tab page, and, in the Name field, enter
AssignInput. -
Select the Copy Operation tab. Click the plus icon and select Copy Operation from the list. The Create Copy Operation dialog appears.
-
On the From side, navigate as follows: Variables > Process > Variables > inputVariable > payload > ns1:Customer.
On the To side, navigate as follows: Variables > Process > Variables > inputVariable > payload > ns1:Customer.
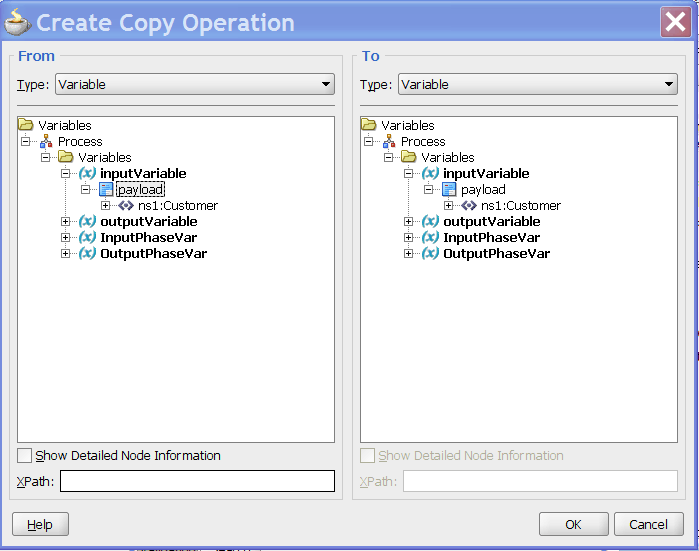
Description of the illustration bp_assign_inputvar.gif
Click OK. This returns you to the Copy Operation tab page where the input copy operation is recorded as follows:
-
Click OK in the Create Copy Operation dialog. The Assign dialog appears with the input copy operation values populated.
-
Click OK. The
CustomerRouterBPELProcess.bpelpage is displayed again. -
Drag and drop another Assign activity from the BPEL component palette into the process model between the Phase activity and the replyOutput activity. The new Assign activity is added to the process model.
-
Double-click the Assign activity. The Assign dialog appears.
-
Enter
AssignOutputin the Name field in the General tab. -
Select the Copy Operation tab. Click the plus icon and select Copy Operation from the list. The Create Copy Operation dialog appears.
-
On the From side, navigate as follows: Variables > Process > Variables > OutputPhaseVar > payload > ns1:Customer/ns1:status.
On the To side, navigate as follows: Process > Variables > outputVariable > payload > client:processResponse > client:result.
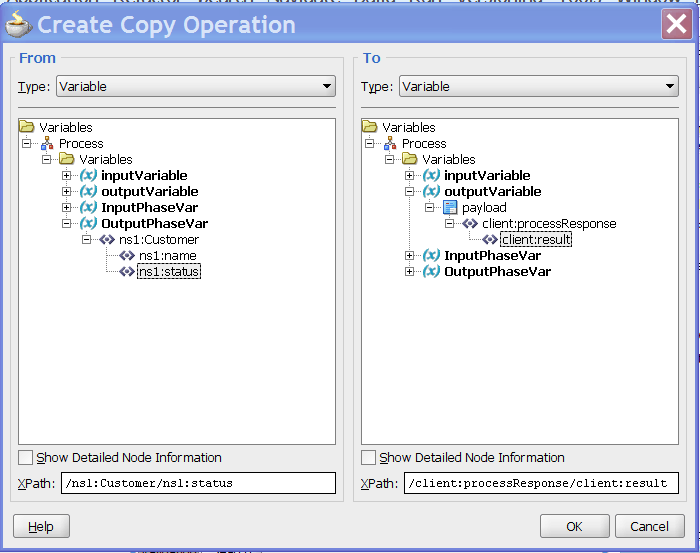
Description of the illustration bp_assignoutputvar.gif
-
Click OK. This returns you to the Copy Operation tab page where the output copy operation is recorded as follows:
-
Click OK in the Create Copy Operation dialog. The Assign dialog is displayed with the output copy operation value populated.
-
Click OK. The
CustomerRouterBPELProcess.bpelpage appears after the input and output Assign activities are created. -
Click Save All from the File menu.
45.4.5 Deploying and Testing the Sample
For instructions on deploying the sample, see Section 38.7, "Deploying SOA Composite Applications".
For instructions on testing a composite instance in Oracle Enterprise Manager, see Oracle Fusion Middleware Administrator's Guide for Oracle SOA Suite.
