4 Integration With BPEL Service Components in the Oracle SOA Suite
Oracle Application Adapter for PeopleSoft integrates seamlessly with Oracle Business Process Execution Language (BPEL) Process Manager to facilitate Web service integration. Oracle BPEL Process Manager is based on the Service-Oriented Architecture (SOA). It consumes adapter services exposed as Web Service Definition Language (WSDL) documents.
This chapter includes the following topics:
Overview
To integrate with Oracle SOA Suite, Oracle Application Adapter for PeopleSoft must be deployed in the same WLS container as Oracle BPEL Process Manager. The underlying adapter services must be exposed as WSDL files, which are generated during design time in Oracle Application Adapter Application Explorer (Application Explorer) for both request-response (outbound) and event notification (inbound) services of the adapter. See Chapter 2, "Configuring Oracle Application Adapter for PeopleSoft" for more information.
The generated WSDL files are used to design the appropriate BPEL processes for inbound or outbound adapter services. A completed BPEL process must be successfully compiled in JDeveloper and deployed to a SOA server. Upon deployment to the SOA server, every newly built process is automatically deployed to the Oracle Enterprise Manager Console, where you run, monitor, and administer BPEL processes, and listen to adapter events.
Deployment of Adapter
During installation, Oracle Application Adapter for PeopleSoft is deployed as a J2CA 1.0 resource adapter within the WLS container. The adapter must be deployed in the same WLS container as Oracle BPEL Process Manager.
Configuring a New Application Server Connection
To configure a new Application Server connection in Oracle JDeveloper:
-
Open Oracle JDeveloper on your system.
-
From the menu bar, click View and select Application Server Navigator.
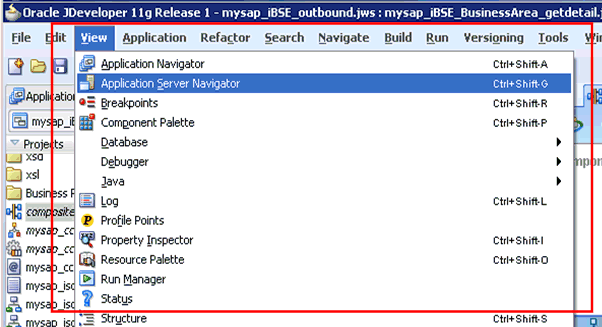
Description of the illustration config_appserver1.gif
The Application Server tab is displayed.
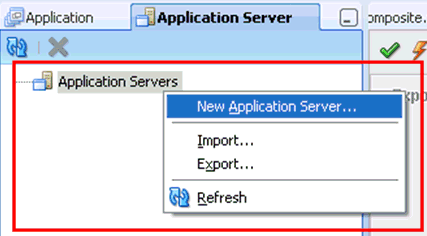
Description of the illustration config_appserver2.gif
-
Right-click Application Servers, and then select New Application Server.
The Create Application Server Connection Wizard is displayed.
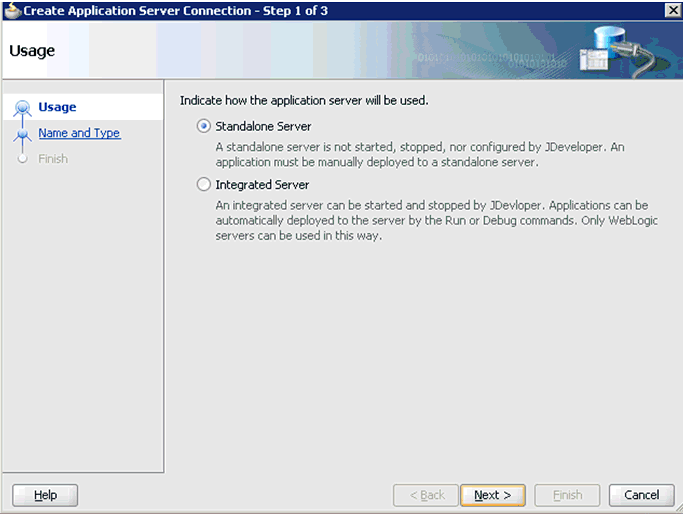
Description of the illustration config_appserver3.gif
-
Accept the default selection (Standalone Server) and click Next.
The Name and Type page is displayed.
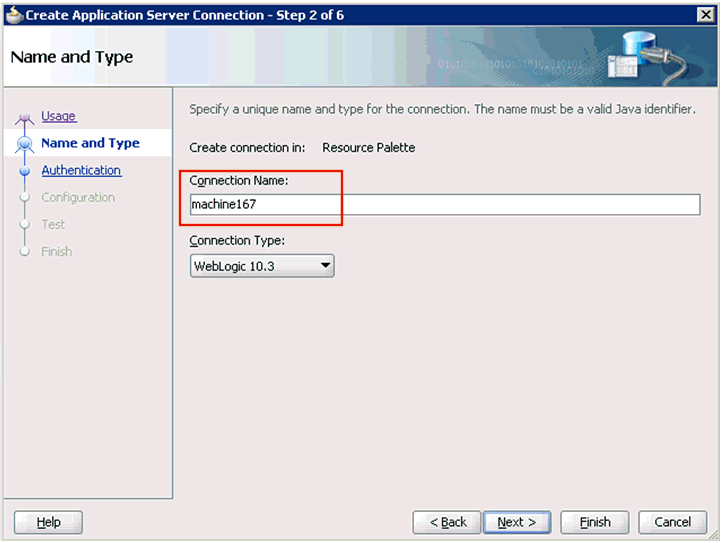
Description of the illustration config_appserver4.gif
-
Specify a new name for the Application Server connection and click Next.
The Authentication page is displayed.
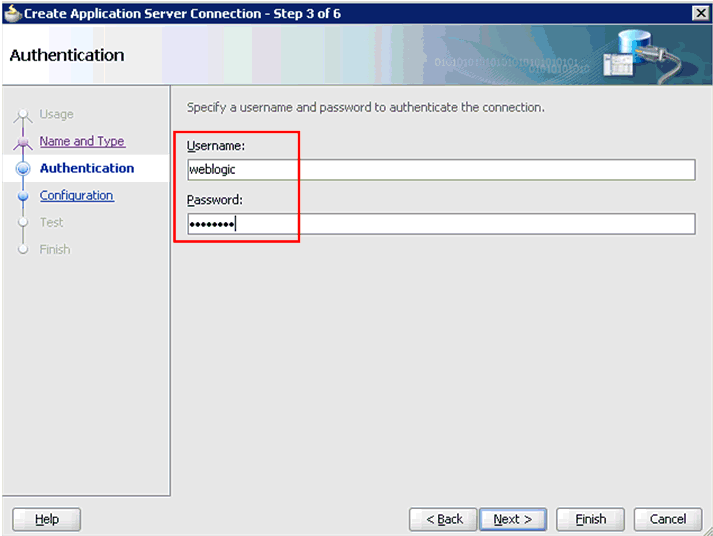
Description of the illustration config_appserver5.gif
-
Specify a valid user name (for example, weblogic) and a password (for example, welcome1) for your new connection.
-
Click Next.
The Configuration page is displayed.
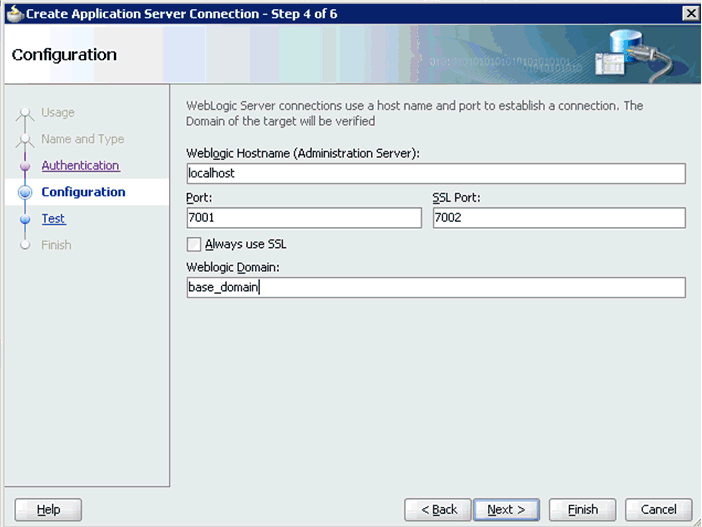
Description of the illustration config_appserver6.gif
-
Specify the Oracle WebLogic host name (for example, localhost), which is the machine IP where the process needs to deploy and Oracle WebLogic domain (for example, base_domain).
-
Click Next.
The Test page is displayed.
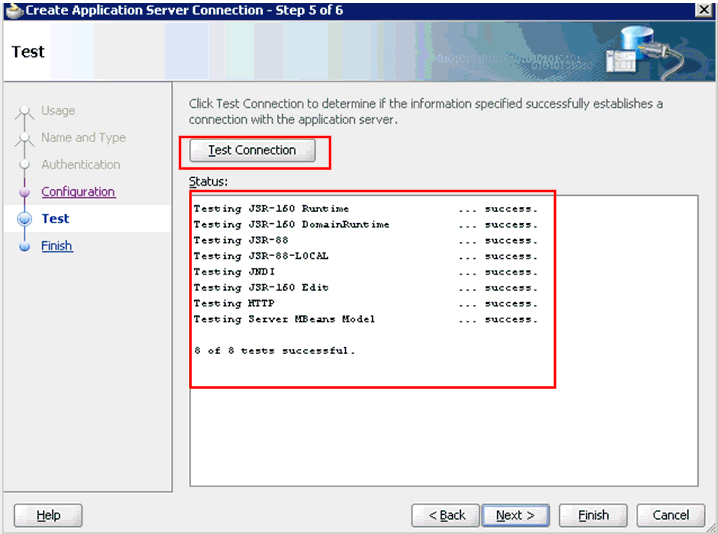
Description of the illustration config_appserver7.gif
-
Click Test Connection.
-
Ensure that the test status is successful.
-
Click Next.
The Finish page is displayed.
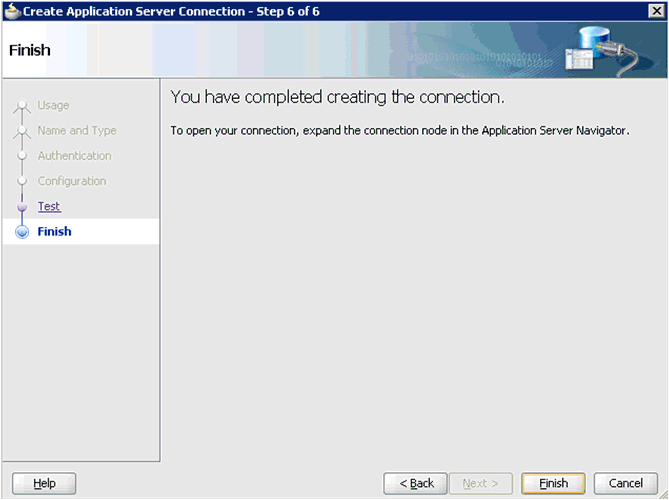
Description of the illustration config_appserver8.gif
-
Click Finish.
The new Application Server connection is listed in the left pane (Application Server tab), as shown in the following image.
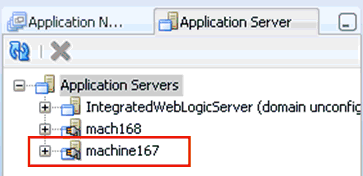
Description of the illustration config_appserver9.gif
Designing an Outbound BPEL Process for Service Integration
The following tools are required to complete your adapter design-time configuration:
-
Oracle Adapter Application Explorer (Application Explorer)
-
Oracle JDeveloper BPEL Designer (JDeveloper) or Eclipse
Note:
The examples in this chapter demonstrate the use of JDeveloper.Before you design a BPEL process, you must create a schema and generate the respective WSDL file using Application Explorer. See "Generating WSDL for Request/Response Service" for more information.
Generating WSDL for Request/Response Service
To generate WSDL for outbound interaction in Application Explorer:
-
Start Application Explorer and connect to a defined PeopleSoft target or create a new target.
See "Defining a Target to PeopleSoft" for more information.
-
Expand the PeopleSoft target to which you are connected.
-
Expand Component Interfaces and select LOCATION.
-
Right-click LOCATION, and then select Create Outbound JCA Service (Request/Response).

Description of the illustration wsdl_generate1.gif
The Export WSDL dialog is displayed.

Description of the illustration wsdl_generate2.gif
-
Specify an export location on your file system or accept the default path.
The .wsdl file extension is added automatically. By default, the names of WSDL files generated for request-response services end with _invoke.
-
Click OK.
You can now create a new SOA application, which is the first step that is required to define a BPEL outbound process in JDeveloper.
Creating a New SOA Application for the Outbound BPEL Process
Perform the following steps to create a new SOA application for the outbound BPEL process:
-
Open Oracle JDeveloper on your system.
-
In the Application Navigator tab, click New Application.
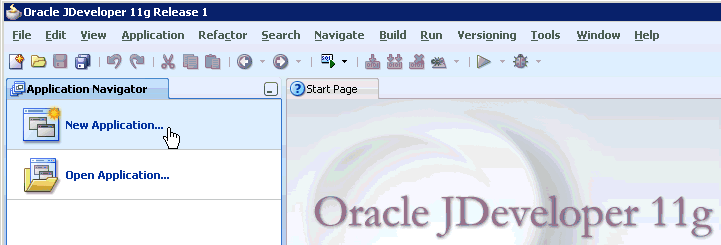
Description of the illustration bpel_out_comp1.gif
The Create SOA Application wizard is displayed.
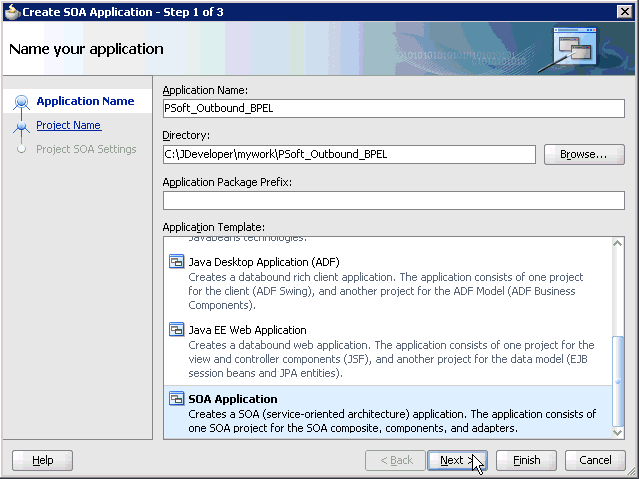
Description of the illustration bpel_out_comp2.gif
-
From the Application Template list, click SOA Application.
-
Enter name for the new SOA application (for example, PSoft_Outbound_BPEL) and click Next.
The Name your project page is displayed.
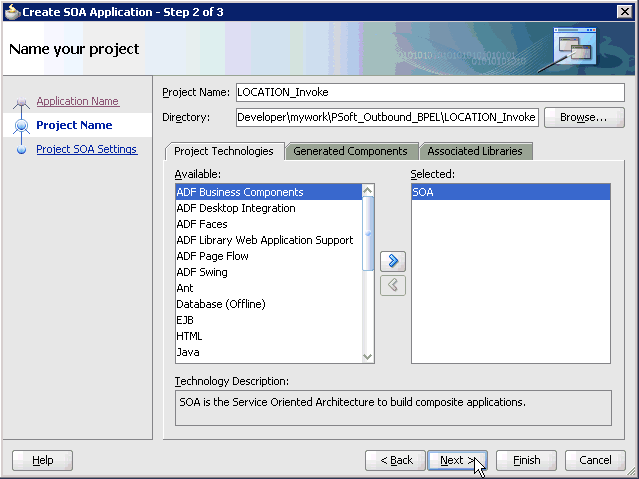
Description of the illustration bpel_out_comp3.gif
-
Enter a project name (for example, LOCATION_Invoke) and click Next.
The Configure SOA settings page is displayed.
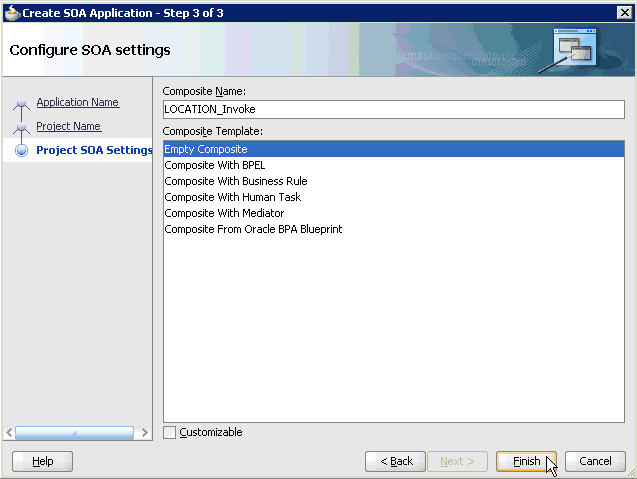
Description of the illustration bpel_out_comp4.gif
-
From the Composite Template list, select Empty Composite and click Finish.
The new SOA application (PSoft_Outbound_BPEL) and associated project (LOCATION_Invoke) are added to the Application Navigator tab in the left pane.
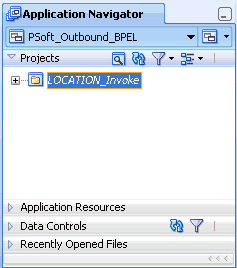
Description of the illustration bpel_out_comp5.gif
Defining a BPEL Outbound Process
This section describes how to define a BPEL outbound process, which consists of the following stages:
-
Configuring a Third Party Adapter Service Component
-
Configuring an Outbound BPEL Process Component
Configuring a Third Party Adapter Service Component
Perform the following steps to create a third party adapter service component:
-
Drag and drop the Third Party Adapter component from the Component Palette tab (Service Adapters section) to the External References pane.
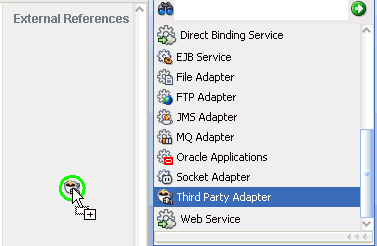
Description of the illustration bpel_out_adapt1.gif
The Create Third Party Adapter Service dialog is displayed.
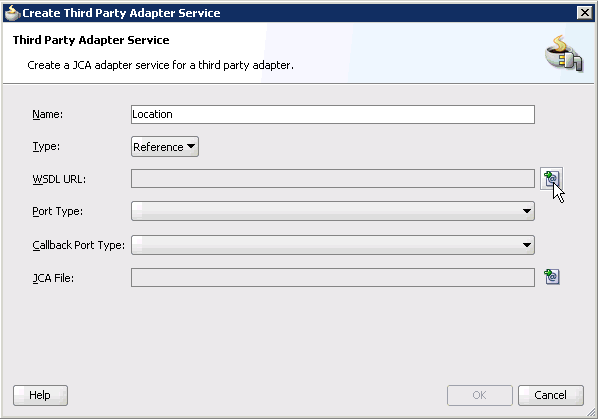
Description of the illustration bpel_out_adapt2.gif
-
Enter a name for the new third party adapter service.
-
Ensure that Reference is selected from the Type list (default).
-
Click the Find existing WSDLs icon, which is located to the right of the WSDL URL field.
The SOA Resource Browser dialog is displayed.
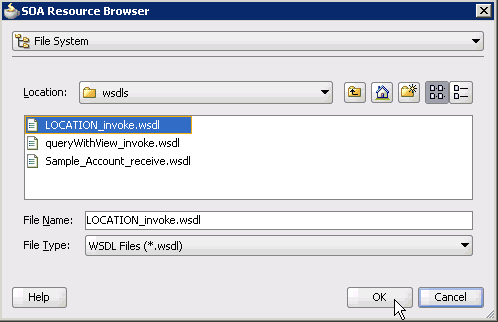
Description of the illustration bpel_out_adapt3.gif
-
Browse and select an outbound WSDL file (for example, LOCATION_invoke.wsdl) from the following directory:
C:\oracle\Middleware\Oracle_SOA1\soa\thirdparty\ApplicationAdapters\wsdls
-
Click OK.
The Localize Files dialog is displayed.
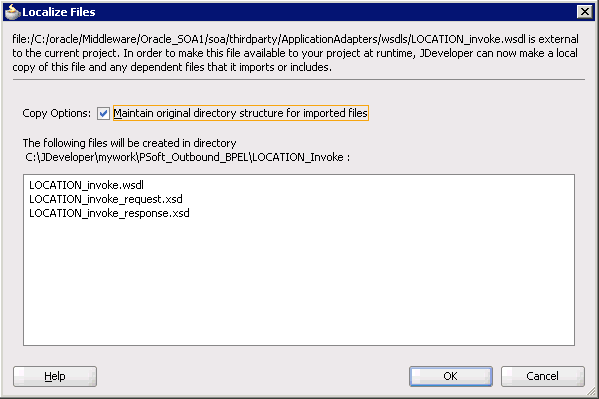
Description of the illustration bpel_out_adapt4.gif
-
Click OK.
The outbound WSDL file and associated request and response XML schema files (.xsd) are imported to the project folder that has been created.
You are returned to the Create Third Party Adapter Service dialog.
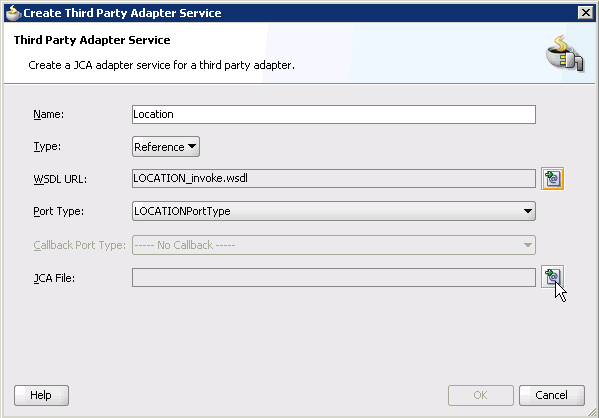
Description of the illustration bpel_out_adapt5.gif
-
Click the Find JCA Files icon, which is located to the right of the JCA File field.
The SOA Resource Browser dialog is displayed.
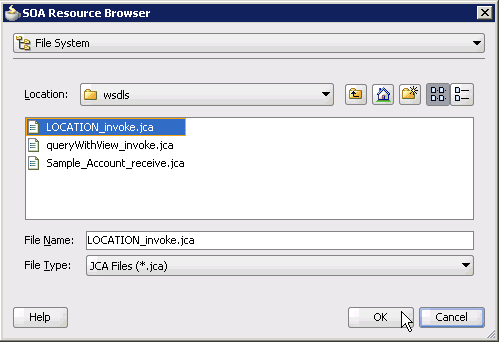
Description of the illustration bpel_out_adapt6.gif
-
Browse and select the JCA properties file (for example, LOCATION_invoke.jca) from the following directory:
C:\oracle\Middleware\Oracle_SOA1\soa\thirdparty\ApplicationAdapters\wsdls
-
Click OK.
The following message is displayed.
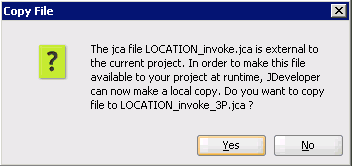
Description of the illustration bpel_out_adapt7.gif
-
Click Yes.
A copy of the JCA properties file is made in the project folder.
You are returned to the Create Third Party Adapter Service dialog.
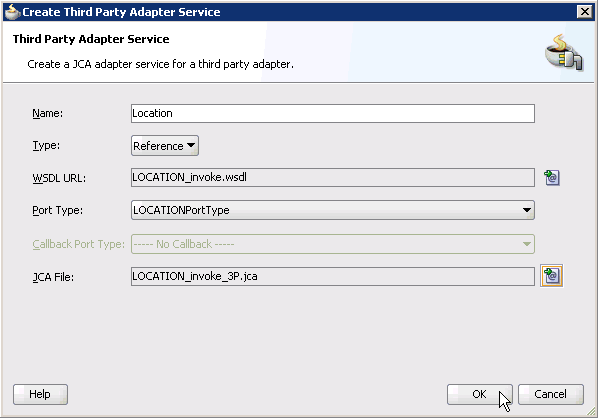
Description of the illustration bpel_out_adapt8.gif
-
Click OK.
The third party adapter service component (Location) is created in the External References pane, as shown in the following image.
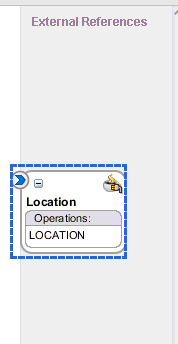
Description of the illustration bpel_out_adapt9.gif
You are now ready to configure an outbound BPEL process component.
Configuring an Outbound BPEL Process Component
Perform the following steps to configure an outbound BPEL process component:
-
Drag and drop the BPEL Process component from the Component Palette tab (Service Components section) to the Components pane.
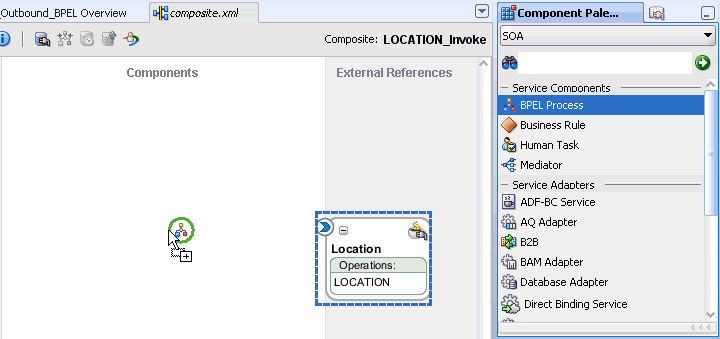
Description of the illustration bpel_out_proc1.gif
The Create BPEL Process dialog is displayed.
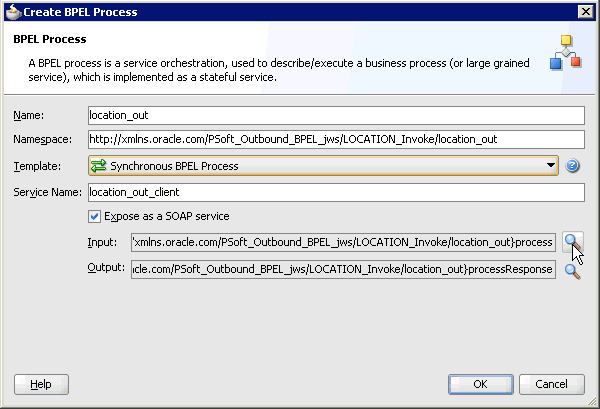
Description of the illustration bpel_out_proc2.gif
-
In the Name field, enter a name to identify the new outbound BPEL process component (for example, location_out).
-
From the Template list, select Synchronous BPEL Process.
-
Click the Browse Input Elements icon, which is located to the right of the Input field to select the associated XML request schema file.
The Type Chooser dialog is displayed.
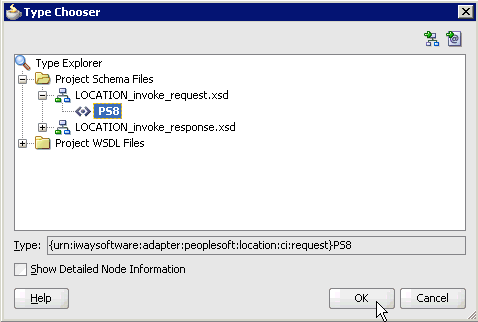
Description of the illustration bpel_out_proc3.gif
-
Expand Project Schema Files, LOCATION_invoke_request.xsd, and select PS8.
-
Click OK.
You are returned to the Create BPEL Process dialog.
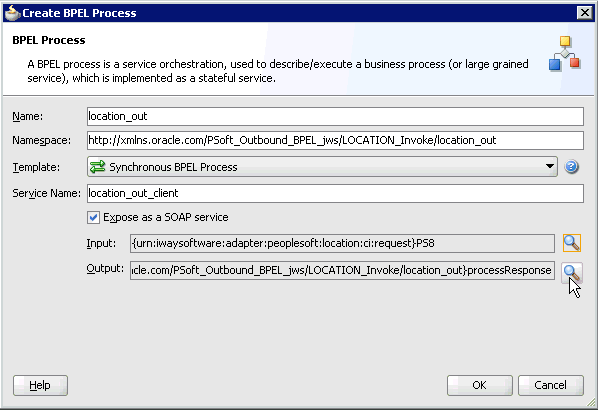
Description of the illustration bpel_out_proc4.gif
-
Click the Browse Output Elements icon, which is located to the right of the Output field to select the associated XML response schema file.
The Type Chooser dialog is displayed.
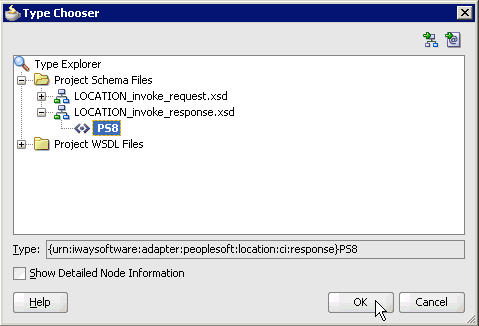
Description of the illustration bpel_out_proc5.gif
-
Expand Project Schema Files, LOCATION_invoke_response.xsd, and select PS8.
-
Click OK.
You are returned to the Create BPEL Process dialog.
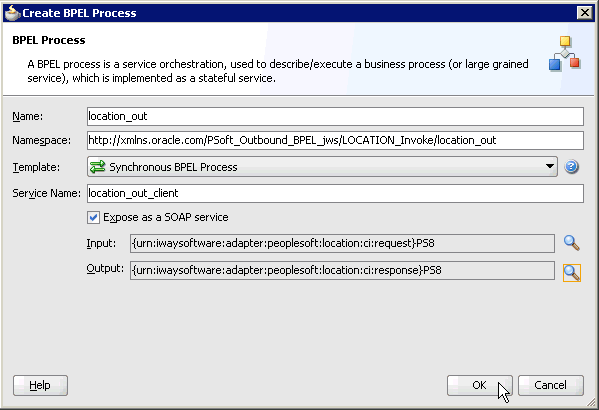
Description of the illustration bpel_out_proc6.gif
-
Click OK.
-
Create a connection between the outbound BPEL process component (location_out) and the third party adapter service component (Location).
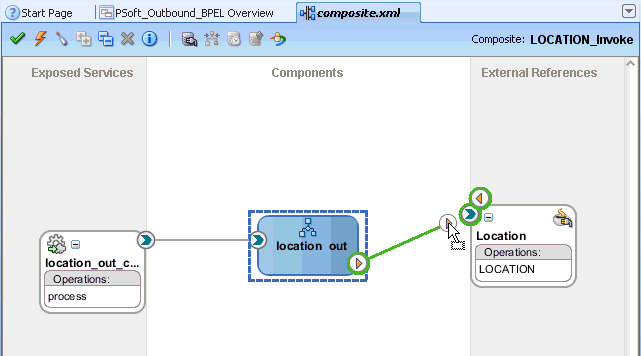
Description of the illustration bpel_out_proc7.gif
-
Double-click the outbound BPEL process component (location_out) in the Components pane.
The following is displayed.
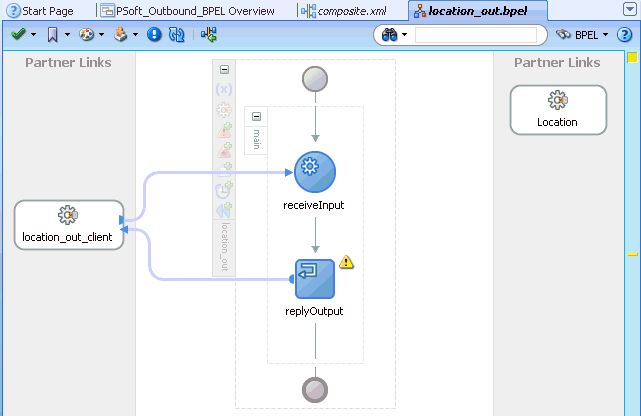
Description of the illustration bpel_out_proc8.gif
-
Drag and drop the Invoke activity component to the Components pane and place it between the receiveInput activity component and the replyOutput activity component.
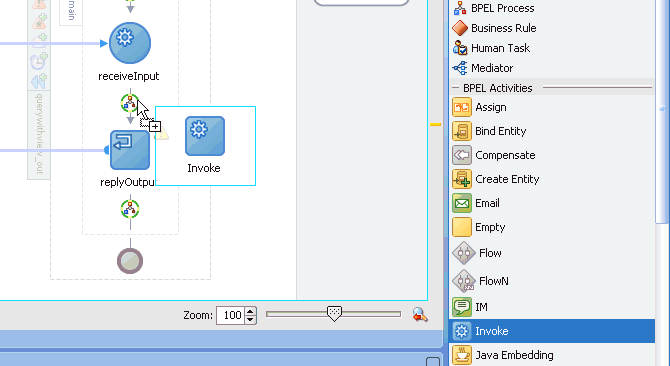
Description of the illustration bpel_out_proc9.gif
-
Create a connection between the new Invoke activity component (Invoke_1) and the third party adapter service component (Location).
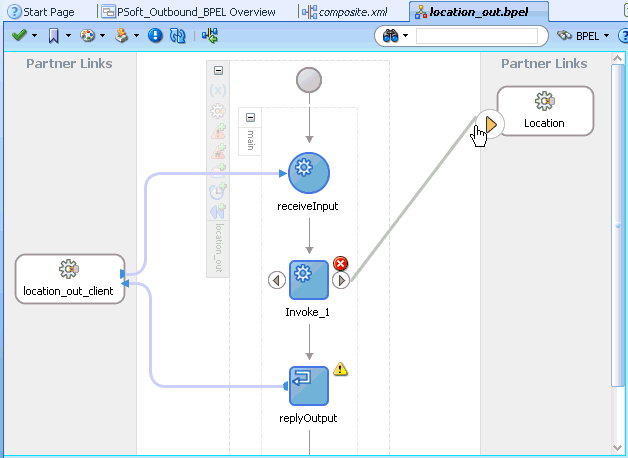
Description of the illustration bpel_out_proc10.gif
The Edit Invoke dialog is displayed.
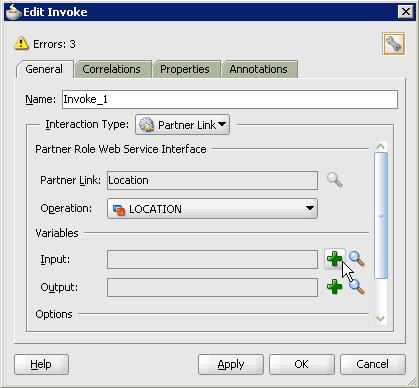
Description of the illustration bpel_out_proc11.gif
-
Click the Automatically Create Input Variable icon, which is located to the right of the Input field to configure a new input variable.
The Create Variable dialog is displayed.
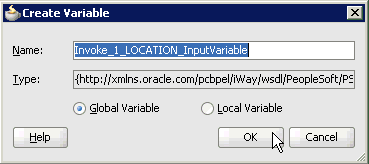
Description of the illustration bpel_out_proc12.gif
-
Accept the default values that are provided for the new input variable and click OK.
You are returned to the Edit Invoke dialog.
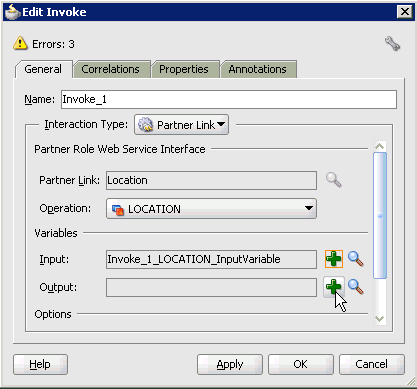
Description of the illustration bpel_out_proc13.gif
-
Click the Automatically Create Output Variable icon, which is located to the right of the Output field to configure a new output variable.
The Create Variable dialog is displayed.
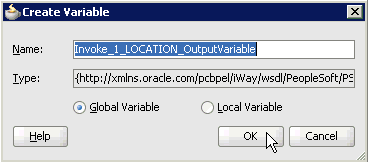
Description of the illustration bpel_out_proc14.gif
-
Accept the default values that are provided for the new output variable and click OK.
You are returned to the Edit Invoke dialog.
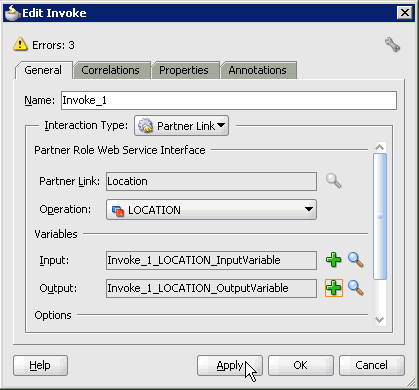
Description of the illustration bpel_out_proc15.gif
-
Click Apply and then OK.
The Invoke activity component (Invoke_1) is updated accordingly.
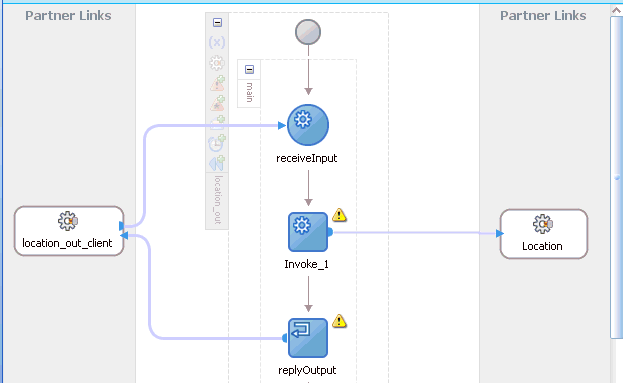
Description of the illustration bpel_out_proc16.gif
-
Drag and drop the Assign activity component to the Components pane and place it between the Receive activity component (receiveInput) and the Invoke activity component (Invoke_1).
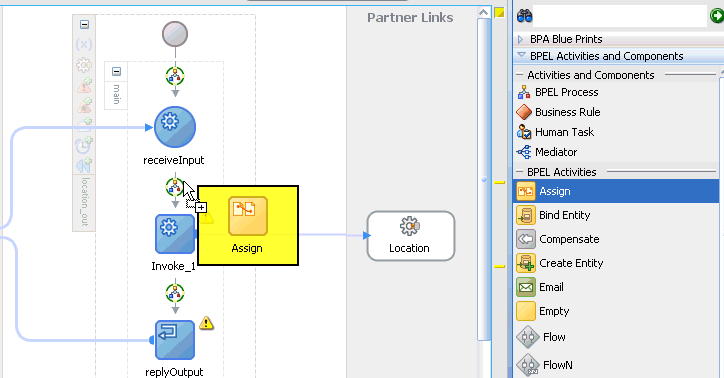
Description of the illustration bpel_out_proc17.gif
-
Double-click the new Assign activity component (Assign_1).
The Assign dialog is displayed.
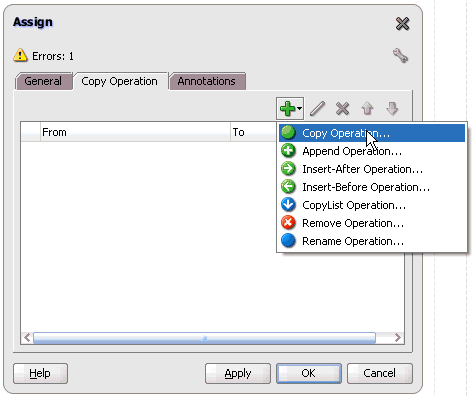
Description of the illustration bpel_out_proc18.gif
-
Click the Copy Operation tab.
-
Click the Plus sign icon and select Copy Operation from the list of available operations.
The Create Copy Operation dialog is displayed.
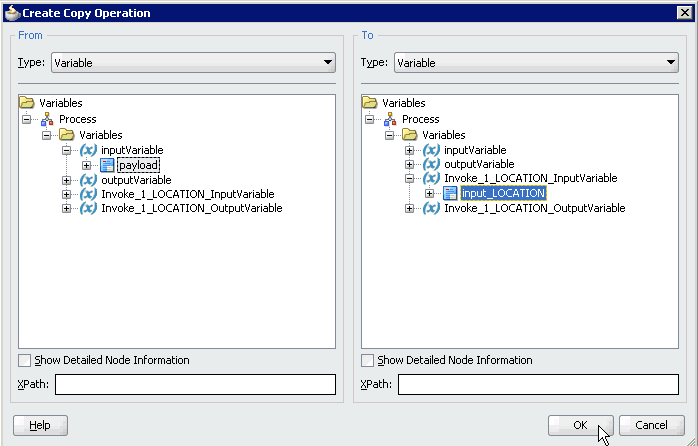
Description of the illustration bpel_out_proc19.gif
-
In the From pane, expand Variables, InputVariable, and then select payload.
-
In the To pane, expand Variables, Invoke_1_LOCATION_InputVariable, and then select input_LOCATION.
-
Click OK.
You are returned to the Assign dialog.
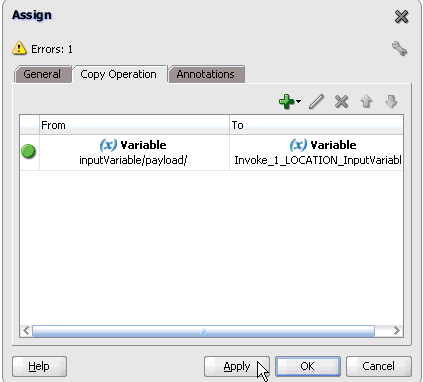
Description of the illustration bpel_out_proc20.gif
-
Click Apply and then OK.
-
Drag and drop the Assign activity component to the Components pane and place it between the Invoke activity (Invoke_1) and the Reply activity (replyOutput).
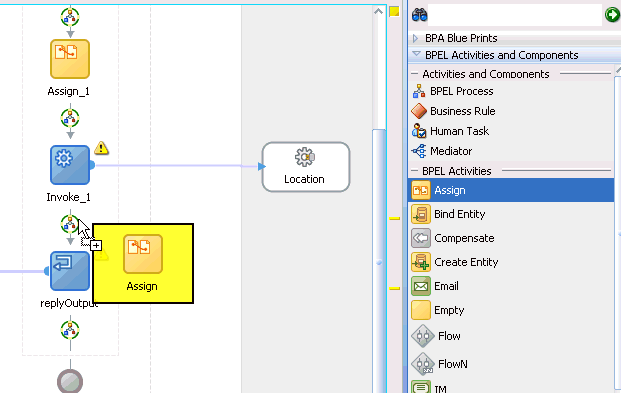
Description of the illustration bpel_out_proc21.gif
-
Double-click the new Assign activity component (Assign_2).
The Assign dialog is displayed.

Description of the illustration bpel_out_proc18.gif
-
Click the Copy Operation tab.
-
Click the Plus sign icon and select Copy Operation from the list of available operations.
The Create Copy Operation dialog is displayed.
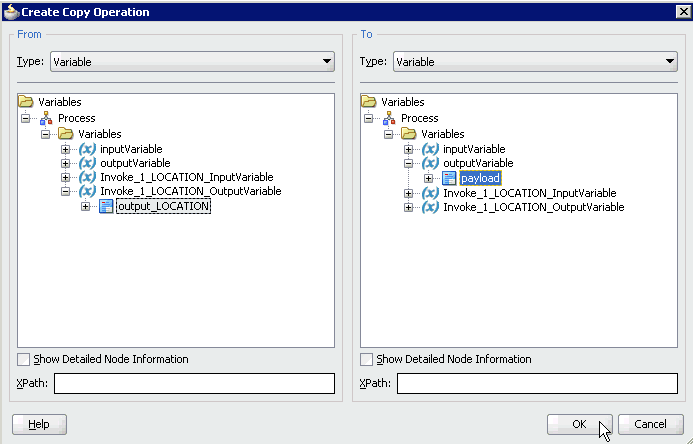
Description of the illustration bpel_out_proc22.gif
-
In the From pane, expand Variables, Invoke_1_LOCATION_OutputVariable, and then select output_LOCATION.
-
In the To pane, expand Variables, outputVariable, and then select payload.
-
Click OK.
You are returned to the Assign dialog.
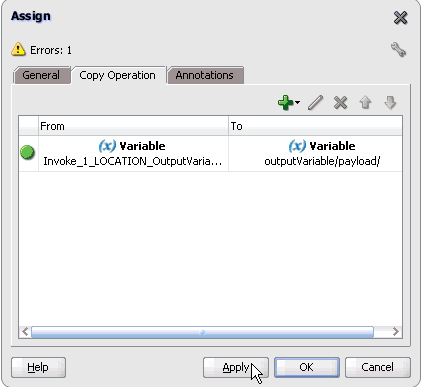
Description of the illustration bpel_out_proc23.gif
-
Click Apply and then OK.
The completed activity flow is now displayed.
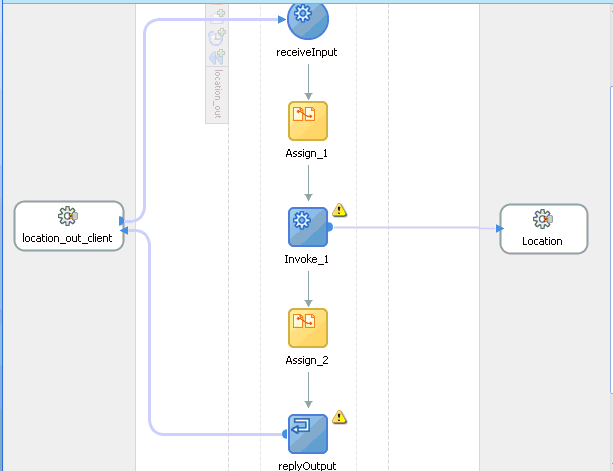
Description of the illustration bpel_out_proc24.gif
-
Double-click composite.xml in the left pane.
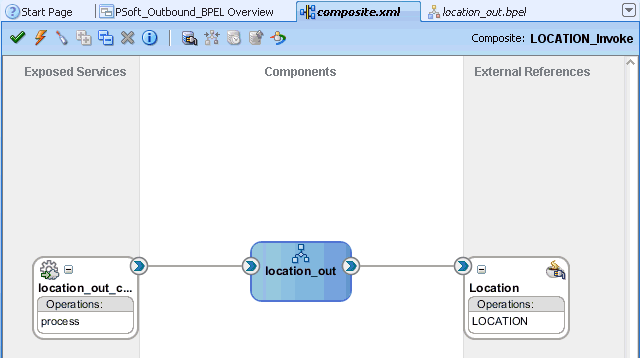
Description of the illustration bpel_out_proc25.gif
-
Click the Save All icon in the menu bar to save the new outbound BPEL process component that was configured.
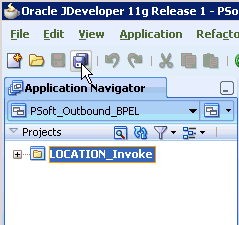
Description of the illustration bpel_out_proc26.gif
You are now ready to deploy the BPEL outbound process.
Deploying the BPEL Outbound Process
Perform the following steps to deploy the BPEL outbound process.
-
Right-click the project name in the left pane (for example, LOCATION_Invoke), select Deploy, and then click LOCATION_Invoke.
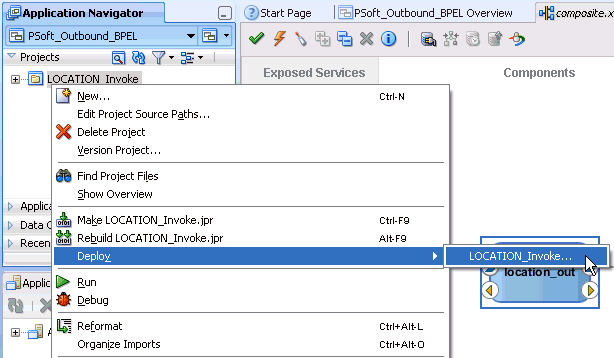
Description of the illustration bpel_out_deploy1.gif
The Deployment Action page is displayed.
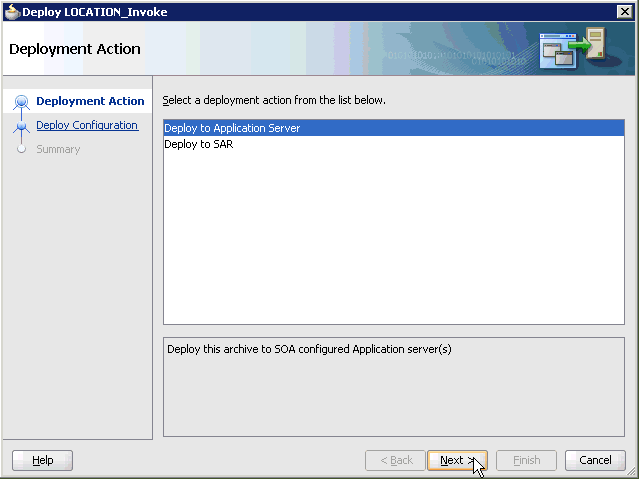
Description of the illustration bpel_out_deploy2.gif
-
Ensure that Deploy to Application Server is selected.
-
Click Next.
The Deploy Configuration page is displayed.
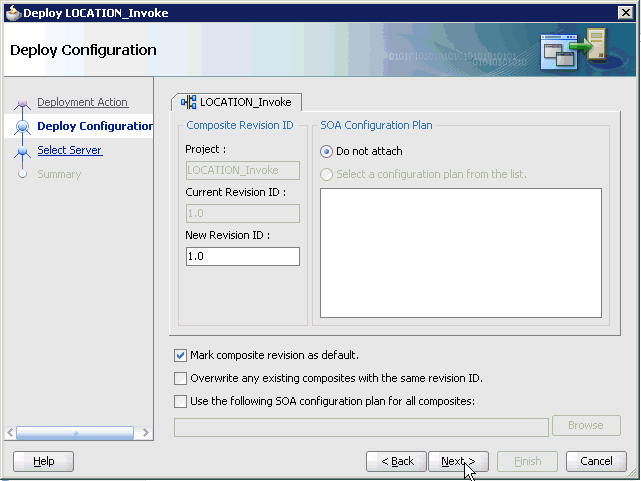
Description of the illustration bpel_out_deploy3.gif
-
Leave the default values selected and click Next.
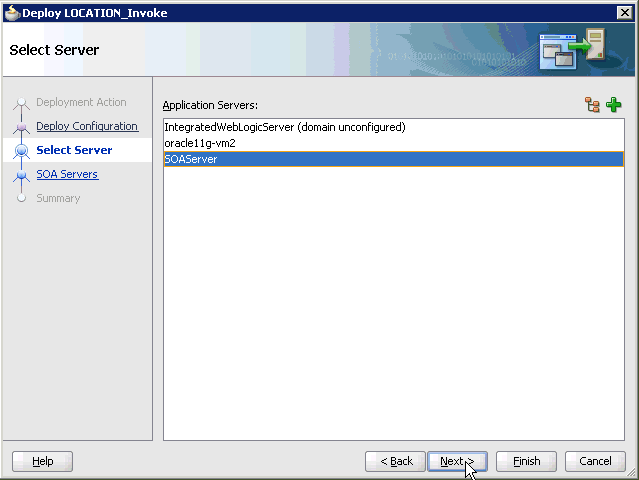
The Select Server page is displayed.
Description of the illustration bpel_out_deploy4.gif
-
Select an available application server that was configured and click Next.
The SOA Servers dialog is displayed.
-
Select a target SOA server and click Next.
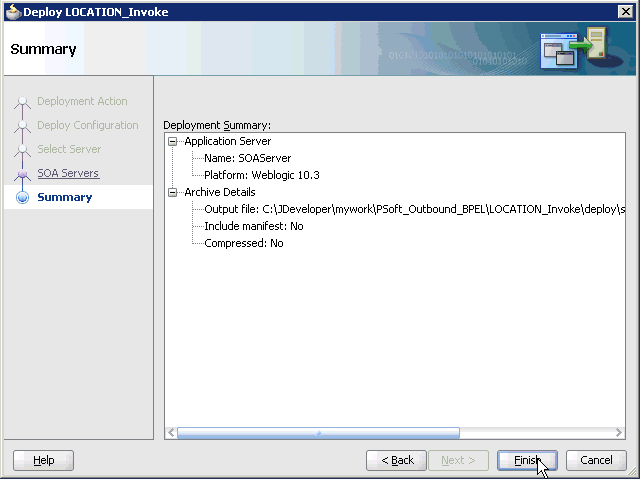
The Summary page is displayed.
Description of the illustration bpel_out_deploy5.gif
-
Review and verify all the available deployment information for your project and click Finish.
The process is deployed successfully.

Description of the illustration bpel_out_deploy6.gif
If an Authorization Request dialog is displayed during the deployment process, provide the required user name and password and click OK.
Invoking the Input XML Document in the Oracle Enterprise Manager Console
Perform the following steps to invoke the input XML document in the Oracle Enterprise Manager console.
-
Log in to the Oracle Enterprise Manager console by using the following URL:
http://localhost:7001/em
-
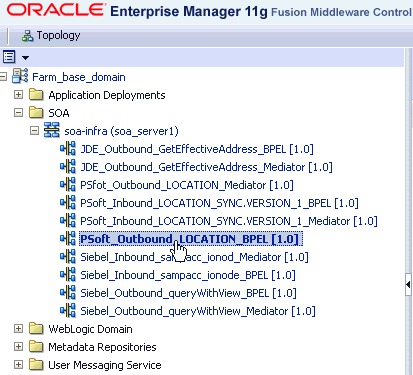
Expand your domain in the left pane followed by the SOA folder.
Description of the illustration bpel_out_test1.gif
-
Select an available project (for example, PSoft_Outbound_LOCATION_BPEL).
Description of the illustration bpel_out_test2.gif
-
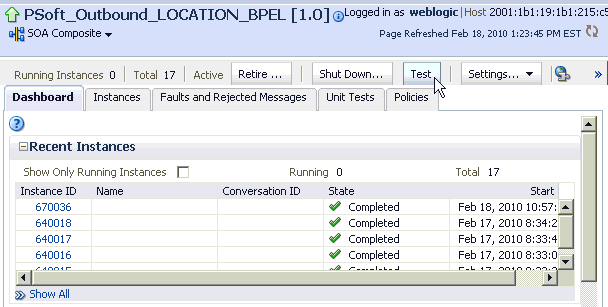
Click Test in the right pane.
The Test Web Service page is displayed.
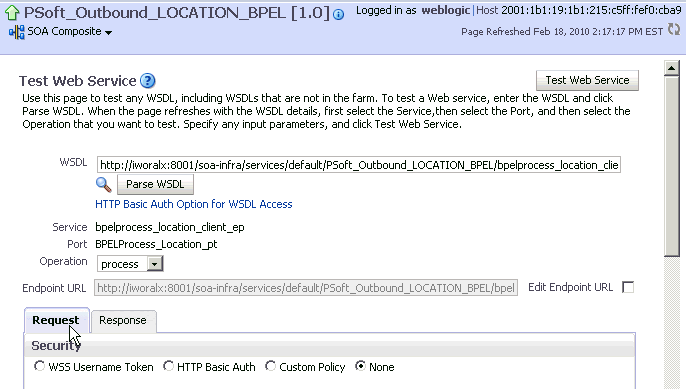
Description of the illustration bpel_out_test2a.gif
-
Click the Request tab.
-
Scroll down to the Input Arguments section.
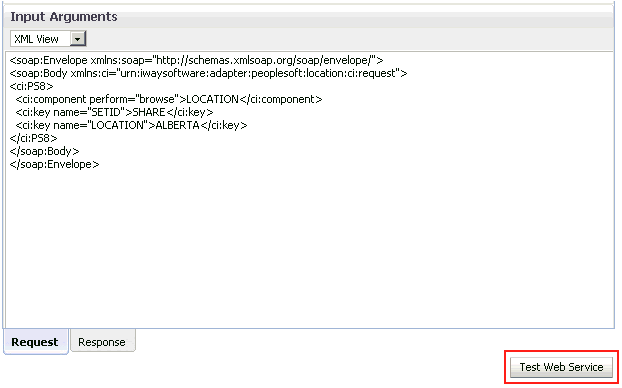
Description of the illustration bpel_out_test3.gif
-
Select XML View from the list in the upper-left corner.
-
Provide an appropriate input XML document in the Input Arguments area.
For example:
<soap:Envelope xmlns:soap="http://schemas.xmlsoap.org/soap/envelope/"><soap:Body xmlns:ci="urn:iwaysoftware:adapter:peoplesoft:location:ci:request"><ci:PS8> <ci:component perform="browse">LOCATION</ci:component> <ci:key name="SETID">SHARE</ci:key> <ci:key name="LOCATION">ALBERTA</ci:key></ci:PS8></soap:Body></soap:Envelope>
-
Click Test Web Service.
The output response is received in the Response tab of the Oracle Enterprise Manager console.
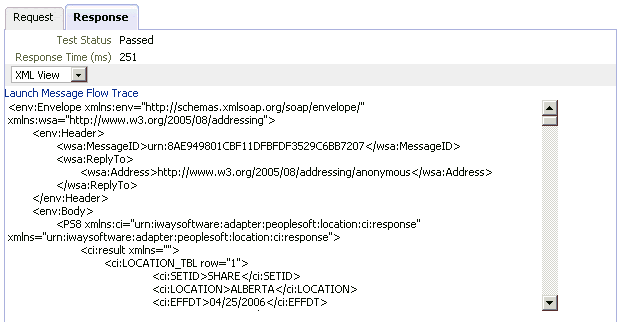
Description of the illustration bpel_out_test4.gif
Testing Outbound BPEL and Mediator Processes
When testing an outbound BPEL process or an outbound Mediator process from the Oracle Enterprise Manager console, do not use the XML envelopes that are generated by these consoles. Instead, remove them and use the XML payloads that are generated from the schemas, which conform to the WSDLs for namespace qualifications.
The Mediator data flows can be tested using the Oracle Enterprise Manager console. When creating a Mediator data flow and interactions, the Web services are created and registered with the Oracle WebLogic Server. For more information on creating a Mediator outbound process, see Chapter 5, "Integration With Mediator Service Components in the Oracle SOA Suite".
Designing an Inbound BPEL Process for Event Integration
This section demonstrates how Oracle Application Adapter for PeopleSoft integrates with PeopleSoft to receive event data. In this example, an PeopleSoft event occurs when a customer record is added to a PeopleSoft system.
The following tools are required to complete your adapter design-time configuration:
-
Oracle Adapter Application Explorer (Application Explorer)
-
Oracle JDeveloper BPEL Designer (JDeveloper) or Eclipse
Note:
The examples in this chapter demonstrate the use of JDeveloper.Before you design a BPEL process, you must generate the respective WSDL file using Application Explorer. See "Generating WSDL for Event Integration" for more information.
Generating WSDL for Event Integration
You must create a separate channel for every event and select that channel when you generate WSDL for inbound interaction using Application Explorer.
Note:
If two or more events share the same channel, event messages may not be delivered to the right BPEL process.To create a channel:
-
Click the Events node.
-
Expand the PeopleSoft node.
The ports and channels nodes appear in the left pane.
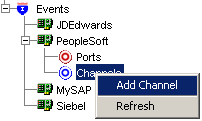
Description of the illustration addchannel.gif
-
Right-click Channels and select Add Channel.
The Add Channel dialog is displayed.
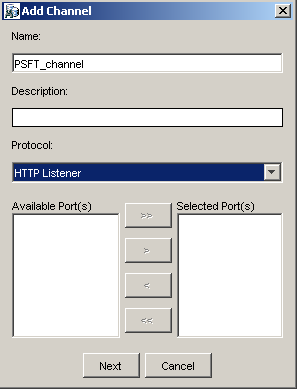
Description of the illustration addchannel_2.gif
Provide the following information:
-
Enter a name for the channel, for example, PSFT_Channel.
-
Enter a brief description (optional).
-
From the Protocol list, select HTTP Listener.
-
-
Click Next.
-
When the HTTP listener dialog is displayed, enter the system information as specified in the following table:
Parameter Description Listener port Port on which to listen for PeopleSoft event data. Https For a secure HTTP connection, select the Https check box. Synchronization Type Choose from the following synchronization options: -
REQUEST_RESPONSE
-
REQUEST_ACK
Important: The PeopleSoft channel does not work if the synchronization type is set to REQUEST.
-
-
Click OK.
The channel appears under the channels node in the left pane. An X over the icon indicates that the channel is currently disconnected.
Generating WSDL for Event Notification
After you create a channel and verify that it is not started, you must generate WSDL for the event using Application Explorer.
-
Start Application Explorer.
-
Expand PeopleSoft.
-
Click a target name under the PeopleSoft node, for example, PSFTtarget.
-
Verify your connection parameters and provide the required password.
-
Right-click the target name and select Connect.
The x icon disappears, indicating that the target is connected.

Description of the illustration select_psft.gif
-
Expand Messages and select LOCATION_SYNC.VERSION_1.
-
Right-click LOCATION_SYNC.VERSION_1.

Description of the illustration bpel_38.gif
-
Select Create Inbound JCA Service (Event).
The Export WSDL dialog is displayed.
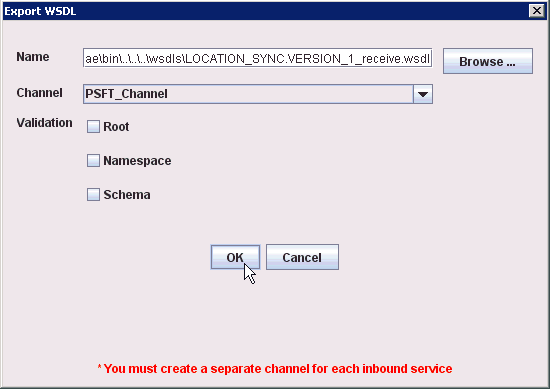
Description of the illustration wsdl_generate3.gif
Perform the following steps:
-
In the Name field, specify the name of the WSDL file.
The .wsdl file extension is added automatically. By default, the names of WSDL files generated for request-response services end with _receive.
-
From the Channel list, select the channel you created for this inbound service.
Important: You must create a separate channel for every event. Verify that the channel is stopped before run-time.
-
Three check boxes for Root, Namespace, and Schema validation are also available. Selection of multiple validation options is allowed.
- Root validation is used to validate the root element in the inbound XML document.
- Namespace validation is used to validate the namespace in the inbound XML document.
- Schema validation is used to validate the inbound XML document with the schema in the WSDL document.
During run time, validation is processed based on the validation options that are selected. If more than one validation option is selected, during run time if the first validation option fails, the remaining validation options are not processed. Root and namespace validations are considered modest levels of validation. Schema validation is a stricter validation level. It is recommended to use root and namespace validation options together, unless the root element and namespace are different between the Messages in the PeopleSoft environment.
-
-
You can now create a new SOA application, which is the first step that is required to define a BPEL inbound process in JDeveloper.
Creating a New SOA Application for the Inbound BPEL Process
Perform the following steps to create a new SOA application for the inbound BPEL process:
-
Open Oracle JDeveloper on your system.
-
In the Application Navigator tab, click New Application.

Description of the illustration bpel_out_comp1.gif
The Create SOA Application wizard is displayed.
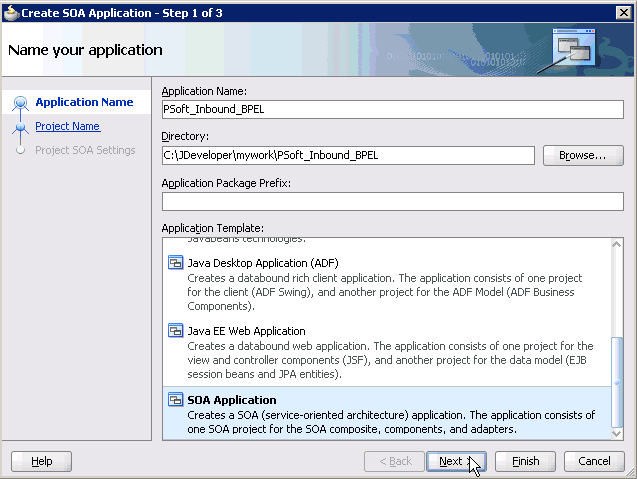
Description of the illustration bpel_in_comp1.gif
-
From the Application Template list, click SOA Application.
-
Enter name for the new SOA application (for example, PSoft_Inbound_BPEL) and click Next.
The Name your project page is displayed.
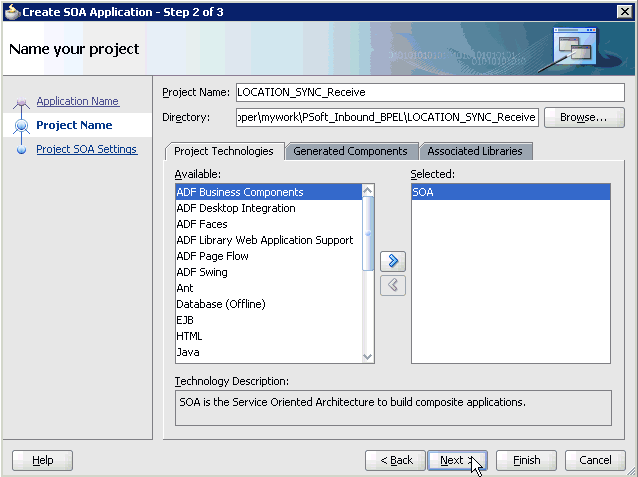
Description of the illustration bpel_in_comp2.gif
-
Enter a project name (for example, LOCATION_SYNC_Receive) and click Next.
The Configure SOA settings page is displayed.
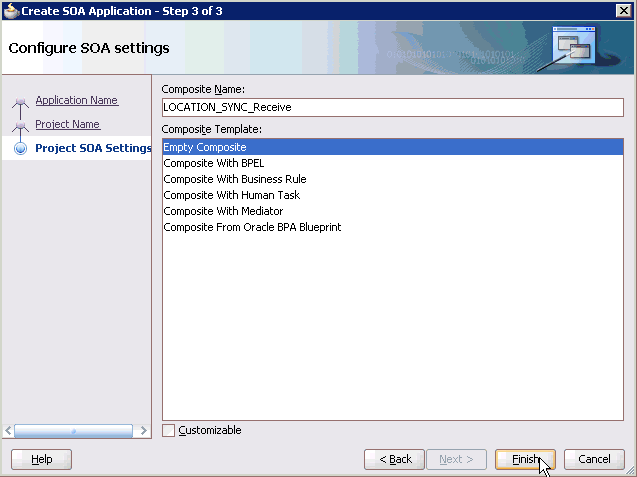
Description of the illustration bpel_in_comp3.gif
-
From the Composite Template list, select Empty Composite and click Finish.
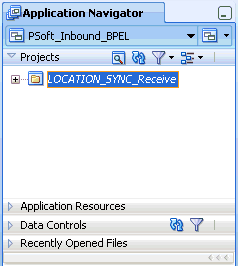
Description of the illustration bpel_in_comp4.gif
The new SOA application (PSoft_Inbound_BPEL) and associated project (LOCATION_SYNC_Receive) are added to the Application Navigator tab in the left pane.
Defining a BPEL Inbound Process
This section describes how to define a BPEL inbound process, which consists of the following stages:
-
Configuring a Third Party Adapter Service Component
-
Configuring an Inbound BPEL Process Component
Creating a Third Party Adapter Service Component
Perform the following steps to create a third party adapter service component:
-
Drag and drop the Third Party Adapter component from the Component Palette tab (Service Adapters section) to the Exposed Services pane.
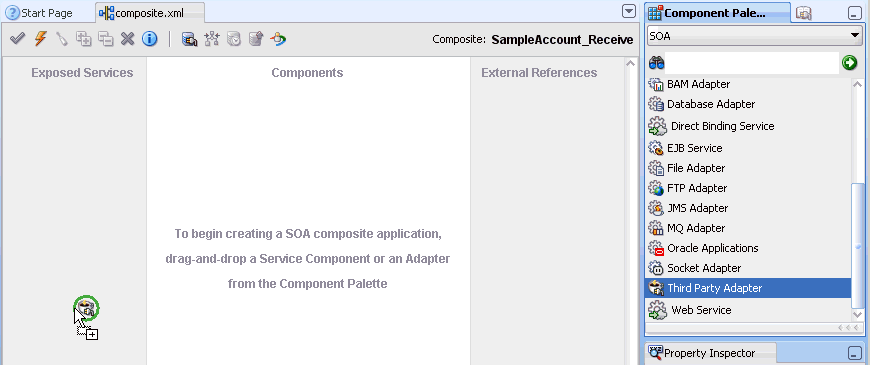
Description of the illustration bpel_in_adapt1.gif
The Create Third Party Adapter Service dialog is displayed.
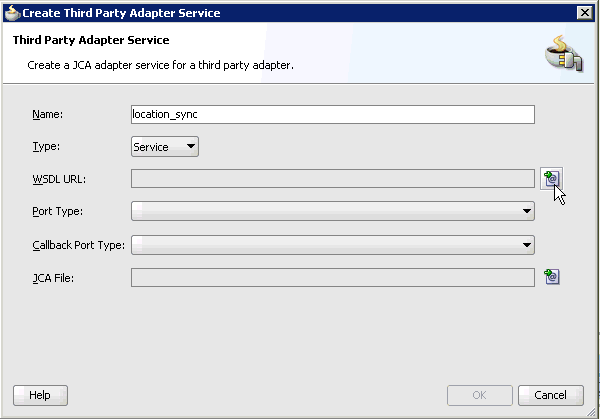
Description of the illustration bpel_in_adapt2.gif
-
Enter a name for the third party adapter service.
-
Ensure that Service is selected from the Type list (default).
-
Click the Find existing WSDLs icon, which is located to the right of the WSDL URL field.
The SOA Resource Browser dialog is displayed.
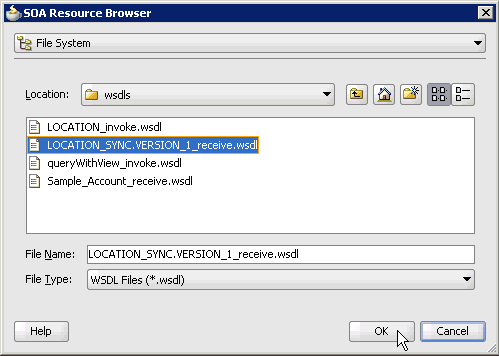
Description of the illustration bpel_in_adapt3.gif
-
Browse and select an inbound WSDL file (for example, LOCATION_SYNC.VERSION_1_receive.wsdl) from the following directory:
C:\oracle\Middleware\home_GA\Oracle_SOA1\soa\thirdparty\ApplicationAdapters\wsdls
-
Click OK.
The Localize Files dialog is displayed.
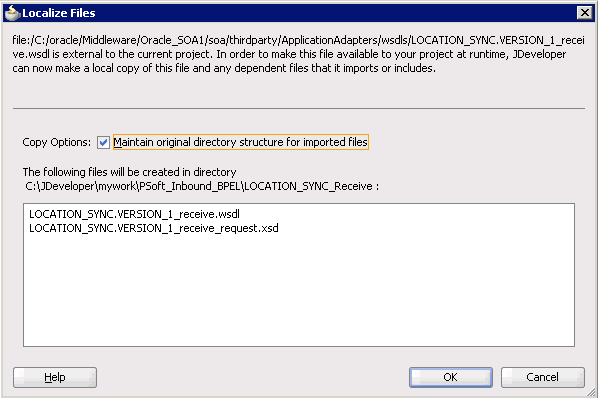
Description of the illustration bpel_in_adapt4.gif
-
Click OK.
The inbound WSDL file and associated receive/request XML schema file (.xsd) are imported to the project folder that has been created.
You are returned to the Create Third Party Adapter Service dialog.
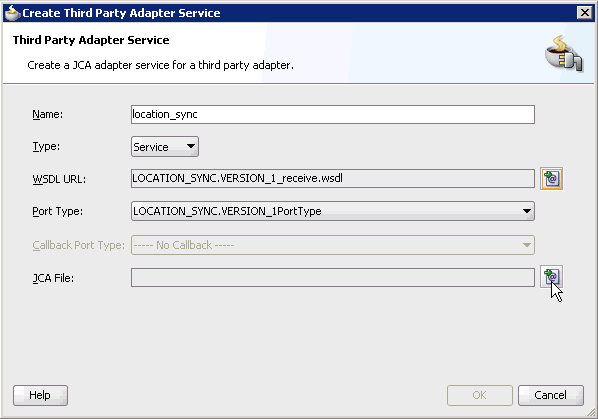
Description of the illustration bpel_in_adapt5.gif
-
Click the Find JCA Files icon, which is located to the right of the JCA File field.
The SOA Resource Browser dialog is displayed.
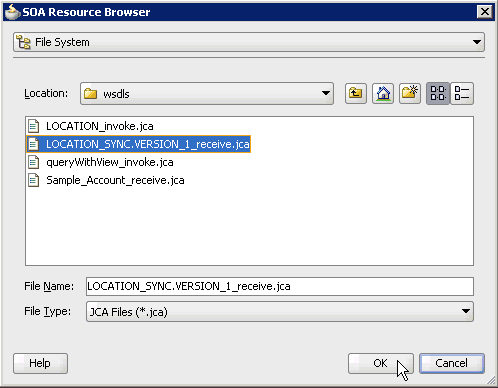
Description of the illustration bpel_in_adapt6.gif
-
Browse and select the JCA properties file (for example, LOCATION_SYNC.VERSION_1_receive.jca)from the following directory:
C:\oracle\Middleware\home_GA\Oracle_SOA1\soa\thirdparty\ApplicationAdapters\wsdls
-
Click OK.
The following message is displayed.
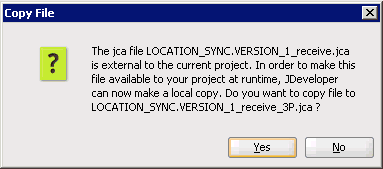
Description of the illustration bpel_in_adapt7.gif
-
Click Yes.
A copy of the JCA properties file is made in the project folder.
You are returned to the Create Third Party Adapter Service dialog.
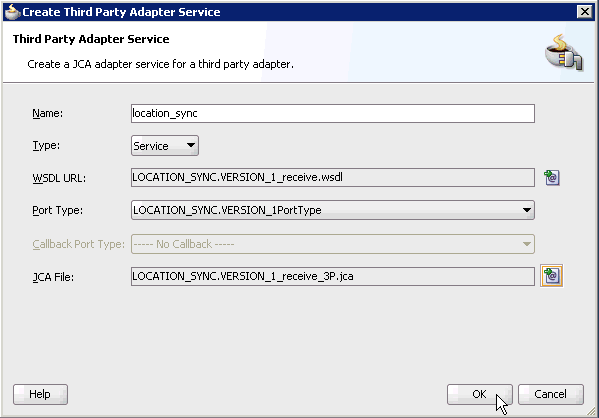
Description of the illustration bpel_in_adapt8.gif
-
Click OK.
The third party adapter service component (location_sync) is created in the Exposed Services pane, as shown in the following image.
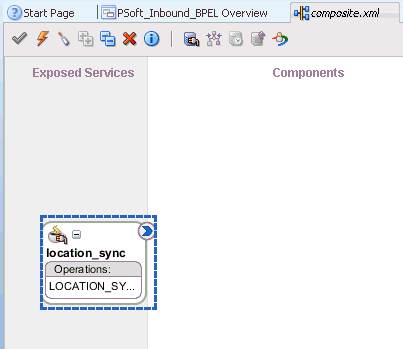
Description of the illustration bpel_in_adapt9.gif
You are now ready to configure an inbound BPEL process component.
Creating an Inbound BPEL Process Component
Perform the following steps to create an inbound BPEL process component:
-
Drag and drop the BPEL Process component from the Component Palette tab (Service Components section) to the Components pane.
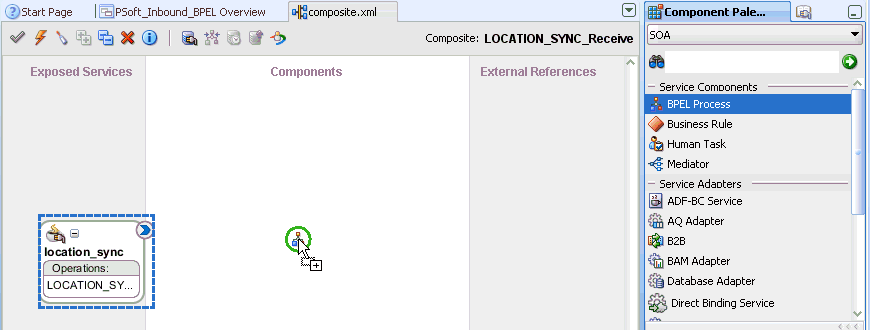
Description of the illustration bpel_in_proc1.gif
The Create BPEL Process dialog is displayed.
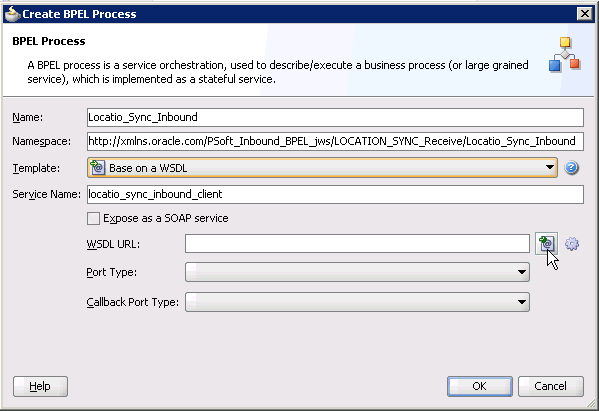
Description of the illustration bpel_in_proc2.gif
-
In the Name field, enter a name to identify the new inbound BPEL process component (for example, Location_Sync_Inbound).
-
From the Template list, select Base on a WSDL.
-
Uncheck the Expose as SOAP service check box.
-
Click the Find existing WSDLs icon, which is located to the right of the WSDL URL field.
The SOA Resource Browser dialog is displayed.
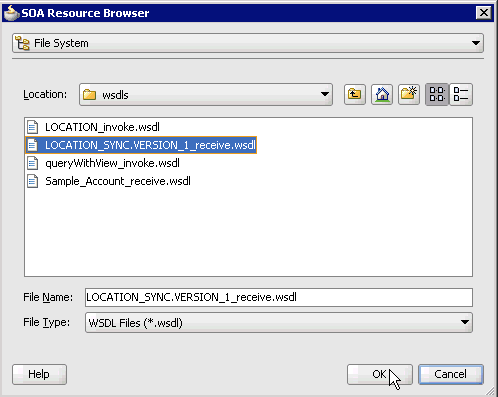
Description of the illustration bpel_in_proc3.gif
-
Browse and select an inbound WSDL file (for example, LOCATION_SYNC.VERSION_1_receive.wsdl) from the project folder.
-
Click OK.
The Localize Files dialog is displayed.
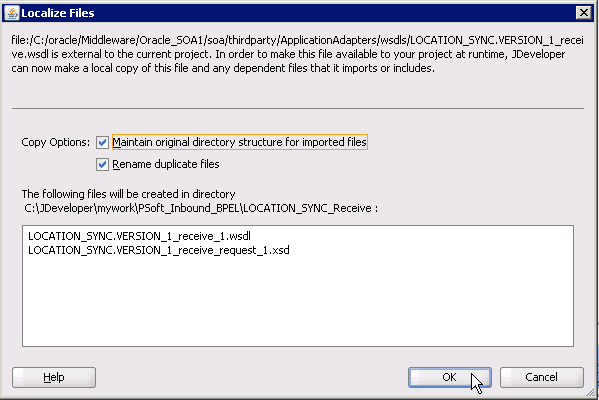
Description of the illustration bpel_in_proc4.gif
-
Click OK.
You are returned to the Create BPEL Process dialog.
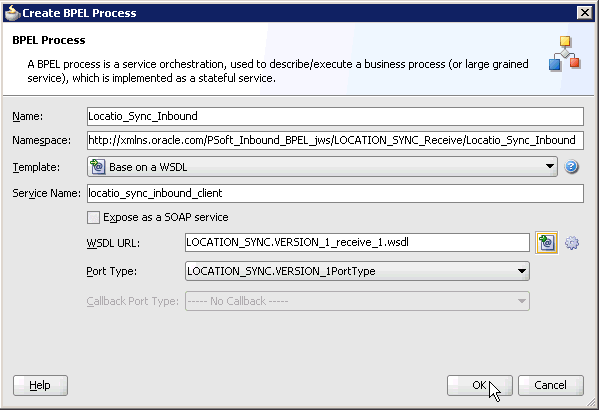
Description of the illustration bpel_in_proc5.gif
-
Click OK.
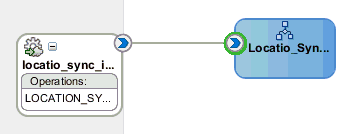
Description of the illustration bpel_in_proc6.gif
-
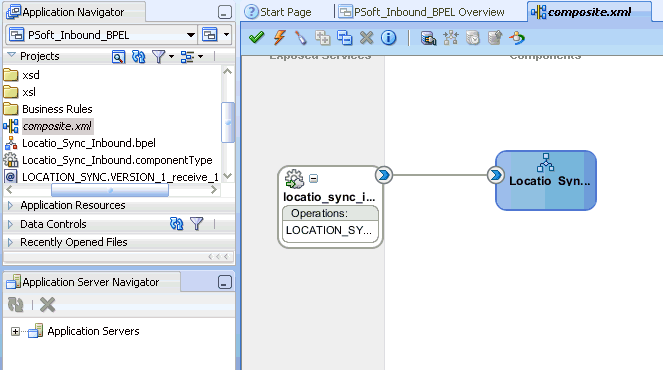
Create a connection between the third party adapter service component (location_sync) and the inbound BPEL process component (Location_Sync_Inbound).
-
Double-click composite.xml in the left pane.
Description of the illustration bpel_in_proc7.gif
-
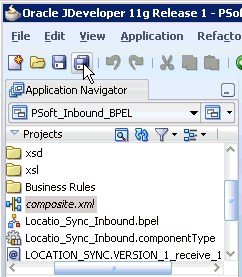
Click the Save All icon in the menu bar to save the new inbound BPEL process component that was configured.
Description of the illustration bpel_in_proc8.gif
You are now ready to deploy the BPEL inbound process.
Deploying the BPEL Inbound Process
Perform the following steps to deploy the BPEL inbound process.
-
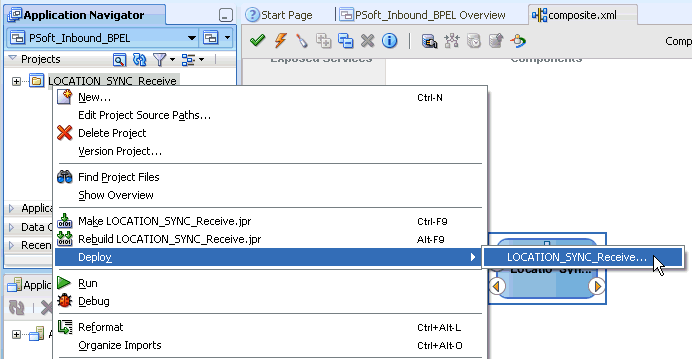
Right-click the project name in the left pane (for example, LOCATION_SYNC_Receive), select Deploy, and then click LOCATION_SYNC_Receive.
Description of the illustration bpel_in_deploy1.gif
The Deployment Action page is displayed.
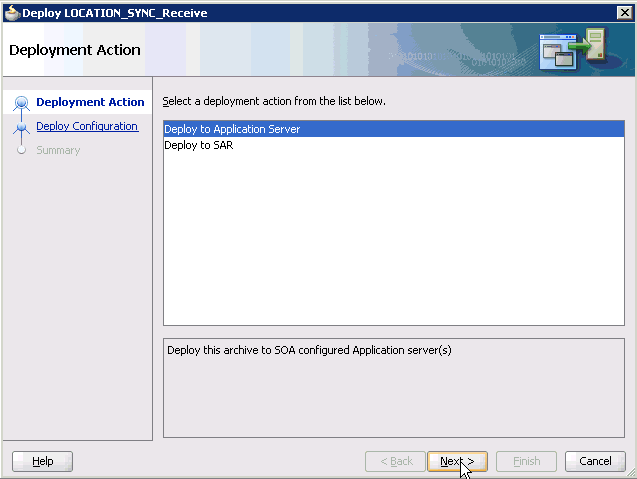
Description of the illustration bpel_in_deploy2.gif
-
Ensure that Deploy to Application Server is selected.
-
Click Next.
The Deploy Configuration page is displayed.
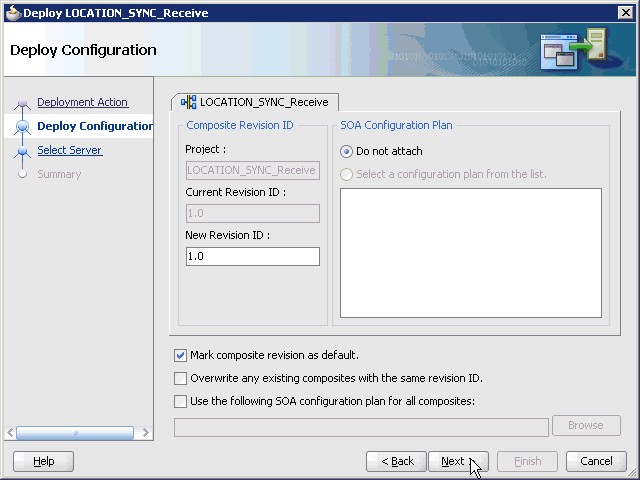
Description of the illustration bpel_in_deploy3.gif
-
Leave the default values selected and click Next.
The Select Server page is displayed.
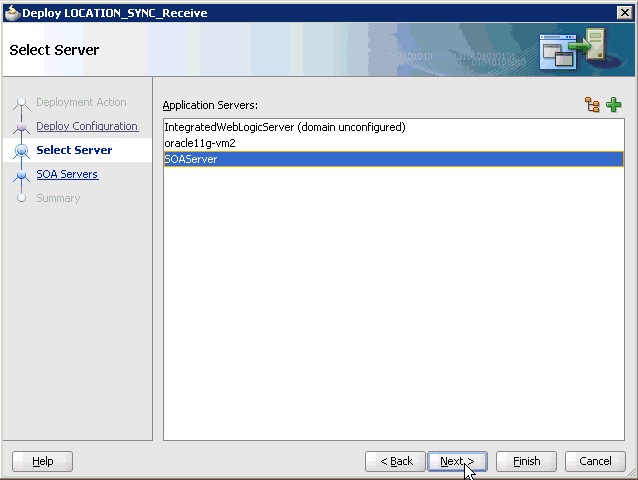
Description of the illustration bpel_in_deploy4.gif
-
Select an available application server that was configured and click Next.
The SOA Servers dialog is displayed.
-
Select a target SOA server and click Next.
The Summary page is displayed.
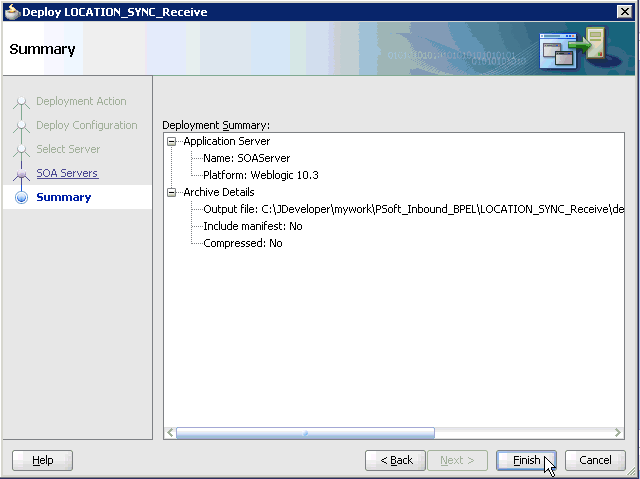
Description of the illustration bpel_in_deploy5.gif
-
Review and verify all the available deployment information for your project and click Finish.
The process is deployed successfully.

Description of the illustration bpel_in_deploy6.gif
If an Authorization Request dialog is displayed during the deployment process, provide the required user name and password and click OK.
Once event messages are triggered through PeopleSoft, successful instances are received in the Oracle Enterprise Manager console.
Triggering an Event in PeopleSoft
Events are generated by activity in an application system. For example, PeopleSoft may generate an event as customer information is updated in the system. The following topics describe how to trigger an event in PeopleSoft and verify the event using Oracle Application Adapter for PeopleSoft.
To trigger an event in PeopleSoft:
-
Log in to PeopleSoft, select PeopleTools, Integration Broker, and then Node Definitions.
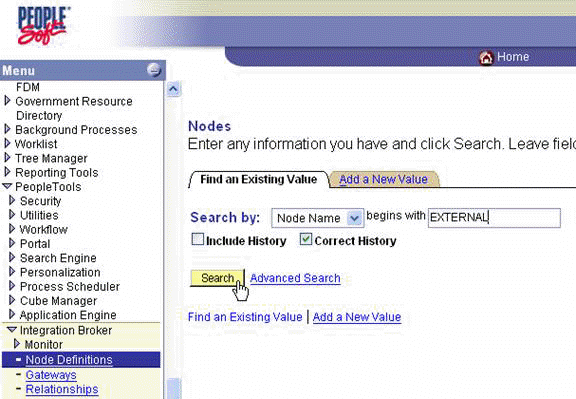
Description of the illustration node_definitions.gif
-
Enter the node name you are using, for example,
EXTERNAL; then click Search.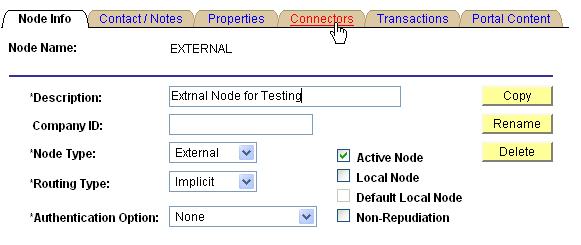
Description of the illustration node_info.gif
-
Click the Connectors tab.
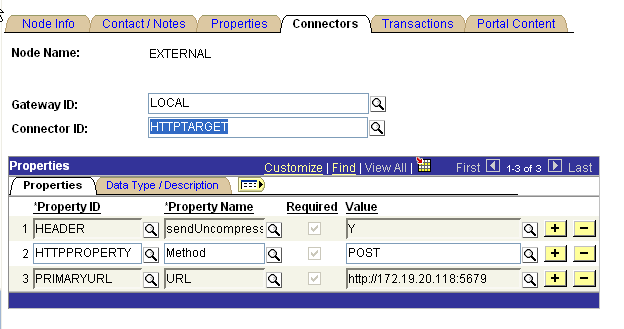
Description of the illustration http_target.gif
-
Enter HTTPTARGET in the Connector ID field; then enter the listener URL and its port in the PRIMARYURL field.
-
To save the configuration, click Save.
Description of the illustration peoplesoft_share.gif
-
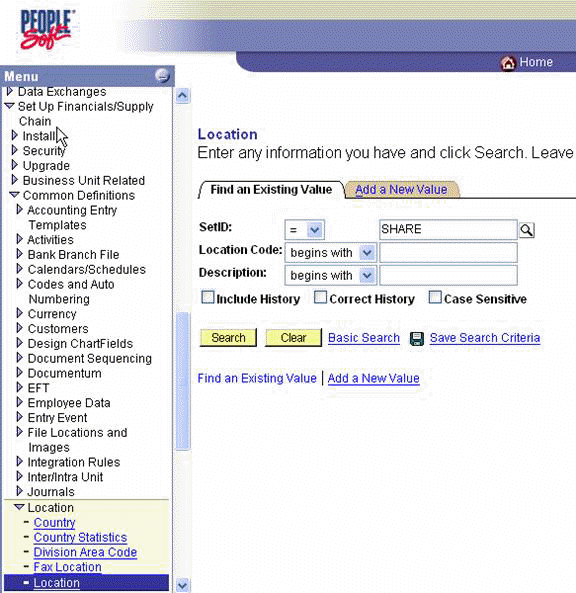
From Menu in the left pane, select Set Up Financials/Supply Chain, Common Definitions, Location, and then Location.
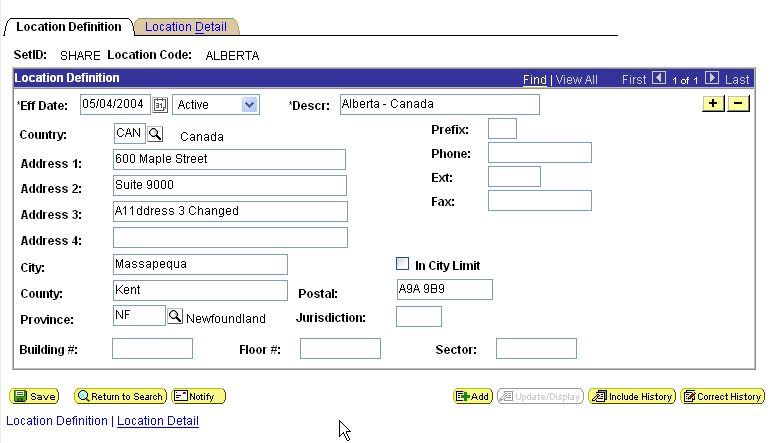
Description of the illustration location_definition.gif
-
To find the location record you want to update, click Search; then make the changes and click Save.
When the change is saved, it triggers an event and sends the event to the listener.
To verify your results:
-
Log in to the Oracle Enterprise Manager console by using the following URL:
http://localhost:7001/em
-
Expand your domain in the left pane followed by the SOA folder.
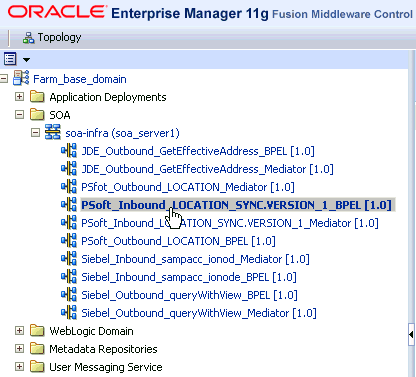
Description of the illustration bpel_in_test1.gif
-
Select an available project (for example, PSoft_Inbound_LOCATION_SYNC.VERSION_1_BPEL).
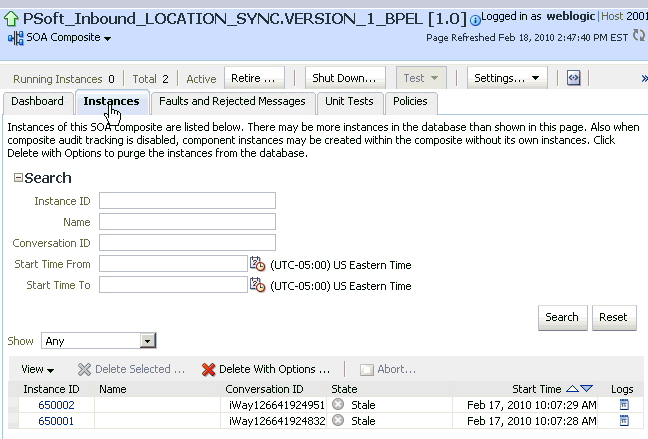
Description of the illustration bpel_in_test2.gif
-
Click the Instances tab in the right pane.
Recently received run-time events are displayed in the Instances tab.

Description of the illustration bpel_in_test3.gif
-
Select a PeopleSoft instance ID.
The Flow Trace page is displayed.
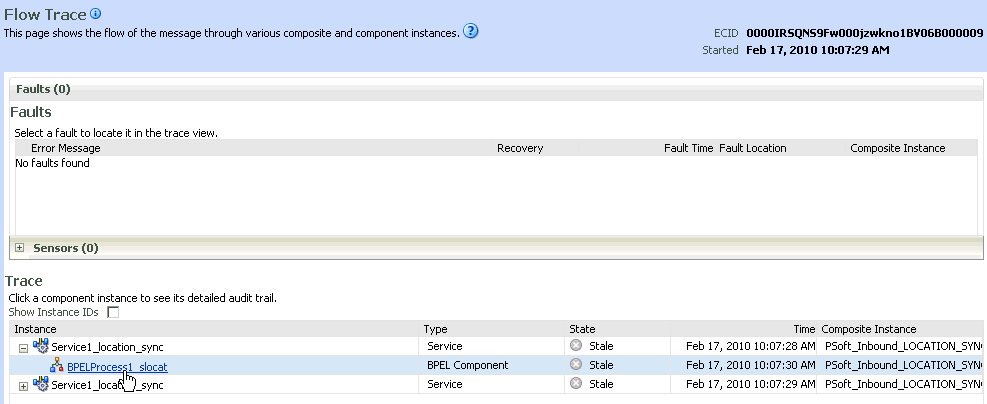
Description of the illustration bpel_in_test4.gif
-
Select a component instance to view its detailed audit trail.
The Instance page for the selected component is displayed.
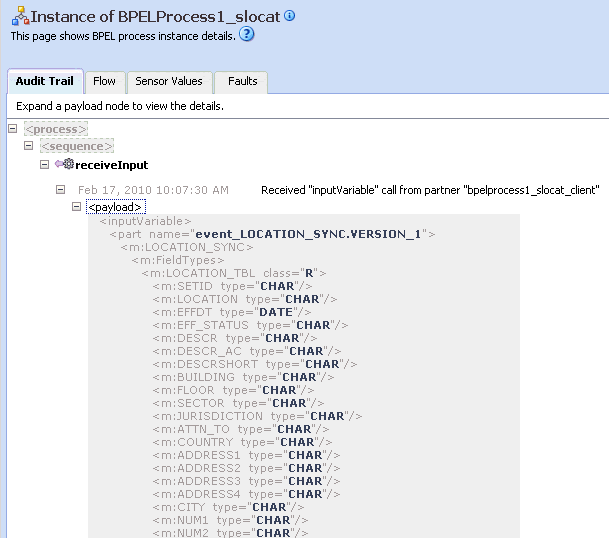
Description of the illustration bpel_in_test5.gif
-
Click the Audit Trail tab to view the event message.
The message received from the PeopleSoft system is displayed in the Audit Trail tab.