10 Building Group Spaces
If you have been granted the Group Spaces-Create permission by the WebCenter Spaces administrator, you can create a group space using one of the out-of-the-box templates, your own custom templates, and published templates created by others.
This chapter contains the following sections:
-
Section 10.2, "What You Should Know About Group Space Templates"
-
Section 10.8, "Defining Custom Attributes for a Group Space"
This chapter is intended for users who want to create a group space or an environment dedicated to a group effort or an area of interest. You must have been granted the Group Spaces-Create permission by the WebCenter administrator to create group spaces of your own. For more information, see "Understanding User Permissions" in Oracle Fusion Middleware Administrator's Guide for Oracle WebCenter.
The rest of the chapter assumes that you, as group space owner, have the group space Moderator role or a custom role that includes the default permissions granted to a moderator. If additional permissions are required, it is noted in the affected section.
The WebCenter Spaces administrator has the authority to expose or hide some group space features and services. This means that some of the tasks discussed in this chapter may not be available to you if the associated feature or service is hidden.
10.1 Who Is the Group Space Moderator?
When you create a group space, you become the default group space moderator. As a group space creator, you are given the group space Moderator role. In this role, you have full control over the group space presentation and content, as well as administrative responsibilities, as listed in Section 12.2.1.1, "Understanding the Default Group Space Roles".
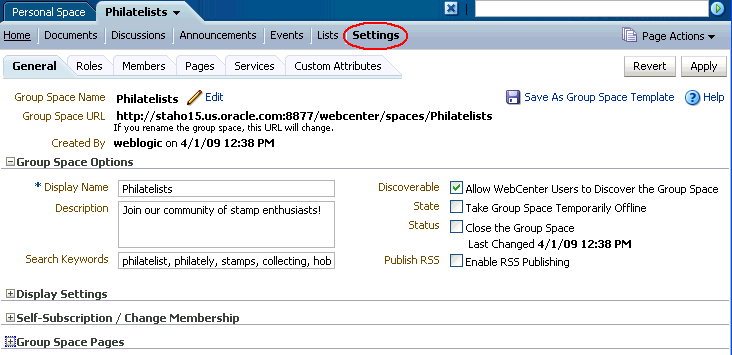
All group space administration takes place on the pages of the Settings tab (Figure 10-1). Group space moderators and anyone granted the Manage or Configure permission on the group space can see the Settings tab and its pages—General, Roles, Members, Pages, Services, and Custom Attributes.
Figure 10-1 Group Space Settings Tab and Pages
Description of "Figure 10-1 Group Space Settings Tab and Pages"
The pages on the Settings tab allow group space moderators to perform the following tasks:
10.2 What You Should Know About Group Space Templates
When you create a group space, you can base its look and feel on a template, either provided out-of-the-box by WebCenter Spaces or a customized template that you design.
The following group space templates are provided out-of-the box:
-
Blank. This template provides an essentially unpopulated, unconfigured starting point for building a group space exactly to your specifications. When you create a group space using this template, it results in a blank Home page. All group space services such as discussions, announcements, and so on, are disabled.
This template is useful when you find that the pages and content supplied by the other templates don't suit your needs and you want to design your group space or group space template from scratch.
By default, a single forum is created under the application root category for each new group space based on the Blank template. If you consider a category that supports multiple forums to be more suitable for the group space, you can set the Discussions server connection property
group.mappingtocategory(see "Registering Discussions Servers Using Fusion Middleware Control" in Oracle Fusion Middleware Administrator's Guide for Oracle WebCenter). This setting takes effect when the Discussions service is provisioned. -
Community of Interest. This template is provided out-of-the-box to support people sharing a common area of interest, as opposed to collaborating to achieve a goal or complete a project. You can create a group space using this template, and optionally make modifications to create a customized template.
The focus of a community of interest is to learn more about a subject area through the sharing of expertise, ideas, and content. Interest-based group spaces provide a consistent, dynamic, timely, and interactive participant experience. For example, all the Java programmers responsible for supporting your customer-facing Web site might want a place to keep up with what's happening in the Java world using discussion forums, links to articles about upcoming patches, and so on.
A category and a default forum are created under the root category for each new group space based on the Community of Interest template. Additional forums are allowed.
-
Group Project. This template is provided out-of-the-box to support team members united in completing a common task, such as a development project. You can create a group space using this template, and optionally make modifications to create a customized template.
The focus of a project group space is to streamline the process of starting a new project, defining the project team, and executing on project deliverables. Members can share documents, communicate with one other, keep up to date on status, and just generally function better as a team than as individuals working side by side.
A single forum is created under the root category for each new group space based on the Group Project template.
You can also create group space templates of your own (see Section 10.9, "Creating Your Own Group Space Templates").
By default, the group space template used determines whether a category or single forum is allocated on the discussions server for a particular group space (see Section 11.3.3, "Specifying Where Group Space Discussions Are Stored").
10.3 Creating a New Group Space
To create a group space:
-
Log in to WebCenter Spaces.
For more information, see Section 2.2.1, "Logging In to WebCenter Spaces".
-
From the Group Spaces menu at the top of the application, select Create Group Space (Figure 10-2).
If you do not see this option, ask your WebCenter Spaces administrator to grant you the
Group Spaces-Createpermission. For more information, see "Understanding User Permissions" in Oracle Fusion Middleware Administrator's Guide for Oracle WebCenter.Figs OK.
-
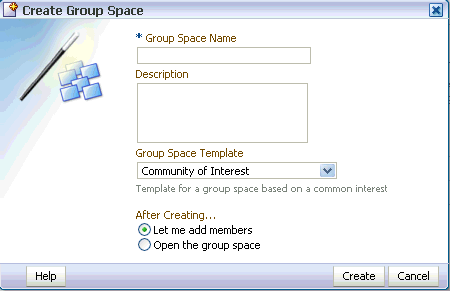
In the Create Group Space dialog (Figure 10-3), enter a Group Space Name.
This name displays on the group space tab (at the same level as Personal Space). Group space names can contain alphanumeric characters, underscores, and spaces. The maximum allowable length is 200 characters. The following reserved keywords are not allowed as the full group space name either in upper or lowercase, or a combination of both—
webcenter,pages,page,spaces,space,group,groups,group space,group spaces,webcenter space,webcenter spaces,webcenter administration,my group spaces,admin,last. These reserved words are allowable as part of a longer name (for example,Sales Group).Note:
WebCenter Spaces converts spaces in a group space name to underscores in the internal name. Thus, if you have created a group space namedMy Group, then try to create another group space namedMy_Group, WebCenter Spaces returns an error stating that a group space with that name exists. -
Enter a short Description explaining the purpose or objective of your group space.
-
Choose a Group Space Template from the list provided.
Three templates are provided out-of-the-box—Blank, Community of Interest, and Group Project (see Section 10.2, "What You Should Know About Group Space Templates"). Other custom templates specific to your WebCenter application may be listed here too (see Section 10.9, "Creating Your Own Group Space Templates").
Note:
When you select a template on which to base a new group space, then subsequently the template is made private by another user before you have completed creating the group space, the template remains valid for your use while you are still creating the group space. -
Select one of the following:
-
Let me add members to display the group space Member page after you click Create. From here you can add or invite members to join your group space. See Section 12.3, "Managing Members and Assigning Roles".
-
Open the group space to display the group space Home page after you click Create. You may prefer to develop the group space content before inviting any members.
Later, when you are ready, you can set up the group space membership policy. See Section 12, "Managing Group Space Members and Roles".
-
-
Click Create.
10.4 Adding Content to a Group Space
Once you have created a group space, you probably want to add pertinent content to it. Moderators and group space members given a role that is granted the appropriate group space and group space page permissions can:
-
Add and administer group space pages. See Section 10.5, "Managing Group Space Pages".
-
Customize the standard pages that users see when they open the group space, attempt to subscribe to the group space, do not have access to the group space, and so on. See Section 10.6, "Customizing Standard Group Space Pages".
-
Apply templates, colors, styles, icons, and logos to "brand" group space pages with a specific look and feel. See Section 10.7, "Applying a Look and Feel to a Group Space".
-
Add custom attributes that are unique to the group space and its characteristics. See Section 10.8, "Defining Custom Attributes for a Group Space".
-
Create new templates, based on the group space. See Section 10.9, "Creating Your Own Group Space Templates".
-
Include wikis and blogs on group space pages. See Section 10.11, "Adding Wikis or Blogs".
-
Make the group space discoverable only by other WebCenter users, or publicly available. See Section 10.12, "Making a Group Space Available".
10.5 Managing Group Space Pages
Moderators and group space members can manage group space pages in two ways:
-
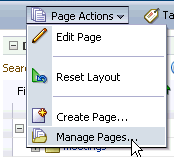
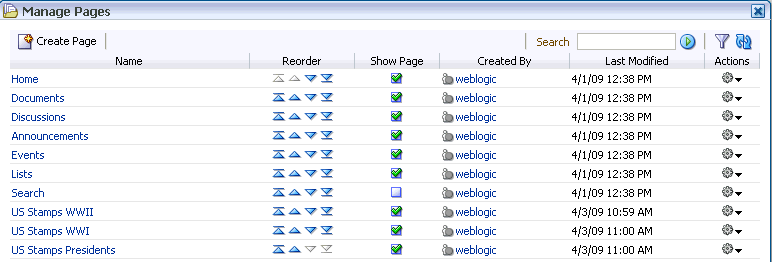
On any page of the group space, any group space member (viewers, participants, or moderators) can click Page Actions, then select Manage Pages (Figure 10-4) to open the Manage Pages dialog (Figure 10-5) to personalize their environment.
The actions available in the Manage Pages dialog depend on your privileges the group space.
Any changes you make to group space page preferences in the Manage Pages dialog apply only to your personal view, and not to anyone else who has access privileges to those pages. This behavior is similar to the Manage Pages dialog for personal pages, as described in Chapter 5, "Working with the Manage Pages Dialog". Note that the results of some operations such as page editing, deleting, copying, and renaming are visible to all members in the group space.
-
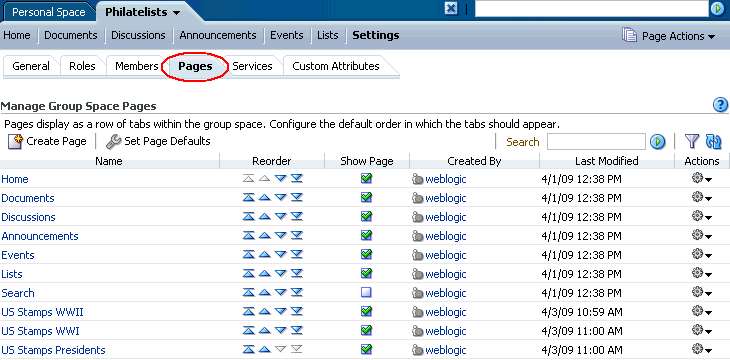
Anyone with
Group Space Services-Full Accesspermission (see Table 12-2, "Group Space Permissions") can manage group spaces pages on the Pages page (Figure 10-6).Any changes made to group space page preferences on the Pages page apply to everyone who has access privileges to those pages, allowing moderators to configure the default page settings for the group space. Managing group space pages on the Pages page is similar to managing page defaults for personal pages, as described in "Setting Up a Default Look and Feel for Personal Pages" in Oracle Fusion Middleware Administrator's Guide for Oracle WebCenter.
Note:
If you view a page at the same time that another user is editing the page, you may not immediately see the results of changes made by the other user in your session. To reliably see any changes, you must view the page after the other user has saved their edits.
To view and manage pages belonging to a group space:
-
Click the Settings tab, then the Pages tab.
-
On the Pages page, perform any of the following tasks:
-
To create a page in the group space, click Create Page to display the Create Page dialog, where you can specify the name, scheme, background color, and style for the new page. Take care when naming your group space pages if you intend to share them, as pages in the same group space that share the same name also share the same pretty URL. For example, if Asok and Pat both create a page named
Tasksin a group space calledFinance, the pretty URL for both pages is:http://<host>:<port>/webcenter/spaces/Finance/page/Tasks. If a user is given access to both pages, they can view only one them. For example, if Monica is granted access to both pages the following may occur:-
If Asok shares his
Taskspage with Monica: Monica sees Asok's page. -
If Asok shares his
Taskspage with Pat: Pat sees his own page, but not Asok's. -
If Pat now shares his
Taskspage with Monica: Monica sees Asok's page (as she saw it first), not Pat's.
For detailed information about each selection, see Section 6.1, "Creating Pages".
If you have previously specified (in the Set Page Defaults dialog) that page defaults should always be used for new pages, the new page is immediately created with the preset defaults, skipping the Create Page dialog.
New group space pages by default display as a new tab for all group space members with roles that have permissions to view pages.
-
-
To select a default look and feel for group space pages, click Set Page Defaults to display the Set Page Defaults dialog, where you can specify the default scheme, style, and background color for group space pages. For detailed information about each selection, see Section 5.5, "Setting Page Creation Defaults for Your Personal Pages".
-
To list one or more specific group space pages, enter a full or partial search term in the Search field, then click the Search icon to refresh the list with all group space pages for which a match is found in the Name or Created By. To clear the current search string and display all group space pages, click the Clear Search icon.
-
To display a filter panel above the page list to enable you to display a subset of pages by Name or Created By, click the Filter icon. For more information about filtering, see Section 5.3.2, "Filtering Your View of Pages in the Manage Pages Dialog".
-
To refresh the list of pages, first ensure that any prior search is cleared (click the Clear Search icon), and no filter is specified in the filter panel, then click the Refresh icon.
-
To change the order in which the pages display, click the Reorder icons. For more information about reordering pages, see Section 5.4, "Changing the Order of Pages Through the Manage Pages Dialog".
-
To display a page as a tab in the group space, click the Show Page check box for that page to show a green check mark, and clear the check box to hide the page.
Note:
If you clear the Show Page check box for the currently active page displayed on your screen, the Manage Pages dialog closes immediately as the page is hidden. -
Under Actions, click the Actions icon for a selected page to perform any of the following actions:
-
To edit the content of the page, select Edit Page to display the page in Oracle Composer.
-
To make a copy of the page, select Copy Page to open the Copy Page dialog. Enter a name for the new page, and click OK.
Note:
You must have theGroup Space Services-Full Accesspermission (see Table 12-2, "Group Space Permissions")to copy a page. If you have not been granted this permission, then the Copy Page selection is not available to you. -
To rename the page, select Rename Page to open the Rename Page dialog. Enter a new name for the page, and click the Save icon.
-
To modify user access to a page, select Set Page Access to open the Set Page Access dialog where you can set permissions for available user roles. The steps are similar to those described in Section 5.7, "Setting and Revoking Page Access Permissions".
-
To remove a page from the group space, select Delete Page to display the Delete Page dialog.
-
To give read-only access to a specific page in a public group space, select Make Public. This selection is active only if the
Public-Userrole has been given permission to access the group space on the Roles page (see Section 10.12.3.1, "Making a Group Space Public"). This automatically assigns thePublic-Userrole View Page privileges (shown asanonymous-rolein the Set Page Access dialog). To give thePublic-Userrole higher access privileges (Edit Page, Delete Page, Perform All Page Actions, or Personalize Page), select Set Page Access to specify these permissions in the Set Page Access dialog foranonymous-role. If you want to make the entire group space public, rather than specific pages, you can make all pages public by granting thePublic-Userrole access to the group space as well as permissions for all pages on the Roles page. -
To restrict the page access to group space members only, select Remove Public Access. This selection is active only if the
Public-Userrole has been given permission to access the group space on the Roles page (see Section 10.12.3.1, "Making a Group Space Public"). -
To add the group space page to the list of pages in your personal space, select Add to Personal Space.
-
To send mail to all members of the group space who have access to the page, select Mail.
To view the printable version of the page, select Print Preview.
-
To view information about the page, select About This Page to open the Page Information dialog, which shows Name, Created By, Date Created, Last Modified, and Direct URL.
-
-
10.6 Customizing Standard Group Space Pages
The following customizable default pages are provided with every group space:
-
Home page
-
Self-Subscription page
-
Unauthorized Access page
-
Group Space Unavailable page
The default content of these pages is derived from the template on which the group space is based. If required, the group space moderator may customize the content of all these pages, as described in the following sections:
10.6.1 Customizing the Home Page
The group space Home page is the starting point for most members and visitors. The group space moderator can use the Home page to welcome visitors, advertise group space objectives, highlight important information, and to launch group space content and activities.
Home pages are not mandatory. Most group space templates provide a default Home page, which the moderator can edit or delete as for any other page in the group space. See Section 10.5, "Managing Group Space Pages".
10.6.2 Customizing the Self-Subscription Page
The Self-Subscription page allows users to subscribe to a group space. Self-subscription is useful when the moderator wants other people to discover and join the group space. Communities of interest are particularly suited to this form of member enrollment as the group space often reaches a wider audience.
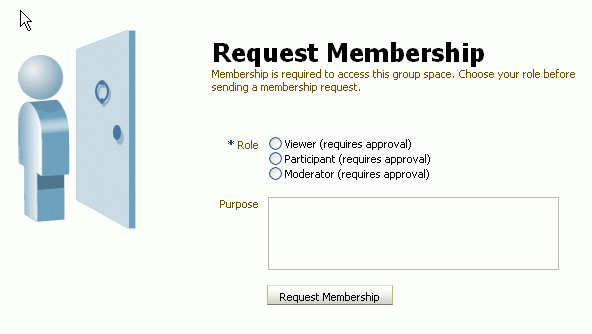
Figure 10-7 shows the Self-Subscription page supplied out-of-the-box. This is the default page for group spaces based on built-in templates. The default page might be different for group spaces based on other templates.
As a group space moderator, you can customize certain aspects of this page. You cannot edit or delete individual input fields and buttons on the page but you can delete entire regions containing these elements, add new components, and change the page layout if required
Figure 10-7 Default Self-Subscription Page
Description of "Figure 10-7 Default Self-Subscription Page"
To customize the Self-Subscription page:
-
Click the Settings tab, then the General tab.
-
On the General page, under Group Space Pages, next to Self-Subscription Page, click View to display the current version of the page, or click Edit to customize the page (Figure 10-8).
Figure 10-8 Editing the Self-Subscription Page

Description of "Figure 10-8 Editing the Self-Subscription Page"
-
Edit the Self-Subscription page in Oracle Composer, then click Save.
Note:
To edit existing text in the page, click the View menu and select Source. Click editable regions of the page to modify the existing text. For text that is not directly editable, open its properties dialog (right-click the object in the Source view and select Properties), and enter the new text in the Value field. To add content to the page, click the View menu and select Design. In the editable areas of the page, click Add Content. For more information about working with Oracle Composer, see Section 4.2, "Introducing Oracle Composer". -
To restore the default version of the page, click Restore Default.
10.6.3 Customizing the Unauthorized Access Page
The Unauthorized Access page displays when someone tries to open a group space or group space page under the following conditions:
without access permissions. If someone tries to open a group space in which they are not a member:
-
The group space does not allow self-subscription (see Section 12.1.1, "Managing Self-Subscription and Membership Changes for a Group Space").
-
A group space member attempts to display a page in the group space for which their role does not have access permissions.
If the user tries to open a group space that allows self-subscription (see Section 12.1.1, "Managing Self-Subscription and Membership Changes for a Group Space"), the Request Membership page displays.
Moderators can customize the default content of this page.
Figure 10-9 shows the Unauthorized Access page supplied out-of-the-box. This is the default page for group spaces based on built-in templates. The default page might be different for group spaces based on other templates.
Figure 10-9 Default Unauthorized Access Page

Description of "Figure 10-9 Default Unauthorized Access Page"
To customize the Unauthorized Access page:
-
Click the Settings tab, then the General tab.
-
On the General page, under Group Space Pages, next to Unauthorized Access Page, click View to display the current version of the page, or click Edit to customize the page (Figure 10-10).
Figure 10-10 Editing the Unauthorized Access Page

Description of "Figure 10-10 Editing the Unauthorized Access Page"
-
Edit the Unauthorized Access page in Oracle Composer, then click Save.
Note:
To edit existing text in the page, click the View menu and select Source. Click editable regions of the page to modify the existing text. For text that is not directly editable, open its properties dialog (right-click the object in the Source view and select Properties), and enter the new text in the Value field. To add content to the page, click the View menu and select Design. In the editable areas of the page, click Add Content. For more information about working with Oracle Composer, see Section 4.2, "Introducing Oracle Composer". -
To restore the default version of the page, click Restore Default.
10.6.4 Customizing the Group Space Unavailable Page
The Group Space Unavailable page displays when a group space member tries to open a group space that is temporarily offline. The group space moderator can customize the default content of this page.
Figure 10-11 shows the Group Space Unavailable page supplied out-of-the-box. This is the default page for group spaces based on built-in templates. The default page might be different for group spaces based on other templates.
Figure 10-11 Default Group Space Unavailable Page

Description of "Figure 10-11 Default Group Space Unavailable Page"
To customize the Group Space Unavailable page:
-
Click the Settings tab, then the General tab.
-
On the General page, in the Group Space Pages section, next to Group Space Unavailable Page, click View to display the current version of the page, or click Edit to customize the page (Figure 10-12).
Figure 10-12 Editing the Group Space Unavailable Page

Description of "Figure 10-12 Editing the Group Space Unavailable Page"
-
Edit the Group Space Unavailable page in Oracle Composer, then click Save.
Note:
To edit existing text in the page, click the View menu and select Source. Click editable regions of the page to modify the existing text. For text that is not directly editable, open its properties dialog (right-click the object in the Source view and select Properties), and enter the new text in the Value field. To add content to the page, click the View menu and select Design. In the editable areas of the page, click Add Content. For more information about working with Oracle Composer, see Section 4.2, "Introducing Oracle Composer". -
To restore the default version of the page, click Restore Default.
10.7 Applying a Look and Feel to a Group Space
To apply a unique look and feel to a group space, or to associate a group space with specific branding, the group space moderator can customize the colors, style, icons, logos, and other aspects of the group space pages.
This section contains the following sub-sections:
10.7.1 Choosing a Default Page Scheme and Style
As a group space moderator, you can choose the default page scheme and style for new pages that you create for your group space. To edit the page scheme and style of existing pages, see Section 6.4, "Working with Page Layouts, Styles, and Schemes".
To choose a default scheme and style for new pages in a group space:
-
Click the Settings tab, then the Pages tab.
-
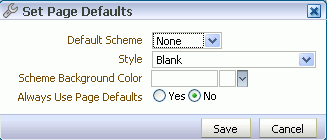
On the Pages page, click Set Page Defaults to display the Set Page Defaults dialog (Figure 10-13), where you can specify the default scheme and style for group space pages.
For more information about each setting, see Section 5.5, "Setting Page Creation Defaults for Your Personal Pages".
-
Select an option next to Always Use Page Defaults:
Yes—Pages created for this group space must always use the page scheme and style chosen here. Select this option to enforce a common look and feel across the entire group space by skipping the Create Page dialog, and creating pages using the defaults set here.
No—Group space members can create pages with different schemes and styles, with the default values you specify displayed as initial values in the Create Page dialog.
10.7.2 Changing the Group Space Display Name
Moderators and users with the Group Space Access-Configure permission can change the group space display name, which appears on the group space tab, and dialogs and pages where users can select the group space.
Note:
Changing the display name does not impact the internal name and URL for the group space. See Section 11.2, "Renaming a Group Space (and Changing the Group Space URL)".To change the display name of a group space:
-
Click the Settings tab, then the General tab.
-
On the General page, under Group Space Options, modify the Display Name.
Figure 10-14 Changing the Group Space Display Name
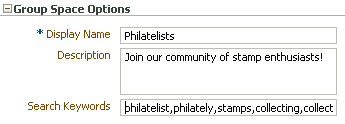
Description of "Figure 10-14 Changing the Group Space Display Name"
-
Click Apply to save.
10.7.3 Changing the Group Space Icon
Group space icons display alongside group space names on the Group Spaces page in My Group Spaces to help other users with identification and location (Figure 10-15).
The default icon is provided by the template used when you create the group space but you can choose a different icon if desired.
Figure 10-15 Displaying a Group Space Icon
Description of "Figure 10-15 Displaying a Group Space Icon"
To change the group space icon:
-
Click the Settings tab, then the General tab.
-
On the General page, under Display Settings, enter the location and file name of a Group Space Icon, or click Browse to open the File Upload dialog to select an icon (Figure 10-16). For best results, select an icon of 16 x 16 pixels.
Note:
The icon file can be up to 1 MB in size. Supported file formats are.gifor.GIF,.pngor.PNG, and.jpgor.JPG.Figure 10-16 Changing the Group Space Icon
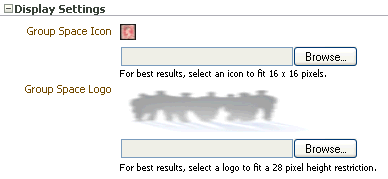
Description of "Figure 10-16 Changing the Group Space Icon"
-
Click Apply to save.
The new icon displays above the input field, and also alongside the group space name on the Group Spaces page in My Group Spaces.
10.7.4 Changing the Group Space Logo
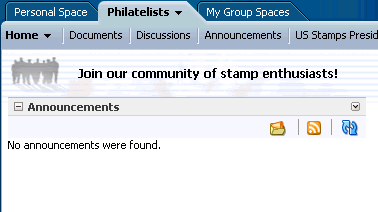
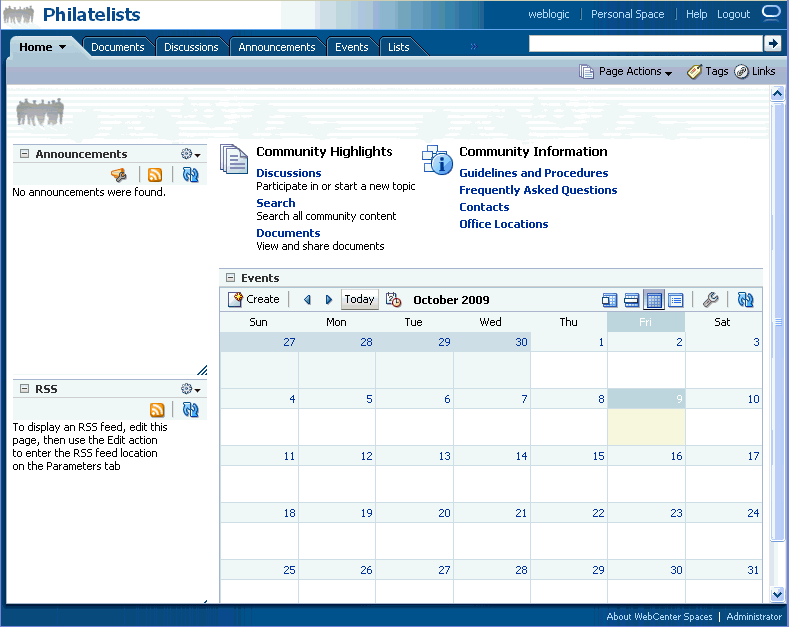
Group spaces created from a template may display a default logo (Figure 10-17) on the Home page. Also, when a group space is displayed in Full Screen Mode, the group space logo displays alongside the group space name at the top of the page.
Moderators can add a logo (or change the default logo) to something more suitable if desired.
To change the group space logo:
-
Click the Settings tab, then the General tab.
-
On the General page, under Display Settings, enter the location and file name of a Group Space Logo, or click Browse to open the File Upload dialog to select a logo (Figure 10-16). For best results, select aa logo to fit the 28 pixel height restriction.
Note:
The logo file can be up to 1 MB in size. Supported file formats are.gifor.GIF,.pngor.PNG, and.jpgor.JPG. -
Click Apply to save.
The new logo displays above the input field. It also displays at the top of the Home page of the group space, and alongside the group space name at the top of the page when the group space is displayed in Full Screen Mode (see Section 10.7.5, "Applying a Group Space Site Template").
10.7.5 Applying a Group Space Site Template
A site is a collection of web pages that contain content items and are connected through a navigation hierarchy. In WebCenter Spaces, a site template describes how the pages of the application display on a user's screen. For example, a page can occupy the entire screen, or display within the confines of the application window. WebCenter Spaces provides five built-in site templates that you can select to specify how your group space pages display on the screen. Alternatively, developers can create custom site templates to offer more ways to display pages on the screen, as described in the white paper "Extending WebCenter Spaces" available on the Oracle Technology Network (http://webcenter.oracle.com).
By default, a group space uses the site template set by the WebCenter Spaces administrator for the entire application (see "Applying Site Templates" in Oracle Fusion Middleware Administrator's Guide for Oracle WebCenter). You can optionally select a new site template for the group space, overriding the setting for the entire WebCenter Spaces application.
To set a group space site template:
-
Click the Settings tab, then the General tab.
-
On the General page, under Site Template, select the desired site template in which to display the group space (Figure 10-18):
Figure 10-18 Setting the Group Space Site Template
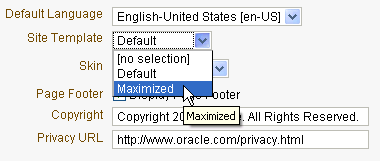
Description of "Figure 10-18 Setting the Group Space Site Template"
-
<no selection>. Uses the site template set at the application level by the WebCenter Spaces administrator.
-
Default. Opens the group space in the normal WebCenter Spaces view; that is, with a global tool bar, sidebar, footers, and so on.
-
Maximized. Opens the entire group space in full-screen mode to occupy the entire screen; the rest of WebCenter Spaces is hidden, as shown in Figure 10-19. This option enables users to focus entirely on the group space and maximizes the display area.
-
-
Click Apply to save.
When group space members open the group space, it displays using the specified site template. This setting cannot be changed by end users.
10.7.6 Applying a Group Space Skin
As a group space moderator, you may customize the appearance of the group space for all members by changing its skin. A skin changes the way the user interface appears, but does not change the group space's behavior. A selection of built-in skins is provided with WebCenter Spaces. Alternatively, developers can create custom skins to brand the application according to your corporate image, as described in the white paper "Extending WebCenter Spaces" available on the Oracle Technology Network (http://webcenter.oracle.com).
By default, a group space uses the skin set by the WebCenter Spaces administrator for the entire application (see "Applying a Look and Feel Using Skins" in Oracle Fusion Middleware Administrator's Guide for Oracle WebCenter). You can optionally select a new skin for the group space, overriding the setting for the entire WebCenter Spaces application.
To set a group space skin:
-
Click the Settings tab, then the General tab.
-
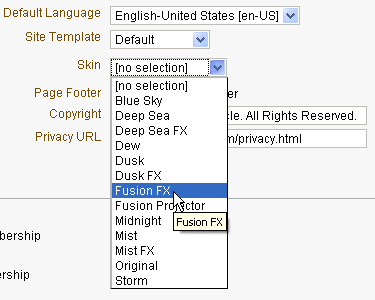
On the General page, under Skin, select the desired skin in which to wrap the group space (Figure 10-20):
-
Click Apply to save.
10.7.7 Customizing Copyright and Privacy Statements
Moderators can customize or hide the copyright and privacy statements for a group space. Copyright and privacy details specific to the group space display in Full Screen Mode only. In Normal Mode, when the group space displays as a tab within WebCenter Spaces, copyright and privacy statements applicable to the entire application display. See Section 10.7.5, "Applying a Group Space Site Template".
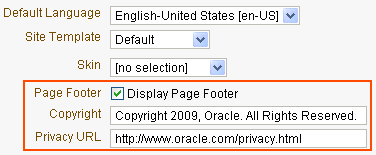
If displayed, the copyright and privacy URL appear in the page footer of the group space (Figure 10-21):
-
Copyright - Displays a copyright statement specific to the group space.
-
Privacy URL - Links to a document that contains a privacy policy for the group space.
Figure 10-21 Customizing the Copyright and Privacy URL
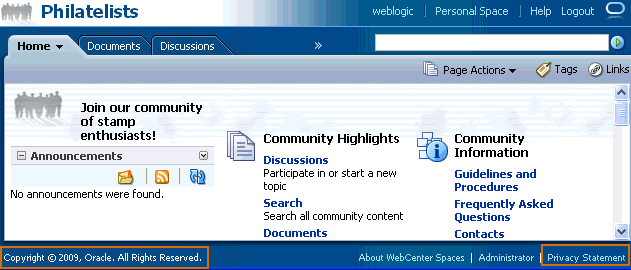
Description of "Figure 10-21 Customizing the Copyright and Privacy URL"
To customize the copyright and privacy URL for a group space:
-
Click the Settings tab, then the General tab.
-
On the General page, under Displays Settings, select Display Page Footer to display a page footer when the group space is displayed in Full Screen Mode (Figure 10-22).
Clear the check box to hide the page footer when the group space is displayed in Full Screen Mode.
Figure 10-22 Customizing the Copyright and Privacy URL
Description of "Figure 10-22 Customizing the Copyright and Privacy URL"
-
In the Copyright and Privacy URL fields, enter appropriate values.
-
Click Apply to save.
10.8 Defining Custom Attributes for a Group Space
Each group space comes with a set of built-in attributes such as name, description, date created, icon, and so on. In addition to these built-in attributes, moderators can add custom attributes that are unique to the group space and its characteristics.
Custom attributes let you specify additional group space information (metadata). Custom attributes are propagated throughout the group space. Any group space pages, task flow, or portlet that delivers customized content based on parameter values can accept custom attribute values and display content accordingly using the following Expression Language (EL) syntax to access the custom attribute value:
#{spaceContext.currentSpace.metadata.customAttributes[attributeName]}
A custom attribute is simply a name value pair (such as customerId=400, orderId=11, or userName=Smith). For example, if you build a group space for customer analysis purposes, it might contain several custom task flows that take the parameter customerId as an input: task flows such as Customer Sales History, Customer Satisfaction Rating, Future Sales Prospects, or Customer Contact Information. With a custom attribute defined named customerId with an appropriate customer value, all the task flows that can accept a customerId can display information specific to that customer.
A custom attribute can also be dynamic, using Expression Language (EL) expressions (see Section 7.5.5, "Using Expression Language (EL) Expressions with Component Properties"). For example, a custom attribute could use an EL expression to read a value that is passed in. A URL that displays the group space could pass the attribute value in the URL (for example, customerid=10), which would be applied to the custom attribute using the EL expression. For more information, see Section 8.5, "Passing Parameter Values Through the Page URL."
Custom attributes are stored with the group space template. New group spaces based on the template inherit the custom attributes, but not their values.
To add a custom attribute for a group space:
-
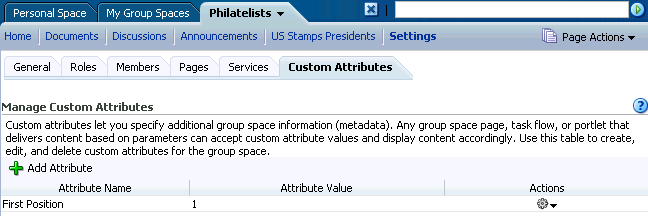
Click the Settings tab, then the Custom Attributes tab.
-
On the Custom Attributes page, click Add Attribute (Figure 10-23).
Figure 10-23 Defining Custom Attributes for a Group Space
Description of "Figure 10-23 Defining Custom Attributes for a Group Space"
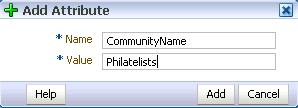
The Add Attribute dialog opens (Figure 10-24).
Figure 10-24 Entering Custom Attribute Name and Value
Description of "Figure 10-24 Entering Custom Attribute Name and Value"
-
Enter a unique Name for the attribute.
-
Optionally, enter a Value for the custom attribute. You can type a static value, or specify a dynamic value by entering an Expression Language (EL) expression (see Section 7.5.5, "Using Expression Language (EL) Expressions with Component Properties").
-
Click Add to save the custom attribute and display it in the list on the Custom Attributes page.
-
Under Actions, click the Actions icon and select the desired action:
10.9 Creating Your Own Group Space Templates
Out-of-the-box, WebCenter Spaces provides three group space templates—Blank, Community of Interest, and Group Project (see Section 10.2, "What You Should Know About Group Space Templates"). You cannot modify or delete these templates but you can create new templates, based on group spaces that you own.
When you save a group space as a template, all the pages, metadata, roles, services, and custom attributes associated with the group space are saved. The group space data, such as documents, discussion threads, list data, and custom attribute values, is not saved with the template. You can publish group space templates for others to use; otherwise, they remain private and hidden from others.
To create a template from a group space:
-
Click the Settings tab, then the General tab.
-
On the General page, click Save As Group Space Template.
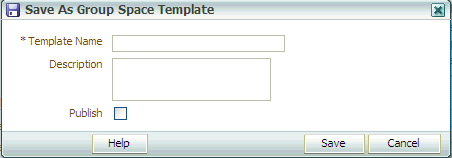
The Save As Group Space Template dialog opens (Figure 10-25).
Figure 10-25 Creating a Group Space Template
Description of "Figure 10-25 Creating a Group Space Template"
-
Enter a suitable Template Name and Description. Choose a name that describes the group space template and other WebCenter users will recognize.
Group space template names can contain alphanumeric characters, underscores, and spaces. The following reserved keywords are not allowed as the full group space template name either in upper or lowercase, or a combination of both—
webcenter,pages,page,spaces,space,group,groups,group space,group spaces,webcenter space,webcenter spaces,webcenter administration,my group spaces,admin,last. These reserved words are allowable as part of a longer name (for example,Sales Group). -
To publish the template to make it available to all WebCenter Spaces users, select Publish. The new template remains private unless you publish it. You can modify this setting on the Templates page in My Group Spaces.
-
Click Save.
Use My Group Spaces to view and manage all your group space templates, as discussed in Section 11.8, "Managing Group Space Templates".
10.10 Setting a Group Space Display Language
A group space display language can be optionally set by the group space moderator to control the language in which the user interface (UI) elements of a particular group space render in WebCenter Spaces. UI elements include button and field labels, application links, screen text, and so on.
WebCenter Spaces provides runtime translations for 27 languages and 100 different locales. For more information, see Section 3.2.1.1, "What You Should Know About Display Languages in WebCenter Spaces." Your WebCenter Spaces administrator can reduce the number of available languages exposed in WebCenter Spaces by modifying the supported-languages.xml file, as described in the white paper "Extending WebCenter Spaces" available on the Oracle Technology Network (http://webcenter.oracle.com).
In WebCenter Spaces, the display language can be set at several levels. The order of precedence for WebCenter Spaces display language settings from weakest to strongest is as follows:
-
Browser setting - your browser documentation will describe how to change the browser's language.
-
Application setting - see "Choosing the Default Display Language" in Oracle Fusion Middleware Administrator's Guide for Oracle WebCenter.
-
User preference setting - see Section 3.2.1.3, "Setting a User Preference Display Language."
-
Session setting - see Section 3.2.1.2, "Setting a Session Display Language."
-
Group space setting - see the instructions below.
When a group space moderator sets the group space display language, the group space will always display using that language setting. As indicated in the list above, this setting is given precedence over all other language settings (within the scope of viewing the group space). For example, if the moderator of a group space named WebCenter Central sets the group space language to German, and Monica (a participant of group space WebCenter Central) sets her session language to Dutch, assuming no other language settings are in effect:
-
Monica will view group space WebCenter Central in German, and cannot change this language setting.
-
Outside the group space, Monica will view everything in Dutch in other parts of WebCenter Spaces.
To set a group space display language:
-
Click the Settings tab, then the General tab.
-
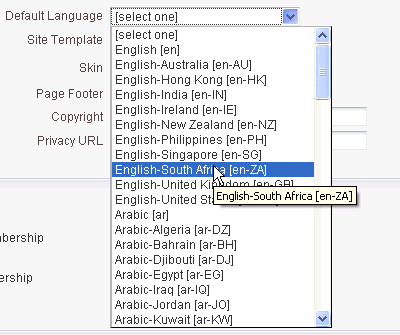
On the General page, under Displays Settings, select a language for the group space from the Default Language list (Figure 10-26).
10.11 Adding Wikis or Blogs
The functionality provided through Oracle Wiki Server is available to you in WebCenter Spaces to include wikis and blogs on your group space pages.
Wiki pages are populated and monitored by a collaborative group of users with common interests and goals. Users with sufficient permission on the wiki can edit a page to add to, revise, or remove information. Everyone works together to create resource pages that are relevant, useful, and up-to-date.
Blogs, on the other hand, are more personal records of an individual user's experience and opinions. Blog pages provide a useful means of capturing and publishing the knowledge and opinions of a subject matter expert.
For information about exposing and developing wikis and blogs on group space pages, see Chapter 27, "Working with Wikis and Blogs".
10.12 Making a Group Space Available
Once you have created a group space, you probably want others to be able to use it. As the group space moderator, you can determine whether the group space should be discoverable only by other WebCenter users, or publicly available:
-
Section 10.12.1, "Making a Group Space Known (Discoverable)"
-
Section 10.12.2, "Granting WebCenter Spaces Users Access to a Group Space"
10.12.1 Making a Group Space Known (Discoverable)
Allowing a group space to be discovered does not make its content accessible. Other WebCenter Spaces users will know that your group space exists as it appears on their Group Spaces page. Users interested in your group space can request membership through self-subscription (if enabled) or by mail.
To make a group space available to other WebCenter Spaces users:
-
Click the Settings tab, then the General tab.
-
On the General page, under Group Space Options, select Allow WebCenter Users To Discover the Group Space (Figure 10-27).
Figure 10-27 Making a Group Space Discoverable By WebCenter Spaces Users

Description of "Figure 10-27 Making a Group Space Discoverable By WebCenter Spaces Users"
-
Click Apply to save.
-
(Optional) To allow users to discover and subscribe themselves to your group space, you may want to enable self-subscription too (you can still retain control by requiring approval for any subscription request). See Section 12.1.1, "Managing Self-Subscription and Membership Changes for a Group Space".
-
Now that you have made the group space discoverable, the next step is to give the appropriate roles the permissions required to access the group space (see Section 10.12.2, "Granting WebCenter Spaces Users Access to a Group Space" and Section 10.12.3, "Granting Public Access to a Group Space").
10.12.2 Granting WebCenter Spaces Users Access to a Group Space
A group space moderator controls what a WebCenter Spaces user can see or do in the group space.
This section contains the following subsections:
10.12.2.1 Granting Access to a Group Space
Group space members with the Moderator, Participant, and Viewer roles are granted specific permissions in the group space by default (see Section 12.2.1.2, "Understanding Group Space Permissions"). The group space moderator can modify these permissions as required (see Section 12.2.3, "Viewing and Editing Permissions of a Group Space Role").
To grant other registered WebCenter Spaces users (who have the default Spaces-User role) access to a group space:
-
Click the Settings tab, then the Roles tab.
-
On the Roles page, under the Spaces-User role, select the check box for the desired WebCenter Spaces user permissions for the group space (View, Configure, or Manage). For example, If you want all registered users to have read-only access to your group space, select the Group Space Access View permission for the Spaces-User role (Figure 10-28).
Figure 10-28 Granting WebCenter Spaces User Access to Group Space
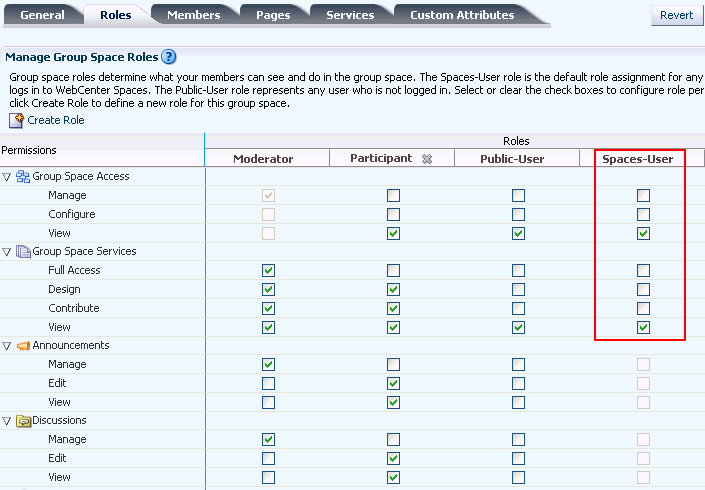
Description of "Figure 10-28 Granting WebCenter Spaces User Access to Group Space"
-
The group space is not fully accessible until you give the
Spaces-Userrole permissions to access the pages of the group space:-
To grant access to the entire group space: On the Roles page, under the Spaces-User role, select the desired check boxes for Group Space Services permissions, which apply to all pages, events, links, lists, and notes in the group space. See Section 12.2.1.2, "Understanding Group Space Permissions" for detailed information.
-
To grant access to a limited number of individual pages of the group space, see Section 10.12.2.2, "Granting Access to Individual Group Space Pages".
-
-
Click Apply to save.
10.12.2.2 Granting Access to Individual Group Space Pages
You may want to make specific pages in your group space available, but not the entire group space.
Group space members with the Moderator, Participant, and Viewer roles are granted certain permissions to all pages in the group space by default (see Section 12.2.1.2, "Understanding Group Space Permissions"). Follow the steps in this section to limit access to only certain group space pages.
To grant group space members and other registered WebCenter Spaces users (who have the default Spaces-User role) access to individual group space pages:
-
Click the Settings tab, then the Roles tab.
-
On the Roles page, under the role for which you want to specify page access permissions, clear any check boxes for Group Space Services permissions, which apply to all pages, events, links, lists, and notes in the group space. See Section 12.2.1.2, "Understanding Group Space Permissions" for detailed information.
-
Click the Pages tab.
-
On the Pages page, select the page that you want to make available, then click the Actions icon and select Set Page Access.
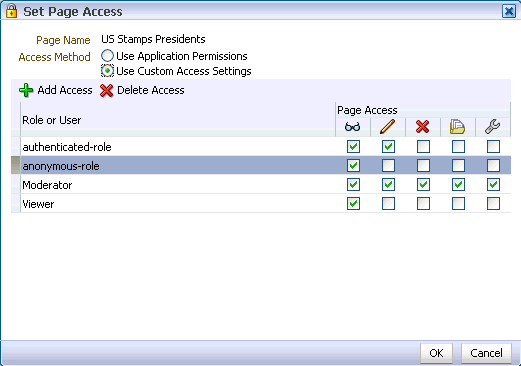
The Set Page Access dialog opens (Figure 10-29).
-
Select Use Custom Access Settings.
-
If the role for which you want to set page access permissions is not listed, click Add Access. In the Add Access dialog (Figure 10-30), search for the role name, and select it for the group space.
Note:
In the Add Access dialog, you can select the default rolesModerator,Participant, andViewer, and any custom roles that have been created for the group space. Additionally, you can select:-
authenticated-roleto set permissions for theSpaces-Userrole. -
anonymous-roleto set permissions for thePublic-Userrole.
For more information about group space roles, see Section 12.2, "Managing Group Space Roles and Permissions"
Click OK.
-
-
Next to the role listed in the Set Page Access dialog, set the Page Access permissions as desired.
10.12.3 Granting Public Access to a Group Space
A group space moderator can make the group space available to anyone with access to the WebCenter Spaces instance that contains the group space. Registering for a WebCenter Spaces account is not required. Public access may be given to the entire group space, or restricted to specific group space pages. The public information provided allows the group space to be shared with non-members and people outside of the WebCenter Spaces community.
This section contains the following subsections:
10.12.3.1 Making a Group Space Public
Users can access public group spaces in two ways:
-
Directly, using the group space's URL as shown on the General page.
-
From the WebCenter Spaces Welcome page, if your installation is configured to display this page (Figure 10-31).
Figure 10-31 Public Group Spaces link on Welcome Page
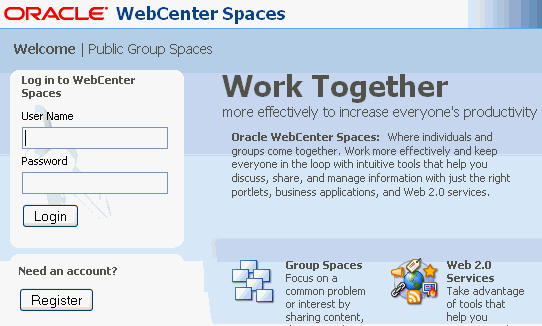
Description of "Figure 10-31 Public Group Spaces link on Welcome Page"
To make a group space public, you must make both the group space and its pages public:
-
Click the Settings tab, then the Roles tab.
-
On the Roles page, under the Public-User role, select the check box for the desired public permissions for the group space. For example, if you want all public users to have read-only access to the group space, select the group space View permission for the Public-User role (Figure 10-32). Grant higher access privileges with care as public users are unauthenticated.
Figure 10-32 Granting Public User Access to Group Space
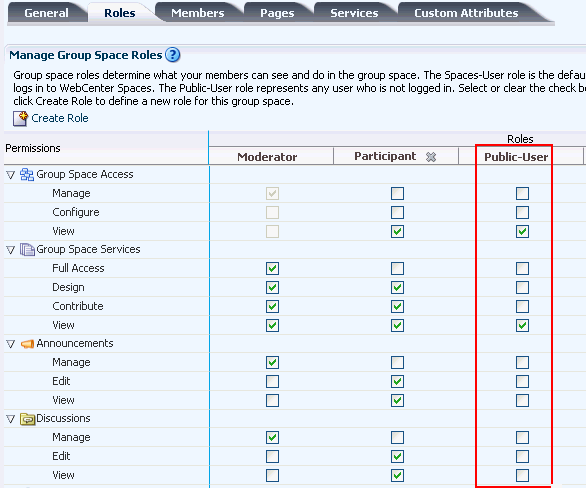
Description of "Figure 10-32 Granting Public User Access to Group Space"
-
The group space is not publicly accessible until you give the
Public-Userrole permissions to access the pages of the group space:-
To make the entire group space public: On the Roles page, under the Public-User role, select the desired check boxes for Group Space Services permissions, which apply to all pages, events, links, lists, and notes in the group space. See Section 12.2.1.2, "Understanding Group Space Permissions" for detailed information.
-
To make a limited number of pages of the group space public, see Section 10.12.3.2, "Making Individual Group Space Pages Public".
-
-
Click Apply to save.
10.12.3.2 Making Individual Group Space Pages Public
You may want to make specific pages in your group space publicly available, but not the entire group space.
To make an individual group space page public:
-
Click the Settings tab, then the Pages tab.
-
On the Pages page, select the page that you want to make public, then click the Actions icon and select Make Public.
Note:
The parent group space must be public for the page to be visible to public users. In other words, Make Public is active only if thePublic-Userrole has been given permission to access the group space on the Roles tab (see Section 10.12.3.1, "Making a Group Space Public").Make Public gives public users (anyone with access to the WebCenter Spaces instance that contains the group space) read-only access to the page. This automatically assigns the
Public-Userrole View Page privileges (shown as anonymous-role in the Set Page Access dialog). -
To give the
Public-Userrole higher access privileges (Edit Page, Delete Page, Perform All Page Actions, or Personalize Page), click the Actions icon and select Set Page Access.The Set Page Access dialog opens (Figure 10-33).
-
Select Use Custom Access Settings.
-
If anonymous-role is not listed, click Add Access. In the Add Access dialog, search for and select
anonymous-role. Click OK. -
For the anonymous-role role listed in the Set Page Access dialog, set the Page Access permissions as desired. The permissions you select for anonymous-role are given to the
Public-Userrole.Note:
To revert a page to its default permission settings, select Use Application Permissions in the Set Page Access dialog.
To see what the public view of your group space looks like, copy the Group Space URL value on the General page, log out of WebCenter Spaces, and paste the URL into your browser. Because you are logged out of WebCenter Spaces, only pages designated as public display.

