5 Cache Group and Cache Table Characteristics
After you have created a cache group, you can view the characteristics of the cache group itself such as its type and automatic refresh attributes, and its cache tables. You can also alter the cache group's automatic refresh attributes and aging policy.
View the characteristics of a cache group
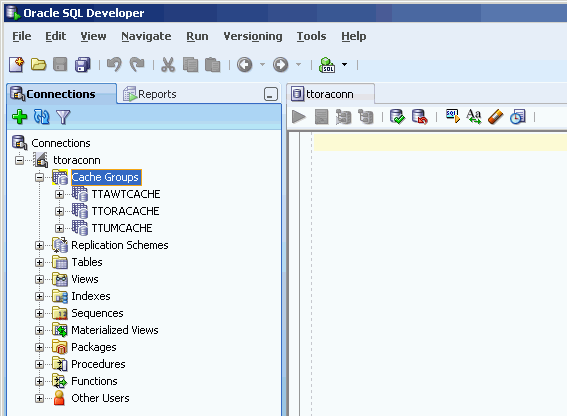
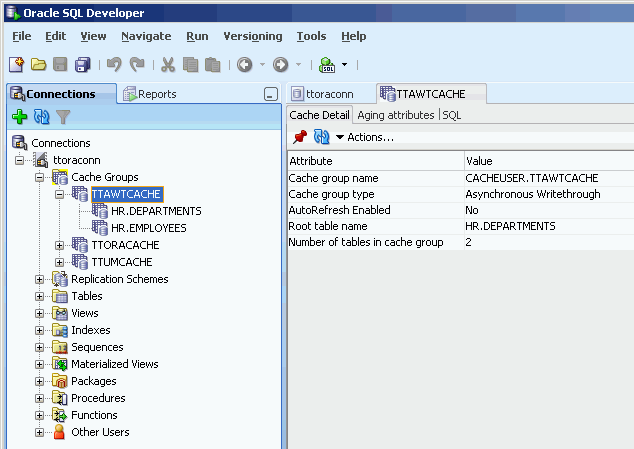
Click the + to the left of the Cache Groups node to view the list of cache groups. Then click the name of the cache group that you want to view the characteristics of.
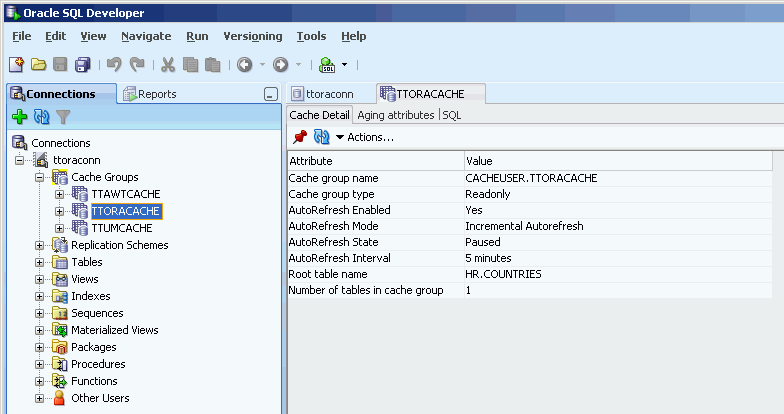
In the Cache Detail tab within the cache group's tab, it shows information such as the cache group type, the name of the root table, and the number of tables in the cache group.
For read-only cache groups and user managed cache groups that have automatic refresh defined, it also shows the automatic refresh mode, interval and state.
View the aging attributes
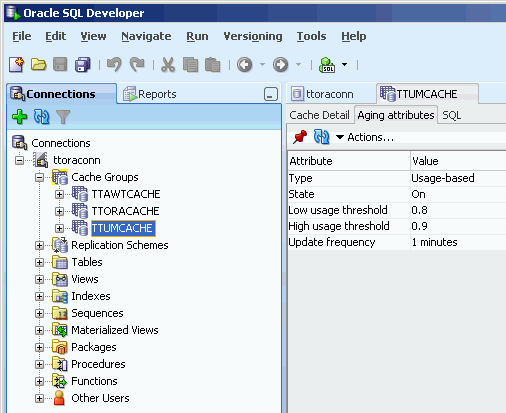
In the Aging attributes tab within the cache group's tab, it shows information such as the aging policy type, aging cycle, and aging state for cache groups that have an aging policy defined.
For cache groups that have an LRU aging policy defined, it also shows the TimesTen database memory usage thresholds that determine when data starts and stops being removed from the cache tables, and the LRU aging cycle. See "Specify an aging policy" for information about how to change these thresholds and the LRU aging cycle.
For cache groups that have a time-based aging policy defined, it also shows the name of the non-nullable DATE or TIMESTAMP column used to store the timestamp value indicating when each row was added or most recently updated, and the length of time in which data that has not been updated is to be kept in the table.
View the cache tables
To view the list of cache tables in a cache group, under the Cache Groups node, click the + to the left of the node that contains the name of the cache group.
View the cache group definition
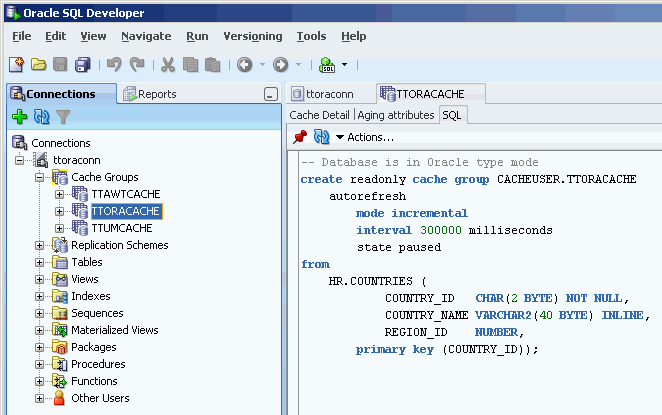
In the SQL tab within the cache group's tab, you can view the CREATE CACHE GROUP statement that was used to create the cache group.
If you are unable to find the cache group that you are looking for, see "Locate a TimesTen database element" for information.
Locate a TimesTen database element
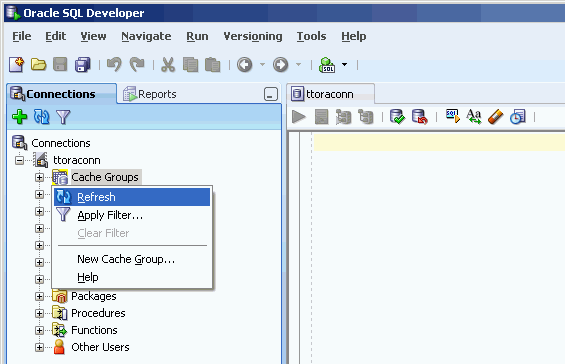
If you are unable to find the database element that you are looking for, right-click the node corresponding to the element type and select Refresh to refresh the list of elements of that type.
For example, to find a cache group, right-click the Cache Groups node and select Refresh to refresh the list of cache groups.
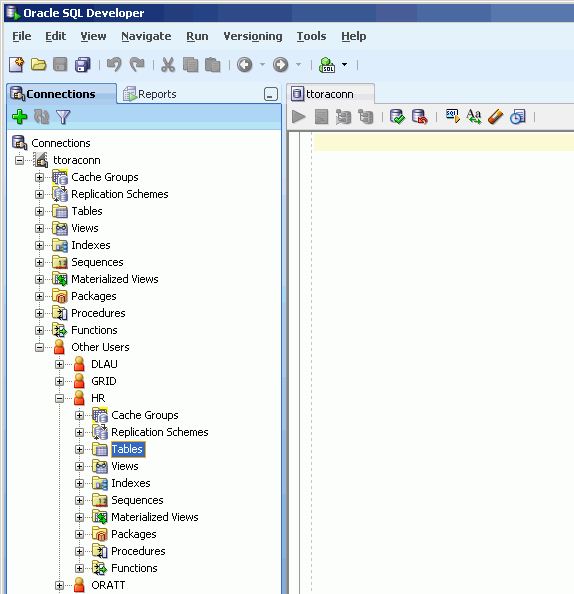
You can also check whether the element appears under the Other Users node. Click the + to the left of the Other Users node to expand the node. Then click the + to the left of any of the users' nodes to expand that user's node.
Click the + to the left of the node corresponding to the element type to view the list of elements of that type owned by that user.
For example, to find a table, click the + to the left of the user's Tables node to view the list of tables owned by that user. Click the + to the left of the node that contains the name of a table to view the list of columns in the table.
View the characteristics of a table
After you have created a regular table, a global temporary table or a cache table, you can view the characteristics of the table itself such as its columns, indexes and aging policy.
Click the + to the left of the Tables node to view the list of tables. Click the name of the table that you want to view the characteristics of.
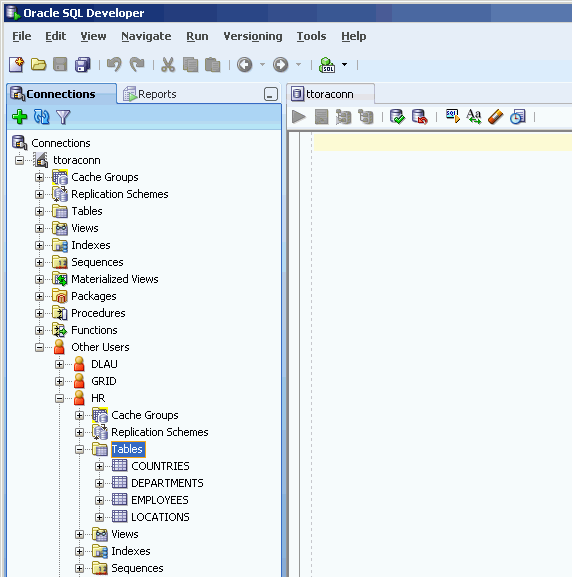
If you are unable to find the table that you are looking for, see "Locate a TimesTen database element" for information.
View the columns
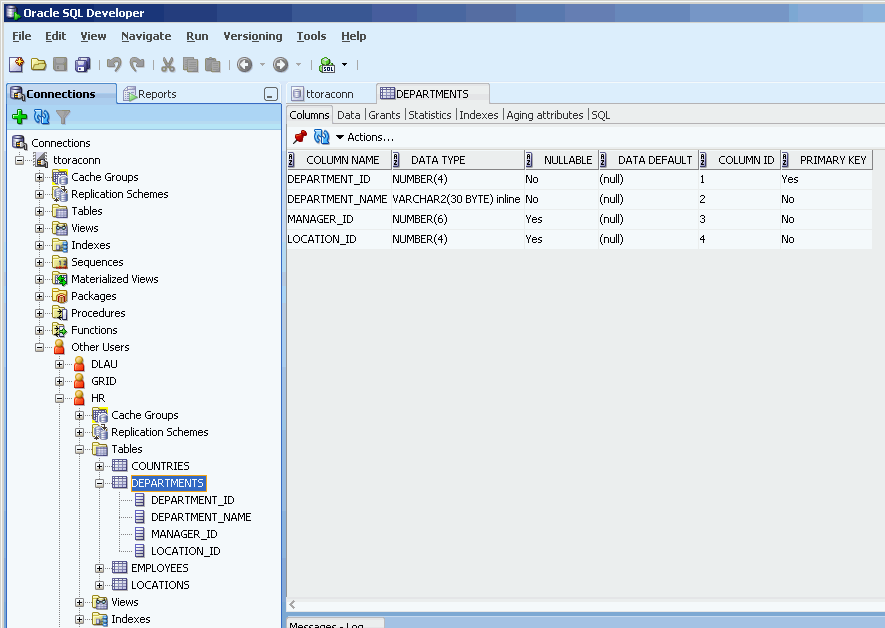
In the Columns tab within the table's tab, it shows information such as the name, data type, nullability property and default value of the table's columns.
Under the Tables node, you can also view the list of columns in a table by clicking the + to the left of the node that contains the name of the table.
View the indexes
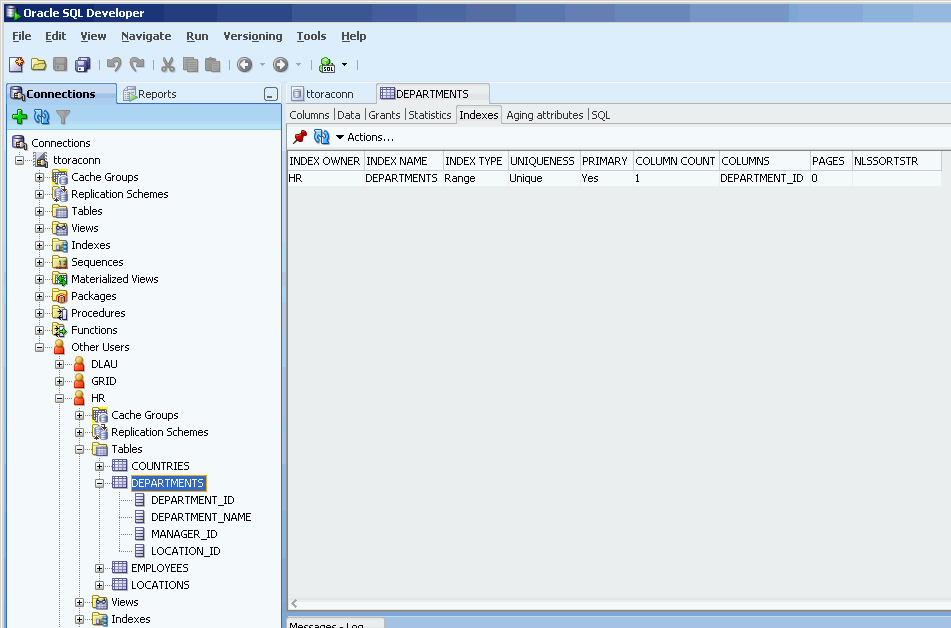
In the Indexes tab within the table's tab, it shows information such as the name, type, uniqueness property, and the number and name of the columns of the table's indexes.
View the aging attributes
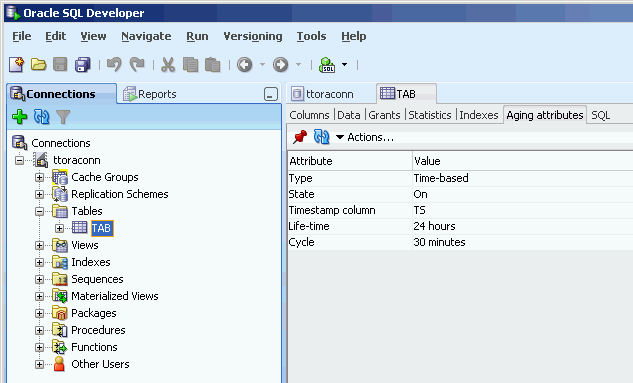
In the Aging attributes tab within the table's tab, it shows information such as the aging policy type, aging cycle, and aging state for tables that have an aging policy defined.
For tables that have an LRU aging policy defined, it also shows the TimesTen database memory usage thresholds that determine when data starts and stops being removed from the tables, and the LRU aging cycle. See "Specify an aging policy" for information about how to change these thresholds and the LRU aging cycle.
For tables that have a time-based aging policy defined, it also shows the name of the non-nullable DATE or TIMESTAMP column used to store the timestamp value indicating when each row was added or most recently updated, and the length of time in which data that has not been updated is to be kept in the table.
View the table definition
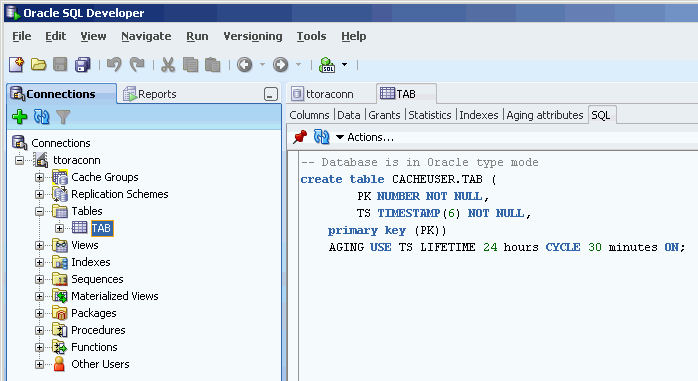
In the SQL tab within the table's tab, you can view the CREATE TABLE statement that was used to create the table for a regular table.
Since a cache table is created when its accompanying cache group is created, you can view a cache table's definition by viewing its cache group definition. See "View the cache group definition" for more information.
View the privileges granted on a database element
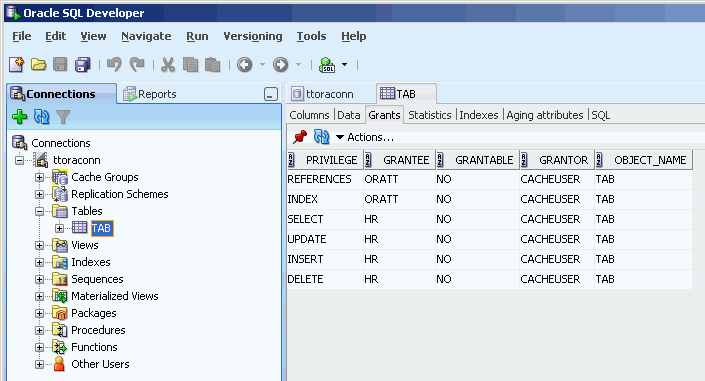
You can view the object privileges granted to all users on a particular element such as a regular table or a cache table, a regular view or a materialized view, a sequence, or a PL/SQL package, procedure or function.
For example, to view the privileges granted on a table, click the + to the left of the user's Tables node to view the list of tables owned by that user and then click the name of the desired table.
In the Grants tab within the table's tab, it shows the users who have been granted privileges on the table, what privileges they have been granted, and which user granted the privileges.
Alter the automatic refresh attributes of a cache group
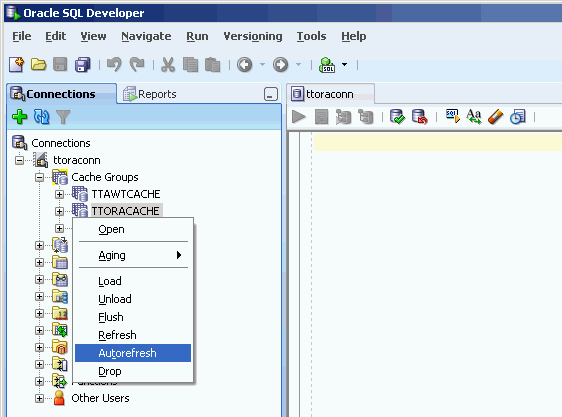
You can alter the automatic refresh attributes of a read-only cache group or a user managed cache group that has automatic refresh defined.
Under the Cache Groups node, right-click the name of the cache group that you want to alter the automatic refresh attributes and select Autorefresh.
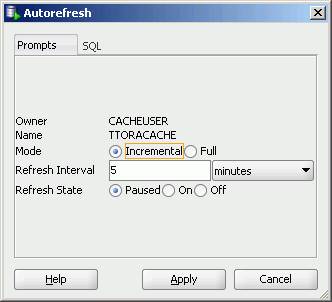
In the Prompts tab of the Autorefresh dialog box, you can change any of the following automatic refresh attributes:
-
Change the automatic refresh mode by selecting either the Incremental or Full button in the Mode field.
-
Change the automatic refresh interval by specifying a numeric interval and units of time in minutes, seconds or milliseconds from the pull-down menu in the Refresh Interval field.
-
Change the automatic refresh state by selecting either the Paused, On or Off button in the Refresh State field.
Click the Apply button to alter the automatic refresh attributes of the cache group.
For more information about automatic refresh of cache groups, see "AUTOREFRESH cache group attribute" in the Oracle In-Memory Database Cache User's Guide.
Alter the aging properties of a table
You can add an aging policy to or drop an aging policy from a regular table or a cache table. You can also change the aging state for a table's existing aging policy, or change the lifetime and cycle for a table's existing time-based aging policy.
Add an aging policy to a table
To add an aging policy to a regular table or a cache table, under the Tables node, right-click the name of the table that you want to add an aging policy to. An aging policy can be added to a cache table only if it is the root table of a cache group.
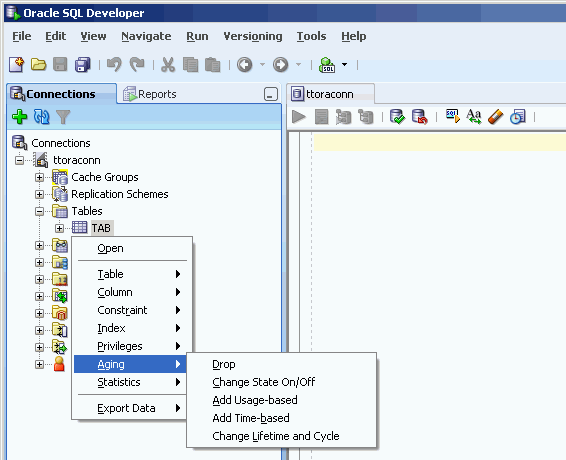
If you are unable to find the table that you are looking for, see "Locate a TimesTen database element" for information.
After you right-click the name of the table that you want to add an aging policy to, select Aging > Add Usage-based to add an LRU aging policy or select Aging > Add Time-based to add a time-based aging policy.
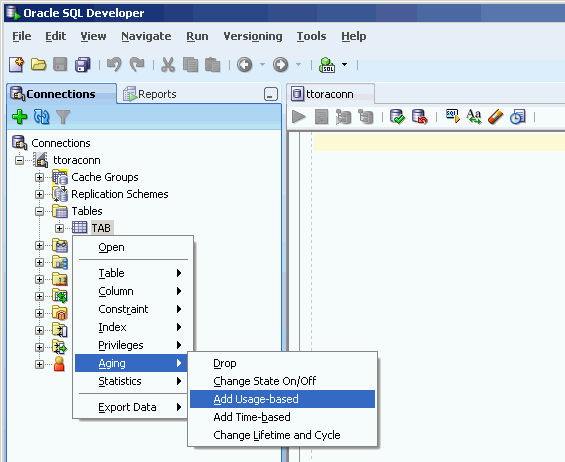
To add an LRU aging policy to the table, in the Prompts tab of the Add Usage-based dialog box, specify an aging state by selecting either the on or off button in the Usage-based aging field. The default aging state is on. Then click the Apply button to add the LRU aging policy to the table.
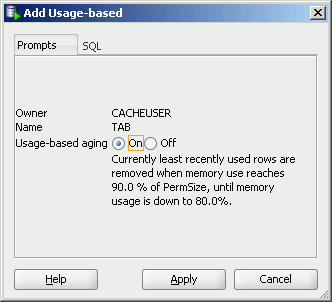
The TimesTen database memory usage thresholds determine when data starts and stops being removed from the table. The default memory usage threshold that determines when data starts being removed from the table is 90%. The default memory usage threshold that determines when data stops being removed from the table is 80%. The default LRU aging cycle is 1 minute. See "Specify an aging policy" for information about how to change these thresholds and the LRU aging cycle.
An LRU aging policy can be added to any regular table, and only to cache tables in an AWT, SWT or user-managed cache group that does not have automatic refresh defined.
To add a time-based aging policy to the table, in the Prompts tab of the Add time-based dialog box, select the column from the Column pull-down menu that you want to store the timestamp value indicating when each row was added or most recently updated.
Indicate the length of time in which data that has not been updated is to be kept in the table by specifying, in the Life-time field, a numeric value followed by a unit of minutes, hours or days in the pull-down menu.
Indicate the frequency at which data is to be aged out of the table by specifying, in the Cycle field, a numeric value followed by a unit of minutes, hours or days in the pull-down menu. The default time-based aging cycle is 5 minutes.
Specify an aging state by selecting either the on or off button in the Time-based aging field. The default aging state is on. Then click the Apply button to add the time-based aging policy to the table.
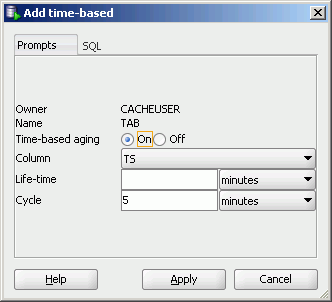
A time-based aging policy can only be added to a table that contains a non-nullable DATE or TIMESTAMP column.
Drop an aging policy from a table
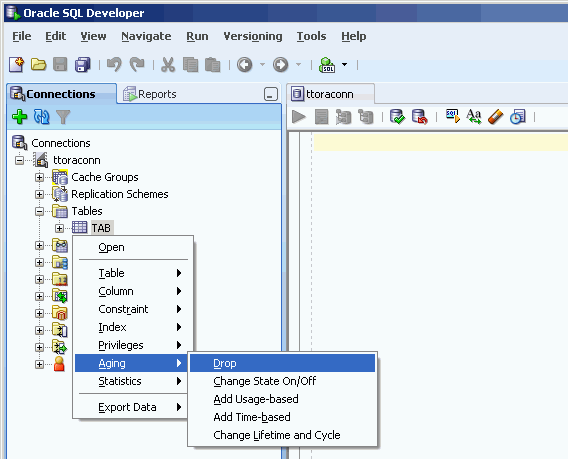
To drop an existing aging policy from a regular table or a cache table, under the Tables node, right-click the name of the table that you want to drop an aging policy from.
If you are unable to find the table that you are looking for, see "Locate a TimesTen database element" for information.
After you right-click the name of the table that you want to drop an aging policy from, select Aging > Drop.
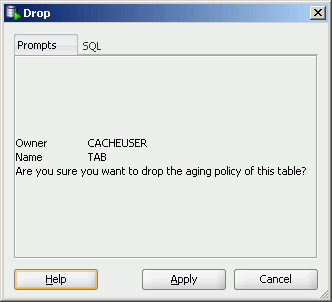
In the Prompts tab of the Drop dialog box, verify that you want to drop the aging policy from the table. Then click the Apply button to drop the aging policy from the table.
Change the aging state for a table's aging policy
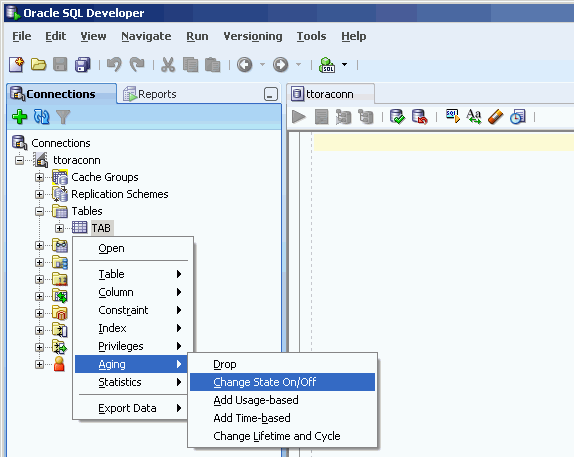
To change the aging state for a regular table's or cache table's existing aging policy, under the Tables node, right-click the name of the table that you want to change the aging state for.
If you are unable to find the table that you are looking for, see "Locate a TimesTen database element" for information.
After you right-click the name of the table that you want to change the aging state for, select Aging > Change State On/Off.
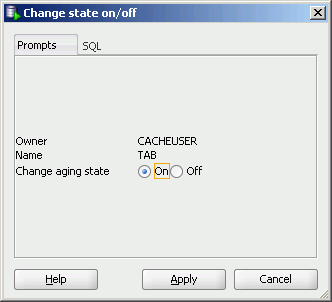
In the Prompts tab of the Change state on/off dialog box, change the aging state by selecting either the on or off button in the Change aging state field. Then click the Apply button to change the aging state for the table.
Change the memory usage thresholds and LRU aging cycle
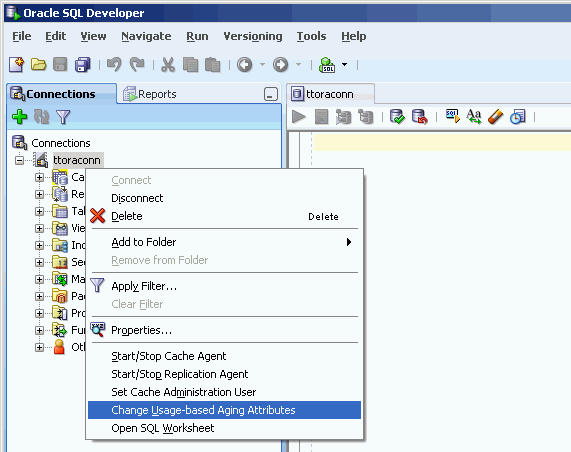
To change the memory usage thresholds and the LRU aging cycle, right-click the node that contains the name of your database connection and select Change Usage-based Aging Attributes.
In the Prompts tab of the Changing the usage-based thresholds dialog box, specify the threshold that determines when data starts being removed from the tables in the High usage threshold field. Specify the threshold that determines when data stops being removed from the tables in the Low usage threshold field. Specify the LRU aging cycle in the Update Frequency field. Then click the Apply button to change the memory usage thresholds and the LRU aging cycle.
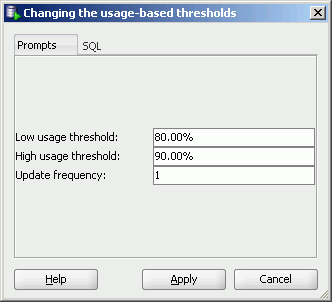
The new settings apply to all tables that have an LRU aging policy defined.
Change the lifetime and cycle for a table's time-based aging policy
To change the lifetime and cycle for a regular table's or cache table's existing time-based aging policy, under the Tables node, right-click the name of the table that you want to change the lifetime and cycle for.
If you are unable to find the table that you are looking for, see "Locate a TimesTen database element" for information.
After you right-click the name of the table that you want to change the lifetime and cycle for, select Aging > Change Lifetime and Cycle.
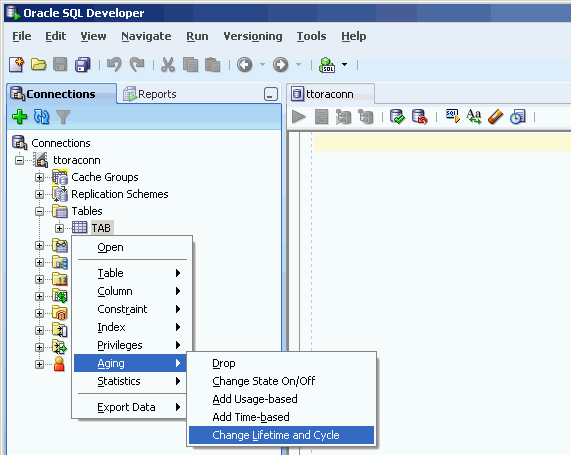
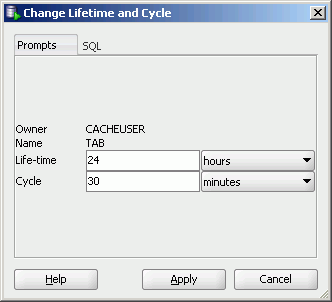
In the Prompts tab of the Change Lifetime and Cycle dialog box, change the length of time in which data that has not been updated is to be kept in the table by specifying, in the Life-time field, a numeric value followed by a unit of minutes, hours or days in the pull-down menu.
Change the frequency at which data is to be aged out of the table by specifying, in the Cycle field, a numeric value followed by a unit of minutes, hours or days in the pull-down menu.
Click the Apply button to change the lifetime and cycle for the table.
