| Oracle® Fusion Middleware Client-Side Developer's Guide for Oracle WebLogic Portal 10g Release 3 (10.3.2) Part Number E14229-01 |
|
|
View PDF |
| Oracle® Fusion Middleware Client-Side Developer's Guide for Oracle WebLogic Portal 10g Release 3 (10.3.2) Part Number E14229-01 |
|
|
View PDF |
A wide variety of JavaScript libraries and toolkits exist today, many of which can be used to build WebLogic Portal projects. For example, the Dojo Toolkit works well for client-side WLP development. This section explains how to set up a WLP project that uses the Dojo Toolkit. You can follow the same basic steps to integrate the JavaScript libraries of your choice into a project.
This chapter includes these topics:
Dojo is a toolkit for DHTML and JavaScript browser programming. Dojo provides low-level I/O (XMLHttpRequest), an event framework, JavaScript extensions, and a rich set of interface widgets such as buttons, lists, forms, and trees. Dojo has a good set of features to use for developing portals and portal components.
This section explains how to set up a WebLogic Portal project that includes the Dojo Toolkit.
Locate and download the Dojo Toolkit. The toolkit is available at http://www.dojotoolkit.org.
Unzip the download file.
In Oracle Enterprise Pack for Eclipse, create a Portal Web Project, a Portal EAR Project, a server, and a domain. See the Oracle Fusion Middleware Tutorials for Oracle WebLogic Portal for details on these tasks.
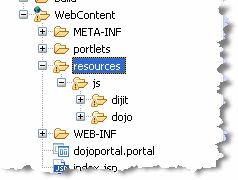
In the WebContent folder of the Portal Web Project, create a folder called resources. In that folder, create a subfolder called js.
Import the Dojo Toolkit folder into the resources/js folder. To do this, right-click the resources/js folder and select Import. In the wizard, select General > Filesystem. Import both the dojo and dijit folders from the Dojo download directory. See Figure 4-1.
Figure 4-1 Adding the Dojo Toolkit to a Portal Project

With the Dojo Toolkit added to your portal project, you can now incorporate Dojo and other JavaScript code into your portlets, as explained in the following sections.
This section describes a simple JSP portlet that displays a message in a pop up. The sample demonstrates how to import the Dojo libraries and use a bit of JavaScript in a portlet.
Create a portlets folder under the WebContent folder of the web project.
In the portlets folder, create a new JSP portlet descriptor file, called dojotest.portlet. To do this, right-click the folder and select New > Portlet. Use the portlet wizard to create a JSP portlet. The wizard automatically creates both the portlet file and an empty JSP file called, by default, dojotest.jsp.
Create a render dependencies file. This file will contain a reference to the Dojo Toolkit file, dojo.js, a CSS file reference, and JavaScript function definitions used by the portlet. See Section 4.3, "Creating a Render Dependencies File" for details.
Configure the portlet to refer to the render dependencies file. To do this, open the portlet in the Portlet Editor view. Set the LAF Dependencies Path in the portlet Properties editor to point to the dependencies file you created.
Add the code in Example 4-1 to the JSP file. The sample code performs these tasks:
Imports a button dijit Button element or widget. This is a common pattern for importing widgets. This code ensures that the Button's JavaScript has been loaded before a Button instance is declared.
Instantiates a button widget and configures an event handler for the button's click event. When the button is pressed, the event handler shows a JavaScript alert containing a greeting and the portlet label.
Example 4-1 Hello World with Dojo
<script type="text/javascript">
    // Load the Dojo Button widget
    dojo.require("dijit.form.Button");
</script>

<button dojoType="dijit.form.Button" id="helloButton">
        Hello World!
    <script type="dojo/method" event="onClick">
        alert('You pressed the button');
    </script>
</button>
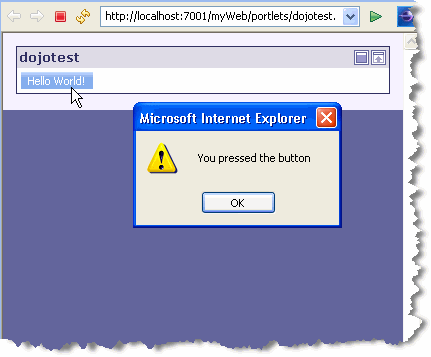
Add the portlet to a portal and run it on the server. When you click the button in the portlet, the popup displays the text defined in the callback.
Figure 4-2 Hello World JSP Portlet with Dojo

This section explained how to use a bit of Dojo code in a JSP portlet. In Chapter 6 we discuss specific problems related to using JavaScript code in portlets and suggest best practices to avoid the problems.
This section explains the purpose and importance of render dependency files and how to create a render dependencies file.
A render dependencies file is XML that defines page-level events and resources such as external JavaScript and CSS that are needed by a portlet. In a non-portal web page, these are often included inside the <head> tags of an HTML page; however, portlets should avoid using this approach, as it can lead to a variety of problems in a portal or mashup environment including creating pages that are not HTML/XHTML compliant and causing unexpected behavior when WebLogic Portal's Desktop Ajax feature is enabled. The render dependencies mechanism addresses these problems by allowing portlets to declare resource references and to wire into page-level events including load and unload. Blocks of JavaScript can even be included in a render dependencies file, wrapped inside of the usual <script> element.
The simplest way to create a render dependencies file is to right-click a folder in your web application and select New > Other > WebLogic Portal > Markup Files > Render Dependencies. The resulting file looks like Example 4-2.
Example 4-2 Empty Render Dependencies File
<?xml version="1.0" encoding="UTF-8"?>
<window
  xmlns="http://www.bea.com/servers/portal/framework/laf/1.0.0"
  xmlns:xsi="http://www.w3.org/2001/XMLSchema-instance"
  xsi:schemaLocation="http://www.bea.com/servers/portal/framework/laf/1.0.0
     laf-window-1_0_0.xsd">
</window>
Next, add a <render-dependencies> XML tag to the file. Include in the tag the path to the Dojo toolkit, as shown in Example 4-3. This listing includes certain elements that Dojo requires for this example: the Tundra theme and the djConfig object, which is created when the page loads and configures Dojo.
The <path-element> must be a relative reference from the render dependencies file to the directory that contains the script sources referenced by the <script> tags.
Example 4-3 Render Dependencies File Includes Dojo Toolkit
<?xml version="1.0" encoding="UTF-8"?>
<window
  xmlns="http://www.bea.com/servers/portal/framework/laf/1.0.0"
  xmlns:xsi="http://www.w3.org/2001/XMLSchema-instance"
  xsi:schemaLocation="http://www.bea.com/servers/portal/framework/laf/1.0.0
     laf-window-1_0_0.xsd">
    <render-dependencies>
       <html>
          <links>
              <search-path>
                  <path-element>../resources/js</path-element>
              </search-path>
               <link href="dijit/themes/tundra/tundra.css" type="text/css"
               rel="stylesheet"/>
          </links>
          <scripts>
              <search-path>
                  <path-element>../resources/js</path-element>
              </search-path>
              <script type="text/javascript">
                  var djConfig = {parseOnLoad:true, isDebug:true};
              </script>
              <script src="dojo/dojo.js" type="text/javascript"/>
          </scripts>
       </html>
    </render-dependencies>
</window>