| Oracle® Fusion Middleware Federated Portals Guide for Oracle WebLogic Portal 10g Release 3 (10.3.2) Part Number E14235-02 |
|
|
View PDF |
| Oracle® Fusion Middleware Federated Portals Guide for Oracle WebLogic Portal 10g Release 3 (10.3.2) Part Number E14235-02 |
|
|
View PDF |
WebLogic Portal supports interportlet communication (IPC) between producers and consumers. For example, a remote portlet deployed in a producer application can handle a minimize event fired by a local portlet in a consumer. This chapter presents a detailed example explaining how to use interportlet communication with remote portlets.
This chapter includes these sections:
WebLogic Portal provides an extension to the WSRP protocol that allows remote portlets to fire events during the interaction phase of their lifecycle. For detailed information on the WebLogic Portal IPC architecture for federated portlets, see Section 3.5.4, "Interportlet Communication with Events".
Communication between portlets deployed in consumer and producer applications is bi-directional. Events fired by local portlets can be handled by portlets deployed in a producer, and vice versa.
The example in this chapter demonstrates one way to implement event handling in a federated portal. In this example, the event handler is added to the portlet on the producer. When a local portlet on the consumer fires an event, the remote portlet on the producer receives the event and handles it (changes the text displayed in the portlet).
Note:
Whenever you implement event handling in a federated environment, remember that you must add event handlers to portlets in the producer application before you create proxy portlets in consumers. If you change a producer portlet's metadata, such as by adding an event handler, consumers are not notified of that change. The correct procedure is to add the event handler to the portlet on the producer before you create the remote portlet on the consumer.For additional information on IPC in WebLogic Portal, see the Oracle Fusion Middleware Portlet Development Guide for Oracle WebLogic Portal.
This section presents a detailed example demonstrating how to use event handling in a remote portlet. In this example, a remote portlet on the consumer fires an onMinimize event. The onMinimize event is fired when a portlet is minimized. When the event is fired from a local portlet in a consumer, the event is handled on the producer. The onMinimize event is one of several standard events supported by the WebLogic Portal framework. For a complete list of standard events, see the Oracle Fusion Middleware Portlet Development Guide for Oracle WebLogic Portal.
In this example, when the user minimizes the remote portlet on the consumer, the producer handles the event and changes some text in the portlet.
Tip:
Remote portlets can also handle custom events. For detailed information on using custom events with remote portlets, see Section 7.4, "Data Transfer with Custom Events".This example includes these steps:
If you want to try the example discussed in this section, you need to run Oracle Enterprise Pack for Eclipse and perform the prerequisite tasks and set up the example environment.
To set up the example environment, perform the prerequisite tasks outlined in Table 7-1. If you are not familiar with the specific procedures for these tasks, they are described in detail in the WebLogic Portal tutorial Oracle Fusion Middleware Tutorials for Oracle WebLogic Portal.
Table 7-1 Prerequisite Tasks
| Task | Recommended Name |
|---|---|
|
1. Create a WebLogic Portal domain. |
ipcWsrpDomain |
|
2. Create a Portal EAR Project. |
ipcWsrpPortalEAR |
|
3. Create an Oracle WebLogic Server v10.x. |
N/A |
|
3. Associate the EAR project with the server. |
N/A |
|
4. Create a Portal Web Project |
consumerWeb |
|
5. Create a second Portal Web Project |
producerWeb |
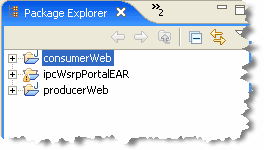
Figure 7-1 shows the Package Explorer after the prerequisite tasks have been completed.
Figure 7-1 Package Explorer After Prerequisite Tasks are Completed
In this task, you create two JSP files on the producer-side, along with the JSP portlets that surface these files. You also create a backing file that contains the instructions necessary to complete the communication between two portlets and add an event handler to one of the portlets. Once you have created the portlets and attached the backing file, you will test the application in your browser.
To create the JSP files that the portlets deployed on the producer will surface:
Be sure you have set up the example environment as explained previously in Section 7.2.1, "Setting Up Your Environment".
In the Project View, right-click the WebContent folder and select New > Portlet.
In the New Portlet dialog, enter the name aPortlet.portlet for the new portlet, and click Next.
In the Select Portlet Type wizard page, select JSP/HTML Portlet, and click Next. (See Figure 7-2.)
In the Portlet Details wizard page, select the Minimizable and Maximizable states, and click Create. (See Figure 7-3.)
Locate the aPortlet.jsp file. By default, it will be in the WebContent/aportlet folder. Double-click the file to open it in the editor.
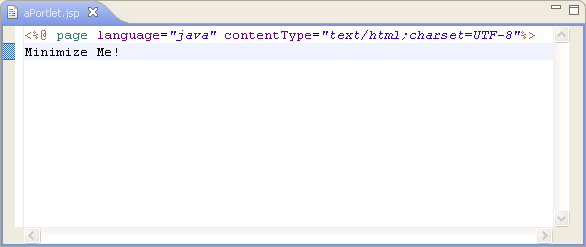
Replace the default text in the file with the text "Minimize Me!" as shown in Figure 7-4.
Figure 7-4 JSP File Showing Edited Body Text
Save the file as aPortlet.jsp
In the same directory, make a copy of aPortlet.jsp, and call the copy bPortlet.jsp.
Open bPortlet.jsp in the editor and copy the code from Example 7-1 into the JSP, replacing everything from <netui:html> through </netui:html>. This code simply displays text placed in the request by a backing file, which you will create and attach to the portlet in a subsequent step.
Example 7-1 New JSP Code for bPortlet.jsp
<netui:html>
   <% String event = (String)request.getAttribute("minimizeEvent");%>
      <head>
         <title>
            Web Application Page
         </title>
      </head>
      <body>
         <p>
            Listening for portlet A minimize event:<%=event%>
         </p>
      </body>
</netui:html>
Figure 7-5 shows the completed JSP source file in the editor.
Save the file.
Following the same steps you used previously, generate a portlet from the bPortlet.jsp file.
Checkpoint: At this point the you have created the following files in the producerWeb/WebContent folder:
aPortlet.jsp
aPortlet.portlet
bPortlet.jsp
bPortlet.portlet.
In this example, we use a backing file attached to the portlet in the producer to handle the onMinimize event fired on the consumer.
Tip:
For detailed information on backing files, refer to the Oracle Fusion Middleware Portlet Development Guide for Oracle WebLogic Portal.To create the backing file:
In producerWeb, expand the Java Resources node, right-click the src folder, and select New > Package from the menu. The Create New Folder dialog box appears.
Create a source folder called backing.
The backing folder appears under producerWeb/Java Resources/src, as shown in Figure 7-6.
Right-click the backing package and select New > Class. The New Java Class dialog appears.
In the Name field, enter Listening and click Finish. The new Java class appears in the editor.
Delete the default contents of Listening.java, and copy the code from Example 7-2 into Listening.java.
Save Listening.java.
Example 7-2 Backing File Code for listening.java
package backing;
import com.bea.netuix.servlets.controls.content.backing.AbstractJspBacking;
import com.bea.netuix.events.Event;
import javax.servlet.http.HttpServletRequest;
import javax.servlet.http.HttpServletResponse;
public class Listening extends AbstractJspBacking
{
     static final long serialVersionUID=1L;
     private static boolean minimizeEventHandled = false;
     public void handlePortalEvent(HttpServletRequest request,
        HttpServletResponse response, Event event)
    {
        minimizeEventHandled = true;
    }
    public boolean preRender(HttpServletRequest request, HttpServletResponse
         response)
    {
        if (minimizeEventHandled){
                request.setAttribute("minimizeEvent","minimize event handled");
        }else{
                request.setAttribute("minimizeEvent",null);
        }
        // reset
        minimizeEventHandled = false;
         return true;
    }
}
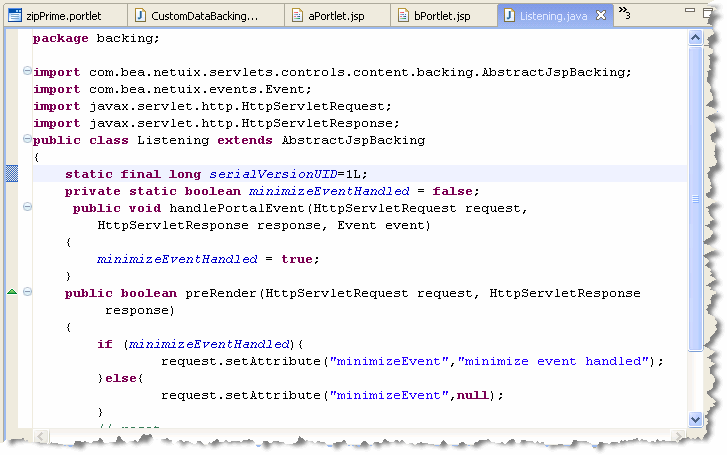
The source should now look like that shown in Figure 7-7.
Figure 7-7 Listening.java with Updated Backing File Code
Now you will attach the backing file created in the previous section to bPortlet.portlet.
In the Package Explorer, double-click bPortlet.portlet to open it.
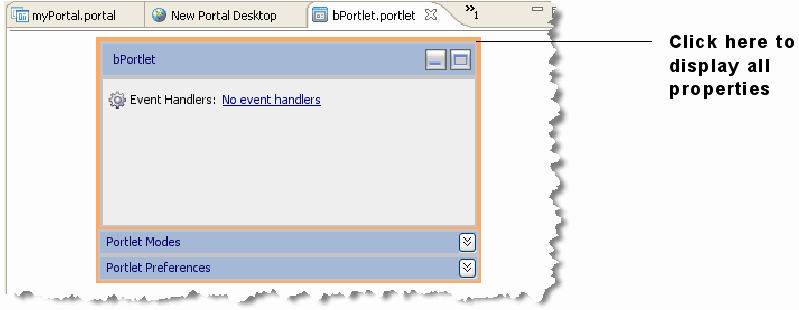
Click on the portlet in the editor to display the portlet's properties. To be sure you see all the properties, click on the border of the portlet, as shown in Figure 7-8.
Figure 7-8 Click to Display All Portlet Properties
Tip:
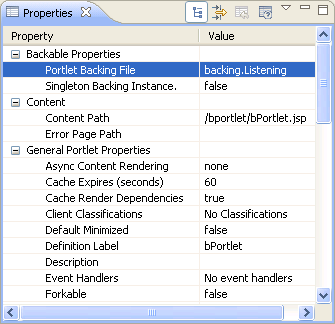
If the Properties view is not visible in your perspective, select Window > Show View > Properties. If you want to learn more about editing portlet properties, see the Oracle Fusion Middleware Portlet Development Guide for Oracle WebLogic Portal.In the Properties view, type backing.Listening into the Backable Properties > Portlet Backing File field, as shown in Figure 7-9 and press Return.
Tip:
You might need to expand the value column to enter text in the Portlet Backing File field.Figure 7-9 Attaching the Backing File in the Properties View
Save the file.
You now add the event handler to bPortlet.portlet. The handler will be configured to listen for an event fired by another portlet and execute an action in response to that event. To add the event handler:
Be sure the file bPortlet.portlet is open. If it is not, double-click it in the Package Explorer.
Click on the portlet in the editor to display the portlet's properties, as shown previously in Figure 7-8.
In the portlet editor, click the Event Handlers link, as shown in Figure 7-10. The Event Handlers dialog appears.
Figure 7-11 Portlet Event Handlers Dialog Box
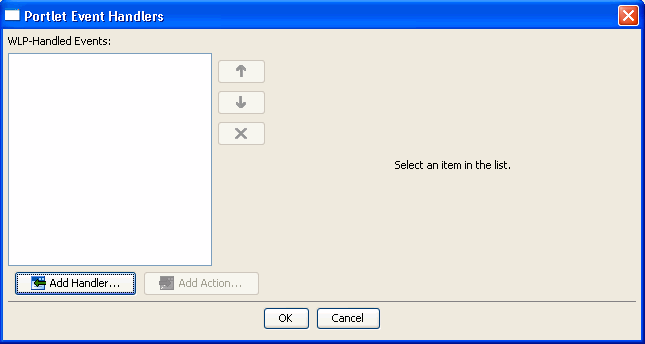
Click Add Handler and select Handle Portal Event from the drop-down menu.
The Portlet Event Handlers dialog box expands to allow entry of more details, as shown in Figure 7-12.
Figure 7-12 Event Handler Dialog Box Expanded
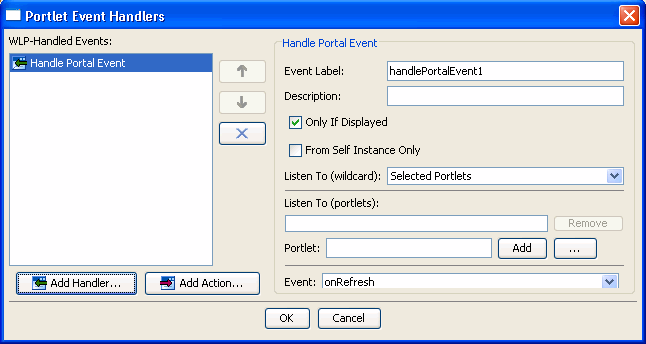
Accept the defaults for all fields except Portlet.
In the Portlet field, click the ellipses button (...). The Please Choose a File dialog box appears.
Select aPortlet.portlet and click OK.
The dialog box closes and aPortlet_1 appears in the Listen to list and the Portlet field, as shown in Figure 7-13. The label aPortlet_1 is the definition label of the portlet to which the event handler will listen.
Tip:
The definition label is a unique identifier for the portlet. A default value is entered automatically, but you can change the value. Each portlet must have a unique value. See the Oracle Fusion Middleware Portlet Development Guide for Oracle WebLogic Portal for more information.Click the Event drop-down menu to open the list of portal events that the handler can listen for and select onMinimize, as shown in Figure 7-14.
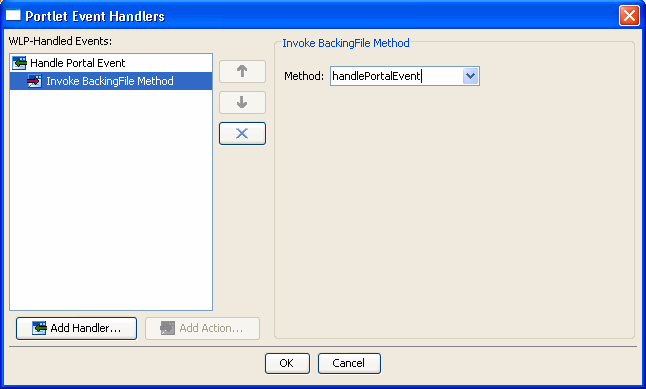
Click Add Action... to open the action drop-down menu and select Invoke BackingFile Method.
Open the Method drop-down menu and enter handlePortalEvent, as shown in Figure 7-15. This method is defined in the backing file that is attached to bPortlet. The source code for the backing file was shown previously in Example 7-2.
Figure 7-15 Adding the Backing File Method
Click OK.
The event handler is added. Note that the Value field of the Event Handlers property now indicates 1 Event Handler.
Note:
WebLogic Portal attempts to validate the settings of the Event Handlers dialog. You will receive an error message if any problems are detected. For detailed information on the WebLogic Portal validation framework, see the Oracle Fusion Middleware Portal Development Guide for Oracle WebLogic Portal.Checkpoint: You added a backing file and an event handler to bPortlet. The event handler is configured to invoke the handlePortalEvent() method in the backing file when the portlet receives an onMinimize event fired by aPortlet. In the next task, you test the application to make sure that the portlets function properly in a local environment. Then, you will create a remote portlet in a consumer application to test the interportlet communication in a federated portal environment.
Create a portal in the producer application called ipcLocal.portal:
In the Package Explorer, right-click producerWeb/WebContent and select New > Portal. The New Portal dialog appears.
In the File name field, enter ipcLocal.portal and click Finish. The portal is created and appears in the editor.
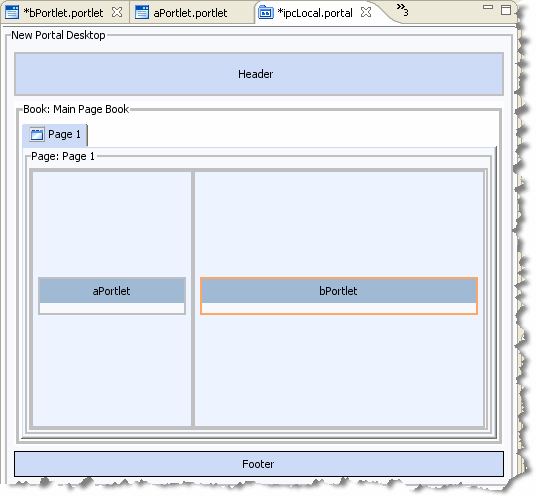
Drag both aPortlet.portlet and bPortlet.portlet from the Package Explorer onto the portal layout, as shown in Figure 7-16.
Figure 7-16 Portal Layout with Portlets Added
Save the portal.
Run the portal. To do this, right-click ipcLocal.portal in the Package Explorer and select Run As > Run on Server.
In the Run On Server – Define a New Server dialog, click Finish.
The portal renders in the default browser, as shown in Figure 7-17.
Minimize aPortlet.
Note the content change in bPortlet.
Figure 7-18 ipcLocal Portal with aPortlet Minimized
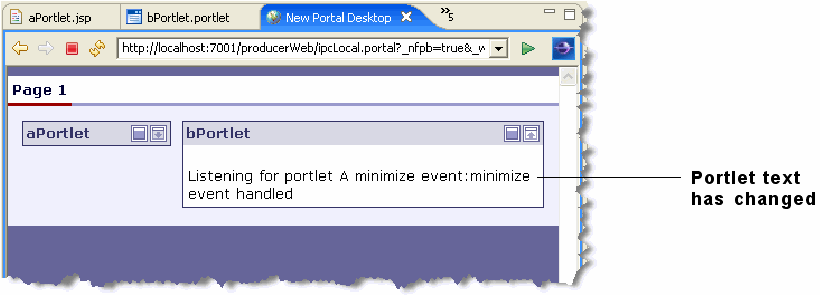
You created a portal containing two local portlets. You configured the portlet called bPortlet to respond to an onMinimize event fired from the portlet called aPortlet. The onMinimize event is a standard event that all WebLogic Portal portlets can fire. When bPortlet receives an onMinimize event, a backing file method is called that modifies the text displayed by the portlet.
In the following steps, you will create a federated portal that uses interportlet communication.
In this section, you create two portlets in the consumer application, one a JSP portlet and the other a remote portlet. The remote portlet consumes the portlet you created previously on the producer, bPortlet.portlet.
Before you continue with this exercise:
In the Package Explorer, copy aPortlet.jsp from the producerWeb/WebContent folder and paste it into the consumerWeb/WebContent folder. For convenience, we reuse this portlet from the producer application. Its function in the consumer portal is simply to provide a portlet that you can minimize.
Right-click consumerWeb/WebContent/aPortlet.jsp and select Generate Portlet.
In the Portlet Details dialog, select Minimizable, Maximizable, and click Create. The new portlet layout appears in the editor.
To create the remote portlet:
Open the consumerWeb folder in the Package Explorer, right-click on the WebContent folder, and select New > Portlet.
In the New Portlet dialog, enter bPrime.portlet in the File name field, and click Finish.
In the Select Portlet Type dialog of the Portlet Wizard, pick Remote Portlet, and click Next.
In the Producer dialog, select Find Producer.
Enter the producer's WSDL URL in the text field, as shown in Figure 7-19. The WSDL URL for this example is:
http://host:port/producerWeb/producer?wsdl
for example:
http://localhost:7001/producerWeb/producer?wsdl
Tip:
WSDL stands for Web Services Description Language and is used to describe the services offered by a producer. For more information, see Chapter 3, "Federated Portal Architecture."Click Retrieve.
After a few seconds, the dialog box refreshes, showing the Producer Details, as shown in Figure 7-19.
Click Register.
In the Register dialog, enter a name for the producer in the Producer Handle field, and click Register. You are returned to the Producer dialog.
In the Producer dialog, click Next. The Select Portlet from List dialog appears.
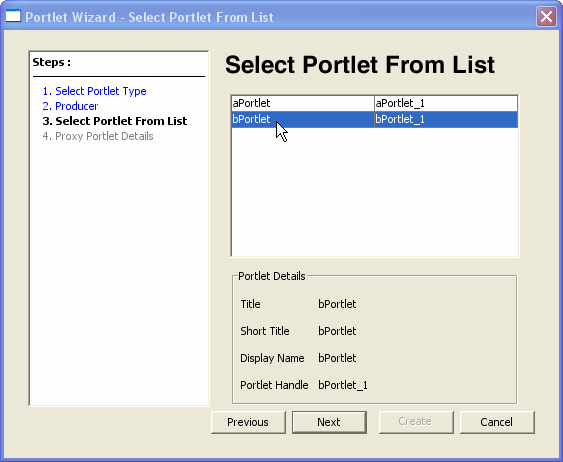
In the Select Portlet from List dialog, select bPortlet, as shown in Figure 7-20.
Figure 7-20 Select Portlet From List Dialog Box
Click Next. The Proxy Portlet Details dialog box appears.
Click Create.
The remote portlet appears as bPrime.portlet in the consumerWeb/WebContent folder in the Package Explorer.
Change the portlet's title to bPrime. To do this, edit the Title field in the portlet's Properties view, as shown in Figure 7-21.
Save the portlet.
Tip:
In the Properties view for bPortlet (in the producerWeb/WebContent folder) be sure the Render Cacheable property is set to false.With the completion of the two consumer portlets, you have now created all of the necessary components to demonstrate interportlet communications between a remote and a local portlet. In the next step, you will add the consumer portlets to a consumer portal and raise an event on one portlet that will cause a reaction on the other.
In this step, you test the consumer application to verify that minimizing aPortlet will change the content of bPrime (the remote portlet). You create a portal and add the two portlets created in Section 7.2.3, "Creating the Consumer Portlets". You then build the application and view the portal in a browser.
Create a portal in the consumer application called ipcConsumer.portal:
In the Package Explorer, right-click consumerWeb/WebContent and select New > Portal. The New Portal dialog appears.
In the File name field, enter ipcConsumer.portal and click Finish. The portal is created and appears in the editor.
Drag both aPortlet.portlet and bPrime.portlet from the consumerWeb/WebContent folder onto the portal layout. The result is shown in Figure 7-22.
Save the portal.
From a user's perspective, the consumer portal works exactly as if all portlets were local. The user is not aware that bPrime is a remote portlet hosted in a producer application. To test the consumer portlet, minimize aPortlet. The remote portlet, bPrime, responds changing the text it displays.
Run the portal. To do this, right-click ipcConsumer.portal in the Package Explorer and select Run As > Run on Server.
In the Run On Server – Define a New Server dialog, click Finish. A browser opens displaying the ipcConsumer portal, as shown in Figure 7-23.
In aPortlet, click the Minimize button. The portlet aPortlet minimizes and the contents of bPortlet change, as shown in Figure 7-24.
Figure 7-24 Consumer Portal in Browser After Minimize Event

Example 7-3 shows an excerpt from the XML content of a .portlet file for the remote portlet described previously in this chapter, bPrime.portlet. Note that the element dispatchToRemotePortlet is added as part of the handleEvent definition. This element indicates that the consumer must dispatch the event to the producer.
Custom events are the recommended method for passing data between portlets deployed in consumer applications and portlets in remote producer applications. This section outlines a possible technique for passing data from a consumer to a producer using custom events. For more information on custom events, see "Custom Event Handling" in the Oracle Fusion Middleware Portlet Development Guide for Oracle WebLogic Portal.
Tip:
You can use custom events to pass data between any portlets, whether the portlets are local or on remote producers. For more information on event payloads that can be used with WSRP, see Section 7.5, "Event Payloads Over WSRP."Figure 7-25 illustrates the configuration of the example discussed in this section.
P1 – A portlet on the consumer. This portlet gathers data in a form. When the user submits this form, the portlet creates a payload object containing the data and fires a custom event with the payload.
P2 – A portlet on the producer. This portlet is configured to listen for the custom event fired by P1. When the event is received, the portlet unpacks the payload and displays it.
P2' – A remote portlet on the consumer (a proxy for P2).
This section illustrates how a portlet on the producer can be configured to handle a custom event containing a payload. In this case, the portlet is a Java portlet associated with the class shown in Example 7-4. See also Section 7.5, "Event Payloads Over WSRP."
Example 7-4 Sample Java Portlet Class
import java.io.IOException;
import javax.portlet.PortletException;
import javax.portlet.GenericPortlet;
import javax.portlet.RenderResponse;
import javax.portlet.RenderRequest;
import javax.portlet.EventResponse;
import javax.portlet.EventRequest;
import javax.portlet.Event;
import javax.portlet.ProcessEvent;

public class JavaPortlet extends GenericPortlet
{
                       @ProcessEvent(qname="{urn:com:oracle:wlp:netuix:event:custom}messageCustomEvent")
    public void getMessage(EventRequest request, EventResponse response)
        throws PortletException, IOException
    {
        Event event = request.getEvent();

        // Get the event's payload
        String message = (String)event.getValue();
        response.setRenderParameter("message0", message);
    }

    public void doView(RenderRequest request, RenderResponse response)
        throws PortletException, IOException
    {
        String message = request.getParameter("message0");
        if (message == null) message = "";
        response.setContentType("text/html");
        response.getWriter().write("<p><b>Message From Consumer: </b>" +
        message + "</p>");
    }
}
The getMessage() method receives the event object containing the payload sent from the consumer to the producer. In the following steps, you will configure the portlet.xml file to mark the portlet as processing this event. Note that in this case the custom event is fired by a portlet deployed to the consumer application.
To configure the event handler in the producer portlet:
In Oracle Enterprise Pack for Eclipse, create a Java portlet using the class shown in Example 7-4.
In the Package Explorer, double-click the Java portlet file to open the portlet in the editor, as shown in Figure 7-26.
Click the No event handlers link in the Java portlet editor to open the Event Handler dialog box.
Tip:
The Portlet Event Handlers dialog box lets you create and configure event handlers for a portlet. An event handler listens for an event and takes a specified action when the event is received.In the Portlet Event Handlers dialog, click Add Processing Event...
In the Define or Choose a Portlet Event Definition dialog, enter {urn:com:oracle:wlp:netuix:event:custom}messageCustomEvent in the QName or NCName field and click OK.
Click OK on the Portlet Event Handlers dialog.
Tip:
For detailed information on the Event Namespace and Alias fields, see "About QNames and Aliases" in the Oracle Fusion Middleware Portlet Development Guide for Oracle WebLogic Portal.Figure 7-27 shows the completed dialog.
Figure 7-27 Portlet Event Handlers Dialog
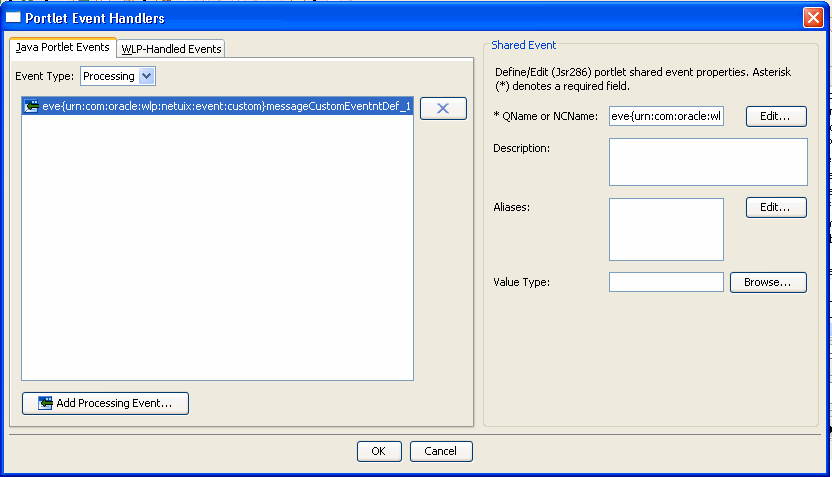
The Java portlet is now configured to handle an event called messageCustomEvent with the default custom event namespace of urn:com:oracle:wlp:netuix:event:custom. When this event is received, the portlet container will invoke the getMessage() method in the Java portlet class. This event handler provides a mechanism for interportlet communication whether the portlets are running locally or on a remote producer.
A consumer portlet can be configured to fire a custom event, which is then handled on the producer. Example 7-5 illustrates code that could be used in a local portlet on the consumer to fire a custom event and attach a payload to that event.
Example 7-5 Sample Event-Firing Code
PortletBackingContext context =
PortletBackingContext.getPortletBackingContext(getRequest());
  context.fireCustomEvent("messageCustomEvent", form.getMessage());
return new Forward("success");
Refer to Oracle Fusion Middleware Java API Reference for Oracle WebLogic Portal for more information on the fireCustomEvent() method. For more information on portlet development and event handling, see the Oracle Fusion Middleware Portlet Development Guide for Oracle WebLogic Portal.
This section discusses how WebLogic Portal handles event payloads sent over WSRP, and explains the rules WLP uses to package and convert event payloads. With knowledge of these rules, you can write portlets to send and/or receive events over WSRP from any other portlet, even if the portlet is on a third-party WSRP producer.
Tip:
For additional detailed information on how event payloads are handled over WSRP, review the Javadoc for the class com.bea.wsrp.model.markup.IEventContext.Events can be sent from any portlet on the consumer or producer to any other portlet on the consumer or to any producer. The consumer is responsible for receiving events and distributing them to the appropriate portlets.When events are sent over WSRP, the event payload object must be sent in XML form to be WSRP-compliant, but the WSRP 2.0 specification does not dictate a particular scheme for encoding event payloads to ensure interoperability. It is therefore possible that an event could be received from a portlet on a third-party WSRP producer, and that WebLogic Portal would not know how to convert the event's payload to a Java object. For this reason, Oracle WebLogic Portal avoids converting event payloads to Java objects whenever possible. This allows a Oracle WebLogic Portal consumer to distribute events between portlets on third-party producers even though the consumer cannot understand the event payload. When event payload conversion into or from a WSRP SOAP message is necessary, WebLogic Portal follows the guidelines discussed in this section. Two special Java objects are used for WSRP event payloads in these cases:
com.bea.wsrp.ext.holders.NamedStringArray – This class represents the optional NamedStringArray schema type defined in the WSRP 2.0 specification for event payloads, and represents an ordered list of name/value pairs of simple strings.
com.bea.wsrp.ext.holders.XmlPayload – This class represents arbitrary XML for an event's payload.
When packaging an event payload into a WSRP SOAP message, WebLogic Portal uses the following logic to convert the event payload to XML. This scenario occurs, for example, when an event is sent by a portlet on the consumer and needs to be delivered to a portlet on a producer, or when a portlet on a WLP producer sends an event.
If the event's payload is an instance of the com.bea.wsrp.ext.holders.NamedStringArray class, the event payload is encoded in a WSRP 2.0 NamedStringArray schema type.
Otherwise, if the event's payload is an instance of com.bea.wsrp.ext.holders.XmlPayload, the event payload is encoded as the XML represented by the object.
Otherwise, if the event's payload is a Java object with a Java Architecture for XML Binding (JAXB) binding, JAXB serialization will be used to encode the payload as XML.
Otherwise, the event's payload is serialized using Java serialization, base-64 encoded, and put in a WLP-specific XML event schema type.
When converting an event payload from a WSRP SOAP message to a Java object, WebLogic Portal uses the following logic. This scenario occurs, for example, when an event is sent by a producer portlet and delivered to a portlet on the consumer, or when an event is received by a portlet on a WLP producer.
If the event's payload in the SOAP message is encoded in a WSRP 2.0 NamedStringArray schema type, it is converted into a com.bea.wsrp.ext.holders.NamedStringArray object.
Otherwise, if the event's payload in the SOAP message is encoded in the WLP-specific serialized Java object schema, the object is deserialized. Note that this requires the appropriate Java class that is being deserialized to be in the class path.
Otherwise, JAXB deserialization is attempted on the XML representation of the event's payload.
If JAXB deserialization fails, an object of type com.bea.wsrp.ext.holders.XmlPayload is created to hold the raw XML representation of the event payload.
Shared parameters allow portlets (including remote portlets) to share simple String values with other portlets during all phases of the portlet lifecycle. For detailed information, see "Using Shared Parameters" in the Oracle Fusion Middleware Portlet Development Guide for Oracle WebLogic Portal.
If a remote portlet handles a custom event, you have the opportunity to create aliases for the event in the remote portlet. Aliases provide a mechanism for renaming events as they are delivered to individual portlets, allowing communication between portlets that may not have been designed to communicate with each other. For detailed information on aliases, see "About QNames and Aliases" in the Oracle Fusion Middleware Portlet Development Guide for Oracle WebLogic Portal.
To add alias(es) to an event in a remote portlet:
Bring up the Portlet Event Handlers dialog. One way to do this is in the Properties view, click the Event Handlers button. Another way is to click the Event Handlers link in the portlet editor. If no event handlers exist for the portlet, this link is called No event handlers.
In the WLP-Handled Events column of the dialog select Handle Custom Event.
In the right side of the dialog, click Edit next to the Aliases field. The Provide List of QName Alias(es) dialog appears, as shown in Figure 7-28.
Figure 7-28 Provide List of QName Alias(es) Dialog
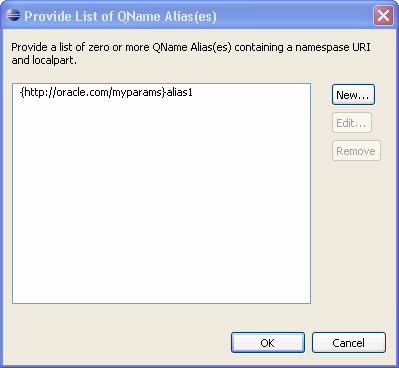
Add one or more aliases to the list. The new button brings up a dialog that helps you to construct the alias properly. For detailed information on constructing alias names, see "About QNames and Aliases" in the Oracle Fusion Middleware Portlet Development Guide for Oracle WebLogic Portal.
Click OK to complete the task.