 Understanding HR Information Used in the Payroll Process
This chapter provides overviews of human resources (HR) information used in the payroll process, tables that support the payroll process, pay calendar date fields, and shift pay calculation methods, and discusses how to:
Set up the Shift table.
Establish special accumulator codes.
Set up holiday schedules.
Set up rapid entry paysheet templates.
Set up continue with errors processing.
Define the Final Check process.
Set up to print and view paychecks with XML Publisher (XMLP)
Set up the Form table for printing checks and direct deposit advices.
Set up banks and direct deposit.
Establish retroactive (retro) pay programs.
Review and modify payroll messages.
Handle employees with multiple jobs in the same organization.
Note. Many other setup steps are covered in other chapters of this PeopleBook and the PeopleSoft Application Fundamentals for HRMS PeopleBook.
See Also
Getting Started with Payroll for North America
Understanding HR Information Used in the Payroll Process
Much of the employee information required to process a payroll resides in tables common to all PeopleSoft Human Resources Management (PeopleSoft HRMS) applications. Employee workforce and benefits information (such as name, address, social security number or social insurance number, rate of pay, department, medical and savings plans, and so on) works in conjunction with payroll data that you provide.
Relationship Between PeopleSoft Human Resources and Payroll for North America Pages
Depending on how your company is organized, you might be responsible for entering all payroll-related information. In many companies, the human resources department enters general company and benefit data, but only the payroll department is authorized to enter data specific to payroll.
This diagram illustrates the flow of employee data from PeopleSoft HRMS (Workforce Administration, Benefits, and Employee Pay Data) to Payroll for North America for payroll processing:
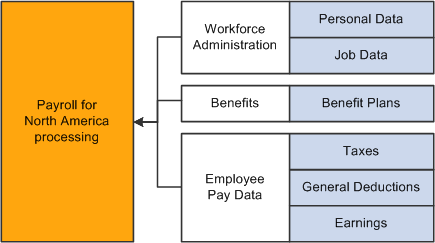
Processing flow from PeopleSoft HRMS (Workforce Administration, Benefits, and Employee Pay Data) to Payroll for North America
See Also
(USF) Adding an Employment Instance
Understanding Tables That Support the Payroll Process
Many tables supply information for the primary payroll process tables. For example:
The Pay Group table uses the information from the Source Bank table and Form table to verify the bank account from which to draw funds and the form on which to print paychecks or advice.
The Pay Calendar table extracts information from the Holiday Schedule table to determine the valid holidays for the organization to which you assign various pay groups.
See Also
Getting Started with Payroll for North America
Understanding Pay Calendar Date Fields
This section discusses:
Interactions with general deductions.
Interactions with additional pay.
Interactions with benefit deductions.
Interactions with job data.
Interactions with the Deduction table.
Note. The examples in this section use a pay period that starts on February 15, 2002, ends on February 28, 2002, and has a check date of March 1, 2002.
Note. Because Payroll for North America balance records have effective dates, you do not have to clear balance accumulators before you begin processing payrolls for a new calendar month, quarter, or year.
 Interactions with General Deductions
To process a general deduction for an employee, the system uses two dates from the Create General Deductions page:
Effective date.
(optional) Deduction end date.
If the effective date of the deduction is before, or on, the pay period end date, the system takes the deduction.
If you specify a deduction end date, the system takes the deduction only if the deduction end date is after, or on, the pay period end date.
The following tables display examples of how the system uses dates in processing general deductions:
|
Deduction Effective Date |
Deduction Taken? |
Reason |
|
February 15, 2002 |
Yes |
Effective date is before, or on, the pay period end date. |
|
February 16, 2002 |
Yes |
Effective date is before, or on, the pay period end date. |
|
February 28, 2002 |
Yes |
Effective date is before, or on, the pay period end date. |
|
March 1, 2002 |
No |
Effective date is not before, or on, the pay period end date. |
|
Deduction End Date |
Deduction Taken? |
Reason |
|
February 15, 2002 |
No |
Deduction end date is not after, or on, the pay period end date. |
|
February 16, 2002 |
No |
Deduction end date is not after, or on, the pay period end date. |
|
February 28, 2002 |
Yes |
Deduction end date is after, or on, the pay period end date. |
|
March 1, 2002 |
Yes |
Deduction end date is after, or on, the pay period end date. |
See Also
Setting Up Employee General Deductions
Interactions with Additional Pay
To process additional pay for an employee, the system uses two dates from the Create Additional Pay page:
Effective date.
(optional) Earnings end date.
If the effective date of the additional pay is before, or on, the pay period end date, the system pays the additional pay.
If you specify an earnings end date, the system pays the additional pay only if the end date is after the pay period begin date.
The following tables display examples of how the system uses dates in processing additional pay:
|
Additional Pay Effective Date |
Additional Pay Paid? |
Reason |
|
February 15, 2002 |
Yes |
Effective date is before, or on, the pay period end date. |
|
February 16, 2002 |
Yes |
Effective date is before, or on, the pay period end date. |
|
February 28, 2002 |
Yes |
Effective date is before, or on, the pay period end date. |
|
March 1, 2002 |
No |
Effective date is not before, or on, the pay period end date. |
|
Earnings End Date |
Additional Pay Paid? |
Reason |
|
February 14, 2002 |
No |
Earnings end date is not after the pay period begin date. |
|
February 15, 2002 |
No |
Earnings end date is not after the pay period begin date. |
|
February 16, 2002 |
Yes |
Earnings end date is after the pay period begin date. |
|
March 1, 2002 |
Yes |
Earnings end date is after the pay period begin date. |
See Also
PeopleSoft Enterprise Human Resources 9.1 PeopleBook: Manage Base Benefits
Interactions with Benefit Deductions
The following table displays examples of how the system uses dates in processing benefit deductions:
|
Deduction Begin Date (Effective Date) |
Benefit Deduction Taken? |
Reason |
|
February 15, 2002 |
Yes |
Deduction begin date is before, or on, the pay period end date. |
|
February 16, 2002 |
Yes |
Deduction begin date is before, or on, the pay period end date. |
|
February 28, 2002 |
Yes |
Deduction begin date is before, or on, the pay period end date. |
|
March 1, 2002 |
No |
Deduction begin date is not before, or on, the pay period end date. |
See Also
PeopleSoft Enterprise Human Resources 9.1 PeopleBook: Manage Base Benefits
Interactions with Job Data
The effective date on the Job Data - Work Location page, together with the action that you select, determines whether the system processes an employee during a payroll run.
The effective date on an employee's Job record represents the first day that a change takes place. For example, if an employee has a Job record with an action of termination and an effective date of January 15, 2002, then January 15, 2002 represents the first day that the employee is no longer working. Therefore, the system does not pay the employee for that day.
Note. (USF) PeopleSoft HRMS for U.S. federal government accommodates statutory and regulatory requirements. Personnel actions that begin new stages of employment (hire, promotion, reassignment, transfer, disciplinary action, and pay rate changes) are effective at the beginning of the business day. Personnel actions such as removal and termination are effective at the end of the business day.
The following tables display examples of how the system uses the effective dates from the job data:
|
Hire Effective Date |
Employee Active on Paysheets? |
Resulting Paysheet Proration |
Reason |
|
February 15, 2002 |
Yes |
Full pay. |
Hire effective date is before, or on, the pay period begin date. |
|
February 16, 2002 |
Yes |
Prorated February 16−February 28. |
Hire effective date is after the pay period begin date. |
|
February 28, 2002 |
Yes |
Prorated February 28 only. |
Hire effective date is after the pay period begin date. |
|
March 1, 2002 |
No |
Not on paysheet. |
Hire effective date is not before, or on, the pay period end date. |
|
Termination Effective Date |
Employee Active on Paysheets |
Resulting Paysheet Proration |
Reason |
|
February 15, 2002 |
No |
Not on paysheet. |
Termination effective date is before, or on, the pay period begin date. |
|
February 16, 2002 |
Yes |
Prorated February 15 only |
Termination effective date is after the pay period begin date. |
|
February 28, 2002 |
Yes |
Prorated February 15–February 27. |
Termination effective date is after the pay period begin date. |
|
March 1, 2002 |
Yes |
Full pay. |
Termination effective date is after the pay period end date. |
Interactions with the Deduction Table
Depending on the employee status on the Job Data - Work Location page (for example, if the employee has been terminated), there is another field that determines whether the system takes benefit and general deductions: the Stop Deduction at Termination field on the Deduction Table - Process page.
If the Stop Deduction at Termination check box is selected, an employee must have an active employee status during the entire pay period for the system to take the deduction.
The following table displays whether the system would take the deduction for employees who were terminated on different days of a pay period:
|
Termination Effective Date |
Deduction Taken? |
Reason |
|
February 15, 2002 |
No |
Employee is not on the paysheet. If paid, the deduction is still not taken. |
|
February 16, 2002 |
No |
Employee is not active for the entire period. |
|
February 28, 2002 |
No |
Employee is not active for the entire period. |
|
March 1, 2002 |
Yes |
Employee is active for the entire period. |
See Also
Understanding Shift Pay Calculation MethodsPayroll for North America provides a variety of methods for setting up and calculating shift pay.
This section discusses:
Comparison of shift pay methods.
Earnings code based on other earnings or special accumulator.
Earnings code with adjustment factor.
Pay group setID and Shift table.
Comparison of Shift Pay Methods
This section describes the shift pay methods and then compares them.
Shift Method Descriptions
This table describes the primary shift pay methods:
|
Method |
Description |
|
Earnings based on other earnings or accumulator. |
Create a separate earnings code for shift differential based on another earnings code or a special accumulator of earnings and pay it out as other earnings. You can set up shift differential as a percentage of amount (amount based) or a flat rate per hour (hours based). |
|
Rate adjustment factor or earnings adjustment factor. |
Add an adjustment factor to applicable earnings on the earnings table:
|
|
Pay group setID and Shift table. |
Create each applicable shift for a setID on the Shift table. Assign each employee to one of these shifts. Specify the shift differential on the shift table or at the employee level in Job data. |
Shift Method Comparisons
This table briefly compares the shift pay methods:
|
Method |
Use Shift Table? |
Earnings Elig for shift |
Additional Pay Setup |
Shift Earnings to Paysheet |
Shift Pay on Paycheck |
|
Earnings based on other earnings or accumulator |
No |
Deselected |
Assign shift earnings code. |
System adds shift earnings code as other earnings. No manual paysheet entry. |
Separate |
|
Rate adjustment factor or earnings adjustment factor |
No |
Deselected |
Assign shift earnings code. |
System adds shift earnings code as other earnings. Manually enter shift hours. |
Separate |
|
Pay group setID and Shift table |
Yes |
Selected |
Not required |
No separate shift earnings code. No manual paysheet entry. |
Not separate |
The following sections describe these methods in more detail.
Earnings Code Based on Other Earnings
Use the Based on Other Earnings/Hours group box on the Earnings Table - Calculation page to calculate shift pay based on either hours or amount of another earnings code or a special accumulator.
Calculation Description
This table describes the pages and fields that you can use to enter shift differential when you base the shift pay on other earnings:
|
Page |
Shift Differential Entry |
Description of Shift Earnings Calculation |
|
Earnings Table - General |
Unit/Override Rate |
Shift differential rate times hours of the specified earnings or accumulator. |
|
Earnings Table - Calculation |
Multiplication Factor |
Shift differential percent times the amount of the specified earnings or accumulator. |
|
Additional Pay |
Hourly Rate |
Shift differential rate times hours of the specified earnings or accumulator. |
Setup Summary
This table summarizes how to set up shift pay using each of these calculation methods:
|
Shift Differential Entry |
Earnings Table Setup Summary |
Additional Pay Setup Summary |
|
Unit Override Rate |
General page:
Taxes page: Deselect Elig for Shift Differential. Calculation page:
|
Note. If you set up an earnings code for shift pay that uses the unit/override rate and is based on a single earnings code, you must ensure that you include the shift earnings code on each payline that contains the earnings on which it is based. For example, if the shift earnings is based on the REG earnings, and if you manually add an additional REG payline to the paysheet, you must manually add the shift earnings code to that payline as well. |
|
Multiplication Factor |
General page: Payment type must be Amounts Only. Taxes page: Deselect Elig for Shift Differential. Calculation page:
|
|
|
Additional Pay Hourly Rate |
General page: Select Hours Only as the payment type. Taxes page: Deselect Elig for Shift Differential. Calculation page:
|
|
Example of Shift Calculations When Based on Other Earnings
All of the example calculations use this data:
|
Variable |
Value |
|
Shift earnings based on single earnings code |
REG (base pay earnings) |
|
Shift-eligible hours in pay period |
40 |
|
REG earnings for pay period |
$400.00 |
|
Base pay hourly rate |
$10.00 |
This table shows the shift calculation for each differential entry method:
|
Differential Entry |
Value |
Shift Earnings Calculation |
Total Earnings (REG + Shift) |
|
Unit Override Rate |
$2.00 |
40 x $2.00 = $80.00 |
$480.00 |
|
Multiplication Factor |
.5 |
$400.00 x .5 = $200.00 |
$600.00 |
|
Hourly Rate in Additional Pay |
$3.00 |
40 x $3.00 = $120.00 |
$520.00 |
Note. The system reports the regular earnings and the shift earnings separately on the paycheck.
See Also
Establishing Special Accumulator Codes
Earnings Code with Adjustment Factor
You can set up earnings codes for shift pay using these factors on the Earnings Table – Calculation page:
|
Factor |
Description |
|
Rate Adjustment Factor |
An amount that adjusts the hourly rate that is associated with the earnings. |
|
Earnings Adjustment Factor |
An amount that adjusts the total earnings amount calculated for the earnings. |
Here are some additional considerations for using earnings code adjustment factors to calculate shift pay:
The paysheet must contain the shift earnings code in Other Earnings.
The system adds the shift earnings code during paysheet creation if you set it up on the Create Additional Pay page for the employee.
You must enter the shift hours for each shift code on the employee's paysheet.
You cannot use these adjustment factors to base the shift pay on other earnings or special accumulators.
You can use these factors in conjunction with the Hourly Rate field on the Create Additional Pay page for the employee.
Example: Rate Adjustment Factor Calculation
The system uses this method to calculate the shift pay with a rate adjustment factor:
|
Step |
Formula |
|
Calculate new hourly rate |
hourly rate (job data or additional pay) + adj. factor = new hourly rate |
|
Calculate the amount of pay |
new hourly rate x hours = amount |
This example shows the calculation of a rate adjustment factor of $5.50 for an employee who worked 8 hours with an hourly rate of $10.00 in the pay earnings record:
|
Step |
Example |
|
Calculate new hourly rate |
$10.00 + $ 5.50 = $15.50 |
|
Calculate the amount of pay |
$15.50 x 8 = $124.00 |
Example: Earnings Adjustment Factor Calculation
The system uses this method to calculate the shift pay with an earnings adjustment factor:
|
Step |
Formula |
|
Calculate earnings amount |
hours x hourly rate (job data or additional pay) = earnings amount |
|
Calculate new earnings amount |
earnings amount + factor = new earnings amount |
This example shows the calculation of an earnings adjustment factor of $25.00 for an employee who worked 8 hours with an hourly rate of $10.00 in the pay earnings record:
|
Step |
Example |
|
Calculate earnings amount |
8 x $10 = $80 |
|
Calculate new earnings amount |
$80 + $25 = $105.00 |
Pay Group SetID and Shift Table
This section discusses:
Summary of shift pay setup using the Shift table.
Example of relationship between setID, pay group, and shift.
Shift differential processing.
Shift differential calculation formulas.
Examples of shift differential calculations.
Note. This method of calculating shift applies only to hourly and exception hourly employees, based on the employee type specified on the employee's job data. The system does not calculate shift pay for employee type S (salaried).
Summary of Shift Pay Setup Using the Shift Table
To set up shift differential using the pay group setID and the Shift table:
Set up setIDs.
Verify or add values to the Translate table to identify the shifts that you intend to set up.
Set up shifts for setIDs, specifying the differential as a rate, a factor, or both.
Note. You can set up the same shift differential for all employees in the shift, or you can specify the differential separately on the Job Information page for each employee assigned to the shift.
Link a shift SetID to a pay group.
Assign employees to a valid shift on the Job Information page.
Select Elig. for Shift Differential (eligible for shift differential) on the Earnings Table - Taxes page for applicable hourly earnings codes.
Selecting this check box triggers shift processing during paysheet creation and payroll calculation.
See Entering Special Options and Tax Methods for Earnings Codes.
Relationship Between SetID, Pay Group, and Shift
The employee's shift differential is based on the Shift table entry for the setID of the employee's pay group and the employee's shift assignment.
This example shows the shift table entries for a second shift that has two rate differentials that are linked to different setIDs:
|
SetID |
Shift ID |
Differential |
|
SHARE |
Shift 2 |
$1.00 |
|
USA |
Shift 2 |
$2.00 |
Two pay groups are assigned to shift 2.
This table illustrates that the setID assigned to the pay group identifies the correct shift 2 differential for that pay group:
|
SetID |
Pay Group |
Shift 2 Differential |
|
SHARE |
Weekly A |
$1.00 |
|
USA |
Biweekly B |
$2.00 |
Shift Differential Processing
Here's how payroll processing uses the setup data:
The Paysheet Creation COBOL SQL process (PSPPYBLD) uses job data to populate the shift value on the paysheet.
The Pay Calculation COBOL SQL process (PSPPYRUN) validates the shift value on the paysheet against the Shift table and against the setID that is associated with the employee's pay group.
To process shift pay, the system checks:
Employees' job records and paylines to verify that you have assigned each of them to a shift and that the employee type in job data is hourly or exception hourly.
The Shift table to determine how you've defined each shift and whether there are any associated shift differentials that affect earnings.
The Earnings table to see whether the earnings are eligible for shift differential.
There must be an entry on the Shift table for the setID that is linked to the pay group. If a shift value is not defined on the Shift table, the system generates an error message during pay calculation that the shift value was not found.
Note. If your organization doesn't use multiple shifts, you must still set up the Not Applicable (N/A) shift with blank values in the Shift table for each pay group setID. N/A is the default shift in Job data. Setting up this entry in the Shift table avoids potential processing errors if an earnings code is created with Elig for Shift Differential selected (the default value), which would trigger the shift pay processing of the employee's shift identified in Job data.
Shift Differential Calculation Formulas
This table defines terms used in shift differential calculation:
|
Term |
Definition |
|
Shift rate |
The shift differential expressed as a flat amount per hour. |
|
Shift factor |
The shift differential percentage. |
|
Pay rate |
The hourly rate in the Pay Earnings record. |
|
Hours worked |
The number of hours associated with the earnings code for that pay period. |
The system follows these steps to calculate shift differentials:
|
Step |
Formula |
|
Calculate the shift premium |
shift rate + (shift factor × pay rate) = shift premium |
|
Adjust the total earnings eligible for shift differential |
(pay rate + shift premium) × hours worked = adjusted earnings |
Example: Shift Differential Calculations
In this example, the company set up three shifts and shift differentials as follows:
|
Shift |
Rate |
Factor |
|
1 |
$0.50 per hour |
|
|
2 |
|
10 percent |
|
3 |
$1 per hour |
15 percent |
This table shows the earnings calculation in each shift for an hourly employee earning $10.00 an hour and working 40 shift-eligible hours:
|
Shift |
Step 1. Shift Premium Calculation |
Step 2. Earnings Calculation |
|
1 |
$0.50 + (0 × $10) = $0.50 |
($10 + $0.50) × 40 = $420 |
|
2 |
0 + (0.10 × $10) = $1 |
($10 + $1) × 40 = $440 |
|
3 |
$1 + (0.15 × $10) = $2.50 |
($10 + $2.50) × 40 = $500 |
Note. The system does not report shift earnings calculated with the Shift table as a separate earnings code or earnings line on paychecks and reports such as the payroll register.
Setting Up the Shift Table
To set up shifts, use the Shift Table (SHIFT_TABLE) component.
This section provides an overview of shifts and discusses how to set up a shift.
Understanding ShiftsYou define shifts in two places:
In the Shift table, which the system checks during batch processes.
Note. If your organization doesn't use multiple shifts, you must still set up the Not Applicable (N/A) shift with blank values in the Shift table for each pay group setID. N/A is the default shift in Job data. Setting up this shift avoids potential processing errors if an earnings code is created with Elig for Shift Differential selected (the default value).
In a series of values in the Translate table, which the system uses when performing online edits on pages, such as paysheets.
PeopleSoft delivers the following basic shift values in the Translate table:
1 (first shift)
2 (second shift)
3 (third shift)
Not Applicable (for no shift)
Note. The values in the Shift table and Translate table must match. You must add new shift values to the Translate table using PeopleSoft Application Designer before adding them to the Shift table.
Note. The values in the Shift table and Translate table must match. You must add new shift values to the Translate table using PeopleSoft Application Designer before adding them to the Shift table. If you don't have multiple shifts, deactivate all shift values in the Translate table (except for the N/A shift value), and define the N/A shift in the Shift table.
Note. Shift earnings are not currently broken out on reports, such as paychecks and payroll registers. To review shift earnings separately, set them up as earnings codes in the Earnings table.
See Also
Pay Group SetID and Shift Table
Pages Used to Set Up and Report on Shifts|
Page Name |
Definition Name |
Navigation |
Usage |
|
SHIFT_TABLE |
Set Up HRMS, Product Related, Payroll for North America, Compensation and Earnings, Shift Table, Shift Table |
Define a shift. Note. Note. If you don't have shifts, you must still define the Not Applicable shift with blank values on the Shift table. |
|
|
PRCSRUNCNTL |
Set Up HRMS, Product Related, Payroll for North America, Comp/Earnings Table Reports, Shift, Shift Report |
Run PAY708, which generate a report that lists information from the Shift table. |
Setting Up a Shift
Access the Shift Table page (Set Up HRMS, Product Related, Payroll for North America, Compensation and Earnings, Shift Table, Shift Table).
Shift Table Information
|
Time In Hour, Time In Minute, Time Out Hour, and Time Out Minute |
The time format uses a 24-hour clock. To define a second shift from 4 p.m. to 11:59 p.m., enter 16, 00, 23, and 59. These fields are for your information only. |
Employee Shift Differential?
|
Specified at Employee level |
Select this check box if shift premiums vary from employee to employee within the shift and setID. This option enables you to define the shift premium rate or factor for any employee assigned to the shift at the employee level on the Job Information page. |
|
Rate and Factor |
If you deselect the Specified at Employee level check box, enter the shift differential as a rate (flat amount), a factor (percentage), or both. Note. If you enter a rate or factor, it applies to all employees assigned to that shift. You cannot override these definitions at the employee level. |
See Also
Establishing Special Accumulator Codes
To set up special accumulators, use the Special Accumulator Table (SPCL_EARNS_TABLE) component.
This section provides an overview of special accumulators and lists the pages used to establish special accumulator codes.
Understanding Special AccumulatorsThe Savings Plan table and the General Deduction table use special accumulator codes in calculation routines.
Here's how to set up special accumulator codes:
Define special accumulator codes on the Special Accumulator Table page.
Use the Earnings Table - Special Process page to assign earnings codes to add to or subtract from the accumulator balances.
Use the Deduction Table - Tax Class page to assign deduction codes to add to or subtract from accumulator balances.
Special Accumulator Example
To understand special accumulators, consider this example of setting up a 401(k) retirement savings plan to calculate the 401(k) deduction as a percentage of regular, overtime, holiday, vacation, and sick earnings:
Create a three-character code for the Special Accumulator table, such as 401.
This code accumulates all earnings that affect 401(k).
For each valid earnings code (such as regular or overtime), enter the 401 special accumulator code on the Earnings Table - Special Process page, and select Adds to Special Balance in the Effect on Special Balance field.
This tells the system to add these earnings to the 401 special accumulator.
Define the 401(k) calculation in the Savings Plan table, and specify Use 401 Special Accumulator Instead of Total Gross.
The system now calculates 401(k) deduction amounts based on the total amount of earnings designated with the 401 special accumulation code.
(USA) Special Accumulator for Supplemental Earnings
Create a special accumulator code to store each employee's taxable gross for supplemental payments to identify the correct point at which the higher federal supplemental withholding tax rate applies. Enter this special accumulator on the Earnings Table - Special Process page with T selected in the Effect on Special Balance field for each earnings code identified as using the supplemental tax method.
Note. You must select T in the Effect on Special Balance field for each earnings code identified as using the supplemental tax method.
Pages Used to Establish Special Accumulator Codes|
Page Name |
Definition Name |
Navigation |
Usage |
|
SPCL_EARNS_TABLE |
Set Up HRMS, Product Related, Payroll for North America, Compensation and Earnings, Special Accumulator Table, Special Accumulator Table |
Define accumulators for deduction calculation. |
|
|
SPCL_ACCUM_EARNS |
Set Up HRMS, Product Related, Payroll for North America, Compensation and Earnings, Review Special Accumulators, Earnings |
Display the earnings codes that you specified in the Earnings table as having an effect on this special accumulator. This page is display-only. |
|
|
SPCL_ACCUM_DEDCD |
Set Up HRMS, Product Related, Payroll for North America, Compensation and Earnings, Review Special Accumulators, Deductions |
Display the deduction codes that you specified in the Deduction table as having an effect on this special accumulator. This page is display-only. |
|
|
PRCSRUNCNTL |
Set Up HRMS, Product Related, Payroll for North America, Comp/Earnings Table Reports, Special Accumulator, Special Accumulator Report |
Run PAY713, which lists information from the Special Accumulator table. It contains codes that isolate earnings for deductions that are stated as a percent of gross such as 401(k). |
Setting Up Holiday Schedules
To set up holiday schedules, use the Holiday Schedule component (HOLIDAY_SCHED_TBL).
This section provides an overview of holiday schedules and lists the page used to set them up.
Understanding Holiday SchedulesBecause holidays might vary for different segments of the employee population (depending on location, work schedules, or other factors), you can define as many holiday schedules as you need. For example, if you pay some employees based on an eight-hour day and others on a 7.5-hour day, you must define a separate holiday schedule for each. The same applies if some employees recognize a holiday on the actual day itself and others on a different date. To add holiday schedules, complete the Holiday Schedule page for each schedule:
The system automatically establishes an employee's holiday earnings based on the scheduled holidays in the Holiday Schedule table.
Do not include floating holidays on this list.
If a defined holiday occurs within the pay period during the Create Paysheet COBOL SQL process (PSPPYBLD), the system automatically creates a holiday earnings code on the paysheet for the number of hours that are indicated in the Holiday Schedule table.
If you selected the Hours Only (Reduce from Reg Pay) (hours only [reduce from regular pay]) option on the Earnings Table - Taxes page, the system reduces the number of regular hours by the number of holiday hours during the Pay Calculation COBOL SQL process (PSPPYRUN).
Specify the holiday earnings code in the Pay Group table.
The system also uses the default holiday schedule from the Pay Group table during the Calendar Build COBOL SQL process (PSPCLBLD) to ensure that check issue dates do not fall on weekends or holidays.
Note. After you define all of your holiday schedules, you can specify a default holiday schedule for the location on the Location Profile page or for the pay group on the Pay Group Table - Calc Parameters page. You can override this default on any employee's Job Data record.
Page Used to Set Up Holiday Schedules|
Page Name |
Definition Name |
Navigation |
Usage |
|
HOLIDAY_SCHED_TBL |
Set Up HRMS, Foundation Tables, Organization, Holiday Schedule, Holiday Schedule |
Designate holidays for payroll processing. |
Setting Up Rapid Entry Paysheet Templates
To set up rapid entry paysheet templates, use the Rapid Entry Paysheet Template component (PYRE_TEMPLATE).
This section provides an overview of rapid entry paysheet templates and discusses how to define rapid entry paysheet templates.
See Also
Entering Hours or Amounts Using Rapid Entry Paysheets
Understanding Rapid Entry Paysheet TemplatesPayroll for North America enables you to create rapid entry paysheet templates that are used as a basis for rapid entry paysheets. You can create three types of templates:
Hours.
Use this template type to set up a template for earnings codes based on hours with no associated dollar amounts.
Amounts.
Use this template type to set up a template for earnings codes based on amounts with no associated hours.
Hours or Amounts.
Use this template type to set up a template for both earnings codes that accept hours and earnings codes that accept amounts.
You can create as many templates as required for each template type. In each template you specify the preset earnings codes that appear on rapid entry paysheets that are based on the template. For Hours and Amounts type templates, you can also select an additional (not preset on the template) earnings code on the rapid entry paysheet.
Fields Available by Template Type
The fields that are available on the Rapid Entry Template page vary according to the template type that you enter when you access the page. The template type determines the type of earnings code that can be specified in the template. This table describes the available fields for each template type:
|
Template Type |
Fields on Template |
|
Hours |
Three fields for specifying earnings codes. When the template type is Hours, only the earnings codes on the Earnings table with a payment type of Either Hours or Amount OK, Both Hours and Amount OK, Hours Only, or Unit/Override Rate are available for selection. |
|
Amounts |
Two fields for specifying earnings codes. When the template type is Amounts, only earnings codes on the Earnings table with a payment type of Either Hours or Amount OK, Both Hours and Amount OK, or Amounts Only are available for selection. |
|
Hours or Amounts |
Three fields for specifying earnings codes and three fields for the corresponding earnings code types. When the template type is Hours or Amounts, you can select earnings codes that accept hours and earnings codes that accept amounts. Note. You cannot add an additional earnings code to a rapid entry paysheet that is based on an Hours or Amounts type template. |
Page Used to Set Up Rapid Entry Paysheet Templates|
Page Name |
Definition Name |
Navigation |
Usage |
|
PYRE_TEMPLATE |
Set Up HRMS, Product Related, Payroll for North America, Payroll Processing Controls, Rapid Entry Paysheet Template, Rapid Entry Paysheet Template |
Define the type of earnings and earnings codes to be used in the Rapid Entry Paysheet component (PYRE_DATA_ENTRY). You can define templates based on hours, amounts, or a combination of hours and amounts. |
Defining Rapid Entry Paysheet Templates
Access the Rapid Entry Paysheet Template page (Set Up HRMS, Product Related, Payroll for North America, Payroll Processing Controls, Rapid Entry Paysheet Template, Rapid Entry Paysheet Template).
Note. You cannot change the template type after the template is created.
|
Earnings Code |
Select the earnings codes that you want to preset for the template. Available earnings codes are determined by the template type. |
|
Earnings Code Type |
This field is only available if the template type is Hours or Amounts. Select an earnings code type for each earnings code that identifies whether hours or an amount will be entered on the rapid entry paysheet for the earnings. |
Setting Up Continue with Errors Processing
This section provides overviews of Continue with Errors processing and setup and lists the pages used to continue with errors while processing payroll.
Understanding Continue with Errors ProcessingThe system issues various types of error messages for situations encountered during the payroll calculation. You can set up Continue with Error functionality to enable certain employee-level error messages that have been identified on the Pay Message table to be transferred to an off-cycle paysheet for further reconciliation and processing, which enables the current payroll to continue.
Note. You cannot bypass errors that would stop the calculation. Messages that stop the payroll process are system error messages. System messages are not available to be bypassed.
After resolving all errors that were not bypassed, you can run the final pay calculation and transfer the paysheets with bypassed messages to a designated off-cycle paysheet that you've set up to process the transferred employees. You should reconcile and process the transferred paysheets so that they are confirmed before the next on-cycle processes.
See Also
Understanding Continue with Errors SetupThis table describes continue with errors setup steps that you should complete before running the Pay Calculation process:
|
Page |
Specific Setting |
Processing Description |
|
Pay Message Table |
|
When the number of occurrences of the message reaches the maximum bypass value, the system bypasses none of the errors. You must correct the errors before continuing the payroll process. |
|
Pay Group Table – Process Control |
|
All pay groups in the same pay run ID must have the same Continue with Errors setting. The Error Pay End Date field indicates the off-cycle date to be used for the transfer of the erred paysheets. You can use either a new stand-alone off-cycle calendar or an existing unprocessed off-cycle pay calendar. |
|
Pay Calendar Table – Pay Confirm Options |
Select Continue with Errors. |
The system supplies the error pay end date on the pay calendar based on the error pay end date option selected on the Pay Group table. |
|
Calculate Payroll |
Select Transfer Calc Errors when you run the final calculation. |
Transfer Calc Errors moves paysheets in error to off-cycle processing Note. To ensure that all error conditions have been resolved, first run the calculation with (Re)Calculate All Checks selected before running the final calculation. with the Transfer Calc Errors option selected. |
The system doesn't assume the check date on the original calendar when transferring the error paysheets to the off-cycle calendar.
The Error Pay End Date field on the Pay Group Table page determines the off-cycle date to be used for the transfer of the erred paysheets as follows:
Same Day: The default date is the same pay period end date as the pay calendar.
Next Day: The default date is the next day and requires an off-cycle pay calendar with a new pay run ID.
Pages Used to Set Up Continue with Errors Processing|
Page Name |
Definition Name |
Navigation |
Usage |
|
PAY_MESSAGE_TABLE |
Set Up HRMS, Product Related, Payroll for North America, Payroll Processing Controls, Pay Message Table |
Update the Pay Message table with options to continue processing of nonsystem errors. |
|
|
PAYGROUP_TABLE2 |
Set Up HRMS, Product Related, Payroll for North America, Payroll Processing Controls, Pay Group Table |
Specify continue with errors process controls for the pay group. |
|
|
PAY_CALENDAR_TBL2 |
Set Up HRMS, Product Related, Payroll for North America, Payroll Processing Controls, Pay Calendar Table |
Specify continue with errors process options for the pay calendar. |
|
|
RUNCTL_PAY_CALC |
|
Specify continue with errors processing during pay calculation processing. |
See Also
Understanding Continue with Errors Setup
Reviewing and Modifying Payroll Messages
Setting Up Process Controls for Pay Groups
Selecting Error Processing Options
Defining the Final Check Process
To set up the final check program, use the Final Check Action Reason (TERM_ACTN_RSN), Final Check Program Table (TERM_PGM_TBL), and Final Check Program Table USF (GVT_TERM_PGM_TBL) components.
This section provides an overview of the Final Check process and discusses how to:
Define final check action and action reason code combinations.
Establish a final check program.
Define final check earnings.
Define final check leave accrual rules.
Define final check deductions.
Clone a final check program.
See Also
Creating Final Check Paysheets
Processing a Final Check Request
Understanding the Final Check Process
Employee terminations occur for various reasons: some are initiated by the employee, others by the employer. When employment is terminated, regardless of the reason, the law requires employers to give employees their final wages. Some states require that the employee receives final wages before leaving the premises.
The Final Check process enables you to:
Define a set of termination rules as a final check program that identifies the earnings, deductions, and leave plans to process when creating a final check.
Automate the application of these rules to provide a clean, quick way of creating final checks.
Create a final check for a terminated employee whether or not the termination has been processed through PeopleSoft Human Resources.
To process final checks for an employee whose termination has not been processed through PeopleSoft Human Resources, enter the employee ID, termination date, and final check program ID on the Request Final Check page.
Note. Because this process is workflow-enabled, the system automatically generates a worklist item to notify the personnel administrator that a final check request has been created for an employee who is not yet terminated on the Job page.
Assign a final check program to each pay group using a final check program ID that you identify.
The pay group's final check program becomes the default for final check requests of terminated employees in that pay group. However, you can override the default final check program for any employee on the Request Final Check page.
Define a set of rules in each program for processing deductions or refunds on an employee's final check.
For example, you might refund or override a general or benefit deduction on a final check.
The system adds deductions and refunds to an employee's paysheet as one-time deductions. This enables a payroll administrator to further override any values on collections or refunds by deduction class, if there are any additional rules that are outside the scope of final checks.
Pages Used to Define the Final Check Process|
Page Name |
Definition Name |
Navigation |
Usage |
|
TERM_ACTN_RSN |
Set Up HRMS, Product Related, Payroll for North America, Payroll Processing Controls, Final Check Action/Reason, Final Check Action/Reason |
Define the action and action reason code combinations that automatically trigger a final check request when an employee termination Job record enters the system. |
|
|
TERM_PGM_TBL |
|
Establish a final check program ID description. |
|
|
TERM_PGM_DEFERN |
|
Define earnings for the final check program. |
|
|
TERM_PGM_DEFLVE |
|
Define rules that apply to paying leave accruals to employees for whom you decide to pay earned or prorated accruals. |
|
|
TERM_PGM_DEFDED |
|
Define which deductions to include in a final check and which limits and special rules to use when calculating the deduction. |
|
|
RUNCTL_PAY751 |
Set Up HRMS, Product Related, Payroll for North America, Comp/Earnings Table Reports, Final Check Program, Final Check Program Report |
Generate the PAY751 report. The report lists information from the Final Check Program table, which contains final check processing rule definitions for earnings, leave accruals, and deductions. |
|
|
RUNCTL_FCXCLONE |
Set Up HRMS, Product Related, Payroll for North America, Payroll Processing Controls, Clone Final Check Program, Final Check Program Clone |
Run the Final Check Pgm Clone Utility (final check program clone utility) SQR Report process (FCXCLONE). |
Defining Final Check Action and Action Reason Code Combinations
Access the Final Check Action/Reason page (Set Up HRMS, Product Related, Payroll for North America, Payroll Processing Controls, Final Check Action/Reason, Final Check Action/Reason).
|
Reason Code |
Select an action reason to associate with the action code. Maintain action codes and reasons on the Action Reason Table page. |
Establishing a Final Check Program
Access the Final Check Program Table - Program Definition page (Set Up HRMS, Product Related, Payroll for North America, Payroll Processing Controls, Final Check Program Table, Program Definition).
|
Include T&L Payable Time (include time and labor payable time) |
Select this check box if you have an interface with PeopleSoft Time and Labor. If you select this check box, the system uses the time from PeopleSoft Time and Labor to create the paysheet for the final check and marks the time and labor paysheet as processed by final check. |
Defining Final Check Earnings
Access the Final Check Program Table - Earnings Definition page (Set Up HRMS, Product Related, Payroll for North America, Payroll Processing Controls, Final Check Program Table, Earnings Definition).
|
Payout Option |
Select: Earns Amt (earnings amount): Select this value if the Final Check process uses the regular earnings amount to pay the earnings for the earnings code. Goal Dif (goal difference): Select this value if the Final Check process searches for a corresponding Additional Pay record for the earnings code and calculates the remaining balance on the employee's goal amount. |
Note. The final check includes only earnings that you identify here. For example, to include additional pay earnings for a car, you must include the appropriate earnings code for those earnings on this page. Otherwise it is not included in employees' final checks.
Defining Final Check Leave Accrual Rules
Access the Final Check Program Table - Leave Accrual Definition page (Set Up HRMS, Product Related, Payroll for North America, Payroll Processing Controls, Final Check Program Table, Leave Accrual Definition).
Leave
|
Override Limit Hours |
To apply an override when the payout earned and prorated hours exceed the limit, enter the number of hours. |
|
Payout Earnings Code |
Select a payout earnings code to use for paying the accruals that are earned and awarded for the benefit plan. You can pay only the earned and awarded accruals, only the prorated portion, or both. Define the earnings code that you use for paying the earned and awarded accruals in the Earnings table as earnings that do not reduce regular pay but do add to hours taken. This ensures the integrity of the Accrual Balance records when you pay employee leave accruals upon termination. |
|
Process Negative |
Select this check box to pay negative accruals. |
|
Prorate Earnings Code |
Select a prorated earnings code to use for paying the prorated portion of accruals for the benefit plan. You can pay either:
Define the earnings code that you use for paying prorated accruals as earnings that do not reduce regular pay, but do add to hours taken and hours adjusted. This ensures the integrity of the Accrual Balance records when you pay employee leave accruals upon termination. |
Accrual Proration
If you prorate accruals for the benefit plan, use this group box to establish the proration rules.
|
Months of Service |
To prorate accruals by months of service, enter the monthly increments. For example, less than or equal to 1 month of service, 2 months of service, and so on. The system computes the months of service based on the employee's termination date and the last date on which you ran the Run Leave Accruals COBOL SQL process (FGPACCRL). |
|
Hours of Service |
To prorate accruals by hours of service, enter the hourly increments. For example, less than or equal to 160 hours of service, 320 hours of service, and so on. |
Defining Final Check Deductions
Access the Final Check Program Table - Deduction Definition page (Set Up HRMS, Product Related, Payroll for North America, Payroll Processing Controls, Final Check Program Table, Deduction Definition).
|
Deduction Code |
Select the deduction code that identifies the deduction in the Deduction table. |
|
Processing Rule |
Select a processing rule for each deduction code: Col GolDif (collect goal difference): Select this value to collect general deductions only. You collect the amount of the general deduction data goal amount minus the goal balance. Col PerDed (collect pay period deduction): Select this value to collect general deductions and benefit deductions. You collect the amount of the scheduled pay period deduction. Ref ESPP (refund employee stock purchase plan balance): This value is reserved for future use. Ref GolBal (refund goal balance): Select this option to refund general deductions only. You refund the amount of the general deduction data goal balance. Ref LstDed (refund last deduction): Select this value to refund general deductions and benefit deductions. You refund the amount of the pay deduction data current deduction, which represents the amount deducted at the last time the deduction was taken. Ref MTDBal (refund month-to-date balance): Select this value to refund general deductions and benefit deductions. You refund the amount of the deduction balance data MTD deduction. Ref QTDBal (refund quarter-to-date balance): Select this value to refund general deductions and benefit deductions. You refund the amount of the deduction balance data QTD deduction. Ref YTDBal (refund year-to-date balance): Select this value to refund general deductions and benefit deductions. You refund the amount of the deduction balance data YTD deduction. Ref SBBal (refund savings bond balance): Select this value to refund U.S. Savings Bond deductions. The amount that you refund depends on the status of each bond. You refund the bond log data accumulated amount when the bond log status is Not Ready to Disburse (N) or Funds Disbursed (D). You refund the accumulated amount when the bond log status is Ready to Disburse (R). Ref SBBRTD (refund savings bond balance and disburse amount): Select this value to refund U.S. Savings Bond deductions. The amount that you refund depends on the status of each bond. You refund the bond log data accumulated amount when the bond log status is Not Ready to Disburse (N) or Funds Disbursed (D). You refund the accumulated amount and disburse amount when the bond log status is Ready to Disburse (R). |
Important! The Final Check process performs normal payroll arrears processing whether or not you include the deduction in the final check program.
Cloning a Final Check ProgramAccess the Final Check Program Clone page (Set Up HRMS, Product Related, Payroll for North America, Payroll Processing Controls, Clone Final Check Program, Final Check Program Clone).
Identify the final check program that you're cloning, specify a final check program ID and the effective date for the new program, and indicate which program elements to copy to the new final check program.
Setting Up to Print and View Paychecks with XML Publisher (XMLP)
To set up to print and view paychecks with XMLP, use the Paycheck Options Table (PY_SSP_OPTIONS) component.
This section provides overviews of setup steps and XMLP templates and discusses how to:
View or modify the delivered report template.
Specify XMLP printing and self-service options.
Note. These setup steps are not necessary if you use the SQR processes to print checks and advices.
See Also
Printing Paychecks and Direct Deposit Advices
Understanding Setup StepsBefore you can create paychecks and direct deposit advices in PDF format, you must complete these setup steps:
Configure Integration Broker and Report Manager.
Update the delivered report definitions:
Modify the delivered paycheck and advice templates if necessary for your organization.
For example, you probably want to add a signature image and update the MICR font. You might also want to add a company logo or watermark.
(Optional) Specify the output folder for the report files.
(Optional) Specify the users who can access the reports in Report Manager.
Specify XMLP printing and self-service options.
Set up the Form table with the form IDs and the last used form number.
See Setting Up the Form Table for Printing Checks and Direct Deposit Advices.
See Also
Enterprise PeopleTools PeopleBook: PeopleSoft Integration Broker
Enterprise PeopleTools PeopleBook: PeopleSoft Process Scheduler
Understanding XMLP Reports and Templates
The PDF check and advice creation PSJob processes (PYCHKUSA, PYCHQCAN, PYDDAUSA, or PYDDACAN) use the PeopleTools XML Publisher to print checks and advice forms.
Payroll for North America delivers these XMLP reports as RTF templates that define the layout of the printed checks and advices:
|
Report Name |
Description |
Data Source Type |
Data Source ID |
|
PRTCNADV |
Print Canadian direct deposit advice forms. |
XML File |
CNADVICES |
|
PRTCNCHQ |
Print Canadian cheques. |
XML File |
CNCHEQUES |
|
PRTUSADV |
Print U.S. direct deposit advice forms. |
XML File |
USADVICES |
|
PRTUSCHK |
Print U.S. checks. |
XML File |
USCHECKS |
Payroll for North America also delivers these reports as RTF templates to display paychecks in the ePay self-service View Paycheck transaction:
|
Report Name |
Description |
Data Source Type |
Data Source ID |
|
SSPCNADV |
Canadian self-service advice form |
XML File |
CNADVICES |
|
SSPCNCHQ |
Canadian self-service paycheque |
XML File |
CNCHEQUES |
|
SSPUSADV |
U.S. self-service advice form |
XML File |
USADVICES |
|
SSPUSCHK |
U.S. self-service paycheck |
XML File |
USCHECKS |
You can modify the delivered templates using PeopleTools XMLP functionality to address your specific formatting requirements. For example, you can add a signature image and MICR font to the check printing templates. After modifying each template, you must upload it to the corresponding report definition.
See Viewing or Modifying the Delivered Report Template.
Note. (USA) As delivered, the templates comply with section 508 requirements. If you modify the templates, you are responsible to ensure that the new templates meet Section 508 standards.
See Also
Enterprise PeopleTools PeopleBook: XML Publisher for PeopleSoft Enterprise
Working with Checks and Direct Deposit
Managing Pay Information for Payroll for North America
Pages Used to Set Up Paycheck Printing and Viewing with XMLP
|
Page Name |
Definition Name |
Navigation |
Usage |
|
PSXPRPTTMPL |
Reporting Tools, XML Publisher, Report Definition, Template |
View or modify the existing template. |
|
|
PY_SSP_SETUP_OPTN |
Set Up HRMS, Product Related, Payroll for North America, Payroll Processing Controls, Paycheck Options, Paycheck Options |
Specify XMLP printing and self-service options. |
See Also
Enterprise PeopleTools PeopleBook: XML Publisher for PeopleSoft Enterprise
Viewing or Modifying the Delivered Report Template
Access the Template page (Reporting Tools, XML Publisher, Report Definition, Template).
Viewing the Existing Template
|
Template File |
Click the template file name to open the RTF template in a new window or save it to a location of your choice. |
|
Preview |
Click to view an example of the report using sample data registered with the data source. |
Modifying the Existing Template
To modify an existing template:
Click Download on the Template page and row for the existing RTF template that you want to copy.
Save a copy of the downloaded template with a new RTF file name (*.rtf).
Make the desired modifications to the new template file and save.
These are some of the changes that you might want to make:
Change the dummy signature image.
Identify the valid signature image.
Change the MICR font.
Add a new effective dated row in the Template Files scroll area on the Template page.
Update these options:
|
Effective Date |
Enter the date that the system should begin to print and display paychecks with this template. |
|
Status |
Select the Active status for the new template. Note. Retain the active status of all historical template files to ensure that the correct template is applied to paychecks viewed in self service. |
Click Upload and select the new template file.
(Optional) Click Preview to confirm your updates and verify that the template uploaded successfully.
Note. Become familiar with XML Publisher before modifying any of the delivered templates.
Changing the Dummy Signature Image
The delivered paycheck template (PRTUSCHK or PRTCNCHQ) includes a dummy image in the signature area. If the valid signature image is not available when you print checks, the dummy image prints.
To change the dummy image on the check printing template:
Download and save a copy of the current check or cheque printing RTF template.
In the lower right corner, right-click the shaded box labeled BG and select Properties.
The Text Form Field Options page appears.
Click the Add Help Text button.
The Status Bar tab displays the address of the dummy image that is delivered with the system in the PSHome directory.
Modify the image address as necessary.
You can use the existing dummy image at the existing address, change either the address or the image, or change both the address and the image.
Click OK to save your changes.
Continue with additional template modifications or proceed with uploading the updated template.
Identifying the Valid Signature Image
Follow these instructions to identify a valid signature that you secure in a secured directory on a server or on a floppy drive. The valid signature prints on checks at run time. The dummy image prints on the check instead of the valid signature at run time if the valid signature is not available, for example, if the floppy is not inserted into the drive.
To identify the valid signature for check printing:
Download and save a copy of the current check or cheque printing RTF template.
In the lower right corner, select the signature image box to the right of the shaded box labeled BG.
When the signature image box is selected, you can see its outline.
Double-click the signature image box.
The Format Picture page appears.
Select the Web tab.
The box labeled Alternative text contains a delivered sample signature as a placeholder and associated URL.
Enter the URL that points to the location of your valid signature image.
XMLP resolves the value at run time.
Click OK to save your changes.
Continue with additional template modifications or proceed with uploading the updated template.
Changing the MICR Font
XMLP needs to know the location of the MICR font at run time so that it can use it in the final output. To specify your MICR font for check printing, you must first make the desired font available in the specific RTF template in which you want to use it. Then you must select that font for the MICR text in the template. This section provides instructions for both tasks.
To specify your MICR font for check printing:
Download and save a copy of the current check or cheque printing RTF template.
At the bottom of the template, click in the MICR line to highlight it and select File, Properties, Custom in the Word application Toolbar.
The delivered value, xdo-font.GnuMICR.normal.normal, includes a font placeholder called GnuMICR.
In the Name field, replace the GnuMICR text with the name of your MICR font.
In the Value field, replace the GnuMICR font and location with the name and location of your MICR font.
Enter the location in which fonts used by Word are stored. This location depends upon your environment.
When you update the Value field, the Modify button changes to the Add button.
Click Add, then click OK.
In your RTF check template, highlight the MICR line and select the MICR font that you just made available in the list of fonts.
Save your changes.
Continue with additional template modifications or proceed with uploading the updated template.
See Also
Enterprise PeopleTools PeopleBook: XML Publisher for PeopleSoft Enterprise
Specifying XMLP Printing and Self-Service OptionsAccess the Paycheck Options Table page (Set Up HRMS, Product Related, Payroll for North America, Payroll Processing Controls, Paycheck Options, Paycheck Options).
Setup ID and Parameters
|
Paycheck Setup ID |
You must use one of the delivered setup IDs:
Payroll for North America does not provide support for user-defined setup IDs. |
|
URL Identifier |
Payroll for North America delivers the Paycheck Options table with PY_SSP_ATTACHMENT table with associated URL address for storing the XML self-service paycheck data. If you create a separate table and URL to store the data, enter your URL here. |
Report Definitions
|
Printing |
Displays the current active report definitions for printing U.S. and Canadian paychecks and direct deposit advices. |
|
Viewing |
Displays the current active report definitions for displaying self-service U.S. and Canadian paychecks and direct deposit advices in the ePay application. |
Self Service Options
|
PDF Paychecks Only |
If your organization used the View Paycheck transaction before Payroll for North America 9.0, use this option to indicate whether you want employees to be able to view older paychecks as well as the PDF paychecks. Select this option to enable employees to view only the PDF self-service paychecks. Leave this option blank to enable employees to view all self-service paychecks. |
|
$0 or Negative Manual Checks |
Select this check box if you want the system to display manual paychecks of zero dollars or manual paychecks with negative net pay amounts in self service. This check box is blank by default; you must select it if you want these checks displayed in self-service. |
|
Paycheck Availability |
For each company and pay group combination, indicate the default timing of when paychecks should be available for viewing in the ePay self-service View Paycheck transaction. You can override this value when you run the check and advice print processes. |
|
Days From Check Date |
Enter 0 to make self-service paychecks available on the check date entered on the pay calendar for the pay run. Enter a negative number to make self-service paychecks available the specified number of days before the check date entered on the pay calendar. Enter a positive number to make self-service paychecks available the specified number of days after the check date entered on the pay calendar. Note. If you have enabled viewing of historical paychecks, the paycheck data from the current pay run is visible in self service as soon as you run pay confirmation. Running the XML print process triggers the paycheck availability option for the PDF paycheck, after which the checks are not viewable until the availability date that you specify. For this reason, we recommend that you run the XML print process immediately after confirming the payroll. |
Setting Up the Form Table for Printing Checks and Direct Deposit Advices
This section provides an overview of the Form table and discusses how to specify form IDs and form numbers.
Understanding the Form TableUse form IDs and form numbers to enable the system to print checks or advices for employees.
Regardless of whether you print checks and advices using the SQR processes or the XMLP processes, you must establish a form ID for every check or advice form that you plan to use.
To run Payroll for North America, you must have at least one entry in the Form table to specify check or advice forms for a pay group. Enter the form IDs on the Source Bank table and the source bank ID on the Pay Group table.
The Pay Confirmation COBOL SQL process (PSPCNFRM) and Check Reprint COBOL SQL process (PSPRPRNT) use the form number from this table to assign check and advice numbers.
See Also
Setting Up Banks and Direct Deposit
Printing Paychecks and Direct Deposit Advices
Page Used to Set Up Print Forms|
Page Name |
Definition Name |
Navigation |
Usage |
|
PAY_FORM_TABLE |
|
Specify the form IDs that you use to print checks and advices, and track form numbers. |
Specifying Form IDs and Form Numbers
Access the Form Table page (Set Up HRMS, Common Definitions, Banking, Form Table, Form Table).
|
Form ID |
Create an entry on this table for each check or advice form that you use. You must set up separate form IDs for each account if you pay employees from one bank with multiple account numbers or from multiple banks with their associated account numbers. |
|
Last Form Number Used |
The Pay Confirmation COBOL SQL process (PSPCNFRM) and Check Reprint COBOL SQL process (PSPRPRNT) use this number. Each time you run the Pay Confirmation process, the system automatically updates this field with the appropriate check or advice number, reflecting the last number used in the payroll process. You can change this number manually if you have a discrepancy in form numbers (for example, if someone spills coffee on the forms you were planning to use for the next pay run). However, normally you do not change this number. If you use the Check Reprint process, the paychecks that you use on form alignment are saved as dead paychecks. |
See Also
Setting Up Banks and Direct Deposit
This section provides an overview and lists pages used to set up banks and direct deposit processing.
See Also
(USA) Understanding Prenotification
Understanding Bank and Direct Deposit SetupThis diagram illustrates the various steps required to set up banks, pay groups, and employee data for processing direct deposit:
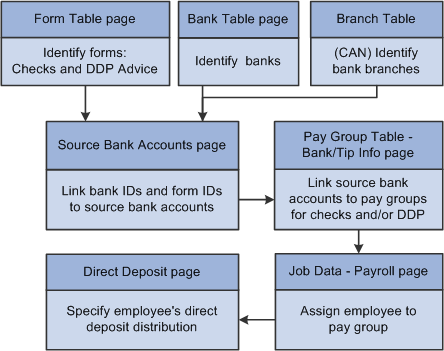
Setting up banks and direct deposit from the Form Table page, the Bank Table page, and the Branch Table page
Paying Checks and Direct Deposit from Separate Accounts
To use separate banks or accounts for checks and direct deposits:
Set up separate source bank IDs for the two banks or the two accounts at the same bank.
On the Pay Group Table – Bank/Tips Info page:
Enter the source Bank ID for paying checks in the Source Bank ID field.
If you pay direct deposit from a different account, enter the source Bank ID for paying direct deposit in the Direct Deposit Bank ID field, otherwise leave the field blank.
Note. Payroll for North America generates direct deposit transmittals by bank ID and account number. Therefore, regardless of pay run ID and pay group/pay end date, the DDP001 report captures all employees who have a prenotification submitted or a direct deposit to be paid if their pay group has that bank ID and account number assigned.
Pages Used to Set Up Banks and Direct Deposit|
Page Name |
Definition Name |
Navigation |
Usage |
|
Form Table |
PAY_FORM_TABLE |
Set Up HRMS, Common Definitions, Banking, Form Table, Form Table |
Identify the type of forms that you use to print checks and advice, and track form numbers. |
|
Bank Table |
BANK_EC |
Set Up HRMS, Common Definitions, Banking, Banks, Bank Table |
Set up basic information for all financial institutions. You must complete the Bank Table page before you identify a bank with a source bank account. |
|
Branch Table |
BANK_BRANCH_EC |
Set Up HRMS, Common Definitions, Banking, Banks, Branch Tabl |
(CAN) Define a bank's branches. |
|
Source Bank Accounts |
SRC_BANK |
Set Up HRMS, Common Definitions, Banking, Source Bank Accounts |
Assign a source bank ID and specify bank, branch, and account information associated with the source bank ID. |
|
Canada Bank Additional Data US Bank Additional Data |
SRC_BANK_PY_SP |
Click the Other Required Information link on the Source Bank Accounts page. |
Specify forms for checks and direct deposit. (USA) Also specify the prenote wait period. (CAN) Also specify the routing format. |
|
Pay Group Table - Bank/Tip Info |
PAYGROUP_TABLE8 |
Set Up HRMS, Product Related, Payroll for North America, Payroll Processing Controls, Pay Group Table, Bank/Tip Info. |
Specify the source bank ID for checks and DDP. If you pay DDP from a different source bank account than checks, select the appropriate source bank ID in the Direct Deposit Bank ID field, otherwise leave it blank. |
|
Direct Deposit |
DIRECT_DEPOSIT |
|
Enter employee bank and distribution information to enable the direct deposit of employee pay to checking or savings bank accounts. |
|
Direct Deposit |
DIRECT_DEPOSIT_CAN |
Payroll for North America, Employee Pay Data CAN, Request Direct Deposit, Direct Deposit |
Enter employee bank and distribution information to enable the direct deposit of employee pay to checking or savings bank accounts. |
See Also
Setting Up the Form Table for Printing Checks and Direct Deposit Advices
Setting Up Banks and Bank Branches
Specifying Banks and Tips Processing
Setting Up Retro Pay ProcessingTo set up retro pay processing, use these components: Retroactive Pay Program (RETROPAY_PGM_TBL), Retro Pay Monitored Fields (PY_RETROTBL_DEF), Retro Pay Trigger Values (RETRO_TRG_VALUES), Retro Pay Trigger Program (PY_RETROTRG_DEF), and Retro Pay Cancellation Reason (PY_RETROCNL_TBL).
This section provides overviews of retro pay programs, retro pay triggers and trigger programs, and retro pay cancellation reasons. This section then lists a prerequisite and discusses how to:
Define retro pay programs.
Define earnings for a retro pay program.
Define retro pay fields.
Define trigger values.
Define retro pay trigger programs.
Define retro pay cancellation reasons.
See Also
Understanding Retro Programs
This overview discusses retro pay programs and retro pay trigger programs.
Note. Mass retro and deduction retro do not use retro pay trigger programs.
Retro Program Setup
To set up retro processing, you must define these two types of retro programs for each pay group:
Retro pay programs define the earnings codes on which retro pay can be calculated as well as the earnings codes used to pay the retro pay earnings.
Retro pay trigger programs control which record and field changes create retro requests.
To set up a retro pay trigger program, you:
Identify fields on the job record (JOB) and on the additional pay data record (ADDL_PAY_DATA) that trigger retro requests when changed.
Perform this task on the Retro Pay Monitored Fields page. The fields that you list on this page are the only fields that are available for retro triggers.
Note. If the delivered data for this page meets your needs, you can skip this step.
Define retro triggers—the specific field changes that trigger retro requests.
Perform this task on the Retro Pay Trigger Values page, where you assign Retro Pay Trigger Value IDs that you can use to reference the different sets of retro triggers.
On this page, you list all of the retro trigger conditions for the record (though you configure the JOB and ADDL_PAY_DATA records separately).
Define a retro pay trigger program and identify its Retro Pay Trigger Value IDs.
Retro pay programs include up to two Retro Pay Trigger Value ID: one for the job record, and one for the addition pay data record.
You can optionally configure a program to generate retro requests when any field in the given record changes (that is, you do not have to define specific field-level triggers), but this is not a common configuration. If you choose this option, you do not need to define monitored fields or set up Retro Pay Trigger Value IDs.
The following diagram illustrates the steps for defining retro programs and associating them with pay groups:
Retro Pay Programs
Retro pay program definitions include some general settings such as the tax method to use for the retro earnings and whether to pay the retro earnings on a separate check. They also include a list of retro earnings codes.
Certain settings in the earnings code definition control which earnings codes you can include in the retro pay program:
When you define the earnings codes that are eligible for retro pay, you can select only earnings codes that are marked as Eligible for Retro Pay.
When you define the earnings codes for the corresponding retro pay earnings, you can select only earnings codes that are marked as Used to Pay Retro.
See Defining Parameters and Rules for Calculating Earnings.
Retro Pay Trigger Programs
Retro pay trigger programs provide information about the field changes that trigger retro requests. The job (JOB) record and the additional pay data (ADDL_PAY_DATA) record are the only records that support retro pay triggers.
You can generate retro requests when a particular field changes, regardless of the new value, or you can limit the trigger so that it generates retro requests only if the field changes to specified values. When you configure triggers for the additional pay data record, you can optionally limit the trigger based on the earnings code in the additional pay record.
Trigger Processing
Trigger processing begins when a change (update, insert, or deletion) occurs in a job or additional pay record.
Both online changes (including those made through manager self-service) and changes that are made through a component interface create triggers. Online changes can be made in add, update/display, or correction mode.
Note. Changes that you make using SQL are not recognized as triggers. To create retro requests for such changes, run the Retroactive Pay Mass Process (PSPRPMSS) COBOL SQL process to create retro requests for payees who meet your selection criteria. The Retroactive Pay Mass Process is unaware of the specific changes that you made using SQL; it simply creates retro requests based on the criteria you specify, and it is up to you to specify criteria that includes the right employees. When the Retroactive Pay Calculations (PSPRPEXT) COBOL SQL process processes the request, it uses the data in the source tables to calculate retro pay.
When an online action or a component interface makes a change in the job or additional pay record, PeopleSoft Integration Broker passes the before and after information to PeopleSoft Event Manager. Event Manager handles the message asynchronously: the system processes and saves the primary transaction normally, even if there is a problem with event processing.
Event Manager passes the messages to the event handler, which performs the following tasks:
Evaluates whether the change is a valid retro trigger:
If the change is not a valid retro trigger, no further processing occurs. To be a valid retro trigger, the change must meet these conditions:
The effective date of the change is earlier than or equal to the pay end date of the last check paid to the employee.
The change is configured as a trigger in the employee's retro pay trigger program (as defined for the employee's pay group).
(Additional pay data changes only) The additional pay earnings code is in the employee's retro pay program (as defined for the employee's pay group).
Creates a new retro request if there is not already an open retro request for the employee and job number, or updates the existing open retro request.
A retro request is considered open if its retro pay process flag (its status) is Not Processed, Calculated, Recalculate Request, Action Required, Suspended, or Extracted.
A retro request is considered closed if its retro pay process flag is Loaded to Paysheets, Manually Loaded to Paysheet, Confirmed Payment, Paycheck Reversed, or Cancelled/Withdrawn
Creates a trigger detail row in the employee's open retro request.
When the retro pay calculation processes a retro request, it uses the actual job and additional pay data. It does not use the trigger details to calculate retro pay. The system saves the trigger data for audit purposes only.
Note. Integration Broker uses the RETROPAY_JOB or RETRO_ADDLPAY messages. Event Manager uses the RetroPayJobChange and RetroAddlPay event definitions.
Understanding Retro Pay Cancellation ReasonsThis overview discusses cancellation reasons for manual and automated cancellations of retro requests.
Manual Cancellations
Users can manually cancel retro requests on the Request and Trigger Summary page. This option is available only for requests where the process flag (the request status) is Not Processed, Suspended, or Action Required.
When users manually cancel retro requests, they can optionally indicate the reason for the cancellation by selecting from the cancellation reasons that you configure.
Automated Cancellations
Oracle delivers three cancellation reasons that are reserved for system use. These are not available for selection when a user manually cancels a request.
The delivered reasons are:
SC (system generated cancellation): the system canceled the request because the original triggering action was reversed.
For example, consider a retro request that is the result of adding a new job data row with a new compensation rate. If a user employs correction mode to delete that job row, the system cancels the retro request and uses the SC cancellation reason.
UC (user canceled): a user cancelled the request by running the Retroactive Pay Undo (PSPRPUND) process from the Change Retro Pay Process Flag page.
ZR (zero retro – $0.00 to be paid): the Retroactive Pay Load Paysheets (PSPRPPSH) Application Engine process cancelled the request because there is nothing to be paid.
Note. Do not delete these delivered cancellation reasons. You cannot delete them using the online system, and it is important that you do not use SQL to delete them either.
See Also
Understanding Retro Pay Processing
PrerequisiteRetro requests are generated through the Enterprise Components Event Framework. Make sure that the RetroPayJobChange and RetroAddlPay events and their associated event handlers are active and that Integration Broker has been set up.
Pages Used to Set Up Retro Pay Processing|
Page Name |
Definition Name |
Navigation |
Usage |
|
RETROPAY_PGM_TBL |
Set Up HRMS, Product Related, Payroll for North America, Retroactive Payroll, Retro Pay Program, Program Table |
Describe a retro pay program and specify paysheet processing options. |
|
|
RETROPAY_PGM_DEF |
Set Up HRMS, Product Related, Payroll for North America, Retroactive Payroll, Retro Pay Program, Program Definition |
Establish the earnings codes for which the retro pay program calculates retro pay and those used for paying retro pay earnings. Note. Valid earnings codes for these fields are only those that you specified as eligible for retro pay or used to pay retro on the Earnings Table - General page. |
|
|
PY_RETROTBL_DEF |
Set Up HRMS, Product Related, Payroll for North America, Retroactive Payroll, Retro Pay Monitored Fields, Retro Pay Monitored Fields |
List the job and additional pay fields that are available to use when you define the triggers that create retro requests. |
|
|
RETRO_TRG_VALUES |
Set Up HRMS, Product Related, Payroll for North America, Retroactive Payroll, Retro Pay Trigger Values, Retro Pay Trigger Values |
Define a sets of field changes that trigger retro requests. Each set can include fields from either the job record or the additional pay records. |
|
|
PY_RETROTRG_DEF |
Set Up HRMS, Product Related, Payroll for North America, Retroactive Payroll, Retro Pay Trigger Program, Retro Pay Trigger Program |
Define a retro pay trigger program that encompasses up to two sets of triggers: one for the job record and one for the additional pay record. |
|
|
PY_RETROCNL_TBL |
Set Up HRMS, Product Related, Payroll for North America, Retroactive Payroll, Retro Pay Cancellation Reason, Retro Pay Cancellation Reason |
Set up the cancellation reasons that users can use when manually canceling a retro pay request. |
Defining Retro Pay Programs
Access the Program Table page (Set Up HRMS, Product Related, Payroll for North America, Retroactive Payroll, Retroactive Pay Program, Program Table).
|
Retro Pay Program ID |
This ID identifies the retro pay program when you associate the program with a pay group. |
|
Offset Earnings Type |
Select an offset earnings type for any negative earnings that are generated by the retro pay calculation. To avoid negative checks, link this earnings code to a payback deduction code. The system deducts the amount from subsequent paychecks of applicable employees. |
Off Cycle?
|
Off Cycle |
Select to create retroactive pay that is associated with this program as off-cycle earnings. If you deselect this check box, the system creates retroactive pay that is associated with this program as on-cycle earnings. After the system calculates retro pay, but before you load the retro pay to paysheets, you can change this setting on the Retro Pay Calculation Results page under Retroactive Payroll. |
|
Separate Check |
Select to load the earnings that are associated with this program to a separate check on the paysheets. |
|
Tax Method |
Select a tax method to load to the paysheet line for the earnings in this program. |
|
Tax Periods |
Enter the number of tax periods to load to the paysheet line for the earnings in this program. |
Defining Earnings for a Retro Pay Program
Access the Program Definition page (Set Up HRMS, Product Related, Payroll for North America, Retroactive Payroll, Retro Pay Program, Program Definition).
Assignments/Ranges
Create a row of data for each earnings code that is eligible for retro pay.
|
Earnings Type for Retro Pay |
Select the earnings code that is eligible for retro pay. |
|
Retro Pay Earnings Type |
Enter the earnings code to use for the retro payment. |
Defining Retro Pay Fields
Access the Retro Pay Monitored Fields page (Set Up HRMS, Product Related, Payroll for North America, Retroactive Payroll, Retro Pay Monitored Fields, Retro Pay Monitored Fields).
|
Record |
Oracle delivers definitions for the JOB record and the ADDL_PAY_DATA record. These are the only supported records for retro pay triggers. |
|
Field Name |
The fields in the Field Definition grid are the only fields that are available for use in retro triggers. Oracle delivers field lists for both the JOB and ADDL_PAY_DATA records. You can add and delete entries to change which fields are monitored. You cannot delete entries for fields that are used in current retro pay trigger value definitions. |
Delivered JOB Fields
The delivered configuration for the JOB record includes these fields:
COMPRATE (compensation rate)
COMP_FREQUENCY (compensation frequency)
EMPL_STATUS (employee status)
FLSA_STATUS (FLSA status)
SHIFT (shift)
SHIFT_FACTOR (shift factor)
SHIFT_RT (shift rate)
STD_HOURS (standard hours)
STD_HRS_FREQUENCY (standard hours frequency)
Delivered ADDL_PAY_DATA Fields
The delivered configuration for the ADDL_PAY_DATA record includes these fields:
ADDL_PAY_SHIFT (additional pay shift)
COMP_RATECD (compensation rate code)
EARNINGS_END_DT (earnings end date)
GOAL_AMT (goal amount)
GOAL_BAL (goal balance)
HOURLY_RT (hourly rate)
OTH_HRS (other hours)
OTH_PAY (other pay)
PAY_PERIOD1, PAY_PERIOD2, PAY_PERIOD3, PAY_PERIOD4, and PAY_PERIOD5 (pay periods 1-5)
Defining Trigger Values
Access the Retro Pay Trigger Values page (Set Up HRMS, Product Related, Payroll for North America, Retroactive Payroll, Retro Pay Trigger Values, Retro Pay Trigger Values).
|
Retro Pay Trigger Value |
This ID identifies the set of retro pay trigger values when you associate it with a retro pay trigger program. |
|
Record |
JOB and ADDL_PAY_DATA are the only supported records for trigger values. |
Retro Pay Trigger Fields
|
Field Name |
Select one of the fields that the system is monitoring for changes. These are the fields that appear on the Retro Pay Monitored Fields page for the selected record. When you select a value, the Field Name field immediately becomes read-only. To change the value, you must delete the row and add a new one. |
|
Earnings Code and All Earnings Codes |
Note. These fields appear only for the ADDL_PAY_DATA record. Use these fields to choose which additional pay earnings codes produce retro requests when the selected field changes. To create retro requests for all retro-eligible earnings codes, select the All Earnings Codes check box. The system hides the Earnings Code field when the check box is selected. To create retro requests for a single earnings code, deselect the check box and enter a value in the Earnings Code field. To create retro requests for some, but not all, earnings codes, you can create multiple rows of data for the same field and enter different earnings codes for each row. Earnings code processing relies on the use of certain delivered codes that populate the Earnings Code field when you do not explicitly select a code. For JOB fields, the system uses the $NA (not applicable) earnings code, and for ADDL_PAY_DATA fields that affect all earnings codes, the system uses the $AC (all codes) earnings code. Therefore, it is critical that you do not modify, remove, or inactivate these two delivered earnings codes. |
|
Dependent on Field Value |
To create a retro request for any change to the selected field, leave this check box deselected. To create a retro request only when the field changes to one or more specific values, select this check box and enter the values in the Field Values grid that appears. |
Field Values
|
Set ID |
If the selected field is setID-controlled, you must enter a setID before you can select specific values. If the selected field is not setID-controlled, this field is not enterable |
|
<Field Type> Value |
Enter the values that create retro requests. For example, in the JOB record, you might create retro requests for certain employee status changes to Active or Leave of Absence, but not when it changes to any other value. Depending on the field type, the label for the field value column is Character Value, Numeric Value, or Date Value. |
Defining Retro Pay Trigger Programs
Access the Retro Pay Trigger Program page (Set Up HRMS, Product Related, Payroll for North America, Retroactive Payroll, Retro Pay Trigger Program, Retro Pay Trigger Program).
|
Retro Pay Trigger Program ID |
This ID identifies the retro pay trigger program when you associate it with a pay group. |
Retro Pay Trigger Records
|
Record Name |
Create rows for the JOB record and the ADDL_PAY_DATA record. These are the only records that support retro pay triggers. |
|
Trigger Level and Retro Pay Trigger Value ID |
Select Record if you want any change to the record (a new row, or changes to any field) to create a retro request. Note. If you select Record, the system creates a retro request when there are changes in any field, not just in the fields that you are explicitly monitoring. Select Field if you want to create retro requests only for specific field changes. When you select this value, the Retro Pay Trigger Value ID field appears so that you can select the retro pay trigger value ID that identifies those specific field changes. |
Defining Retro Pay Cancellation Reasons
Access the Retro Pay Cancellation Reason page (Set Up HRMS, Product Related, Payroll for North America, Retroactive Payroll, Retro Pay Cancellation Reason, Retro Pay Cancellation Reason).
Note. All fields are read-only when you view the SC (system generated cancellation), UC (cancelled by user), and ZR (zero retro - $0.00 to be paid) cancellation reasons.
Reviewing and Modifying Payroll Messages
To set up payroll messages, use the Pay Message Table component (PAY_MESSAGE_TABLE).
This section provides an overview of payroll messages and discusses how to add and modify payroll messages.
Understanding Payroll MessagesThe Pay Message table identifies all the error messages that can occur during the batch payroll processes. Each error message has a message ID number and a complete description. PeopleSoft maintains this table.
If you modify the system and your changes include new error messages, you can add new error message codes and text. When you add a new message code, use a number greater than 90,000 to avoid conflict with message codes that are provided by PeopleSoft. You can also modify the error message descriptions to include procedures unique to your environment. For example, you might add:
Call Pat Jones at extension 23, and ask her to run the Pay Calculation process in Final mode.
You can also specify how to proceed when the system encounters each error.
Page Used to Review and Modify Payroll Messages|
Page Name |
Definition Name |
Navigation |
Usage |
|
PAY_MESSAGE_TABLE |
Set Up HRMS, Product Related, Payroll for North America, Payroll Processing Controls, Pay Message Table, Pay Message Table |
Add new error messages, modify message descriptions, and specify nonfatal system messages to bypass during pay calculation. |
Adding and Modifying Payroll Messages
Access the Pay Message Table page (Set Up HRMS, Product Related, Payroll for North America, Payroll Processing Controls, Pay Message Table, Pay Message Table).
|
Specify how to proceed when the system encounters this error that would otherwise cause the payroll process to stop: Yes: Select this value to continue with payroll processing after encountering this error. The Maximum Errors field becomes available for entry. No: Select this value to stop payroll processing after encountering this error. System: This value appears for errors for which you cannot select a Continue With This Error value. The entire Continue With This Error group box becomes unavailable for entry. |
|
|
Maximum Errors |
Enter a numerical value to limit the number of times the system bypasses the error message within a run ID. Note. When the number of occurrences of the message equals this value, the system bypasses none of the errors. You must correct the errors before continuing the payroll process. |
|
Distribute With This Error |
Select this check box to let the Actuals Distribution COBOL SQL process (PSPPFUND) continue when it encounters this error. |
See Also
Setting Up Continue with Errors Processing
Handling Employees with Multiple Jobs in the Same Organization
This section provides an overview of multiple job considerations and discusses how to:
Issue a single check.
Set up direct deposit for paychecks.
Take general deductions.
Set up deduction subsets.
Set up union dues deductions.
Set up multiple benefits programs.
Set limits for general deductions and benefits deductions.
Note. The content of this section is only part of what you must know about multiple jobs. Other relevant information appears in the PeopleSoft Application Fundamentals PeopleBook.
See Also
PeopleSoft Application Fundamentals for HRMS PeopleBook
Understanding Multiple Job Considerations
In many medical, academic, and industrial settings, employees hold more than one job in the same organization. A professor might double as a dean or a doctor as a professor of medicine. Following are some of the considerations to keep in mind when employees hold more than one job in the same organization.
(USA) FLSA Overtime Requirements for Multiple Jobs
The Fair Labor Standards Act (FLSA) of 1937 requires that you pay overtime to nonexempt employees who work more than 40 hours in a week. When an employee has multiple nonexempt jobs in the same organization, Payroll for North America applies the overtime rule to the total hours for all jobs with the same FLSA period.
For example, suppose an employee has two nonexempt jobs:
Data entry clerk for 22.5 hours.
Receptionist for 20 hours.
The system adds together the hours and pays overtime for 2.5 hours at the FLSA rate.
Note. Payroll for North America does not calculate a blended FLSA rate for employees working in multiple companies, because each job would have its own FLSA rate.
An employee who holds multiple jobs might be exempt from the Federal Insurance Contributions Act (FICA) in one job, while eligible for FICA in another job. Designate the FICA status of each job on the Job Data - Payroll page in the Job Data component (JOB_DATA).
If an employee has multiple jobs with different pay frequencies (weekly, biweekly, and monthly), Payroll for North America calculates the taxes for each job separately, based on the pay frequency. This ensures that you tax an employee's earnings according to the appropriate tax bracket.
When processing an off-cycle payroll using the right-hand side of the run control page (Off-Cycle group box), do not include multiple-job employees in the same calculation as the single-job employees. You must process the two separately.
Issuing a Single Check
Payroll for North America can issue a single check that covers all of an employee's FLSA calculations, taxes, benefits, and general deductions for multiple jobs in the same organization.
To issue a single check:
Select the Single Chk for Multiple Jobs (single check for multiple jobs) option on the Company - Default Settings page.
Designate a primary pay group for the employee on the Payroll Options 2 page.
The primary pay group identifies which pay group the system uses when creating consolidated paysheets. It also determines whether the system should take general deductions for a pay period.
PeopleSoft recommends that you select the pay group in which the payee is paid most often. If you do not select a primary pay group, the system uses the pay group that is associated with the first job into which you hired the employee.
When you run the Create Paysheet process, the system combines the paysheets for all jobs into the paysheet for the primary pay group. When you view the individual paysheets online, they appear as OK to Pay, signifying that they are paid through the consolidated paysheet. The system combines paysheets only when they have the same period end date, check date, FLSA period definition, FLSA calendar ID, FLSA salaried hours used (if subject to FLSA rules), and payroll cycle (on-cycle or off-cycle). The pay frequencies of the paysheets do not have to be the same.
A simple rule of thumb is that all calculations need to be completed on all outstanding paysheets prior to the confirm. If an employee has outstanding paysheets in pay group X and Y, all of his paysheets need to be calculated before any of those pay groups can be confirmed. The single check will be created under the employee's primary pay group.
To change paysheets after running the Create Paysheet process:
Enter changes on the individual paysheets (you can't see the collective paysheet).
Run the Create Paysheet process again.
Setting Up Direct Deposit for Paychecks
Regardless of how many jobs an employee has, create only one set of direct deposit instructions on the Request Direct Deposit page.
Taking General Deductions
How you take general deductions is influenced by whether you select the Single Chk for Multiple Jobs option on the Company - Default Settings page.
When the Single Check Feature is Enabled
The following describes processing when you select the Single Chk for Multiple Jobs option:
The system takes general deductions based on earnings from the total earnings that it calculates for all jobs paid in the same check.
The system always takes general deductions that are scheduled for the current period when paying the job in the primary pay group.
To have the system take a deduction every time it issues a check for the employee—even when not paying the employee's job in the primary pay group—select the Take on All Paygroups option on the Create General Deductions page. For example, suppose an employee has a weekly job and a biweekly job. The pay group for the weekly job is the primary pay group, because it is the one that the system pays most frequently. Normally, when the system pays the biweekly job, it also pays the weekly job, so it issues a single check. If the system processes the biweekly job at a different time than the weekly job, it takes the deduction only if the Take on all Paygroups check box is selected.
The system automatically takes general deductions in the appropriate pay periods when an employee receives a single check for jobs that the system pays at different frequencies and deductions have different frequencies.
For example, suppose an employee receives a single check, which includes compensation for a semimonthly pay period and a monthly pay period. The system takes a United Way deduction only in the first pay period of each month. When the system issues a check for the second pay period (the check that covers both the second semimonthly period and the monthly period), the system does not take the United Way deduction.
To override a deduction for an employee who has jobs in different pay groups (that is, to override the deduction schedule or change the amount), enter the override instructions for the primary pay group on the General Ded Code Override (general deduction code override) page.
The system ignores override instructions for the employee's other pay groups. To identify an employee's primary pay group, check the Payroll Options 2 page.
When the Single Check Feature is Not Enabled
If the Take on All Paygroups option is not selected on the Create General Deductions page, the system uses the Priority Number field on the Pay Group Table - Definition page to determine whether to take a general deduction. It takes the deduction only when processing the job in the pay group with the lowest priority number.
Setting Up Deduction Subsets
For employees who receive additional pay:
Select a deduction subset on the Create Additional Pay page.
Request that the system issue a separate check using the Sep Chk # (separate check number) field on the Create Additional Pay page.
The deduction subset overrides other deduction instructions elsewhere in the system.
If you do not request a separate check, the system ignores the deduction subset and follows the deduction instructions from the calendar, the employee's Job record, or payroll data.
If an employee has multiple Additional Pay records with the same separate check indicator, select the same deduction subset for each record. If you select different subsets, the system applies the deduction subset that is associated with the last Additional Pay record that it processes.
Use deduction subsets to process only a selected set of deductions for a pay run. For example, for a bonus run, you might deduct only one or two of the deductions that you process during the regular monthly pay run.
Select a deduction subset on any of the following pages:
Pay Calendar Table
Payroll Options 2
Additional Pay
When you select subsets on more than one page, the system uses a hierarchy to determine which deductions to process. If you pay an employee for multiple jobs, the system also considers the employee's primary pay group and primary job when making this determination.
See the following scenarios and examples of the processing rules that apply. If you do not use the single check option, the term primary pay group used in the scenarios refers to the pay group for the job that the system is processing.
Scenario 1: Deduction Subset on Calendars
The system processes:
General deductions in the subset attached to the calendar for the primary pay group.
Benefit deductions in the subset attached to the calendar associated with the primary job.
Scenario 2: Deduction Subset on Calendars and the Override Benefits Deductions Page
The system processes:
General deductions included in the subset attached to the calendar for the primary pay group.
Benefit deductions included in the subset selected on the Override Benefits Deductions page.
Scenario 3: Deduction Subset on Calendars and the Payroll Options 2 Page
The system processes:
General deductions in the subset on the Payroll Options 2 page.
Benefit deductions in the subset specified on calendar for the primary job.
Scenario 4: Deduction Subset on Calendars and Override Benefits Deductions Page and Payroll Options 2 Page
The system processes:
General deductions in the subset on the Payroll Options 2 page.
Benefit deductions in the subset on the employee's Override Benefits Deductions page.
The system ignores the subsets on the calendars because employee-level instructions take precedence.
Example
This table displays the five deduction subsets for the example. All of these deductions have been assigned to the employee on the Create General Deductions page and Assign to Benefit Program page.
Note the following:
(B) indicates a benefit deduction.
(G) indicates a general deduction.
The following table indicates where the deduction subset is selected:
|
Additional Pay |
Calendar for Primary Pay Group |
Job (Benefits Ded Proc Override page) |
Calendar (not primary pay group) |
Payroll Data |
|
None |
401K (B) GARN (G) |
FSA-H (B) Bond (G) |
FSA-D (B) MISC (G) |
401K (B) Garn (G) Bond (G) Charity (G) |
This table displays the deductions taken in the following scenarios:
Scenario 1: Subset defined on calendars.
Scenario 2: Subset defined on calendars and Job data.
Scenario 3: Subset defined on calendars and Payroll Options 2.
Scenario 4: Subset defined on calendars and Job Data and Payroll Options 2.
|
Scenario and Deductions Processed |
401(k) |
FSA-H |
FSA-D |
Garn |
Bond |
Charity |
|
Scenario 1 |
||||||
|
Primary job in primary pay group |
X |
|
|
X |
|
|
|
Primary job not in primary pay group |
|
|
X |
X |
|
|
|
Scenario 2 |
||||||
|
Primary job in primary pay group |
|
X |
|
X |
|
|
|
Primary job not in primary pay group |
|
X |
|
X |
|
|
|
Scenario 3 |
||||||
|
Primary job in primary pay group |
X |
|
|
X |
X |
X |
|
Primary job not in primary pay group |
|
|
X |
X |
X |
X |
|
Scenario 4 |
||||||
|
Primary job in primary pay group |
|
X |
|
X |
X |
X |
|
Primary job not in primary pay group |
|
X |
|
X |
X |
X |
Setting Up Union Dues Deductions
Set up union dues as general deductions. The system takes these deductions only when paying a job that is affiliated with the union code. Therefore, if an employee is a member of a union, but one job does not qualify for union membership, the system does not take dues for that job.
If the system calculates union dues as a percentage of earnings, PeopleSoft recommends that you:
Assign a unique earnings code to each job that is associated with the union.
Create a special accumulator to track the total earnings for jobs with that earnings code.
Consequently, when calculating the union dues, the system considers only the earnings from jobs enrolled in the corresponding union.
Setting Up Multiple Benefits Programs
If an employee has multiple jobs that are covered by different benefits programs, and you select the Single Chk for Multiple Jobs option on the Company - Default Settings page, the system breaks down all benefits deductions by benefit record number during processing and stores the balances by benefit record number. For example, if an employee has two jobs that are covered by two separate benefits programs, and both programs include a 401(k) deduction or a Registered Pension Plan deduction for Canada, the system calculates two deductions and displays both on the paychecks.
Setting Limits for General Deductions and Benefits Deductions
Employees can have different deduction limits for different jobs. When an employee has multiple jobs with multiple benefit programs (Ben_Rcd#s), and each program has the same deduction, the system adjusts each current goal balance (from the Benefits Program Table page) by the appropriate amount. Because you assign a general deduction at the company level, you can have only a single limit per company for those deductions.
For example, suppose an employee's two jobs are covered by different benefit programs, each with an individual retirement account deduction. The deductions are as follows:
|
Empl_Rcd# |
Ben_Rcd# |
Contribution Amount (% of gross) |
Goal Balance |
|
0 |
0 |
5% |
1000 USD |
|
1 |
1 |
2% |
500 USD |
The system issues a check that includes:
500 USD gross pay for Empl_Rcd#0, Ben_Rcd#0.
1000 USD gross pay for Empl_Rcd#1, Ben_Rcd#1.
The total deduction amount is (500 USD × 5%) + (1000 USD × 2%) = 45 USD. The current goal balance for Ben_Rcd#0 increases by 25 USD and the current goal balance for Ben_Rcd#1 increases by 20 USD.