3 Getting Started
This chapter contains the following topics to help you connect to a cluster and start using Oracle Fail Safe Manager:
3.1 Starting the Manager and Verifying the Oracle Fail Safe Installation
After you install the Oracle Fail Safe software on all nodes in the cluster, you must verify the installation.
This section describes how to start Oracle Fail Safe Manager, connect to the cluster, and perform the tasks involved in installation verification.
3.1.1 Start Oracle Fail Safe Manager
After the installation is completed, start Oracle Fail Safe Manager from the Microsoft Windows taskbar by selecting Programs (or All Programs) from the Windows Start menu, then Oracle - ORACLE_HOME, then Oracle Fail Safe Manager. (ORACLE_HOME is the name of the Oracle home where you installed Oracle Fail Safe.)
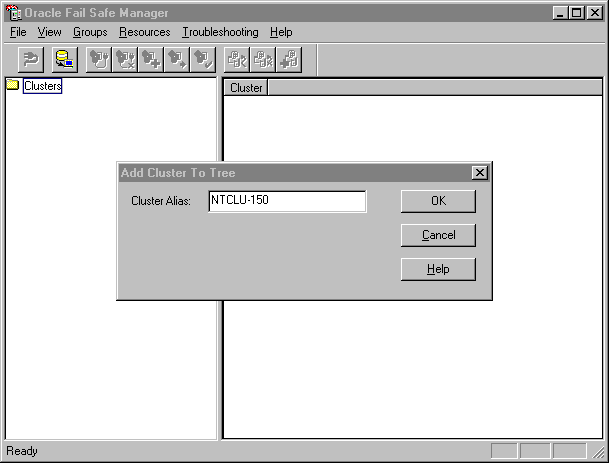
When Oracle Fail Safe Manager opens, usually the Add Cluster to Tree dialog box also opens, as shown in Figure 3-1. If the Add Cluster to Tree dialog box does not open, from the File menu, select Add Cluster to Tree. In the Cluster Alias box, enter the alias for the cluster and then click OK.
Figure 3-1 Adding a Cluster to the Tree View

Description of "Figure 3-1 Adding a Cluster to the Tree View"
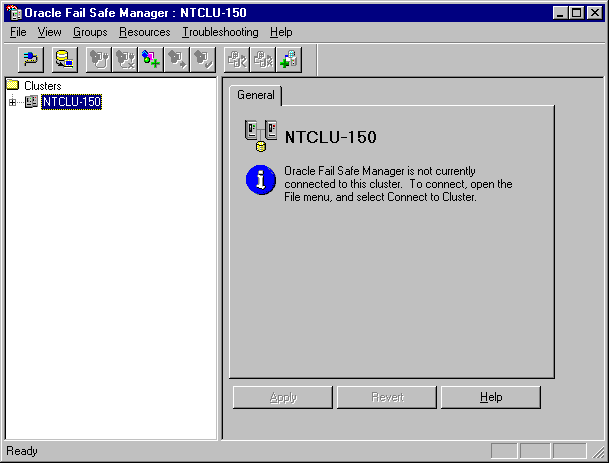
After you click OK in the Add Cluster to Tree dialog box, the cluster alias is added to the tree view, and the General tab for the cluster is displayed, as shown in Figure 3-2. However, because Oracle Fail Safe Manager is not yet connected to the cluster, the General tab displays the message: "Oracle Fail Safe Manager is not currently connected to this cluster. To connect, open the File menu, and select Connect to Cluster." The next section describes connecting to a cluster in detail.
Figure 3-2 Oracle Fail Safe Manager with a Cluster Added to the Tree View

Description of "Figure 3-2 Oracle Fail Safe Manager with a Cluster Added to the Tree View"
3.1.2 Connect to the Cluster
After you add the cluster to the tree view, you must connect to the cluster. Open the Connect to Cluster dialog box by performing one of the following steps:
-
On the File menu, click Connect to Cluster.
-
Right-click the cluster alias, then click Connect.
-
Click the box to the left of the cluster alias (to expand the cluster alias folder).
The following list describes the input to the Connect to Cluster dialog box:
-
Enter a user name for a domain account name that has Administrator privileges on all nodes of the cluster where you are connecting.
-
Enter the password for the account specified in the User Name field.
-
Contains the alias of the cluster that you selected from the tree view. The alias name is assigned to the cluster when you (or someone else) created the cluster with MSCS. A cluster alias is sometimes referred to as a cluster name.
-
Enter the name of the domain to which the user name belongs.
-
Save as local preferred credentials
Select to have Oracle Fail Safe Manager save the account information you have entered to a text file,
ORACLE_HOME\fs\fsmgr\FsClusters.txton the system from which you are running Oracle Fail Safe Manager. The password is saved in an encrypted format. This lets you disconnect and reconnect to the cluster (from your current system) without having to specify the account information each time a reconnection is requested.
Click OK or press Enter to connect to the cluster.
Cluster Alias, User Name, Password, and Domain should all be entered. The Save as Local Preferred Credentials option is not a required choice on any Microsoft Windows system. If you do not specify a user name, password, or domain, Oracle Fail Safe attempts to connect to the cluster using the account with which you logged on to the server node.
Once a connection to the cluster is made, the Oracle Fail Safe Manager main window expands the tree view.
3.1.3 Run Verify Cluster
The first time you connect to a cluster after you install Oracle Fail Safe, Oracle Fail Safe Manager prompts you to run the Verify Cluster operation to validate the Oracle Fail Safe installation and the network configuration. The Verify Cluster operation displays its progress in a Verifying Cluster window.
Later, you can run the Verify Cluster operation at any time by selecting Troubleshooting, then Verify Cluster from the Oracle Fail Safe Manager menu bar. This is especially useful if you later change your cluster configuration.
Verify Cluster performs operations to verify that:
-
The Oracle homes are identical on all nodes
-
The Oracle Fail Safe release is identical on all nodes
-
The resource providers are configured identically on all nodes
-
The resource providers are disabled if the required software has not been installed
-
The Host Name/IP Address mappings resolve consistently across all nodes in the cluster
Verify Cluster also registers with MSCS the resource DLLs for the resource types that Oracle Fail Safe supports.
For more information about Verify Cluster operations, refer to Oracle Fail Safe Concepts and Administration Guide.
3.1.4 Verify the OracleMSCSServices Service Entry
On successful installation and verification of Oracle Services for MSCS, the Services Control Panel on each cluster node must include a new service entry named OracleMSCSServices.
To verify the OracleMSCSServices entry in the Services Control Panel:
3.1.5 Verify That Oracle Services for MSCS Is in the Cluster Group
The Oracle Services for MSCS service is maintained by MSCS. On successful installation of Oracle Services for MSCS on each cluster node, start MSCS Cluster Administrator and verify that it includes Oracle Services for MSCS as a resource in the Cluster Group (the group containing the MSCS resources critical to cluster operation).
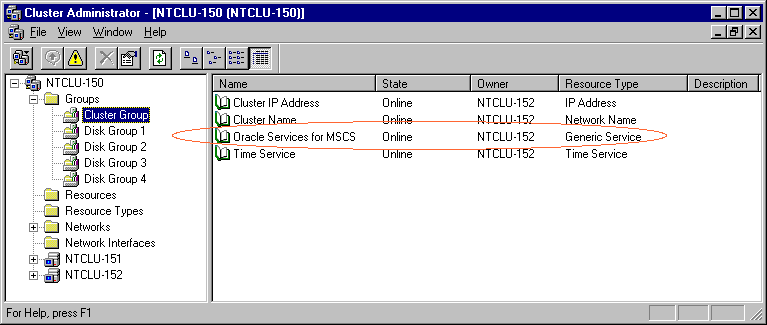
To verify that Oracle Services for MSCS is listed as a resource, start MSCS Cluster Administrator, then click Cluster Group in the Cluster Administrator tree view to select it, and, in the right-hand side pane, locate the Oracle Services for MSCS entry in the Name column, as shown in Figure 3-3.
Figure 3-3 Oracle Services for MSCS in the Cluster Administrator Window

Description of "Figure 3-3 Oracle Services for MSCS in the Cluster Administrator Window"
3.1.6 Verify That Oracle Resource DLLs Are Registered with MSCS
After installing Oracle Services for MSCS on all cluster nodes and verifying the cluster, start the MSCS Cluster Administrator and verify that it includes the cluster resource types for Oracle Fail Safe.
For example, if you have the database installed on the cluster nodes, start the MSCS Cluster Administrator. Then select Resource Types in the Cluster Administrator tree view, and, in the right-hand side pane, locate the Oracle Database and Oracle TNS Listener entries in the Display Name column.
3.2 Oracle Fail Safe Manager Tutorial and Online Help
For detailed step-by-step instructions about using Oracle Fail Safe Manager, refer to the Oracle Fail Safe tutorial and help. To access these online tools, from the Oracle Fail Safe Manager menu bar, select Help, then select Contents, or Help, and then select Tutorial for step-by-step instructions.
The online help is your primary source of information when you use Oracle Fail Safe Manager. For example, if you select Contents in the Help menu, the Help window displays the first help topic. If you select Search for Help on, a Help window opens to display Contents, Index, and Find tabs. You can find common tasks under the Contents tab and in the Index. The Find tab lets you perform a full text search of the Oracle Fail Safe Manager Help. To view the full set of Oracle Fail Safe documentation, select Online Manuals.
If the documentation was not installed on the system then the documentation options under the Help menu will be dimmed and will not be available.